Strange Blobbing on Layer Change
-
So basically we can have different approach to the blobs problems.
Tune the pressure advance via firmware or tune the slicer side. Or maybe both together.
If we use different materials that have different characteristics we should save different profiles.@DIY-O-Sphere said in Strange Blobbing on Layer Change:
My experience is, that issues on the hardware side in most cases are caused by the hotend.......
Can you explain a little bit ? I'm interested in understand it.
-
Just spotted this topic, and I've been getting the same from the moment I fitted a genuine BMG to my bowden drive Ender 3. No sign of it before that with the same printer/profile/files.
It's just a matter of easing up the coast distance and negative restart until you find the happy place. Note the direction of travel, and if it's getting thing towards the end of a circuit, back of the coast. If there's a blob, add some negative restart.
At the moment I'm running 1.8mm coast and -0.04mm restart, and just starting to home in on a result.
I think it's just a characteristic of the BMG, possibly due to the ultra low reduction gearing allowing it to "pump up" the pressure in the hot end.
But that's just my untested theory backed by no scientific evidence whatsoever. Mine's pretty much stock, but if pressure advance is making a difference that could reinforce my theory I guess.
-
@Corexy said in Strange Blobbing on Layer Change:
I think it's just a characteristic of the BMG, possibly due to the ultra low reduction gearing allowing it to "pump up" the pressure in the hot end.
Probably not due to gearing because the BMG and E3D Titan have very similar ratios. But they perform very differently https://somei3deas.wordpress.com/2018/05/11/bondtech-bmg-vs-e3d-titan-extreme-retraction-torture-test/
The genuine BMGs don't grind the filament compared to spring loaded, single drive extruders such as Titans so the latter type may suffer some slippage which the BMGs do not. The same cannot be said for the BMG clones because the "hobbed" teeth are not cut as deep as the genuine article and the shafts and gears are not hardened, nor do the line up as well.
-
@deckingman said in Strange Blobbing on Layer Change:
@Corexy said in Strange Blobbing on Layer Change:
I think it's just a characteristic of the BMG, possibly due to the ultra low reduction gearing allowing it to "pump up" the pressure in the hot end.
Probably not due to gearing because the BMG and E3D Titan have very similar ratios. But they perform very differently https://somei3deas.wordpress.com/2018/05/11/bondtech-bmg-vs-e3d-titan-extreme-retraction-torture-test/
The genuine BMGs don't grind the filament compared to spring loaded, single drive extruders such as Titans so the latter type may suffer some slippage which the BMGs do not. The same cannot be said for the BMG clones because the "hobbed" teeth are not cut as deep as the genuine article and the shafts and gears are not hardened, nor do the line up as well.
No worries.
Mine's definitely genuine, as I bought it straight from Bondtech (I really hate clones of other peoples products), and I've never had a problem with any grinding.
All I know is that it started with a bit of blobbing the moment I fitted it, and I tuned it out with a bit of coast, and with PETG a bit of negative restart as well.
-
@Corexy Yes, no worries back to you.
") I was just trying to make the point that (genuine) BMGs might be causing a bit higher hot end pressure than other extruders because they grip the filament better, rather than it being a "gearing thing". But the root cause is largely irrelevant as long as you've found a solution that works for you.
I was just trying to make the point that (genuine) BMGs might be causing a bit higher hot end pressure than other extruders because they grip the filament better, rather than it being a "gearing thing". But the root cause is largely irrelevant as long as you've found a solution that works for you. -
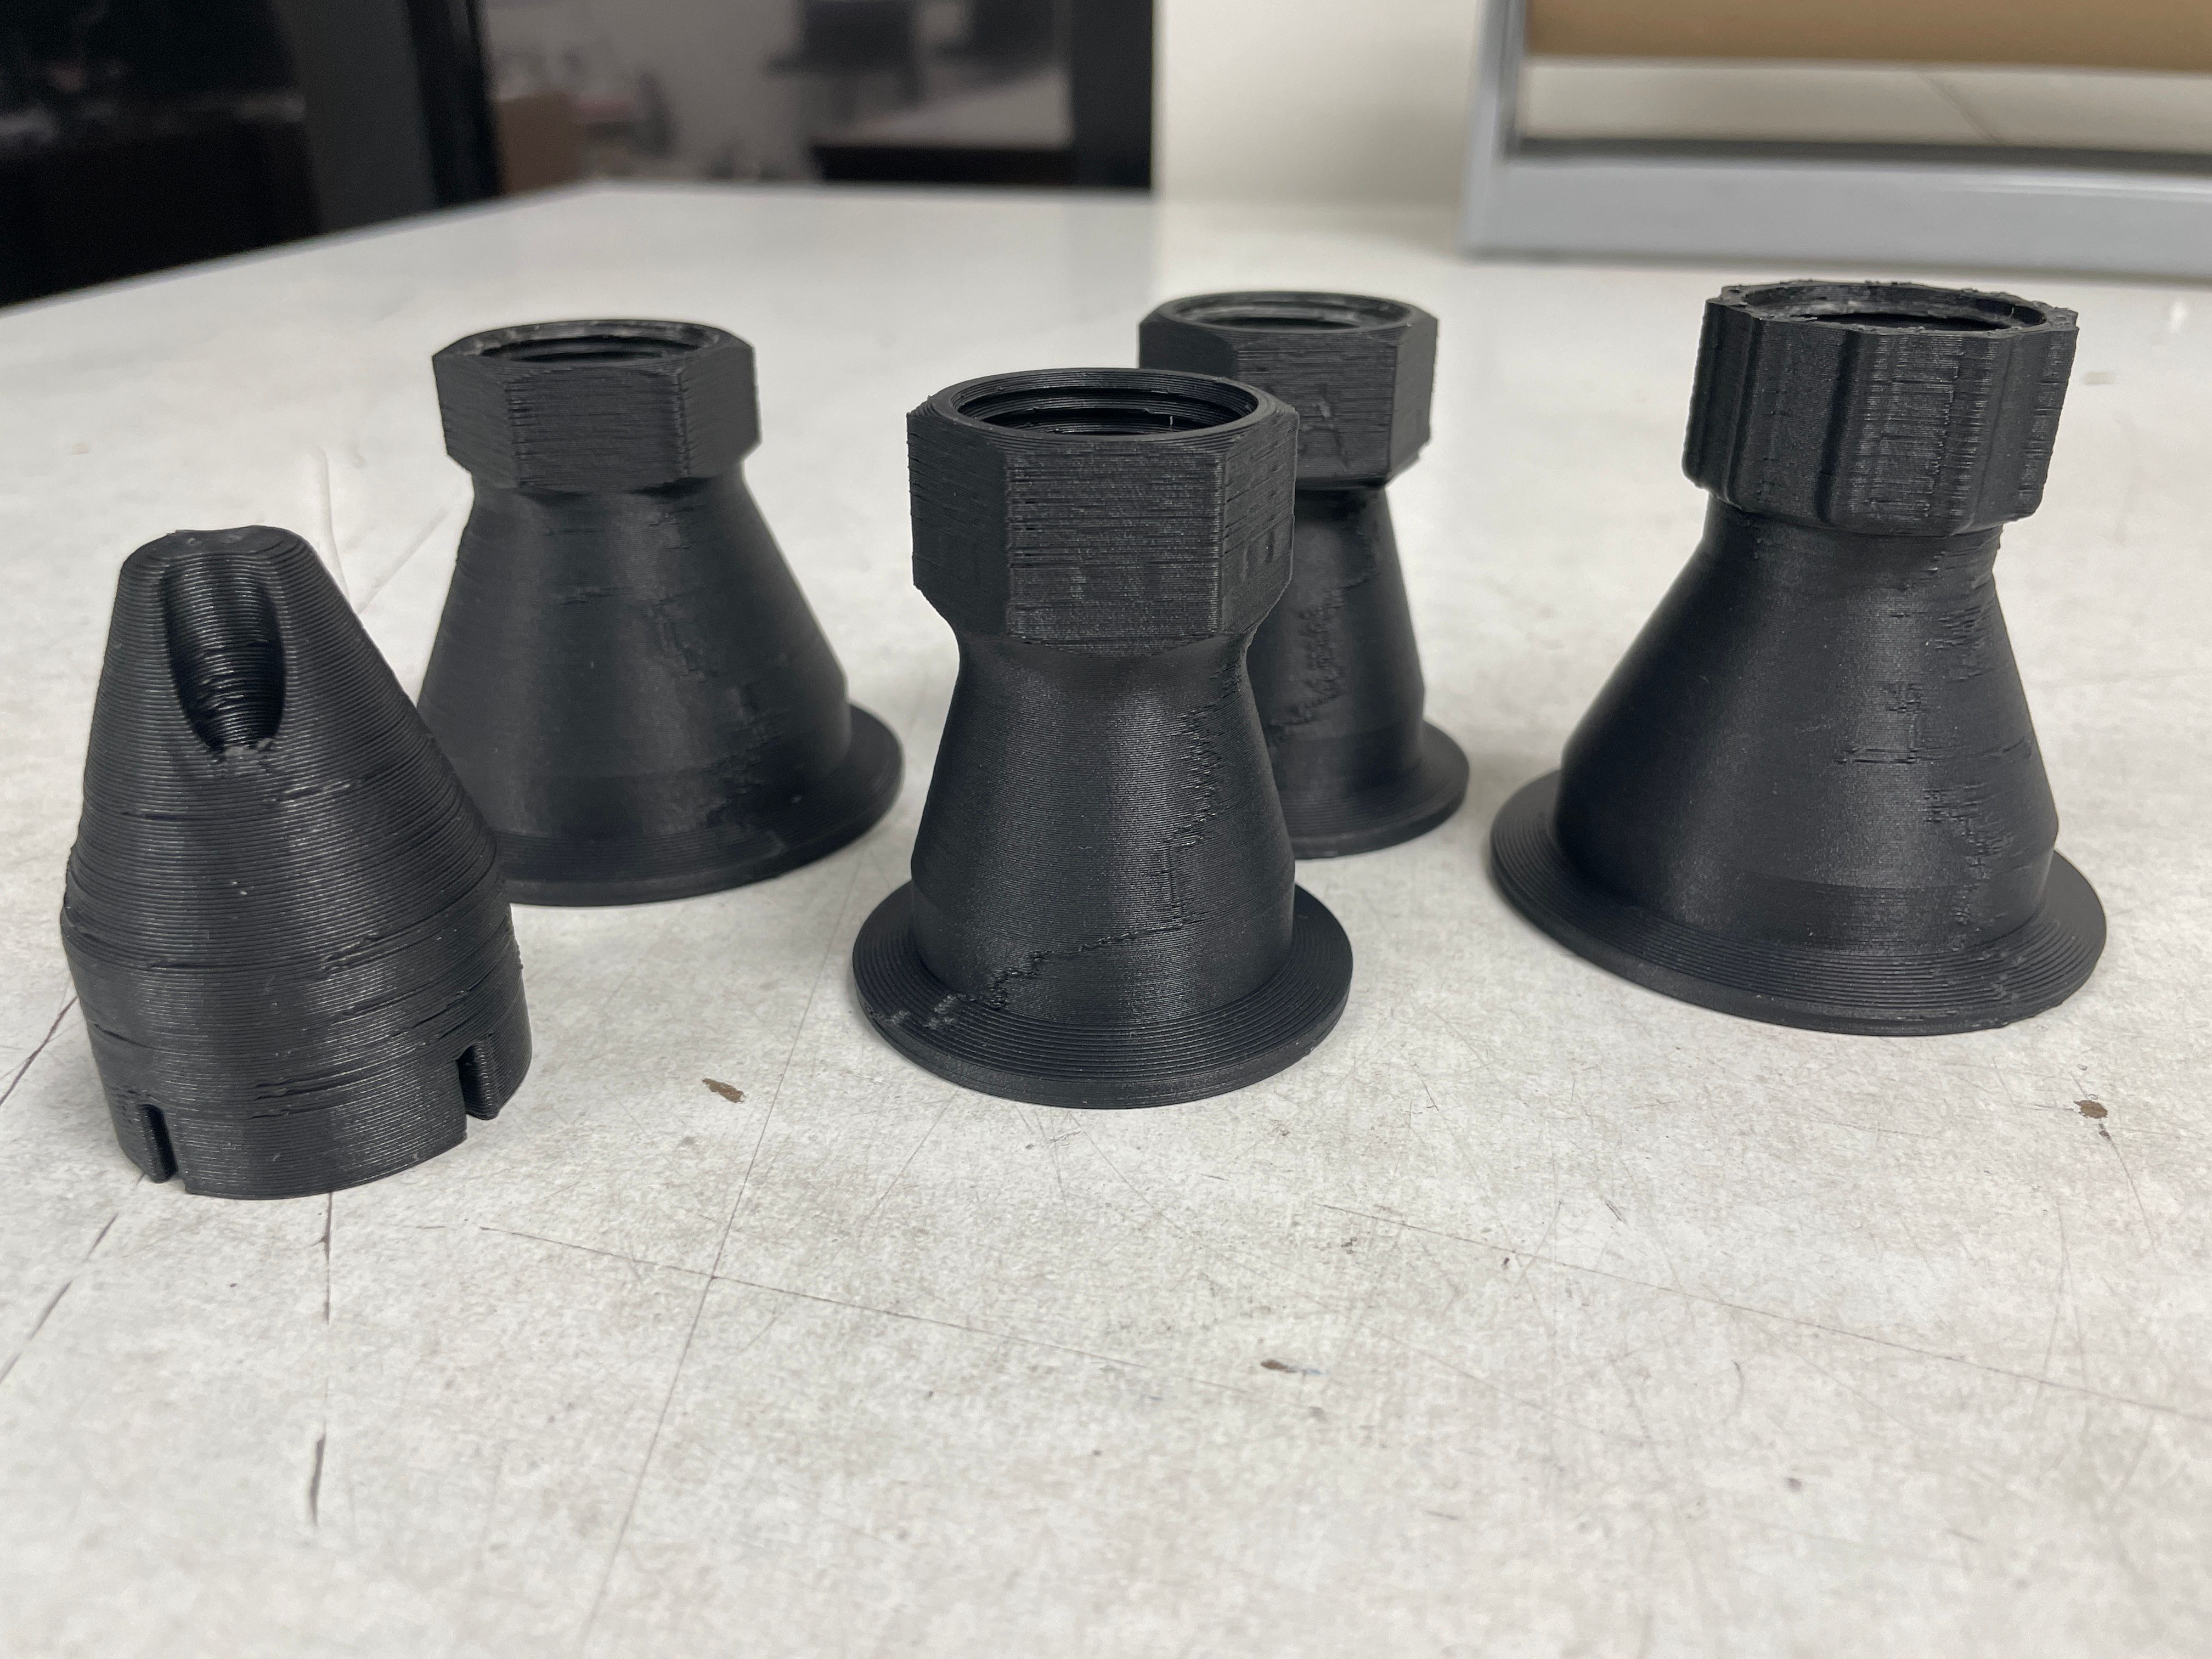
I was just looking at this same problem on my Delta printing a benchy from S3d. I have those exact same blobs. If I zoom in on the benchy preview I can see that S3d is showing exactly where the blobs will appear. Because of this I'm assuming that the mechanics of the printer is not causing the issue.
If I turn on "Only retract when crossing open spaces" it greatly reduces the number of blobs but not to zero. Setting retraction to zero completely removes them but at the cost of major stringing. Any retraction amount greater than zero shows the blobs.I'm using a flex3drive extruder and the vendor highly recommends turning off coasting and wiping.
-
@deckingman said in Strange Blobbing on Layer Change:
@Corexy Yes, no worries back to you.
I was just trying to make the point that (genuine) BMGs might be causing a bit higher hot end pressure than other extruders because they grip the filament better, rather than it being a "gearing thing". But the root cause is largely irrelevant as long as you've found a solution that works for you.Actually...this roll of PETG is a total #$%&...but mostly because I'm demanding the kind of print quality I can get from PLA and ABS I guess. I'm setting a pretty high bar there (if I say so myself), and I'm coming to the conclusion I might have to lower my standards a bit for this one.
What I love about the BMG is that it seems to use the same steps/mm not matter what you feed it. Which has most certainly not been the case with other single sided extruders I've had.
I think you are right. I think the BMG holds the extruder at a higher pressure, which may lead to some drooling at retract points that can be tuned out a bit with pressure advance/coast/restart/extrusion multiplier etc.
-
@Corexy said in Strange Blobbing on Layer Change:
Actually...this roll of PETG is a total #$%&...but mostly because I'm demanding the kind of print quality I can get from PLA and ABS I guess. I'm setting a pretty high bar there (if I say so myself), and I'm coming to the conclusion I might have to lower my standards a bit for this one.
There have been a few threads recently by people having problems with PET-G. Even the same brand and colour seems to throw up some seemingly random variability between reels. Doing a temperature tower for every new reel might be the answer (but then again, it might not).
What I love about the BMG is that it seems to use the same steps/mm not matter what you feed it. Which has most certainly not been the case with other single sided extruders I've had.
I've found exactly the same thing. I patiently and carefully calibrated all 6 of mine and ended up with less than 1% spread between them. Which is within the realms of what one might expect when trying to measure 100mm of filament multiple times. It doesn't matter if I feed them PLA or PET-G or whatever. Might as well just set them all to 415 and be done with it. I tend to use 0.95 extrusion multiplier most of the time - I've found that on my machine, printed parts are surprisingly tolerant of under extrusion but very intolerant of any over extrusion.
I think you are right. I think the BMG holds the extruder at a higher pressure, which may lead to some drooling at retract points that can be tuned out a bit with pressure advance/coast/restart/extrusion multiplier etc.
That's my hypothesis - but I might be wrong
-
Hello everyone.
I am getting z-seam blobs due to slight pauses at layer changes.
This happens only on my Ender 6 running Duet.I primarily use PrusaSlicer, but I've also tried Cura 5.x.
I do not get these marks on my Prusa MK3s.Note: both printers have the same extruder and hot end as listed blow.
Printer: Ender 6
Mods: Bondtech BMG direct extruder, Slice Eng Mosquito Magnum hot end.M115
FIRMWARE_NAME: RepRapFirmware for Duet 3 Mini 5+ FIRMWARE_VERSION: 3.3RC2 ELECTRONICS: Duet 3 Mini5plus WiFi FIRMWARE_DATE: 2021-05-11 14:55:40Config.g file: config.g

-
@davidewen
Hi Davide,
Maybe you are super skilled already with all those programs , I'll just try to be cooperative.
Is a little hard to tell for sure regarding just one possible solution.
I use Cura and I can try suggesting something using it.- Try to use Cura 4.13.1. The 5.X series address some issue with concentric shapes (the width of the lines) and is removed the function of exclude tiny gaps, resulting in additional movement and extrusions. (maybe is not the case but on circular shapes could help the first point).
- Try to use defined seam. (so , not the shortest nor the random or sharpest) . In the preview look for the best position where to place the seam. (back , front, left etc) . Try to obtain on vertical line as seam. If necessary rotate the shape. (Cura is rotation sensitive , and you can discover it looking the support lines)
- Try to work on Wall > outer wall wipe distance. (should help to hide the seam inside the shape)
- Try to work on Travel > disable retraction at layer change (this avoid pause and leak of materials because the pressure)
- Try to work on Travel > combing mode on all (less retraction > less pressure changing > less leaking)
- Try to work on Travel > disable retraction before outer wall
- Try to work on Experimental > enable coasting . Here work on the number of the area of the nozzle. (moving without retraction should reduce the amount of material leaked for the variation of pressure. If you exaggerate with this option , or the sum of all those settings, you could generate holes instead of blobs).
- Keep in mind that if you change layer height , all those parameters will change. To my printer ,to print at 0.3 or 0.2 is not absolutely the same.
And you have seen by yourself with the first shape on left that emphasize the issues. - Keep in mind that not all the shape can use the same profile.
- The concept is to try to avoid the numbers of retractions and keep the material's extrusion the more constant you can.
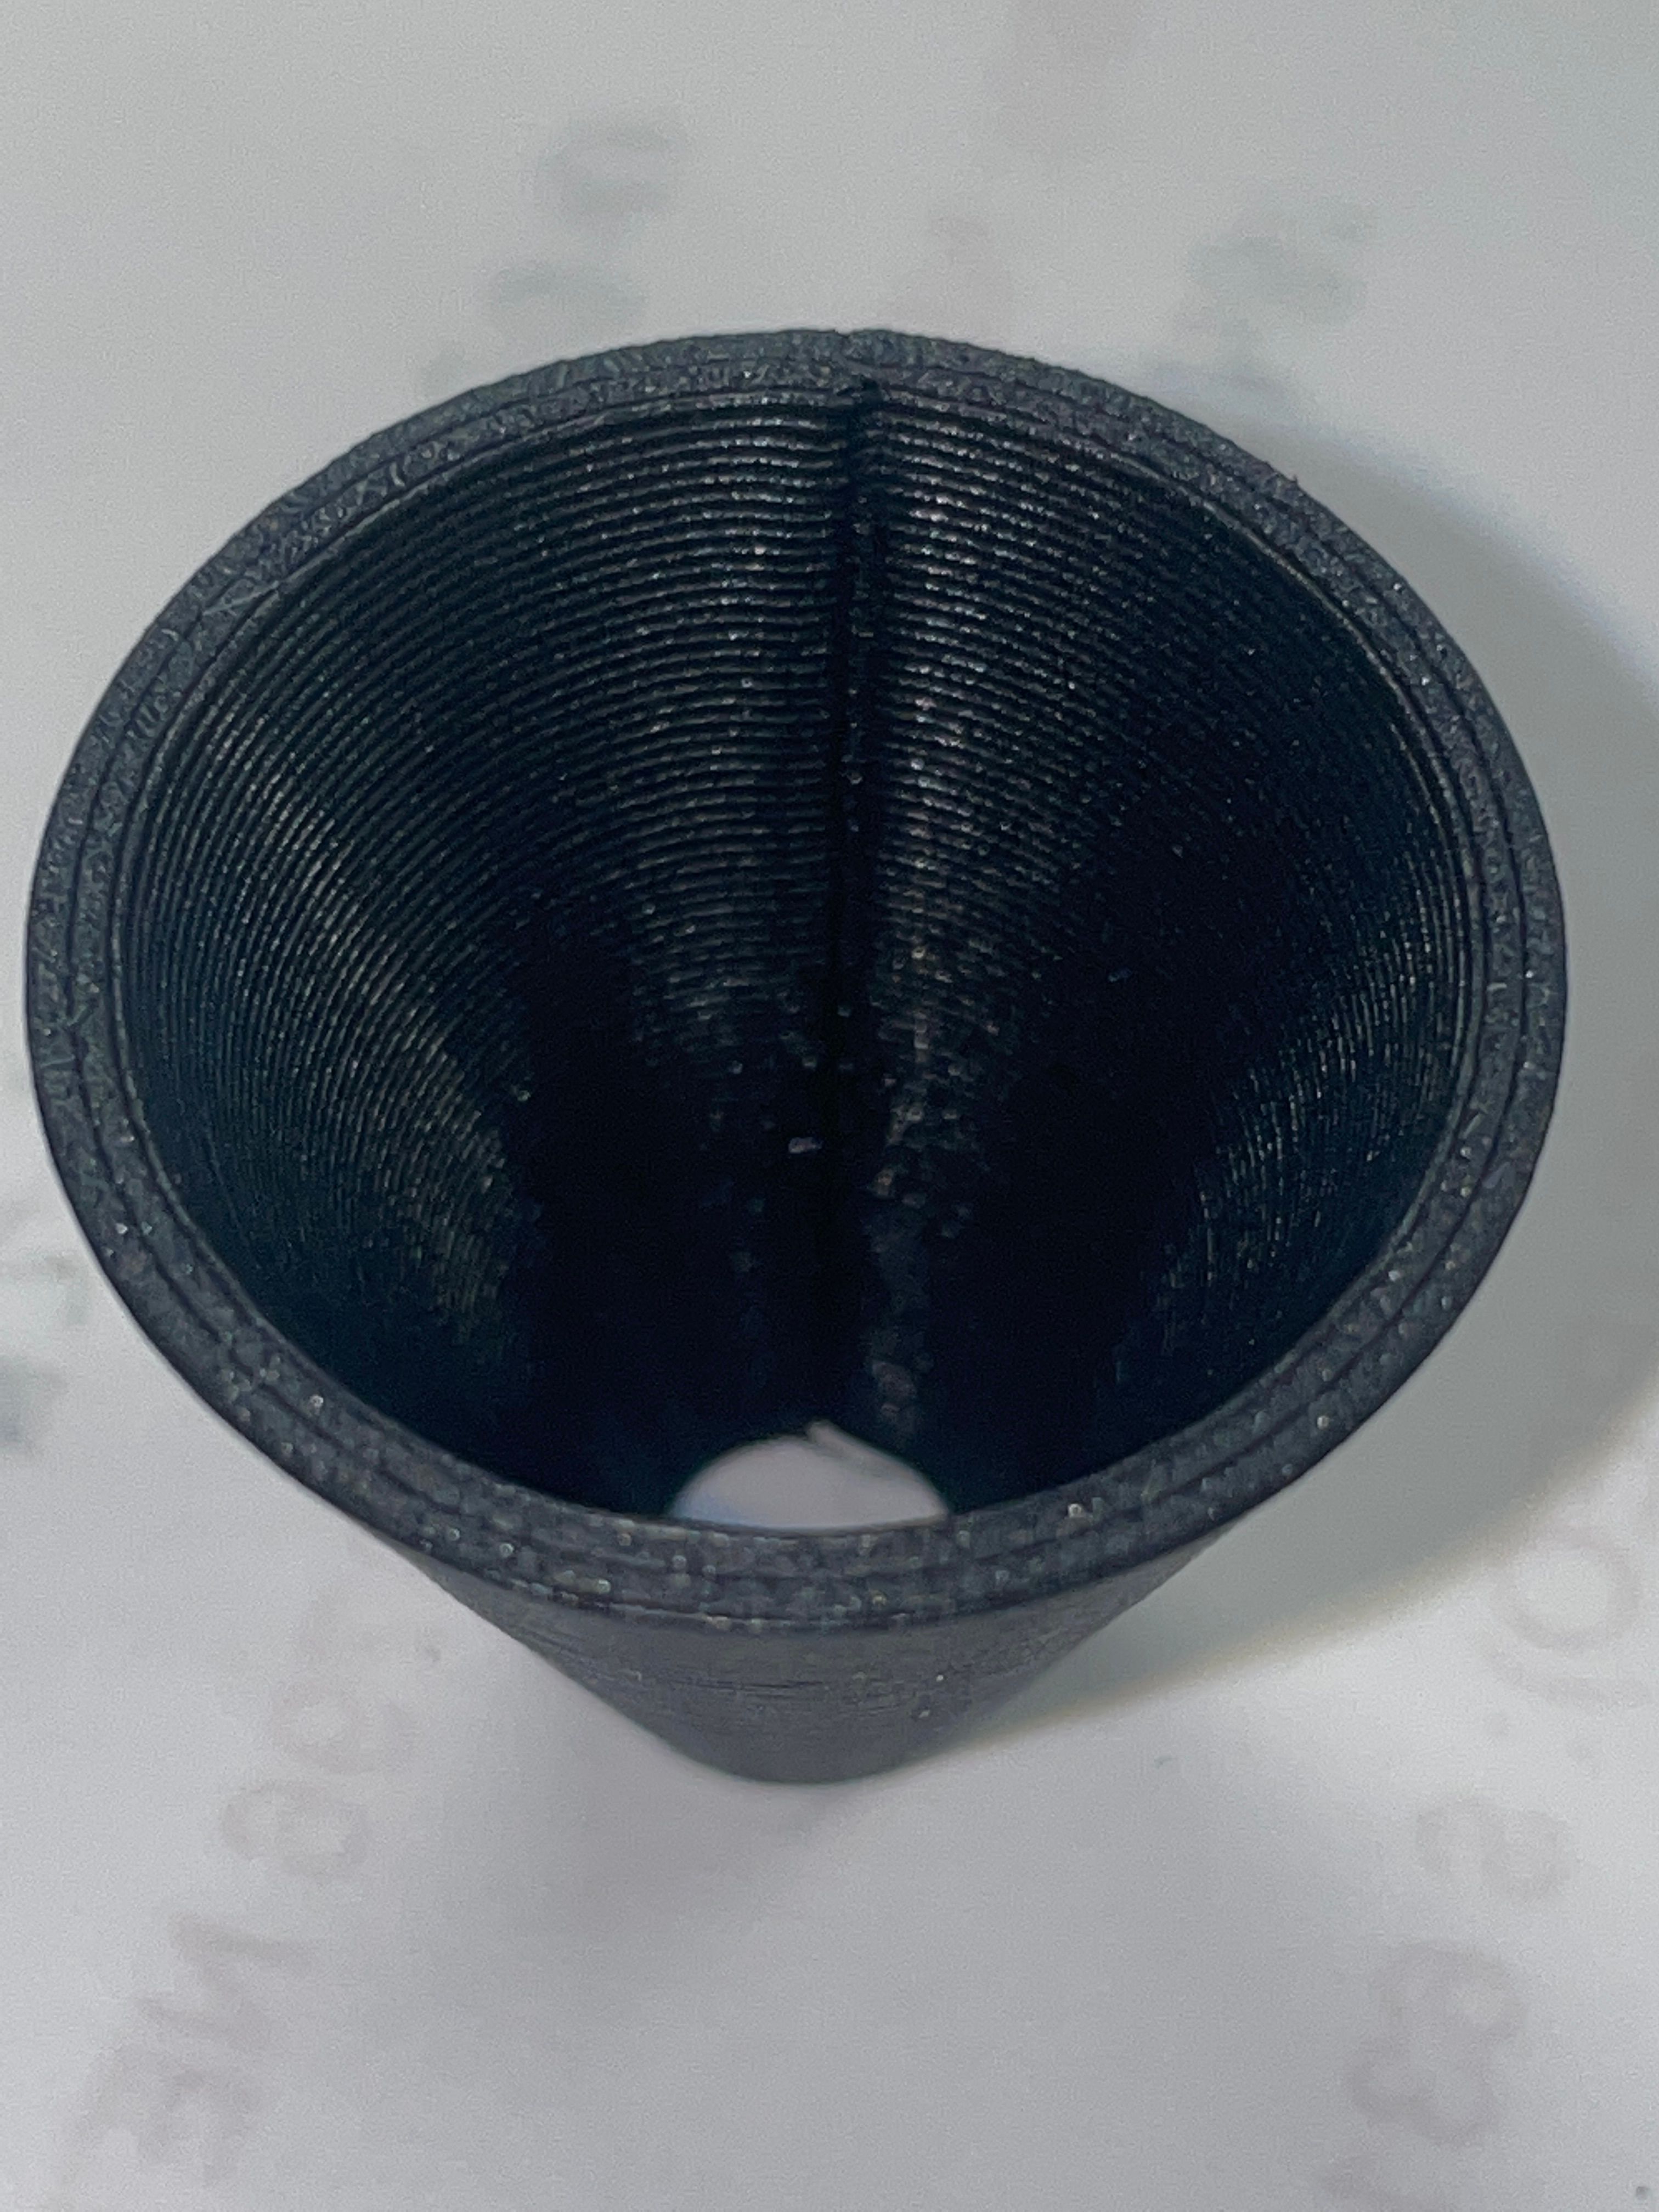
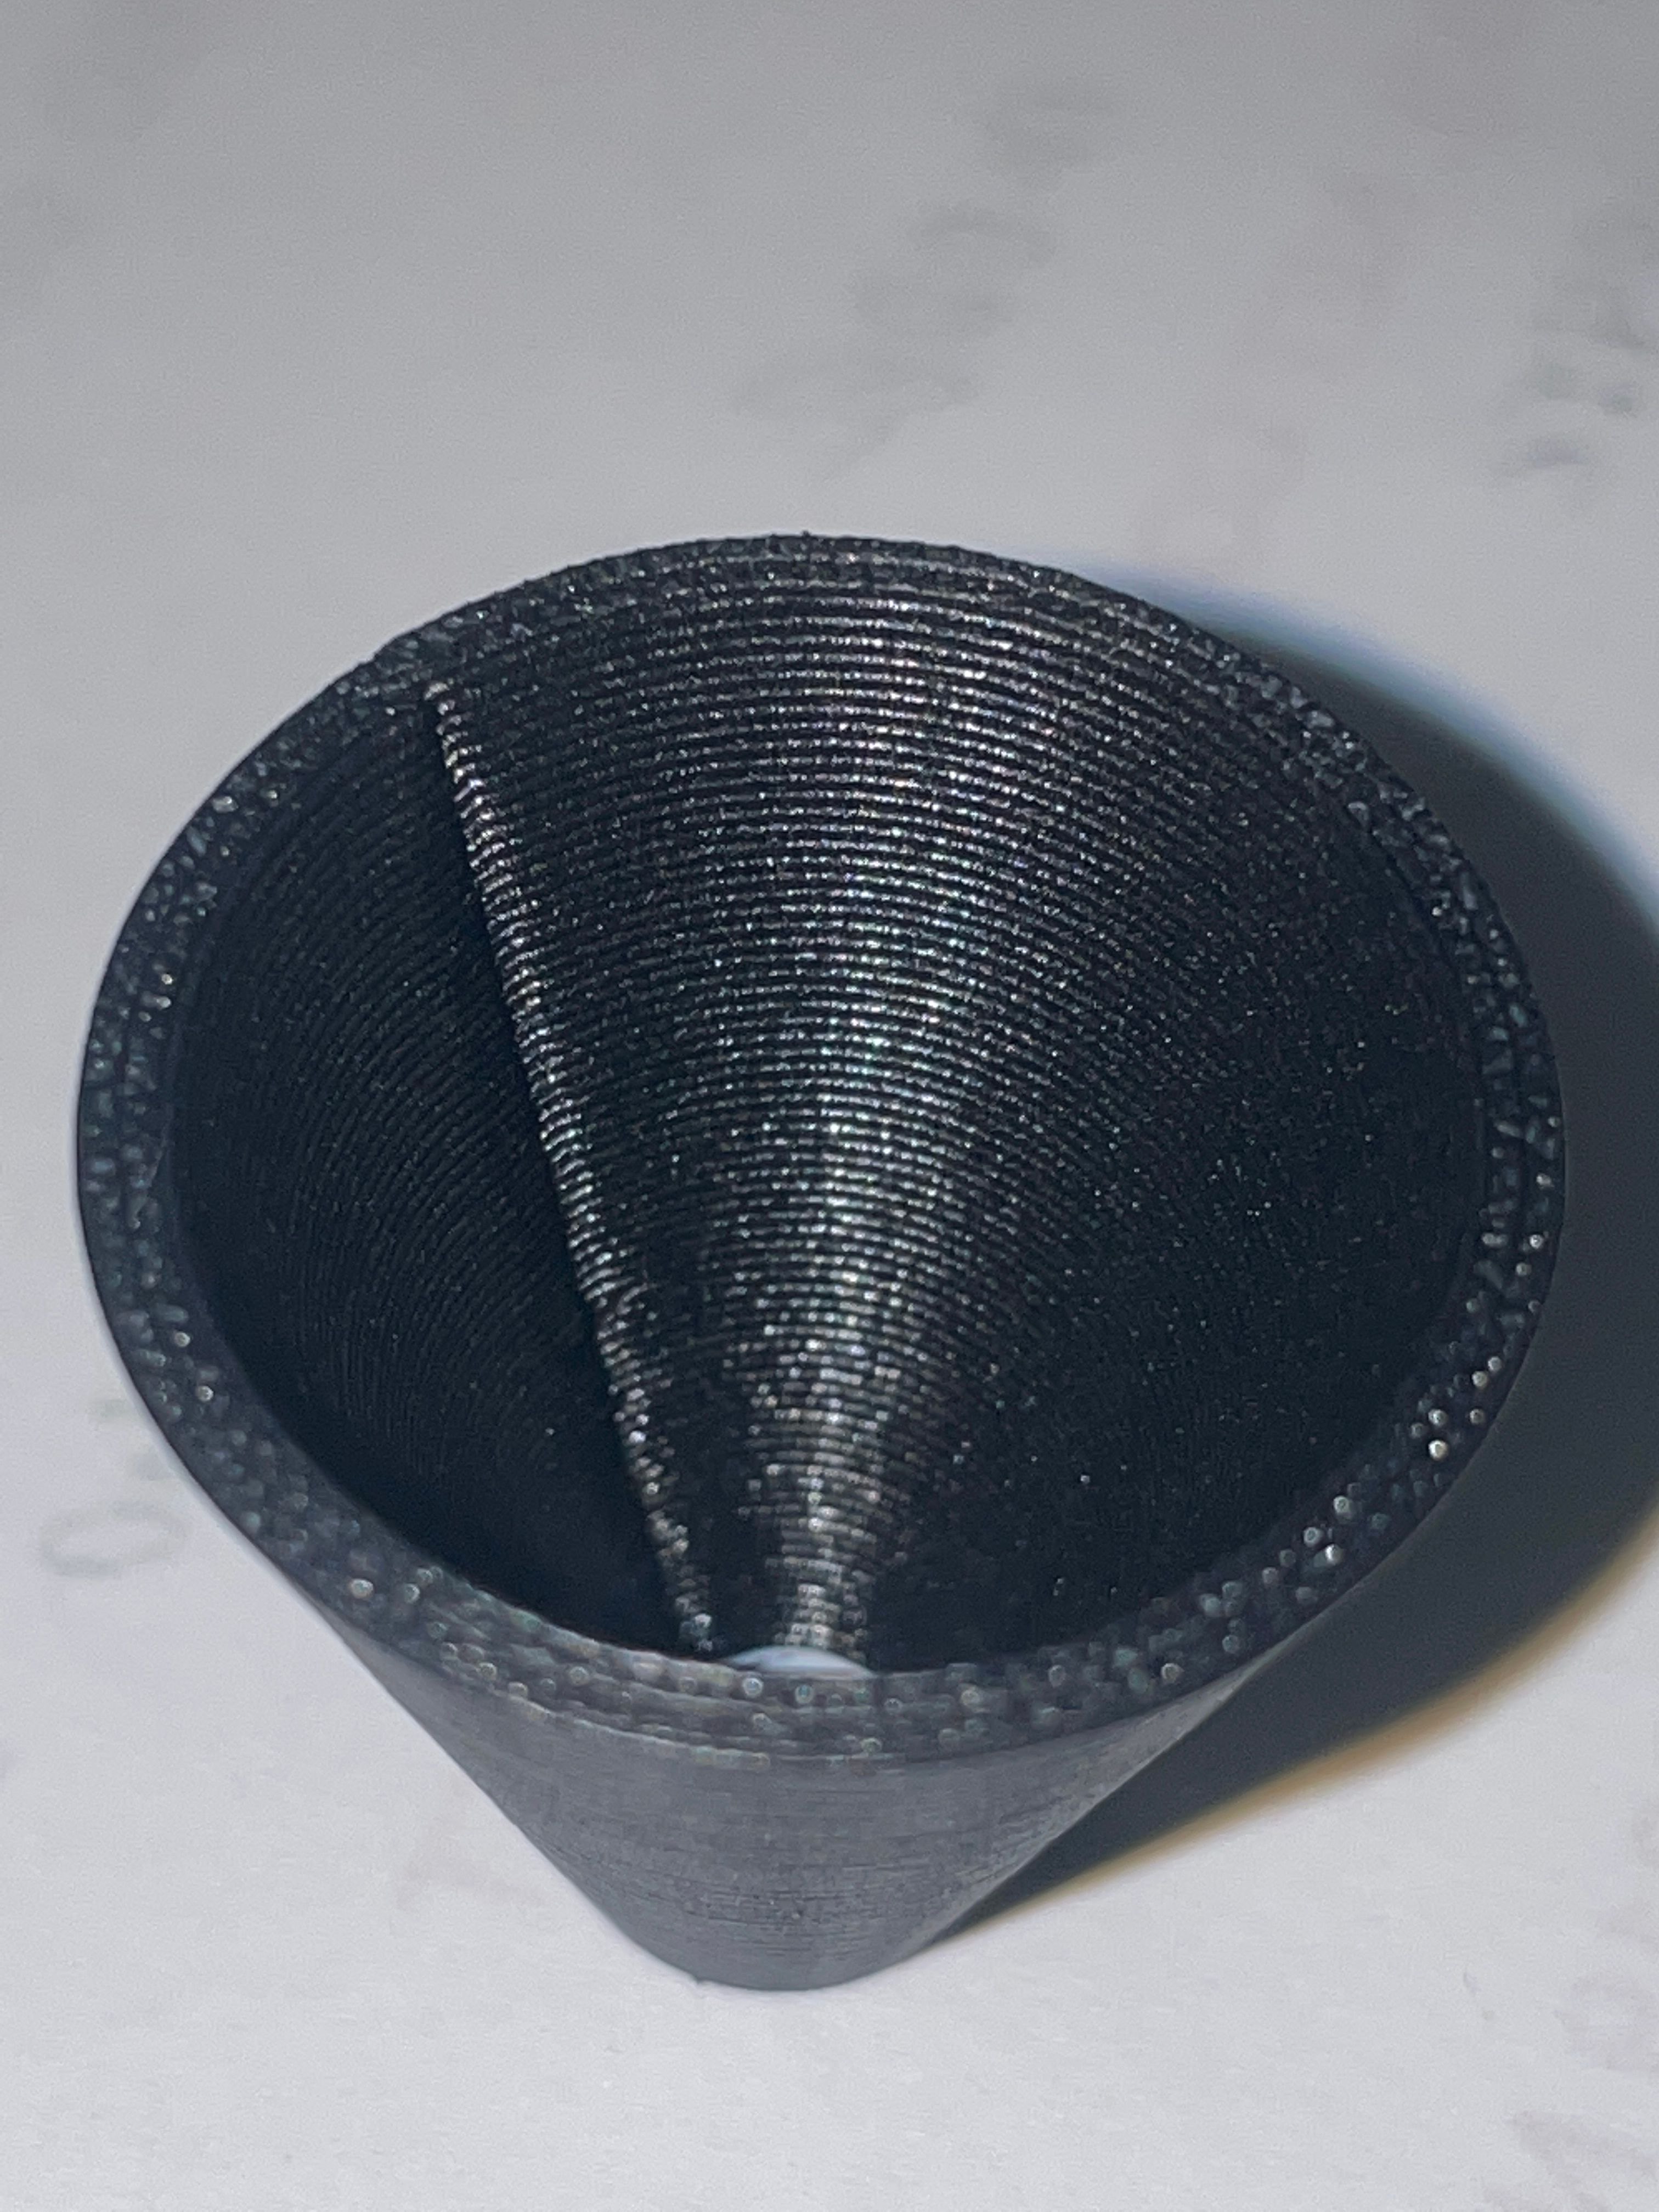
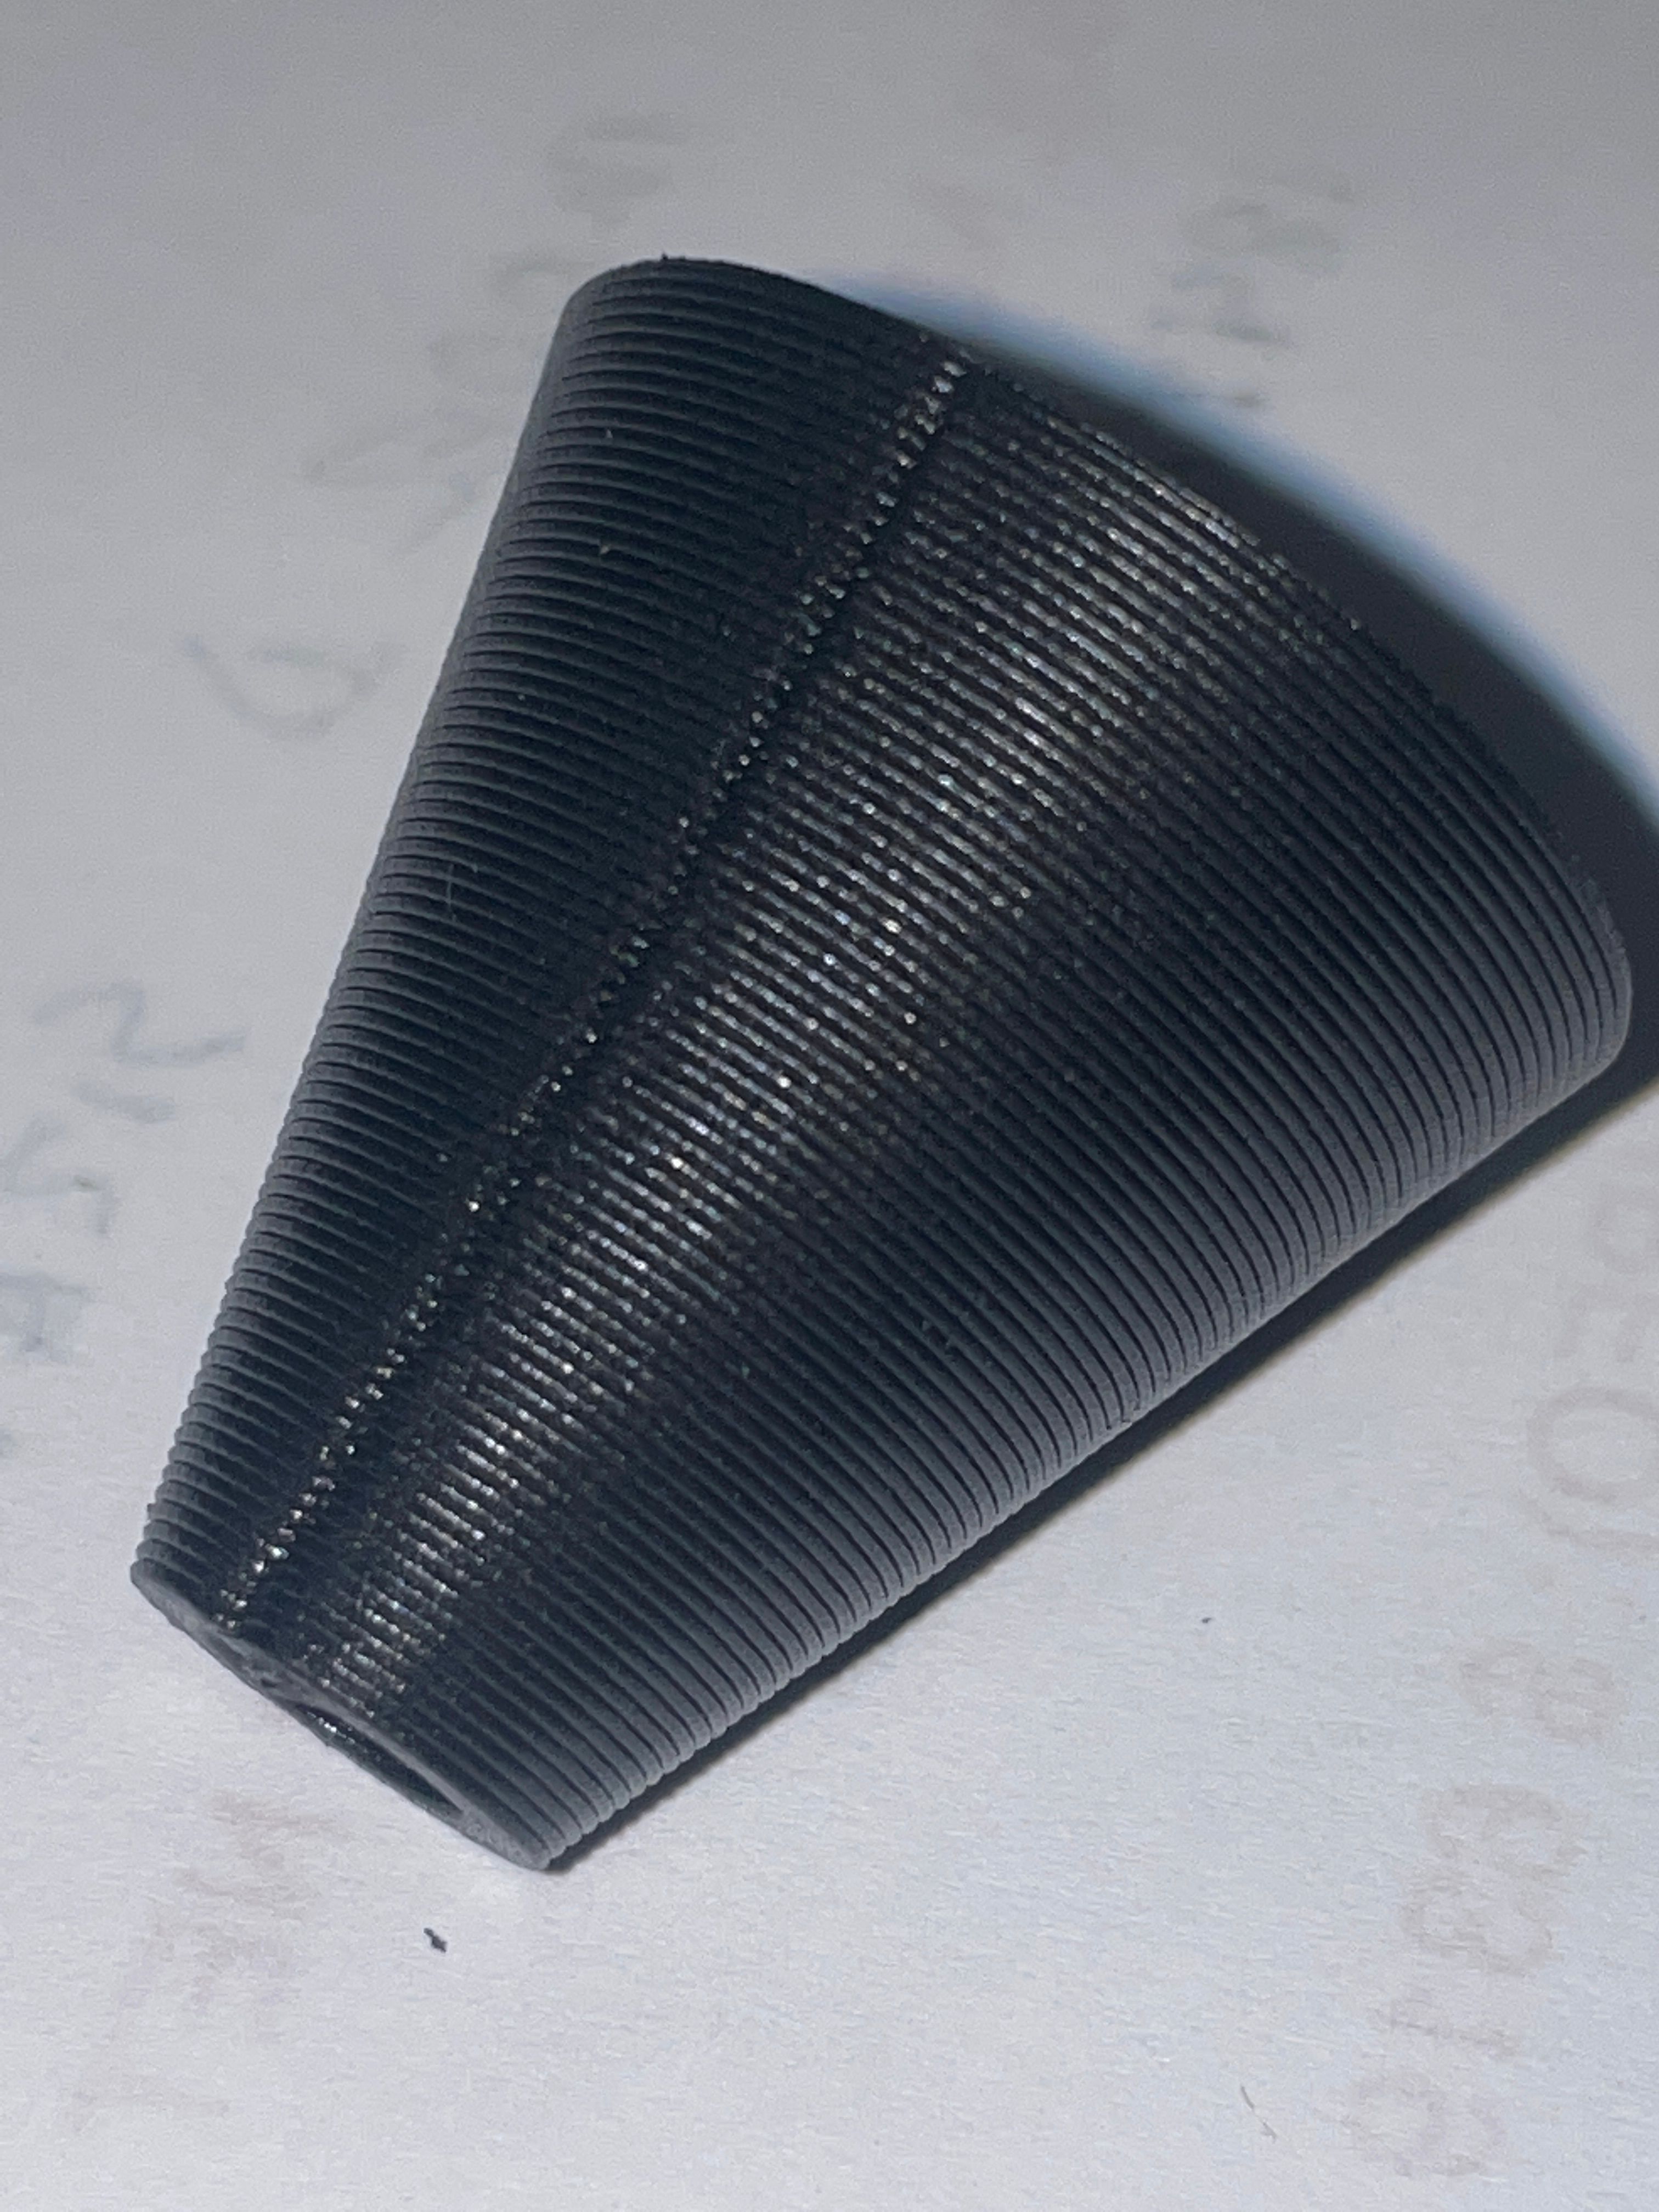
- Then... is not exactly clear from the picture , because there are not 90 degree corners , check the belt tension. On quick and fast direction's change you can have a little of vibration of the nozzle. Or instead do not exaggerate with the speed of the print.
I tried to inspect your picture , thanks for the high resolution.
The lines seems good except for the seams.
I'm optimistic that you can nail the right combo of settings. -
undefined giostark referenced this topic 30 Oct 2022, 12:22
-
@giostark
Thanks for responding. I also responded to @Phaedrux on the other older post. This may be a better place to continue the conversation.My printers are at the office. I'll test your ideas on Monday.
You mentioned 90° corners. These blobs are still present on those as well.
Watching the printer, the pause between layer changes is very evident. And at the location of the pause is where the blobs occur.
Most other posts talk about pressure advance and jerk control. I haven't done much with those settings, so I'm not very familiar with the pros/cons or the affects of making changes.The easiest thing for me to test will be the suggestion from @Phaedrux regarding the Z axis speed. So I will start with that.
Cheers,
David -
@davidewen
Yep the Z in M566 could be higher. Right now I have just a delta printer and settled 800 on all 3 axis.
You have 900 on x and y. Why so slow on z with just 60?
David suggest the default as 600 in this post:
https://forum.duet3d.com/topic/310/m566-what-s-a-good-number
But someone use even 1200.Please if you found the solution replay here so that will be useful to us all

ps:
I have to learn to check before the config.g and then the slicer , damn. Here the phaedrux's skill was evident!
My advice still remain good for refinement
-
Thanks for your help.
Changing the Z Axis speed has definitely helped.I'm still getting a dimple at the Z-Seam, but not blobs as before.
new numbers.
M566 X1500.00 Y1500.00 Z600.00 E120.00 ; set maximum instantaneous speed changes (mm/min)


test cone (N)0.6 (L)0.36 (IF)15% (S)80 (T)250°C (F)ASA (T)9m .gcode
-
Increase your extruder jerk.
-
@davidewen
On the Bondtech BMG I have settled E1200. Tie well the screw otherwise the gears will dent the wire. -
@davidewen
How many mm is your retract in the slicer and at what speed does it run ? -
@Phaedrux
Sorry for the slow response. We're trying to get a big project out the door and that has been consuming time.I've increased jerk in PrusaSlicer to the following;
X: 32
Y: 32
Z: 32
E: 20And here are my config.g settings
M566 X1500.00 Y1500.00 Z600.00 E120.00			; set maximum instantaneous speed changes (mm/min)

M203 X12000.00 Y12000.00 Z600.00 E2100.00		; set maximum speeds (mm/min)
M201 X1500.00 Y1500.00 Z500.00 E250.00			; set accelerations (mm/s^2)
Still getting the same results.
-
@Norder
PrusaSlicer Retraction settings;
Length: 0.8
Z lift: 0.4
Speed: 40
Min Travel: 2
Retract on layer: off
Min travel after retract: 2
Wipe while retracting; on
retract amount before wipe: 80% -
@davidewen try retracting a little bit more...like 0.85 or 0.90! Also reduce the retraction speed to something like 25 to 30
Jerk values are to high! -
@davidewen
So far the settings look good.
If you don't have stringing or other problems with blobs or similar, then the 0.8mm retraction path is probably OK. But it can change depending on the temperature and filament and then higher values would be more suitable, which could then go up to 1.5mm.That with the speed could reduce this gap at the Z-seam, as weed2all already wrote, 25-30 mm/s may be better values for you.
If these changes don't bring any improvements, you could enter something under "Extra length on restart". Step up there by 0.1mm.
This option of "Extra length on restart" is rarely used.Google Translate
-- Original Text --Soweit sehen die Einstellungen gut aus.
Wenn Du kein Stringing hast oder sonstige Probleme mit Kleckse o.ä., dann sind die 0.8mm Rückzugsweg wohl OK. Es kann sich aber je nach Temperatur und Filament ändern und dann wären höhere Werte besser geeignet die dann gerne mal bis 1.5mm gehen könnten.Das mit der Geschwindigkeit könnte diesen Spalt an der Z-Naht verringern, wie weed2all bereits schrieb sind 25-30 mm/s gegebenenfalls bessere Werte für Dich.
Sollten diese Änderungen keine Verbesserungen bringen, dann könntest Du bei "Extralänge bei Neustart" etwas eintragen. Dort Schrittweise mit 0.1mm herangehen.
Diese Option der "Extralänge bei Neustart" wird eher selten genutzt.