• Tags
  • Documentation
  • Order
  • Register
  • Login
Duet3D Logo Duet3D
  • Tags
  • Documentation
  • Order
  • Register
  • Login

Connecting stepper motor encoders to closed loop drivers

Scheduled Pinned Locked Moved Solved
Duet Hardware and wiring
3
47
3.1k
Loading More Posts
  • Oldest to Newest
  • Newest to Oldest
  • Most Votes
Reply
  • Reply as topic
Log in to reply
This topic has been deleted. Only users with topic management privileges can see it.
  • undefined
    baird1fa @V.A.M.P printing snproj
    last edited by 15 Feb 2022, 02:22

    @v-a-m-p-printing-snproj The alarm and Brake will just be outputs that you can use to monitor for an error in the drive (like out of position) or to apply an external brake. The com will be for those outputs.

    in my setup I have the alarm status being monitored to stop my controller from tying to continue when one drive has stalled out.

    1 Reply Last reply Reply Quote 0
    • undefined
      V.A.M.P printing snproj
      last edited by 16 Feb 2022, 21:25

      Thanks for the help! Ill let you know how they are working. Also what is the connection signal on the duet 2 ethernet? I have the option of setting the drivers to either 5v or 12v.

      undefined 1 Reply Last reply 16 Feb 2022, 22:10 Reply Quote 0
      • undefined
        alankilian @V.A.M.P printing snproj
        last edited by 16 Feb 2022, 22:10

        @v-a-m-p-printing-snproj Use 5v setting.

        The Duet's 3.3 Volt output might work and if not, you should get the expansion board as described HERE.

        SeemeCNC Rostock Max V3 converted to V3.2 with a Duet2 Ethernet Firmware 3.2 and SE300

        undefined 1 Reply Last reply 16 Feb 2022, 22:16 Reply Quote 0
        • undefined
          V.A.M.P printing snproj @alankilian
          last edited by 16 Feb 2022, 22:16

          @alankilian I got it figured out I already have the expansion board. I got the new drivers all connected along with the encoders, but when I try and home the print head it shoots off in the wrong direction and requires me to emergency stop the printer. Any idea why this could be?

          undefined 1 Reply Last reply 16 Feb 2022, 22:43 Reply Quote 0
          • undefined
            alankilian @V.A.M.P printing snproj
            last edited by 16 Feb 2022, 22:43

            @v-a-m-p-printing-snproj Your direction signal is the wrong-way around.

            In the M569 configuration change the "S" value to say the motor goes the other way.

            SeemeCNC Rostock Max V3 converted to V3.2 with a Duet2 Ethernet Firmware 3.2 and SE300

            undefined 1 Reply Last reply 16 Feb 2022, 22:45 Reply Quote 0
            • undefined
              alankilian @alankilian
              last edited by 16 Feb 2022, 22:45

              @alankilian

              ALSO, first get everything workong in OPEN-LOOP mode by setting SW6 CLOSED.

              After you get everything moving in the right directions, you can change to closed-loop mode and see if your encoder is wired backwards.

              SeemeCNC Rostock Max V3 converted to V3.2 with a Duet2 Ethernet Firmware 3.2 and SE300

              1 Reply Last reply Reply Quote 0
              • undefined
                V.A.M.P printing snproj
                last edited by 16 Feb 2022, 22:57

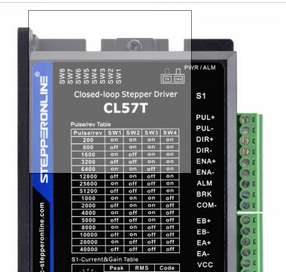
                @alankilian Where will I find SW6?

                undefined 1 Reply Last reply 16 Feb 2022, 22:59 Reply Quote 0
                • undefined
                  alankilian @V.A.M.P printing snproj
                  last edited by alankilian 16 Feb 2022, 22:59

                  @v-a-m-p-printing-snproj
                  Capture.PNG

                  SeemeCNC Rostock Max V3 converted to V3.2 with a Duet2 Ethernet Firmware 3.2 and SE300

                  undefined 1 Reply Last reply 16 Feb 2022, 23:00 Reply Quote 0
                  • undefined
                    V.A.M.P printing snproj @alankilian
                    last edited by 16 Feb 2022, 23:00

                    @alankilian Oh okay what do i want the rest of them to be set to?

                    undefined 1 Reply Last reply 16 Feb 2022, 23:05 Reply Quote 0
                    • undefined
                      alankilian @V.A.M.P printing snproj
                      last edited by 16 Feb 2022, 23:05

                      @v-a-m-p-printing-snproj Set SW1-4 to how ever many pulses-per-rev you want.

                      What did you have your microstepping set to? 16x? with a 1.8-degree motor that would be 200 * 16 = 3200 steps-per-rev which is SE1-4 Off Off On On Or I bet you could see what your old driver was set to and copy that.

                      Oh HEY!!! SW5 changes the direction so you don't have to change the "S" setting in your configuration.

                      And SW6 should be ON to set open-loop control.

                      They are all described on the front of your driver.

                      SeemeCNC Rostock Max V3 converted to V3.2 with a Duet2 Ethernet Firmware 3.2 and SE300

                      undefined undefined 2 Replies Last reply 16 Feb 2022, 23:10 Reply Quote 1
                      • undefined
                        V.A.M.P printing snproj @alankilian
                        last edited by 16 Feb 2022, 23:10

                        @alankilian Okay I copied the settings from my other drivers already so ill changing the direction and see how it goes. Thanks!

                        undefined 1 Reply Last reply 16 Feb 2022, 23:13 Reply Quote 0
                        • undefined
                          alankilian @alankilian
                          last edited by alankilian 16 Feb 2022, 23:10

                          @V-A-M-P-printing-snproj

                          Yes, I can read the switches on your old driver and it was set to 3200 steps-per-rev

                          Also set the rotary switch to 0 so when you start your closed-loop experiments it will be "weak". You can make it stronger once you get things working.

                          All the switches are described in the manual available HERE.

                          SeemeCNC Rostock Max V3 converted to V3.2 with a Duet2 Ethernet Firmware 3.2 and SE300

                          1 Reply Last reply Reply Quote 0
                          • undefined
                            alankilian @V.A.M.P printing snproj
                            last edited by 16 Feb 2022, 23:13

                            @v-a-m-p-printing-snproj

                            SW7 should be OFF to select step/direction mode.

                            SeemeCNC Rostock Max V3 converted to V3.2 with a Duet2 Ethernet Firmware 3.2 and SE300

                            undefined 1 Reply Last reply 17 Feb 2022, 16:14 Reply Quote 0
                            • undefined
                              V.A.M.P printing snproj @alankilian
                              last edited by 17 Feb 2022, 16:14

                              @alankilian I got it moving in the right direction and it hits the x y limit switches but continues trying to drive through the x limit switch. What could be causing this?

                              undefined 1 Reply Last reply 17 Feb 2022, 16:55 Reply Quote 0
                              • undefined
                                alankilian @V.A.M.P printing snproj
                                last edited by 17 Feb 2022, 16:55

                                @v-a-m-p-printing-snproj

                                Post your config.g, homex.g, homey.g homez.g homeall.g homedelta.g config-override.g and all that and we'll take a look. (You might not have all those files)

                                • Did you change the direction using the "S" parameter or did you change using the switch on the driver?
                                • Did your printer work well with the old drivers?

                                SeemeCNC Rostock Max V3 converted to V3.2 with a Duet2 Ethernet Firmware 3.2 and SE300

                                1 Reply Last reply Reply Quote 0
                                • undefined
                                  V.A.M.P printing snproj
                                  last edited by 17 Feb 2022, 17:21

                                  @alankilian I changed the direction with the switch on the driver and it printed alright, prints were sloppy. I ordered a new hot end so hopefully that helps with the sloppy prints when i get it moving right again.

                                  undefined undefined 2 Replies Last reply 17 Feb 2022, 17:23 Reply Quote 0
                                  • undefined
                                    V.A.M.P printing snproj @V.A.M.P printing snproj
                                    last edited by 17 Feb 2022, 17:23

                                    @v-a-m-p-printing-snproj
                                    Config .g
                                    ; Configuration file for Duet WiFi (firmware version 2.03)
                                    ; executed by the firmware on start-up
                                    ;
                                    ; generated by RepRapFirmware Configuration Tool v3.2.3 on Mon Mar 15 2021 15:55:39 GMT-0400 (Eastern Daylight Time)

                                    ; General preferences
                                    G90 ; send absolute coordinates...
                                    M83 ; ...but relative extruder moves
                                    M550 P"VAMP" ; set printer name
                                    M669 K1 ; select CoreXY mode

                                    ; Network
                                    M552 P0.0.0.0 S1 ; enable network and acquire dynamic address via DHCP
                                    M586 P0 S1 ; enable HTTP
                                    M586 P1 S0 ; disable FTP
                                    M586 P2 S0 ; disable Telnet

                                    ; Drives

                                    M569 P3 S0 ; physical drive 3 goes forwards
                                    M569 P5 S1 T2.5:2.5:5:5 ; physical drive 5 goes forwards
                                    M569 P6 S1 T2.5:2.5:5:5 ; physical drive 6 goes forwards
                                    M569 P7 S0 T2.5:2.5:5:5 ; physical drive 7 goes backwards
                                    M569 P8 S0 T2.5:2.5:5:5 ; physical drive 8 goes backwards
                                    M569 P9 S0 T2.5:2.5:5:5 ; physical drive 9 goes backwards
                                    M584 X5 Y6 Z7:8:9 E3 ; set drive mapping
                                    M350 X16 Y16 Z16 E16 I1 ; configure microstepping with interpolation
                                    M92 X80.5234 Y79.6020 Z800.00 E95.00 ; set steps per mm
                                    M566 X900.00 Y900.00 Z60.00 ; set maximum instantaneous speed changes (mm/min)
                                    M203 X6000.00 Y6000.00 Z180.00 ; set maximum speeds (mm/min)
                                    M201 X500.00 Y500.00 Z20.00 ; set accelerations (mm/s^2)
                                    M906 E1600 I30 ; set motor currents (mA) and motor idle factor in per cent
                                    M84 S30 ; Set idle timeout

                                    ; Axis Limits
                                    M208 X0 Y0 Z0 S1 ; set axis minima
                                    M208 X415 Y415 Z440 S0 ; set axis maxima

                                    ; Endstops
                                    M574 X1 Y2 S1 ; set active high endstops
                                    M574 Z1 S2 ; set endstops controlled by probe

                                    ; Z-Probe
                                    M307 H6 A-1 C-1 D-1 ; disable heater on PWM channel for BLTouch
                                    M558 P9 H5 F120 T6000 ; set Z probe type to bltouch and the dive height + speeds
                                    G31 P500 X0 Y0 Z2.5 ; set Z probe trigger value, offset and trigger height
                                    M557 X15:215 Y15:195 S20 ; define mesh grid

                                    ; Heaters
                                    M305 P0 T100000 B3950 R4700
                                    M305 P1 T4700000 B5140 R4700 ; set thermistor + ADC parameters for heater 1
                                    M143 H0 S180 ; set temperature limit for heater 0 to 100C
                                    M143 H1 S490 ; set temperature limit for heater 1 to 490C

                                    ; Fans

                                    ; Tools
                                    M563 P0 D0 H1 F0 ; define tool 0
                                    G10 P0 X0 Y0 Z0 ; set tool 0 axis offsets
                                    G10 P0 R0 S0 ; set initial tool 0 active and standby temperatures to 0C

                                    ; Custom settings are not defined
                                    M501

                                    undefined 1 Reply Last reply 17 Feb 2022, 17:24 Reply Quote 0
                                    • undefined
                                      V.A.M.P printing snproj @V.A.M.P printing snproj
                                      last edited by 17 Feb 2022, 17:24

                                      @v-a-m-p-printing-snproj
                                      ; homex.g
                                      ; called to home the X axis
                                      ;
                                      ; generated by RepRapFirmware Configuration Tool v3.2.3 on Mon Mar 15 2021 15:55:40 GMT-0400 (Eastern Daylight Time)
                                      G91 ; relative positioning
                                      G1 H2 Z5 F6000 ; lift Z relative to current position
                                      G1 H1 X-420 F1800 ; move quickly to X axis endstop and stop there (first pass)
                                      G1 X-5 F6000 ; go back a few mm
                                      G1 H1 X-420 F360 ; move slowly to X axis endstop once more (second pass)
                                      G1 H2 Z-5 F6000 ; lower Z again
                                      G90 ; absolute positioning

                                      undefined 1 Reply Last reply 17 Feb 2022, 17:25 Reply Quote 0
                                      • undefined
                                        V.A.M.P printing snproj @V.A.M.P printing snproj
                                        last edited by 17 Feb 2022, 17:25

                                        @v-a-m-p-printing-snproj
                                        ; homey.g
                                        ; called to home the Y axis
                                        ;
                                        ; generated by RepRapFirmware Configuration Tool v3.2.3 on Mon Mar 15 2021 15:55:40 GMT-0400 (Eastern Daylight Time)
                                        G91 ; relative positioning
                                        G1 H2 Z5 F6000 ; lift Z relative to current position
                                        G1 H1 Y420 F1800 ; move quickly to Y axis endstop and stop there (first pass)
                                        G1 Y-5 F6000 ; go back a few mm
                                        G1 H1 Y420 F360 ; move slowly to Y axis endstop once more (second pass)
                                        G1 H2 Z-5 F6000 ; lower Z again
                                        G90 ; absolute positioning

                                        undefined 1 Reply Last reply 17 Feb 2022, 17:28 Reply Quote 0
                                        • undefined
                                          V.A.M.P printing snproj @V.A.M.P printing snproj
                                          last edited by 17 Feb 2022, 17:28

                                          @v-a-m-p-printing-snproj
                                          ; homez.g
                                          ; called to home the Z axis
                                          ;
                                          ; generated by RepRapFirmware Configuration Tool v3.2.3 on Mon Mar 15 2021 15:55:40 GMT-0400 (Eastern Daylight Time)
                                          G91 ; relative positioning
                                          G1 H2 Z5 F6000 ; lift Z relative to current position
                                          G90 ; absolute positioning
                                          G1 X15 Y15 F6000 ; go to first probe point
                                          G30 ; home Z by probing the bed

                                          ; Uncomment the following lines to lift Z after probing
                                          ;G91 ; relative positioning
                                          ;G1 Z5 F100 ; lift Z relative to current position
                                          ;G90 ; absolute positioning

                                          undefined 1 Reply Last reply 17 Feb 2022, 17:30 Reply Quote 0
                                          22 out of 47
                                          • First post
                                            22/47
                                            Last post
                                          Unless otherwise noted, all forum content is licensed under CC-BY-SA