Duet3D Logo Duet3D
    • Tags
    • Documentation
    • Order
    • Register
    • Login

    PID Tuning Procedure

    Scheduled Pinned Locked Moved Solved
    Tuning and tweaking
    6
    56
    2.8k
    Loading More Posts
    • Oldest to Newest
    • Newest to Oldest
    • Most Votes
    Reply
    • Reply as topic
    Log in to reply
    This topic has been deleted. Only users with topic management privileges can see it.
    • oliofundefined
      oliof @CarlBosson
      last edited by

      @CarlBosson have you tried putting the DuetWifiServer.bin file in to the right directory? It looks like the module reacts and you have a way to submit the right commands.

      A PanelDue will allow you to use the machine, but you will lose a lot of convenience compared to using DuetWebControl the least being able to upload files for printing and remote control.

      <>RatRig V-Minion Fly Super5Pro RRF<> V-Core 3.1 IDEX k*****r <> RatRig V-Minion SKR 2 Marlin<>

      CarlBossonundefined 1 Reply Last reply Reply Quote 0
      • CarlBossonundefined
        CarlBosson @oliof
        last edited by

        @oliof Ok well I will listen to advice :). I do very much like the DWC setup. are you saying it's either panel due , or DWC? They can not be used together? meaning can I heat up the printer and up load .gcode files at my PC, then walk over to the printer and use the panel due to move axis and run macros?

        The only problem I have with the DWC is this frustrating wi-fi connection. It is due to my ignorance for sure. If I could get this setup to connect reliably to my work and home network I would be a happy guy!

        Carl

        There is no box!

        T3P3Tonyundefined 1 Reply Last reply Reply Quote 0
        • T3P3Tonyundefined
          T3P3Tony administrators @CarlBosson
          last edited by

          @CarlBosson they can be used together. The PanelDue gives you an interface directly connected to the machine but its more limited that DWC

          www.duet3d.com

          1 Reply Last reply Reply Quote 1
          • Phaedruxundefined
            Phaedrux Moderator @CarlBosson
            last edited by

            @CarlBosson said in PID Tuning Procedure:

            M997 S1
            Error: M997: File 0:/firmware/duetwifiServer.bin not found

            Place this file in the firmware folder on the SD card and send M997 S1 again.

            https://github.com/Duet3D/RepRapFirmware/releases/download/3.3/DuetWiFiServer.bin

            Z-Bot CoreXY Build | Thingiverse Profile

            CarlBossonundefined 2 Replies Last reply Reply Quote 0
            • CarlBossonundefined
              CarlBosson @Phaedrux
              last edited by

              @Phaedrux

              @Phaedrux said in PID Tuning Procedure:

              Place this file in the firmware folder on the SD card and send M997 S1 again.

              Here is what I get.

              M997 S1
              Error: M997: File 0:/firmware/DuetWiFiServer.bin not found
              ok

              There is no box!

              1 Reply Last reply Reply Quote 0
              • Phaedruxundefined
                Phaedrux Moderator
                last edited by

                And you're sure the file is present in the folder?
                Is it also present in the sys folder?
                Is DWC also updated to 3.3?

                It wouldn't hurt to re-download the 3.3 zip file and upload it via DWC again and have it attempt to reflash and update everything. Don't extract it first.

                https://github.com/Duet3D/RepRapFirmware/releases/download/3.3/Duet2and3Firmware-3.3.zip

                Z-Bot CoreXY Build | Thingiverse Profile

                CarlBossonundefined 1 Reply Last reply Reply Quote 0
                • CarlBossonundefined
                  CarlBosson @Phaedrux
                  last edited by

                  @Phaedrux
                  My biggest problem right now is that without Wi-Fi access I have no access to the DWC. It is getting late tonight. i will look at all this again in the morning. Sorry to be a bother. Thank you for the help.

                  Carl

                  There is no box!

                  1 Reply Last reply Reply Quote 0
                  • CarlBossonundefined
                    CarlBosson @Phaedrux
                    last edited by

                    @Phaedrux

                    @Phaedrux said in PID Tuning Procedure:

                    Place this file in the firmware folder on the SD card and send M997 S1 again.

                    https://github.com/Duet3D/RepRapFirmware/releases/download/3.3/DuetWiFiServer.bin

                    I backed up the SD card from the control board on 3/2/24 and these are the directories that were on it:

                    GCodes
                    macros
                    sys
                    www
                    DuetDriverFiles.zip

                    Yesterday when you asked me to "Place this file in the firmware folder on the SD card and send M997 S1 again." I did not see a "firmware folder" so I placed the file on the SD card with these other directories. When that failed, I looked a little deeper and found some firmware files in the SYS directory. So the second time I placed this file in the sys directory. This still failed.
                    See below a screen shot of the directories on the SD Card, and a screen shot of the files and directories in the SYS directory.
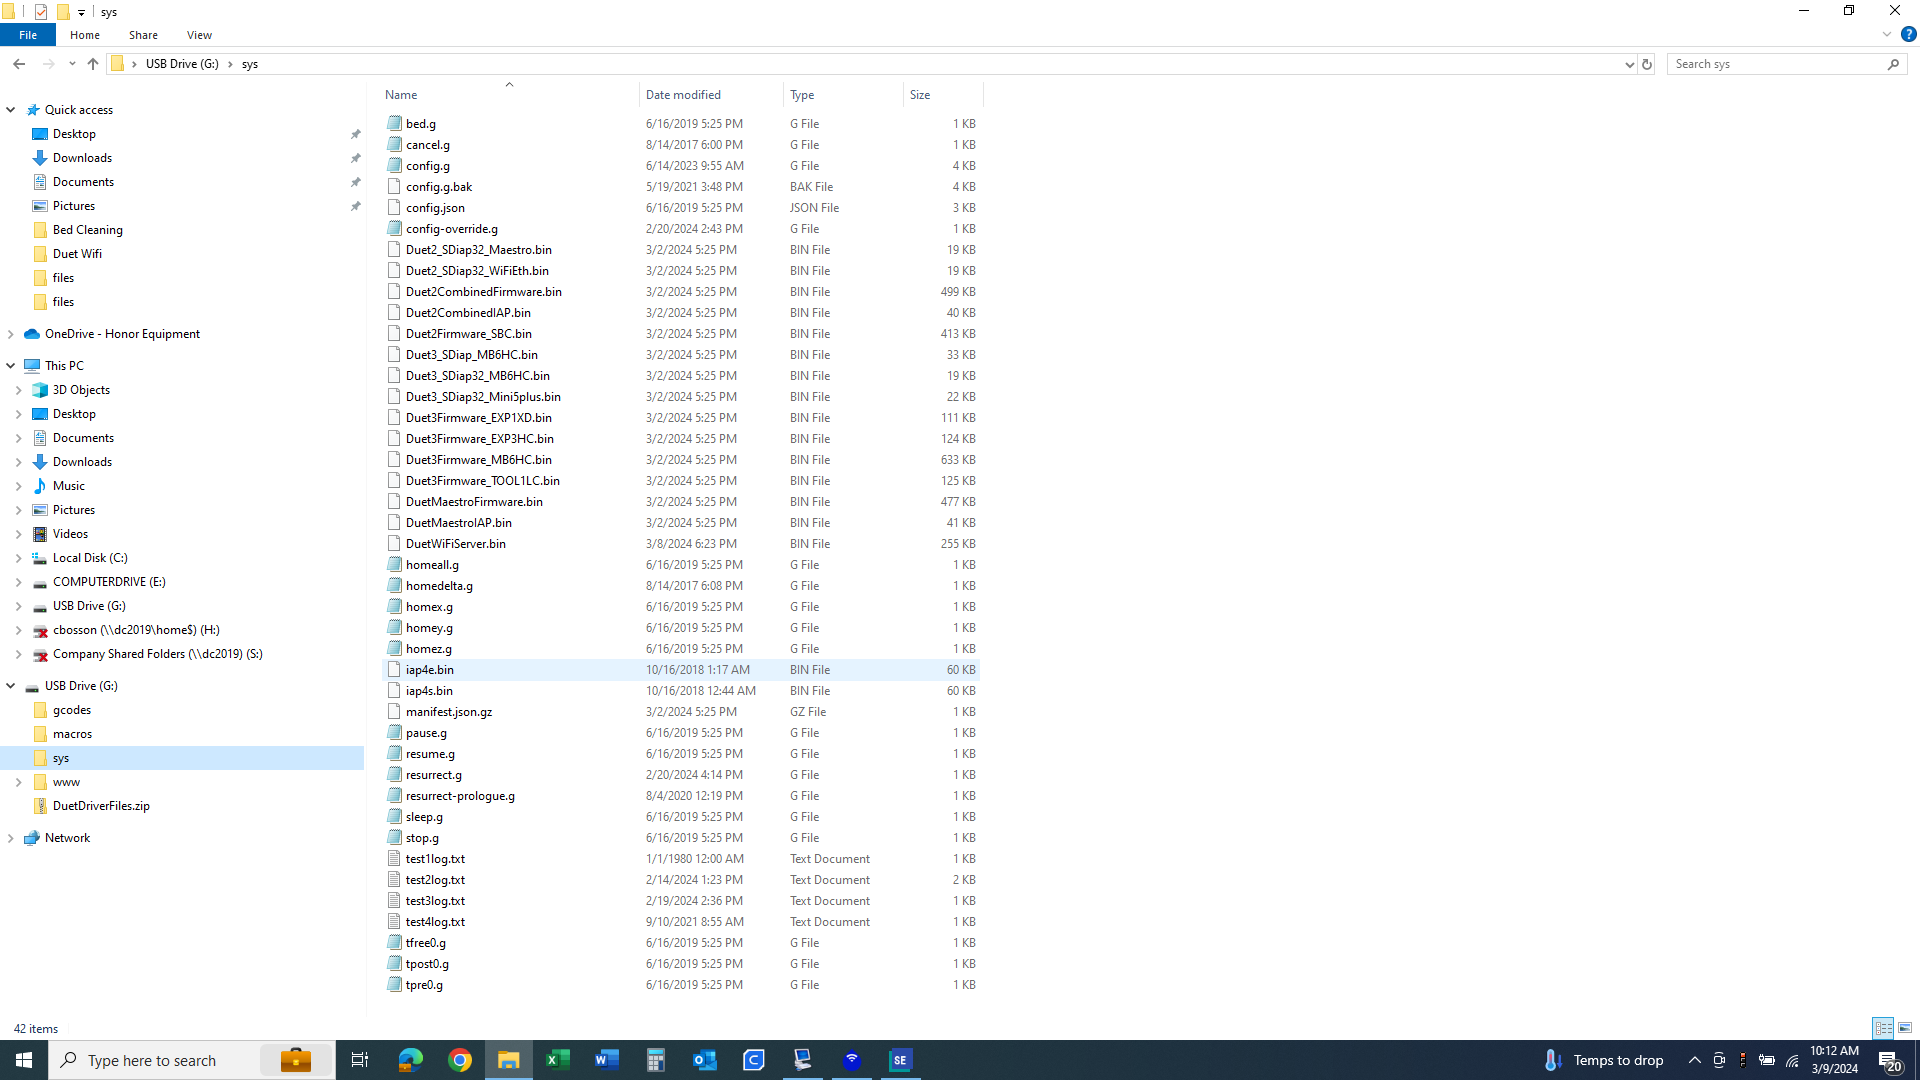
                    Sys directory on SD Card.png Directories on SD Card.png

                    There is no box!

                    droftartsundefined 1 Reply Last reply Reply Quote 0
                    • Phaedruxundefined
                      Phaedrux Moderator
                      last edited by

                      Create a folder named firmware and put the file there. Then send M997 S1 again.

                      Z-Bot CoreXY Build | Thingiverse Profile

                      CarlBossonundefined 1 Reply Last reply Reply Quote 1
                      • droftartsundefined
                        droftarts administrators @CarlBosson
                        last edited by

                        @CarlBosson or send

                        M997 S1 P"0:/sys/DuetWiFiServer.bin"
                        

                        When you can access DWC, the next time you upload a firmware update, RRF will create the firmware folder and put any further firmware updates in that.

                        See https://docs.duet3d.com/User_manual/RepRapFirmware/Updating_firmware#file-locations-on-the-duet-sd-card

                        Ian

                        Bed-slinger - Mini5+ WiFi/1LC | RRP Fisher v1 - D2 WiFi | Polargraph - D2 WiFi | TronXY X5S - 6HC/Roto | CNC router - 6HC | Tractus3D T1250 - D2 Eth

                        CarlBossonundefined 1 Reply Last reply Reply Quote 0
                        • CarlBossonundefined
                          CarlBosson @Phaedrux
                          last edited by

                          @Phaedrux Some good news.

                          M997 S1
                          Trying to connect at 230400 baud: success
                          Erasing 4096 bytes...
                          Erasing 196608 bytes...
                          Uploading file...
                          5% complete
                          10% complete
                          15% complete
                          20% complete
                          25% complete
                          30% complete
                          35% complete
                          40% complete
                          45% complete
                          50% complete
                          55% complete
                          60% complete
                          65% complete
                          70% complete
                          75% complete
                          80% complete
                          85% complete
                          90% complete
                          95% complete
                          Upload successful
                          ok
                          WiFi module started
                          WiFi module is connected to access point ATT2j8EdGs, IP address 192.168.1.186

                          There is no box!

                          1 Reply Last reply Reply Quote 0
                          • CarlBossonundefined
                            CarlBosson @droftarts
                            last edited by

                            @droftarts
                            But now that we are this far I still cannot access the DWC.
                            When I open the browser and enter the IP address the screen comes up blank?

                            Carl

                            There is no box!

                            1 Reply Last reply Reply Quote 0
                            • Phaedruxundefined
                              Phaedrux Moderator
                              last edited by

                              Download this file and extract it to the WWW folder on the SD card and try again.

                              https://github.com/Duet3D/RepRapFirmware/releases/download/3.3/DuetWebControl-SD.zip

                              Z-Bot CoreXY Build | Thingiverse Profile

                              CarlBossonundefined 1 Reply Last reply Reply Quote 0
                              • CarlBossonundefined
                                CarlBosson @Phaedrux
                                last edited by

                                @Phaedrux
                                THAT WORKED!!!!! I have the DWC back!!!
                                I know this is the weekend. Thank you so much for the help. Now I will continue with your other instructions.

                                There is no box!

                                1 Reply Last reply Reply Quote 0
                                • Phaedruxundefined
                                  Phaedrux Moderator
                                  last edited by

                                  Now that you have DWC, you should upload the 3.3 release zip file once more to make sure everything is where it should be, and then update to 3.4.6 by uploading it's zip file. That would be the normal means of update going forward.

                                  https://github.com/Duet3D/RepRapFirmware/releases/download/3.3/Duet2and3Firmware-3.3.zip

                                  https://github.com/Duet3D/RepRapFirmware/releases/download/3.4.6/Duet2and3Firmware-3.4.6.zip

                                  Then you're all up to date.

                                  Z-Bot CoreXY Build | Thingiverse Profile

                                  CarlBossonundefined 1 Reply Last reply Reply Quote 0
                                  • CarlBossonundefined
                                    CarlBosson @Phaedrux
                                    last edited by

                                    @Phaedrux
                                    Again, Thank you so much for your time.
                                    I have updated firmware to 3.4.6, and installed the RepRap config.
                                    The printer is doing some funny things that I am sure are settings in the RepRap config we can work on fixing. But we have solid repeatable connection to the DWC!

                                    I originally started this string to PID tune the heated circuits but now after all your help I need get everything working properly. Then we can fine tune. Please see the Config.g file below. First issue is I cannot home the axes. Is there anything else you can see right away that needs to be fixed? Have a great day! You have made my weekend!

                                    Carl

                                    ; Configuration file for RepRapFirmware on Duet 2 WiFi
                                    ; executed by the firmware on start-up
                                    ;
                                    ; generated by RepRapFirmware Configuration Tool v3.5.0-rc.3 on Sun Mar 10 2024 17:12:57 GMT-0400 (Eastern Daylight Time)

                                    ; General
                                    M550 P"My Printer" ; set hostname

                                    ; Network
                                    M552 S1 ; configure WiFi adapter
                                    M586 P0 S1 ; configure HTTP

                                    ; Smart Drivers
                                    M569 P0 S1 D2 ; driver 0 goes forwards (X axis)
                                    M569 P1 S1 D2 ; driver 1 goes forwards (Y axis)
                                    M569 P2 S1 D2 ; driver 2 goes forwards (Z axis)
                                    M569 P3 S1 D2 ; driver 3 goes forwards (extruder 0)

                                    ; Motor Idle Current Reduction
                                    M906 I30 ; set motor current idle factor
                                    M84 S30 ; set motor current idle timeout

                                    ; Axes
                                    M584 X0 Y1 Z2 ; set axis mapping
                                    M350 X16 Y16 Z16 I1 ; configure microstepping with interpolation
                                    M906 X8 Y800 Z800 ; set axis driver currents
                                    M92 X80 Y80 Z400 ; configure steps per mm
                                    M208 X0:200 Y0:200 Z0:200 ; set minimum and maximum axis limits
                                    M566 X900 Y900 Z12 ; set maximum instantaneous speed changes (mm/min)
                                    M203 X6000 Y6000 Z180 ; set maximum speeds (mm/min)
                                    M201 X500 Y500 Z20 ; set accelerations (mm/s^2)

                                    ; Extruders
                                    M584 E3 ; set extruder mapping
                                    M350 E16 I1 ; configure microstepping with interpolation
                                    M906 E1000 ; set extruder driver currents
                                    M92 E420 ; configure steps per mm
                                    M566 E120 ; set maximum instantaneous speed changes (mm/min)
                                    M203 E3600 ; set maximum speeds (mm/min)
                                    M201 E250 ; set accelerations (mm/s^2)

                                    ; Kinematics
                                    M669 K0 ; configure Cartesian kinematics

                                    ; Probes
                                    M558 K0 P0 H5 F120 T6000 ; configure manual probe via slot #0
                                    G31 P500 X0 Y0 Z0.7 ; set Z probe trigger value, offset and trigger height

                                    ; Endstops
                                    M574 X1 P"xstop" S1 ; configure X axis endstop
                                    M574 Y1 P"ystop" S1 ; configure Y axis endstop
                                    M574 Z1 S2 ; configure Z axis endstop

                                    ; Sensors
                                    M308 S0 P"bedtemp" Y"thermistor" A"Heated Bed" T100000 B4725 C7.06e-8 ; configure sensor #0
                                    M308 S1 P"nil" Y"rtdmax31865" A"Nozzle" W"K" F50 ; configure sensor #1

                                    ; Heaters
                                    M950 H0 C"bedheat" T0 ; create heater #0
                                    M143 H0 P0 T0 C0 S140 A0 ; configure heater monitor #0 for heater #0
                                    M307 H0 R2.43 D5.5 E1.35 K0.56 B1 ; configure model of heater #0
                                    M950 H1 C"e0heat" T1 ; create heater #1
                                    M143 H1 P0 T1 C0 S285 A0 ; configure heater monitor #0 for heater #1
                                    M307 H1 R2.43 D5.5 E1.35 K0.56 B0 ; configure model of heater #1

                                    ; Heated beds
                                    M140 P0 H0 ; configure heated bed #0

                                    ; Fans
                                    M950 F0 C"fan0" ; create fan #0
                                    M106 P0 S0 L0 X1 B0.1 ; configure fan #0
                                    M950 F1 C"fan1" ; create fan #1
                                    M106 P1 S0 B0.1 H1 T45 ; configure fan #1

                                    ; Tools
                                    M563 P0 D0 H1 F0 ; create tool #0
                                    M568 P0 R0 S0 ; set initial tool #0 active and standby temperatures to 0C

                                    There is no box!

                                    1 Reply Last reply Reply Quote 0
                                    • Phaedruxundefined
                                      Phaedrux Moderator
                                      last edited by

                                      This is a good place to start.

                                      https://docs.duet3d.com/en/How_to_guides/Commissioning

                                      Z-Bot CoreXY Build | Thingiverse Profile

                                      CarlBossonundefined 2 Replies Last reply Reply Quote 0
                                      • CarlBossonundefined
                                        CarlBosson @Phaedrux
                                        last edited by

                                        @Phaedrux
                                        After all your help I wanted to give you an update. I have been using the commissioning document to fine tune the board. As I now have this "Work" printer at my home I have been doing this in the evenings. I am very close with the basic setup and may start a test print tonight or tomorrow, definitely by this weekend.

                                        There is no box!

                                        1 Reply Last reply Reply Quote 2
                                        • CarlBossonundefined
                                          CarlBosson @Phaedrux
                                          last edited by

                                          @Phaedrux
                                          I ran in to a issue maybe you can help with?
                                          When I home the axis individually or by home all, they work correctly. Once homed X, and Y work properly. But Z goes in the wrong direction. If I select +25mm it will go back towards the end stop. I have changed from S1 to S0 in the homing and config.g a few times trying different combinations but no luck. See below the config.g, homeall.g and homeZ.g
                                          Thank you in advance.

                                          3/20/24
                                          Config.g
                                          ; Configuration file for RepRapFirmware on Duet 2 WiFi
                                          ; executed by the firmware on start-up
                                          ;
                                          ; generated by RepRapFirmware Configuration Tool v3.5.0-rc.3 on Sun Mar 10 2024 17:12:57 GMT-0400 (Eastern Daylight Time)

                                          ; General
                                          M550 P"My Printer" ; set hostname

                                          ; Network
                                          M552 S1 ; configure WiFi adapter
                                          M586 P0 S1 ; configure HTTP

                                          ; Smart Drivers
                                          M569 P0 S1 D2 ; driver 0 goes forwards (X axis)
                                          M569 P1 S1 D2 ; driver 1 goes forwards (Y axis)
                                          M569 P2 S1 D2 ; driver 2 goes forwards (Z axis)
                                          M569 P3 S1 D2 ; driver 3 goes forwards (extruder 0)

                                          ; Motor Idle Current Reduction
                                          M906 I30 ; set motor current idle factor
                                          M84 S30 ; set motor current idle timeout

                                          ; Axes
                                          M584 X0 Y1 Z2 ; set axis mapping
                                          M350 X16 Y16 Z16 I1 ; configure microstepping with interpolation
                                          M906 X1450 Y1450 Z1450 ; set axis driver currents
                                          M92 X80.58 Y80.58 Z400 ; configure steps per mm
                                          M208 X0:300 Y0:300 Z0:400 ; set minimum and maximum axis limits
                                          M566 X900 Y900 Z12 ; set maximum instantaneous speed changes (mm/min)
                                          M203 X6000 Y6000 Z180 ; set maximum speeds (mm/min)
                                          M201 X500 Y500 Z20 ; set accelerations (mm/s^2)

                                          ; Extruders
                                          M584 E3 ; set extruder mapping
                                          M350 E16 I1 ; configure microstepping with interpolation
                                          M906 E1000 ; set extruder driver currents
                                          M92 E799.53 ; configure steps per mm
                                          M566 E120 ; set maximum instantaneous speed changes (mm/min)
                                          M203 E3600 ; set maximum speeds (mm/min)
                                          M201 E250 ; set accelerations (mm/s^2)

                                          ; Kinematics
                                          M669 K0 ; configure Cartesian kinematics

                                          ; Probes
                                          ;M558 K0 P0 H5 F120 T6000 ; configure manual probe via slot #0
                                          ;G31 P500 X0 Y0 Z0.7 ; set Z probe trigger value, offset and trigger height

                                          ; Endstops
                                          M574 X1 P"!xstop" S1 ; configure X axis endstop
                                          M574 Y1 P"!ystop" S1 ; configure Y axis endstop
                                          M574 Z1 P"!zstop" S1 ; configure Z axis endstop

                                          ; Sensors
                                          M308 S0 P"bedtemp" Y"thermistor" A"Heated Bed" T100000 B4725 C7.06e-8 ; configure sensor #0
                                          M308 S1 P"spi.cs1" Y"rtdmax31865" ; configure sensor #1
                                          M950 H1 C"e0heat" T1

                                          ; Heaters
                                          M950 H0 C"bedheat" T0 ; create heater #0
                                          M143 H0 P0 T0 C0 S200 A0 ; configure heater monitor #0 for heater #0
                                          M307 H0 R0.457 K0.287:0.000 D28.14 E1.35 S1.00 B0 V24.6 ; configure model of heater #0
                                          M950 H1 C"e0heat" T1 ; create heater #1
                                          M143 H1 P0 T1 C0 S475 A0 ; configure heater monitor #0 for heater #1
                                          M307 H1 R2.43 D5.5 E1.35 K0.56 B0 ; configure model of heater #1

                                          ; Heated beds
                                          M140 P0 H0 ; configure heated bed #0

                                          ; Fans
                                          M950 F0 C"fan0" ; create fan #0
                                          M106 P0 S0 L0 X1 B0.1 ; configure fan #0
                                          M950 F1 C"fan1" ; create fan #1
                                          M106 P1 S0 B0.1 H1 T45 ; configure fan #1

                                          ; Tools
                                          M563 P0 D0 H1 F0 ; create tool #0
                                          M568 P0 R0 S0 ; set initial tool #0 active and standby temperatures to 0C

                                          HomeZ.g

                                          ; homez.g
                                          ; called to home the Z axis
                                          ;
                                          ; generated by RepRapFirmware Configuration Tool v3.5.0-rc.3 on Sun Mar 10 2024 17:13:00 GMT-0400 (Eastern Daylight Time)

                                          ; lift Z
                                          G91 ; relative positioning
                                          G1 H2 Z-5 ; move Z relative to current position to avoid dragging nozzle over the bed
                                          ;G90 ; absolute positioning

                                          ; home Z
                                          ;var xCenter = move.compensation.probeGrid.mins[0] + (move.compensation.probeGrid.maxs[0] - move.compensation.probeGrid.mins[0]) / 2 - sensors.probes[0].offsets[0]
                                          ;var yCenter = move.compensation.probeGrid.mins[1] + (move.compensation.probeGrid.maxs[1] - move.compensation.probeGrid.mins[1]) / 2 - sensors.probes[0].offsets[1]
                                          ;G1 X{var.xCenter} Y{var.yCenter} F6000 ; go to bed centre
                                          ;G30 ; probe the bed

                                          ;Home Z with out probe
                                          G1 H1 Z20 F1800 ; move z up until the endstop is triggered
                                          G1 H2 Z-5 F900 ;go back a few mm
                                          G1 H1 Z20 F900 ; move slowly to z axis endstop once more (second pass)
                                          G90 ; absolute positioning

                                          Homeall.g

                                          ; homeall.g
                                          ; called to home all axes
                                          ;
                                          ; generated by RepRapFirmware Configuration Tool v3.5.0-rc.3 on Sun Mar 10 2024 17:13:00 GMT-0400 (Eastern Daylight Time)

                                          ; lift Z
                                          G91 ; relative positioning
                                          G1 H2 Z5 F6000 ; move Z relative to current position to avoid dragging nozzle over the bed
                                          G90 ; absolute positioning

                                          ; home XY
                                          var xTravel = move.axes[0].max - move.axes[0].min + 5 ; calculate how far X can travel plus 5mm
                                          var yTravel = move.axes[1].max - move.axes[1].min + 5 ; calculate how far Y can travel plus 5mm
                                          G91 ; relative positioning
                                          G1 H1 X{-var.xTravel} Y{-var.yTravel} F600 ; coarse home in the -X and -Y directions
                                          G1 H2 X5 Y5 F6000 ; move back 5mm
                                          G1 H1 X{-var.xTravel} Y{-var.yTravel} F300 ; fine home in the -X and -Y directions
                                          G90 ; absolute positioning

                                          ; home Z
                                          ;var xCenter = move.compensation.probeGrid.mins[0] + (move.compensation.probeGrid.maxs[0] - move.compensation.probeGrid.mins[0]) / 2 - sensors.probes[0].offsets[0]
                                          ;var yCenter = move.compensation.probeGrid.mins[1] + (move.compensation.probeGrid.maxs[1] - move.compensation.probeGrid.mins[1]) / 2 - sensors.probes[0].offsets[1]
                                          ;G1 X{var.xCenter} Y{var.yCenter} F6000 ; go to bed centre
                                          ;G30 ; probe the bed

                                          G91 ;relative positioning
                                          G1 H1 Z20 F1800 ; move z up until the endstop is triggered
                                          G1 H2 Z5 F900 ; Go back a few mm
                                          G1 H1 Z20 F900 ; move back slowly to z axis endstop once more (second pass)
                                          G90 ; absolute positioning

                                          There is no box!

                                          Phaedruxundefined 1 Reply Last reply Reply Quote 0
                                          • Phaedruxundefined
                                            Phaedrux Moderator @CarlBosson
                                            last edited by

                                            @CarlBosson said in PID Tuning Procedure:

                                            But Z goes in the wrong direction.

                                            Keep in mind that Z0 is when the nozzle and bed are touching, and a Z+ move will make them move apart and a Z- move will make them move together. The position of the endstop does not have any bearing on the movement. If the endstop is at the Z0 end, it's a Z1, for low end, and the G1 Z homing move must be negative. If the endstop is at the Z max position farthest away from the bed, it's a Z2, for high end, and the G1 Z homing move must be positive.

                                            If all that is as it should be and a Z move is going the wrong direction, you may need to change the direction of rotation of the motor set by M569 S1 or S0.

                                            Z-Bot CoreXY Build | Thingiverse Profile

                                            CarlBossonundefined 1 Reply Last reply Reply Quote 0
                                            • First post
                                              Last post
                                            Unless otherwise noted, all forum content is licensed under CC-BY-SA