@wieman01 Of course you were correct the print did come loose. But I am not finished ") We have bead basted a glass build plate and also using Nano polymer. I will power down tonight and see what we get in the morning.
We have bead basted a glass build plate and also using Nano polymer. I will power down tonight and see what we get in the morning. 
Best posts made by CarlBosson
-
RE: Pause the print for the day.posted in General Discussion
-
RE: PID Tuning Procedureposted in Tuning and tweaking
@Phaedrux
After all your help I wanted to give you an update. I have been using the commissioning document to fine tune the board. As I now have this "Work" printer at my home I have been doing this in the evenings. I am very close with the basic setup and may start a test print tonight or tomorrow, definitely by this weekend. -
RE: PID Tuning Procedureposted in Tuning and tweaking
@Phaedrux
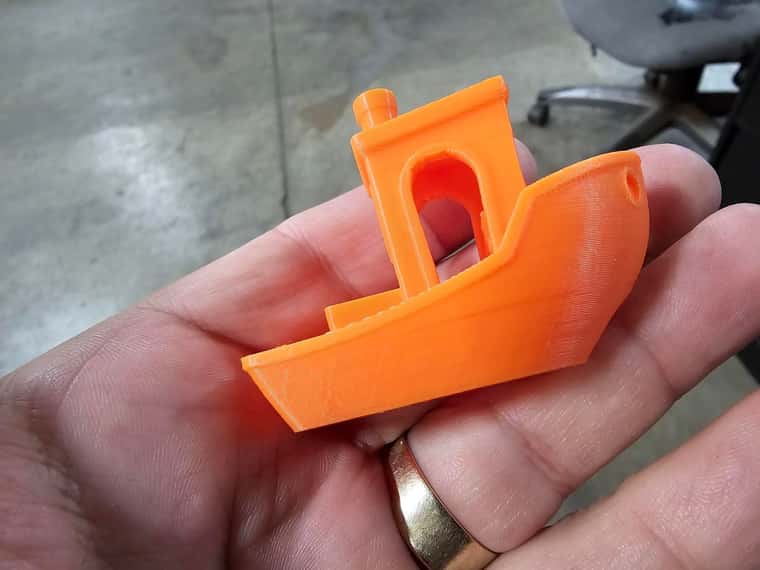
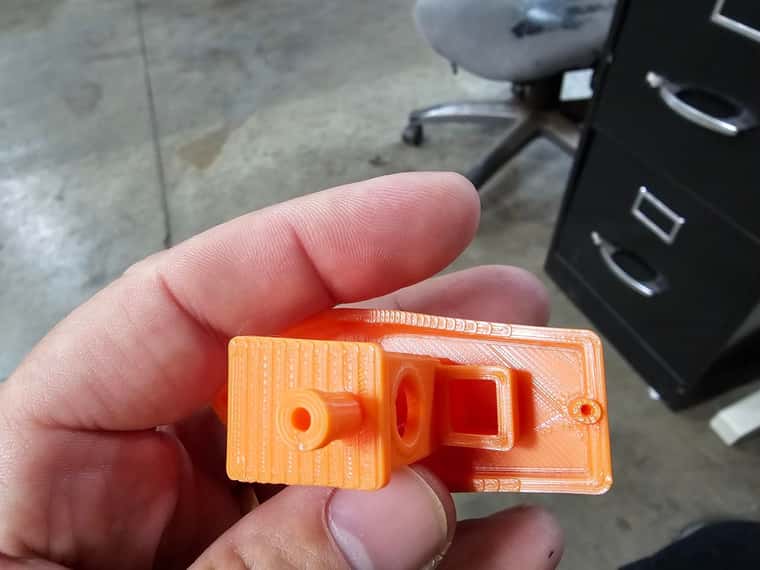
Thank you for your input and all your help. All the heaters have been tuned. All the steppers have been calibrated. I printed this Benchy over the weekend. This looks pretty good to me! Have a great day.Carl
-
RE: Pause the print for the day.posted in General Discussion
The first test was a success! Thanks for all the help! After the firmware update there was no excessive extrusion at restart after power loss.
Today I will start a test print about an hour before we go home for the day. I will pause and power down like this morning, but I will not restart until tomorrow morning 7am EST. The printer will be at room temp when I get to work 75 deg F, this will test bed adhesion.
-
RE: Stepper Driver Plugsposted in Duet Hardware and wiring
@norder Thank you, just what I was looking for!

-
RE: Extruder set point limited to 270cposted in Tuning and tweaking
@jay_s_uk
I have never seen a heating element fail in this manor before, but it looks like I let some of the smoke out. I will have replacement elements today and will replace tommrow. Once this is done I will report back. Thank you for your help.Carl
-
RE: Pause the print for the day.posted in General Discussion
@wieman01 I don't have a photo but there was only a very fine line. So you could see where it stopped and then restarted. I mean to say that I could see it only because i knew it was there.
-
RE: Stepper Driver Plugsposted in Duet Hardware and wiring
@norder Also very helpfull! Thank you again!
-
RE: Extruder set point limited to 270cposted in Tuning and tweaking
@jay_s_uk
It turns out, I have still never seen a heating element fail in this manor. The problem was a loose connection. I have a small two pole screw terminal connecting the heating element in the hot end back to the control board. As I began to disassemble the hot end I found the loose terminal connection. It is heating and controlling as it should at 400 deg. C. You can mark this one solved! Thanks for all the help.Carl
-
RE: Stepper skipping/single phasingposted in General Discussion
@engikeneer the board is the duet 3D wifi if that is what your asking. I agree with both of you. I did some more searching after I posted this. I am pretty sure its a bad connection or broken wire. I have ordered new plugs and will run new PTFE coated wire. i will update when done. should be back up mid next week. Thanks for all your help.
Latest posts made by CarlBosson
-
RE: Swipe/prime Nozzle macroposted in General Discussion
@mikeabuilder In addition to the issue you have all ready help me with, Thank you. I have a post print issue. When a print is finished it back the filament all the way out of the extruder, direct drive. This means I have to reload the filament for every print.
See attached the start and end macros from Cura for this printer. The G28 line says to retract 5.0mm of filament. I have reduced this from 10 with no noticeable difference.
Could this be something in my Config.g doing this. I saw a Stop.g directory but it is empty? could this be the problem?Thanks again.
Carl
-
RE: Swipe/prime Nozzle macroposted in General Discussion
@mikeabuilder This worked well. I am making some adjustments to fit my machine. Thank you.
-
RE: Swipe/prime Nozzle macroposted in General Discussion
@mikeabuilder Thank you, I am using Cura, and there is a place for start Gcode. This was just what I was looking for.
-
Swipe/prime Nozzle macroposted in General Discussion
I would like my print to swipe/prime the nozzle prior to starting a print. So I started looking.
I found a Marlin web page that describes swipe nozzle macros "https://marlinfw.org/docs/gcode/G012.html" see a statement from this page below
"The most basic example is to use the command without any arguments, this will default to a stroke based pattern which will be stroked NOZZLE_CLEAN_STROKES times.
G12 ; stroke pattern (default)"I am fine with a simple swipe/prime, like a stock primer. Where in the config.g file do I place this G12 statement?
Duet Web Control 3.5.0-rc.3
GitHub
Web interface developed by Christian Hammacher for Duet3D .
Licensed under the terms of the GNU General Public License v3 .Current Config.g
; Configuration file for RepRapFirmware on Duet 2 WiFi
; executed by the firmware on start-up
;
; generated by RepRapFirmware Configuration Tool v3.5.0-rc.3 on Sun Mar 10 2024 17:12:57 GMT-0400 (Eastern Daylight Time); General
M550 P"My Printer" ; set hostname; Network
M552 S1 ; configure WiFi adapter
M586 P0 S1 ; configure HTTP; Smart Drivers
M569 P0 S1 D2 ; driver 0 goes forwards (X axis)
M569 P1 S1 D2 ; driver 1 goes forwards (Y axis)
M569 P2 S0 D2 ; driver 2 goes forwards (Z axis)
M569 P3 S0 D2 ; driver 3 goes forwards (extruder 0); Motor Idle Current Reduction
M906 I30 ; set motor current idle factor
M84 S30 ; set motor current idle timeout; Axes
M584 X0 Y1 Z2 ; set axis mapping
M350 X16 Y16 Z16 I1 ; configure microstepping with interpolation
M906 X1450 Y1450 Z1450 ; set axis driver currents
M92 X80.58 Y80.58 Z400 ; configure steps per mm
M208 X0:300 Y0:300 Z0:400 ; set minimum and maximum axis limits
M566 X900 Y900 Z12 ; set maximum instantaneous speed changes (mm/min)
M203 X6000 Y6000 Z180 ; set maximum speeds (mm/min)
M201 X500 Y500 Z20 ; set accelerations (mm/s^2); Extruders
M584 E3 ; set extruder mapping
M350 E16 I1 ; configure microstepping with interpolation
M906 E1000 ; set extruder driver currents
M92 E879.0 ; configure steps per mm
M566 E120 ; set maximum instantaneous speed changes (mm/min)
M203 E3600 ; set maximum speeds (mm/min)
M201 E250 ; set accelerations (mm/s^2); Kinematics
M669 K0 ; configure Cartesian kinematics; Probes
;M558 K0 P0 H5 F120 T6000 ; configure manual probe via slot #0
;G31 P500 X0 Y0 Z0.7 ; set Z probe trigger value, offset and trigger height; Endstops
M574 X1 P"!xstop" S1 ; configure X axis endstop
M574 Y1 P"!ystop" S1 ; configure Y axis endstop
M574 Z1 P"!zstop" S1 ; configure Z axis endstop; Sensors
M308 S0 P"bedtemp" Y"thermistor" A"Heated Bed" T100000 B4725 C7.06e-8 ; configure sensor #0
M308 S1 P"spi.cs1" Y"rtdmax31865" ; configure sensor #1
M950 H1 C"e0heat" T1; Heaters
M950 H0 C"bedheat" T0 ; create heater #0
M143 H0 P0 T0 C0 S200 A0 ; configure heater monitor #0 for heater #0
M307 H0 R0.457 K0.287:0.000 D28.14 E1.35 S1.00 B0 V24.6 ; configure model of heater #0
M950 H1 C"e0heat" T1 ; create heater #1
M143 H1 P0 T1 C0 S475 A0 ; configure heater monitor #0 for heater #1
M307 H1 R2.43 D5.5 E1.35 K0.56 B0 ; configure model of heater #1; Heated beds
M140 P0 H0 ; configure heated bed #0; Fans
M950 F0 C"fan0" ; create fan #0
M106 P0 S0 L0 X1 B0.1 ; configure fan #0
M950 F1 C"fan1" ; create fan #1
M106 P1 S0 B0.1 H1 T45 ; configure fan #1; Tools
M563 P0 D0 H1 F0 ; create tool #0
M568 P0 R0 S0 ; set initial tool #0 active and standby temperatures to 0CHappy fourth of July!
Carl
-
RE: Inductive bed leveling sensorposted in General Discussion
@oliof Wow, sorry again! You were true. I just looked up the Euclid sensor. I think this will work thank you.
-
RE: Inductive bed leveling sensorposted in General Discussion
@oliof I am sorry I left out some important information. I plan to be printing high temperature filaments in a heated enclosure. The leveling sensor I use will need to be able to handle around 100 deg C in the enclosure. It seems the industrial machines use glass beds? What sensor do they use?
Thanks for you input. Have a great day.Carl
-
RE: PID Tuning Procedureposted in Tuning and tweaking
@Phaedrux
Thank you for your input and all your help. All the heaters have been tuned. All the steppers have been calibrated. I printed this Benchy over the weekend. This looks pretty good to me! Have a great day.Carl
-
RE: PID Tuning Procedureposted in Tuning and tweaking
@Phaedrux
Hot end is at 200c heated bed is at 60c all axes are homed but the extrude and retract buttons are grayed out. I can not select them?Carl