NEW PROBLEM WITH 1LC CARD
-
@Gianluca what happens if you connect just one of the non-functioning tool boards to the CAN bus and hold both buttons down while powering up? What sequence of LED flashes do you see on the tool board?
Duet WiFi hardware designer and firmware engineer
Please do not ask me for Duet support via PM or email, use the forum
http://www.escher3d.com, https://miscsolutions.wordpress.com -
@Phaedrux said in NEW PROBLEM WITH 1LC CARD:
Is this the same can cable as before?
No, I have tried various canbus cables. I'm sure this isn't the problem.
-
@dc42 said in NEW PROBLEM WITH 1LC CARD:
@Gianluca what happens if you connect just one of the non-functioning tool boards to the CAN bus and hold both buttons down while powering up? What sequence of LED flashes do you see on the tool board?
I answer the questions by attaching videos.
VIDEO_1: startup in stand alone mode.
The beep at the end indicates boot completion.
link textVIDEO_2: startup in stand alone mode with reset 1LC.
The beep at the end indicates boot completion.
link textVIDEO_3: startup in SBC mode.
The beep at the end indicates boot completion.
link textVIDEO_4: startup in SBC mode with reset 1LC.
The beep at the end indicates boot completion.
link textThe file "Duet3Firmware_TOOL1LC.bin" is present in both the firemware and SYS folders, both in the SD card (st. alone mode) and in the raspberry (SBC mode).
Unfortunately the toolboard reset procedure did not work with any attempts.
Before the toolboards were blocked, they worked fine, except for the "Can't turn heater 1 on while in fault state" error, that perhaps arose with the RC3 version.
Is it not possible to send the cards to load the firmware in your laboratory?
Thanks for the help, I really need it to get a usable printer again.
-
@Gianluca All the videos are marked as private, so I can't see them.
Ian
Bed-slinger - Mini5+ WiFi/1LC | RRP Fisher v1 - D2 WiFi | Polargraph - D2 WiFi | TronXY X5S - 6HC/Roto | CNC router - 6HC | Tractus3D T1250 - D2 Eth
-
@droftarts said in NEW PROBLEM WITH 1LC CARD:
@Gianluca All the videos are marked as private, so I can't see them.
Ian
Sorry... Could you try now?
-
Have you seen the videos?
Can you help me get a working printer again?
Thank you -
@Gianluca can you remove everything from the toolboard so nothing is plugged in except the CAN and power connections?
I see you are using a 1LC v1.3
If you just have the one toolboard in the setup and its on the end of the CAN run, I would use the built in terminating resistor rather than have a resistor on the CAN connection
-
@jay_s_uk said in NEW PROBLEM WITH 1LC CARD:
@Gianluca can you remove everything from the toolboard so nothing is plugged in except the CAN and power connections?
I see you are using a 1LC v1.3
If you just have the one toolboard in the setup and its on the end of the CAN run, I would use the built in terminating resistor rather than have a resistor on the CAN connection
Thanks, I'll try this too, just CAN and power connected.
No need to cut the track, if you look, there is the resistor on the CAN connector.
I have two v1.3 boards blocked by updates, one with the electrical track cut and one with the resistor. -
@Gianluca i was just suggesting remove all variables, but if you want to stick to the resistor thats fine
Owns various duet boards and is the main wiki maintainer for the Teamgloomy LPC/STM32 port of RRF. Assume I'm running whatever the latest beta/stable build is
-
@Gianluca Hi, I have watched your videos, and also tested updating here on a v1.2a 1LC.
One thing I noticed is that if I disconnect the CAN cable, then I hold down the buttons and power up, I get an initial flash of the STATUS LED (like yours does), then let go of the buttons after a few seconds, I get a constant flashing on the red STATUS LED. I think the bootloader falls back to the firmware if it doesn't receive a response from the mainboard, but yours is then crashing. This makes me think that the firmware on your board is corrupted, and possibly stuck in a boot loop. However, pressing the two buttons on power up should allow it to request a new firmware, even if the current firmware is corrupt. Which makes me think there is a problem with the CAN cable, but it's possible there is some other fault with the board.
With the 1LC not finding a CAN connection, I think the main issue is with the CAN cable. Even with no firmware, or when pressing the buttons, you should still get a CAN connection. You said you replaced the cable, but to me it appears to still be a problem. Please try making a new cable. Do you have a working toolboard at the moment that you can test with?
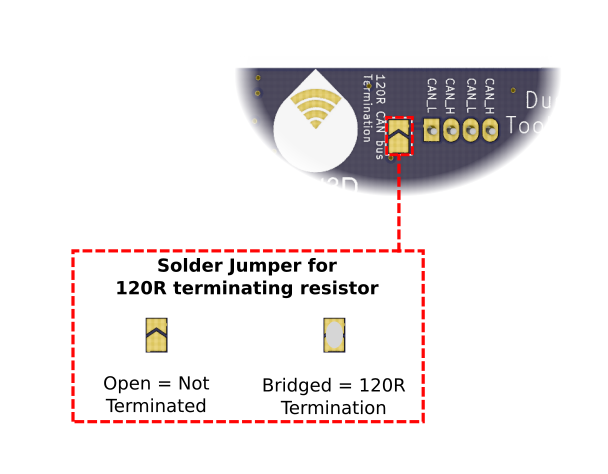
Also, check your CAN termination. I see you have a resistor connected to the CAN connector on the toolboard, does that mean you have NOT soldered the CAN termination jumper on the back of the board? You shouldn't do both. We recommend bridging the CAN termination jumper on the back of the board, see https://docs.duet3d.com/Duet3D_hardware/Duet_3_family/Duet_3_Toolboard_1LC#terminating-resistor
If you stick with the resistor, make sure it is properly connected and providing resistance. Measure the resistance on the pins of the CAN cable connector.
I'm not sure what was causing the initial problem of the memory error, but hopefully we can get back to that.
Ian
Bed-slinger - Mini5+ WiFi/1LC | RRP Fisher v1 - D2 WiFi | Polargraph - D2 WiFi | TronXY X5S - 6HC/Roto | CNC router - 6HC | Tractus3D T1250 - D2 Eth
-
@jay_s_uk said in NEW PROBLEM WITH 1LC CARD:
@Gianluca i was just suggesting remove all variables, but if you want to stick to the resistor thats fine
I didn't solder the terminal, just to keep the board without any modifications...
-
@droftarts
First of all, thanks for your help, I hope to have a working printer again soon.I don't understand why in stand alone mode, the Status LED ( in both toolboards ) doesn't flash, while in SBC mode it does.
It would seem more logical to me to try to restore the firmware with the fastest boot (St. alone) and not waiting for the 30 seconds of the Raspberry (SBC).
In SBC, it seems that after the toolboard reset, the mainboard can give the firmware too late, only when the 1LC is no longer asking for it.Before the firmware update, both toolboards worked quite well, except for the "Expansion board 121 stopped sending status" error that was occasionally shown on the display. Printing was not interrupted.
In any case, making a new CAN cable costs nothing and I will do it right away.I also measure the resistance on the pins of the CAN cable connector, is actually working.
I'll report back as soon as all the tests have been done.
-
@Gianluca I did my tests in standalone, I suggest you do the same, as it boots quicker.
Ian
Bed-slinger - Mini5+ WiFi/1LC | RRP Fisher v1 - D2 WiFi | Polargraph - D2 WiFi | TronXY X5S - 6HC/Roto | CNC router - 6HC | Tractus3D T1250 - D2 Eth
-
@droftarts
After many attempts and many tested CAN-FD cables, I was able to get the locked Toolboards working.
It was definitely the faulty cable. it was cut off about halfway down the length and was making false contact.
I managed to restore the two original 1LC cards and also a clone that I had purchased for testing.
The quality of the cables is very important!Thanks, you can mark it as resolved.
-
 undefined jay_s_uk has marked this topic as solved