@dc42 Thanks' a lot for adding this issue to Github
Posts made by buckker
-
RE: How to get thumbnails on Paneldue ?posted in PanelDue
-
RE: How to get thumbnails on Paneldue ?posted in PanelDue
@dc42 I tested 3 different configurations. In DWC all configurations work, than means the thumbnails are shown as it should be. On the Panel Due 7i only the 160x160 work. Both other g-code files doesn't show any thumbnail on the Panel Due.
Endstopper V4 v3_160x160.gcodeEndstopper V4 v3_160x160, 400x400.gcode
Endstopper V4 v3_400x400, 160x160.gcode
That's my configuration from the Prusa (400x400, 160x160):

Regarding the thumbnail on the status page. Does it make sense to add a second "status page" with less print information in order to have more space for the thumbnail? Why do I prefer to have a thumbnail on the status screen? In our company we are a team of 3 people who work on the 3d printers. Sometimes it's not 100% clear what's on the machine when you only see the filename. We noticed that the thumbnails helps a lot in the DWC. We can see quickly which parts and how much of them are placed on the build plate. If we can get those information visually on the Panel Due it would help us to be up to date more easily.
Many thanks in advance
Michael
-
RE: How to get thumbnails on Paneldue ?posted in PanelDue
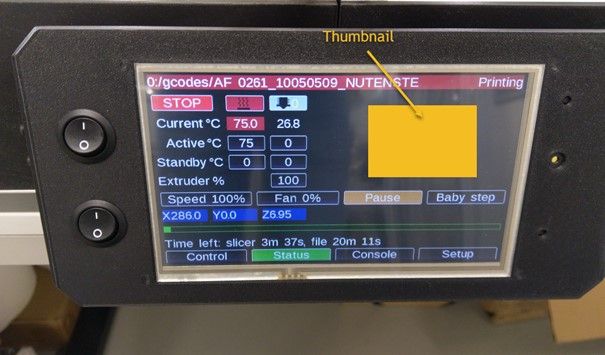
@dc42 Thanks for your reply. I think the data that is actually shown on the Panel Due Screen definitely makes sense. I would only remove the actual XYZ coordinates. Maybe it's possible to move the Pause and Baby Step button below the Speed and Fan button to have more space on the right side of the screen. You mentioned that on the status screen is not enough space. For what is the space used in the right upper corner (where I placed the yellow thumbnail dummy)?
Many thanks in advance.
Michael
-
RE: How to get thumbnails on Paneldue ?posted in PanelDue
Hi
I have updated the Panel Due to the latest firmware version (3.5.0-rc3-7.0i). I can see the thumbnail when choosing the file to print. But I can't see a thumbnail on the status screen. Is it planed that the thumbnail can be seen on the status screen? I would very appreciate it

I also noticed that the max. image size is 160x160 for the Panel Due. I prefer to set it bigger (400x400) to have a nice preview on the Duet Web Control. But then, it doesn't work for the Panel Due. Is it possible to convert the image size during the upload to fit the Panel Due requirements?
-
RE: Motor driver destroyed?posted in Duet Hardware and wiring
@jay_s_uk great, I will order some TMC 2660C-PA.
Many thanks for your help

-
RE: Motor driver destroyed?posted in Duet Hardware and wiring
@jay_s_uk In Switzerland
Is it possible that the TMC 2660-PA is no longer in production?
Does the TMC 2660C-PA also works? This driver is available at Digikey.
https://www.digikey.ch/en/products/detail/trinamic-motion-control-gmbh/TMC2660C-PA/4500212
-
RE: Motor driver destroyed?posted in Duet Hardware and wiring
thanks to all
Do you have a source for a original TMC2660 chips? My favorite electronic store is out of stock....
-
RE: Motor driver destroyed?posted in Duet Hardware and wiring
@jay_s_uk Thanks for your help. I already use E1 for the second z-axis motor. Should I pay attention to something special if I buy a replacement chip?
-
RE: Motor driver destroyed?posted in Duet Hardware and wiring
Yes, of course:


The E0 driver is faulty.
-
Motor driver destroyed?posted in Duet Hardware and wiring
Hi
I'm not sure if I destroyed the extruder motor driver on my new Duet Wifi. After testing all functions, the extruder motor made some strange noises. I find out that the extruder phase cables are wrong connected to the 4pin connector. The Duet reported a Phase A short to ground error. After that I plugged in the cables correctly. Unfortunately the error still appears. The motors phase resistance is 3mOhm (both phases) as it should be. I also measured the phase resistance on the Duet board. One phase of the faulty motor output only have 3MOhm resistance. All other phases (also from the other correct working motor drivers) have a resistance of approximately 12MOhm.
Is the motor driver destroyed?
Many thanks in advance
Best regards
Michael
-
RE: Mesh Bed Leveling does not work (Core XY with 2 z-axis motors)posted in Tuning and tweaking
Hello Everyone
The problem is finally solved!!


I checked yesterday if the machine compensates the bed deviation correctly with a dial gauge attached to the z-axis. The result was at 3 corners very good (better than 0.02mm). At one corner around 0.05mm.
So I checked again the linear rails from the x-axis. I find out that the rails aren't aligned perfectly to each other. The result was that the bltouch get tilted and the offset isn't consistent over the hole travel length.
I aligned both rails and the issue is gone.
Thanks everyone who was helping me

-
RE: Mesh Bed Leveling does not work (Core XY with 2 z-axis motors)posted in Tuning and tweaking
Thanks for your post
To my knowledge a negative z-axis limit is not necessary. The limits in M208 are only applied to the g-code. Despite that, I changed it to Z-1. It doesn't make any difference.
I also put a G30 after the G32 on the first G29 probing point (left front corner). Now I have the first probing point at exactly 0.000mm.
I printed my test print again. at the left side the first layer is not sticking to the build plate. At the right side it's too close.. So this proves, that the firmware compensates in the negative direction. But it seems it compensates wrong values.
Next step will be to attach a dial gauge to measure the the z-axis travel. I will compare the effective values that the machine compensates. My test print will be adjusted to match the probing points.


-
RE: Mesh Bed Leveling does not work (Core XY with 2 z-axis motors)posted in Tuning and tweaking
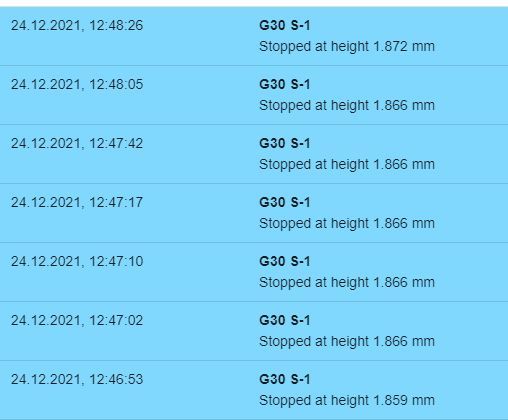
I did did some further tests. I use G30 S-1 to probe at the center and at one corner of the build plate. Those are the results:
center:
corner:
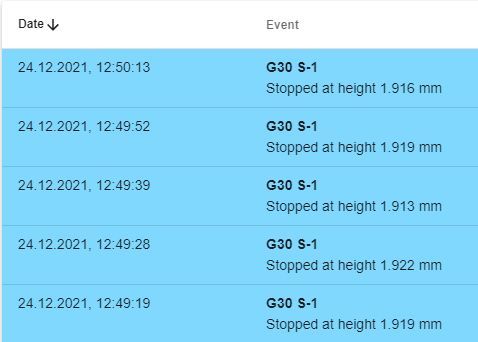
And I did another test where I pull on the cable in several directions (regarding the post from @gloomyandy ) The max. deviation I get is around 0.015mm.
I think this is a nice precision.
I also eliminate the G32 from the start code. With that the bed is around 0.5mm tilted. I started a print. I could see, that the machine do some compensating, but not enough.
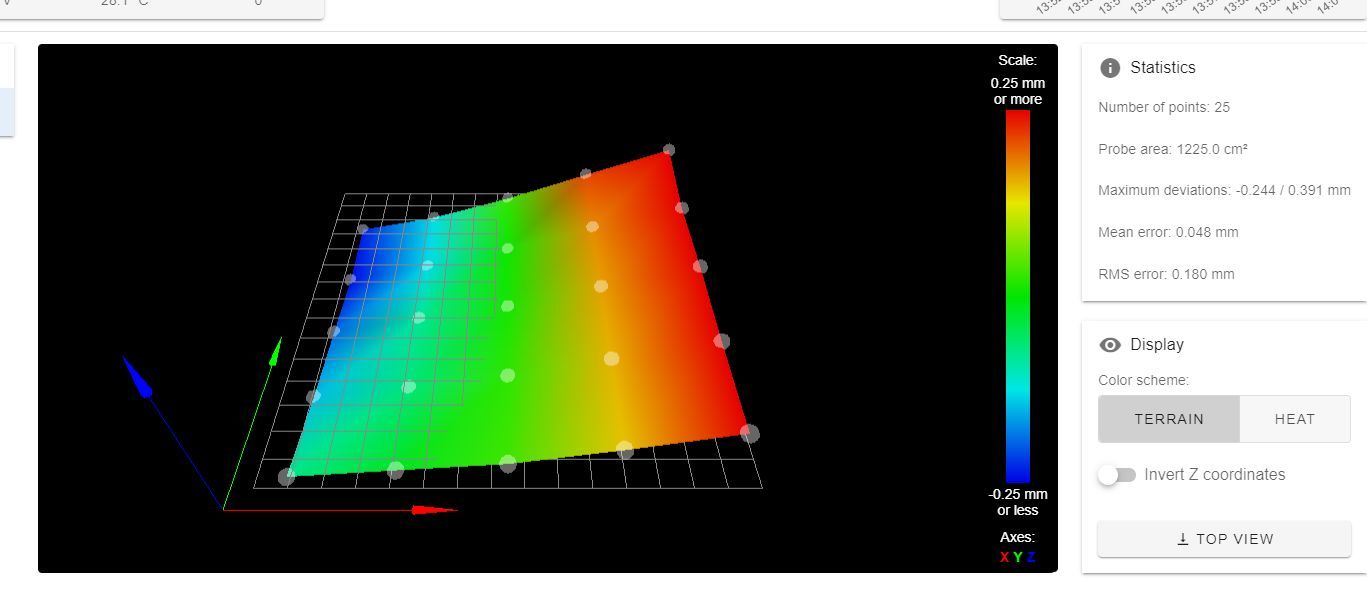
From my actual standpoint I would say that a mechanical cause is improbable. I asking me if something is wrong with my configuration or if it's really a firmware bug. Do we have a prove that the mesh bed leveling works with two independent stepper motors? Could it be, that reprap firmware only compensates 50% of the deviation because of the two motors? With one motor it compensates 100%?
-
RE: Mesh Bed Leveling does not work (Core XY with 2 z-axis motors)posted in Tuning and tweaking
Good Morning everyone

@JoergS5 I designed the heat bed with enough play for the heat expansion. I also printed the the supporting parts on the left and right side for the heat bed. Due to the plastic material, it's not that stiff and can be deformed. Secondly, if the length rises due to the heat expansion, the screw head is able to move in the cylinder countersink.
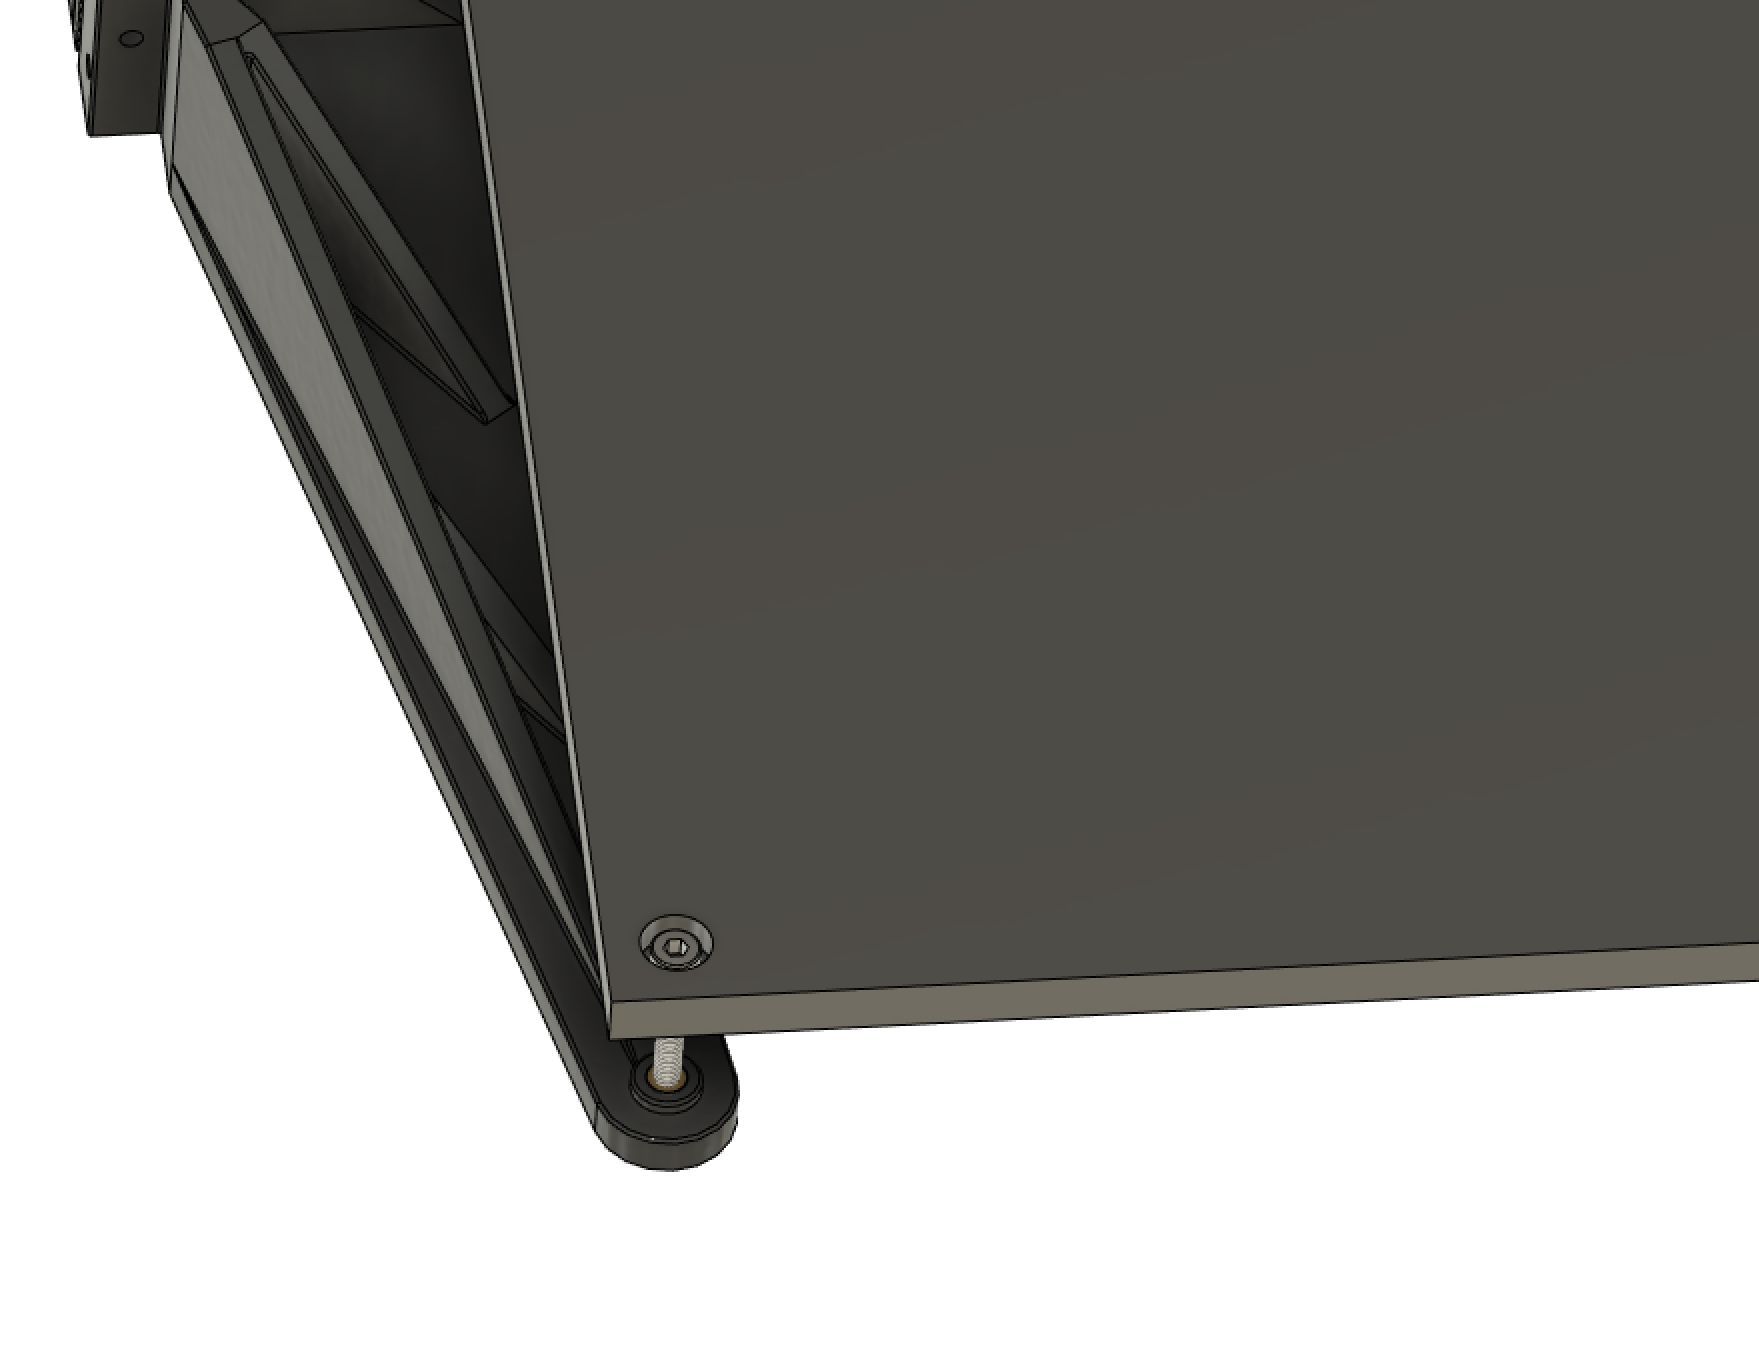
I did a few prints on this machine and they looking very good. Actual a 400mm high part. I believe, if I have a mechanical problem, the prints would't looking that nice.

https://www.youtube.com/watch?v=s3IA_d9eO8U
@Phaedrux Thanks. I have checked the mechanical system yesterday. I couldn't find any play or low stiffness. The x-axis is supported by two MGN9 rails. It's a lot stiffer than my second printer, who actually print very nice first layer...
Maybe it's time to change the BLTouch. I ordered it from Triangle Lab. Normally they sold very high quality products, but it's possible that the sensor isn't that precise as it should be.
I will do some probing points to see how good the repetitive precision is.
Many thanks for your help!
-
RE: Mesh Bed Leveling does not work (Core XY with 2 z-axis motors)posted in Tuning and tweaking
It's not a measurement error. The aluminium bed is flat (EN AW-5093 precision cast plate, also checked with a lineal). But it's possible to bend the plate with the 4 adjusting screws. For my opinion 0.2mm error for a 400x400mm plate is not that bad.
I have a second printer with a 350x350mm bed and only one z-axis stepper motor (also Duet Wifi equipped, same firmeware version). I tested the bed leveling with the same test part. On this machine the bed leveling works normal and the first layer is perfect over the hole area. The flatness of the bed is around 0.2mm..
After that I compared the start g code from my prusa slicer. I could notice some differences. But for today it's enough tested

 Maybe I have more luck tomorrow...
 -
RE: Mesh Bed Leveling does not work (Core XY with 2 z-axis motors)posted in Tuning and tweaking
Yes, Tesa really produces very high quality measurement equipment

I modified the probing area with more points. But it also doesn't help. I also print some smaller test parts (cubic with 280mm x 280mm). With this dimensions the part is 100% in the probed area. Same result...
I also checked with the dial gauge the travel of the z-axis. Both motors compensate some deviation. The direction should be also fine. But it was not able to compare the z-axis absolute travel measured by the dial gauge with the height map. It seems that the printer compensate some deviation, but no enough..
I use a belt driven gearbox for the z-axis (4:1). I will check the backlash of the axis.
actual printing result:

height map for this part:
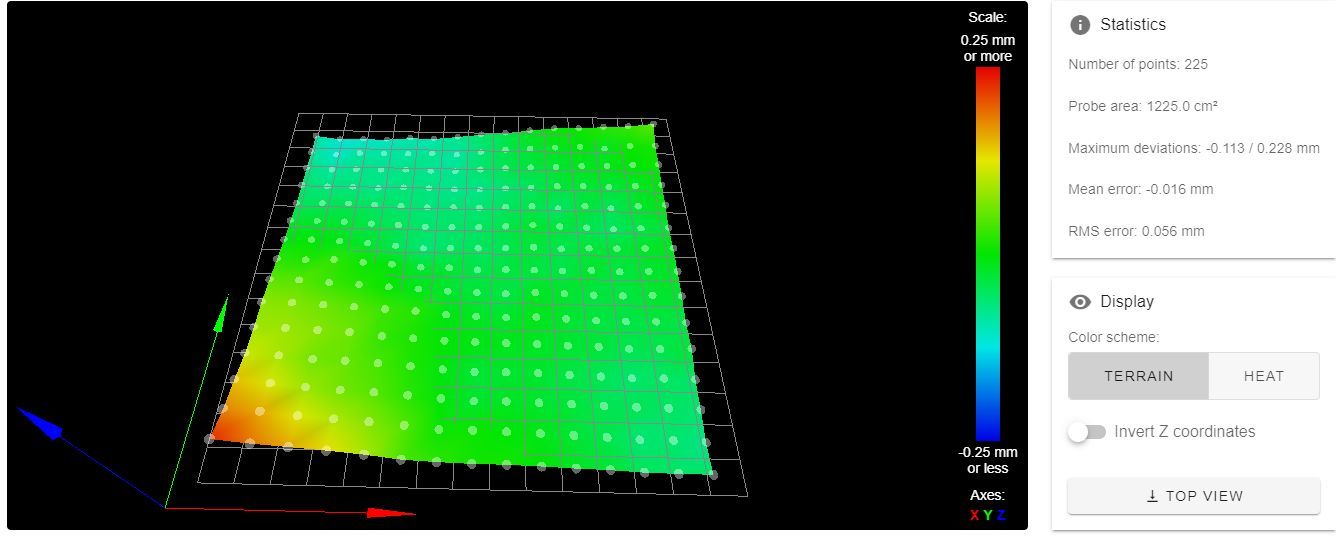
One thing confused me: at the left front corner, the layer should stick very good (+0.2mm offset), the nozzle should have nearly zero gap without mesh bed compensating (if I print at 0.2mm layer height). But actually the layer is too far away from the build plate... I don't understand this...
I will run a print with disabling mesh bed compensation
-
RE: Mesh Bed Leveling does not work (Core XY with 2 z-axis motors)posted in Tuning and tweaking
My conclusion after a few tests....:
- the printer compensates now some z-axis deviation. I put a dial gauge on the heat bed. I could see, that the z-axis moves during the printing. But the nozzle touches the bed at one corner. At the other corner the first layer is somewhere in the air... It seems that It compensates in the wrong direction... How is this possible? G32 works fine, it compensates in the correct direction.
The BL Touch is placed behind the nozzle, only y-axis offset:

some other pictures:


Heightmap:

@joergs5 said in Mesh Bed Leveling does not work (Core XY with 2 z-axis motors):
printing outside mesh probing M557 X50:350 Y50:350 S50
Whats actually happens if I print outside the probing area?
-
RE: Mesh Bed Leveling does not work (Core XY with 2 z-axis motors)posted in Tuning and tweaking
I checked the following things:
M122 during probing:
DMs created 83, maxWait 9ms, bed compensation in use: none, comp offset 0.000M122 during printing:
DMs created 83, maxWait 18ms, bed compensation in use: mesh, comp offset 0.000this is the tool section from the config..g:
; Tools
M563 P0 S"Dragon Hotend" D0 H1 F0                      ; define tool 0
G10 P0 X0 Y0 Z0                                        ; set tool 0 axis offsets
G10 P0 R0 S0                                           ; set initial tool 0 active and standby temperatures to 0C
I add a T0 to my g-code file:
; generated by PrusaSlicer 2.4.0-beta1+win64 on 2021-12-22 at 12:54:39 UTC

;

; external perimeters extrusion width = 0.45mm
; perimeters extrusion width = 0.45mm
; infill extrusion width = 0.45mm
; solid infill extrusion width = 0.45mm
; top infill extrusion width = 0.40mm
; first layer extrusion width = 0.45mm

M107
;TYPE:Custom
T0;
M140 S55; set bed temp
M190 S55; wait for bed temp
G32
M104 S220; set extruder temp
G29 S0;
G1 Z30 F5000;
G1 X10 Y0 F30000;
M109 S220; wait for extruder temp
G92 E0 ; reset extrusion distance
G1 Z10 F1000;
G1 X50 Z1 F1000;
G1 X100 Z0.4 F1000 E15;
G1 X200 F1000 E22;


G21 ; set units to millimeters
G90 ; use absolute coordinates
M82 ; use absolute distances for extrusion
G92 E0
M572 D0 S0.05;
I will modify the gcode to your ideas.
Actually I can't see any z-axis compensating during the print....
-
RE: Mesh Bed Leveling does not work (Core XY with 2 z-axis motors)posted in Tuning and tweaking
I tried this several minutes ago, but It doesn't help:
; generated by PrusaSlicer 2.4.0-beta1+win64 on 2021-12-22 at 12:54:39 UTC

;

; external perimeters extrusion width = 0.45mm
; perimeters extrusion width = 0.45mm
; infill extrusion width = 0.45mm
; solid infill extrusion width = 0.45mm
; top infill extrusion width = 0.40mm
; first layer extrusion width = 0.45mm

M107
;TYPE:Custom
G29 S2;
M140 S55; set bed temp
M190 S55; wait for bed temp
G32
M104 S220; set extruder temp
G29 S0;
G1 Z30 F5000;
G1 X10 Y0 F30000;
M109 S220; wait for extruder temp
G29 S1;
G92 E0 ; reset extrusion distance
G1 Z10 F1000;
G1 X50 Z1 F1000;
G1 X100 Z0.4 F1000 E15;
G1 X200 F1000 E22;


G21 ; set units to millimeters
G90 ; use absolute coordinates
M82 ; use absolute distances for extrusion
G92 E0
M572 D0 S0.05;
M107
;LAYER_CHANGE
;Z:0.2
;HEIGHT:0.2
G1 E-1.2 F3600
G92 E0
G1 Z.2 F30000
G1 Z.4
G1 X10.225 Y10.225
G1 Z.2
G1 E1.2 F3600
;TYPE:External perimeter
;WIDTH:0.45
G1 F2100
G1 X389.775 Y10.225 E13.53342
G1 X389.775 Y389.775 E25.86685
G1 X10.225 Y389.775 E38.20027
G1 X10.225 Y10.285 E50.53174
G1 X10.975 Y10.975 F30000
G1 F2100
G1 X389.025 Y10.975 E62.81642
Clear height map a the begin, probing and at the loading it..
-
RE: Mesh Bed Leveling does not work (Core XY with 2 z-axis motors)posted in Tuning and tweaking
I removed the unnecessary commands. But it don't make any difference.
The probing works normal. I can also see the height map. But the printer does not use the height map during the print...