Duet3D Logo Duet3D
    • Tags
    • Documentation
    • Order
    • Register
    • Login
    1. Home
    2. Gerrard
    3. Posts
    • Profile
    • Following 0
    • Followers 0
    • Topics 17
    • Posts 77
    • Best 8
    • Controversial 0
    • Groups 0

    Posts made by Gerrard

    • RE: Blobs and zits - stuttering movement

      So, a quick follow up on this.

      Back story - the printer is a huge CoreXY built as a MVP (minimum viable product) - there have been a lot of short cuts taken, so I expect a bunch of problems.

      The job I was printing when I posted this was for a casting pattern - it took almost 6 full days to print, and the quality was very average. The blobs and zits were the biggest problem, but there were several horizontal bands that were several layers thick - kind of like the magic numbers problem scaled up a few layers.

      Anyway - I made the error of printing the whole job 2% too small :'(, so I'm now re-printing it. I took some feedback on board, tried a few test prints, and turned the settings up. I disabled the Accel and Jerk control in Cura, then tweaked the M5665 and M201 values on the duet while it was printing.
      We're now printing at 150mm/s (max), Jerk is 750mm/s, Accel is 700mm/s^2, and layer height has been increased to 0.32mm. All with the intention of speeding the print up firstly - and hopefully to get some improvements in quality...

      Well... Here's a before and after shot of the print at roughly the same point in the print.

      Before
      20210522_095133.jpg

      After
      20210530_091253.jpg

      It's not perfect, but it's a huge improvement.

      posted in Tuning and tweaking
      Gerrardundefined
      Gerrard
    • RE: Blobs and zits - stuttering movement

      @engikeneer - Thanks for the tips. Long story short, I've come to the settings I use now as a result of resolving earlier problems - for example, extruder and Z skipping because jerk was too high. Some of these problems have been resolved at the source, some haven't. Sounds like I need to go back to first principles and re-tune everything.

      posted in Tuning and tweaking
      Gerrardundefined
      Gerrard
    • RE: Blobs and zits - stuttering movement

      @engikeneer - now that you mention it, I noticed that cura jerk is set to 12mm/s, but duet is 2000mm/min (33mm/s).

      I had a problem a long time back where the extruder jerk or accel was too low, so the motion was fine, but occasionally it would have to wait for the extruder. From memory it was only on retracts though.

      Sadly, this is a huge job - 100+ hrs, so I'll have to wait until it finishes before I can try anything else.

      Here's the config.g file:

      ; Configuration file for Duet WiFi (firmware version 2.03)
      ; executed by the firmware on start-up
      ;
      ; generated by RepRapFirmware Configuration Tool v2.1.8 on Mon Mar 30 2020 11:14:18 GMT+1000 (Australian Eastern Standard Time)
      
      ; General preferences
      G90                                       ; send absolute coordinates...
      M83                                       ; ...but relative extruder moves
      M550 P"Point Zero CoreXY"                 ; set printer name
      
      M667 S1                                   ; select CoreXY mode
      
      ; Network
      M552 S1                                   ; enable network
      M586 P0 S1                                ; enable HTTP
      M586 P1 S0                                ; disable FTP
      M586 P2 S0                                ; disable Telnet
      
      ; Drives
      M569 P0 S1                                ; physical drive 0 goes backwards
      M569 P1 S1                                ; physical drive 1 goes forwards
      M569 P5 S1                                ; physical drive 5 goes backwards
      M569 P6 S1
      M569 P7 S1
      M569 P8 S1
      M569 P4 S0                                ; physical drive 3 goes backwards
      M569 P3 S1
      M584 X1 Y0 Z5:6:7:8 E4:3                  ; set drive mapping
      M671 X-60:-60:875:875 Y200:400:200:400 S5.0	    ; Set location of z leadscrews for independant bed levelling.
      M350 X16 Y16 Z16 E16:16 I1                   	; configure microstepping with interpolation 
      M92 X80.00 Y80.00 Z1600.00 E412.0:412.0         ; set steps per mm
      M566 X2000.00 Y2000.00 Z20.00 E5000.00:5000.0   ; set maximum instantaneous speed changes (mm/min)
      M203 X18000.00 Y18000.00 Z400.00 E5000:5000     ; set maximum speeds (mm/min)
      M201 X800.00 Y800.00 Z100.00 E2000.00:2000.00   ; set accelerations (mm/s^2)
      M204 P1200 T4000			  			  		; print and travel acceleration
      M906 X1600 Y1600 Z1200 E1200:1200 I30           ; set motor currents (mA) and motor idle factor in per cent
      M84 S30                                   ; Set idle timeout
      M593 F80				  				  ; Set Dynamic Acceleration Adjustment
      M572 D0 S0.06				  			  ; Set extruder pressure advance
      ;M915 P0:1 S5 F1 H200 R3			      ; Set up stall detection
      
      
      ; Axis Limits
      M208 X0 Y0 Z0 S1                          ; set axis minima
      M208 X740 Y800 Z750 S0                    ; set axis maxima Previous X860
      
      ; Endstops
      M574 X1 Y1 S1
      M574 Z0 S0                          	  ; set active high endstops
      M591 D0 P5 C3 R5:120 E20.0 S1		  	  ; Configure Laser filament sensor for extruder drive 0.
      
      ; Z-Probe
      M307 H3 A-1 C-1 D-1                       ; disable heater on PWM channel for BLTouch
      M558 P9 H5 F120 T6000                     ; set Z probe type to bltouch and the dive height + speeds
      G31 P500 X-21.6 Y9.4 Z0.85               ; set Z probe trigger value, offset and trigger height - refer to: https://duet3d.dozuki.com/Wiki/Gcode#Section_M564_Limit_axes
      M557 X40:740 Y40:780 S78                  ; define mesh grid - AS DESIGNED
      ;M557 X270:530 Y270:530 S52               ; define mesh grid - FOR TESTING ONLY
      M376 H10				  				  ; Set bed compensation taper (layers to fade out bed compensation)
      ;G29 S1
      
      ; Heaters
      M307 H0 B0 S1.00                          ; disable bang-bang mode for the bed heater and set PWM limit
      M305 P0 T100000 B4138 R4700 S"Bed"        ; set thermistor + ADC parameters for heater 0
      ;M140 H0 S75 R50
      M143 H0 S120                              ; set temperature limit for heater 0 to 120C
      M305 P1 T100000 B4138 R4700 S"Extruder 1" ; set thermistor + ADC parameters for heater 1
      M143 H1 S280                              ; set temperature limit for heater 1 to 280C
      M305 P2 T100000 B4267 R4700 S"Extruder 2" ; set thermistor + ADC parameters for heater 2
      M143 H2 S280                              ; set temperature limit for heater 1 to 280C
      
      M305 P101 S"Duet 2" T100000 B4725 R4700	  ; Duet 2 Drivers Over Temp Warning
      M305 P102 S"Duex 5" T100000 B4725 R4700	  ; Duex 5 Drivers Over Temp Warning
      
      ; Fans
      M106 P0 S0 I1 F25000 H-1 X255 B0.001             ; set fan 0 value, PWM signal inversion and frequency. Thermostatic control is turned on
      ;M106 P1 S0 I1 F25000 H-1 X255             ; set fan 1 value, PWM signal inversion and frequency. Thermostatic control is turned off
      M106 P2 S1 I0 F500 H-1
      
      ; Tools
      M563 P0 D0 H1 F0:1                          ; define tool 0
      G10  P0 X0 Y0 Z0                           ; set tool 0 axis offsets
      M563 P1 D1 H2 F0:1                          ; define tool 1
      G10  P1 X-20 Y00 Z0                          ; set tool 1 axis offsets
      G10  P1 S190 R150
      G10  P0 S190 R150                              ; set initial tool 0 active and standby temperatures to 0C
      
      ; Custom settings are not defined


      posted in Tuning and tweaking
      Gerrardundefined
      Gerrard
    • RE: Blobs and zits - stuttering movement

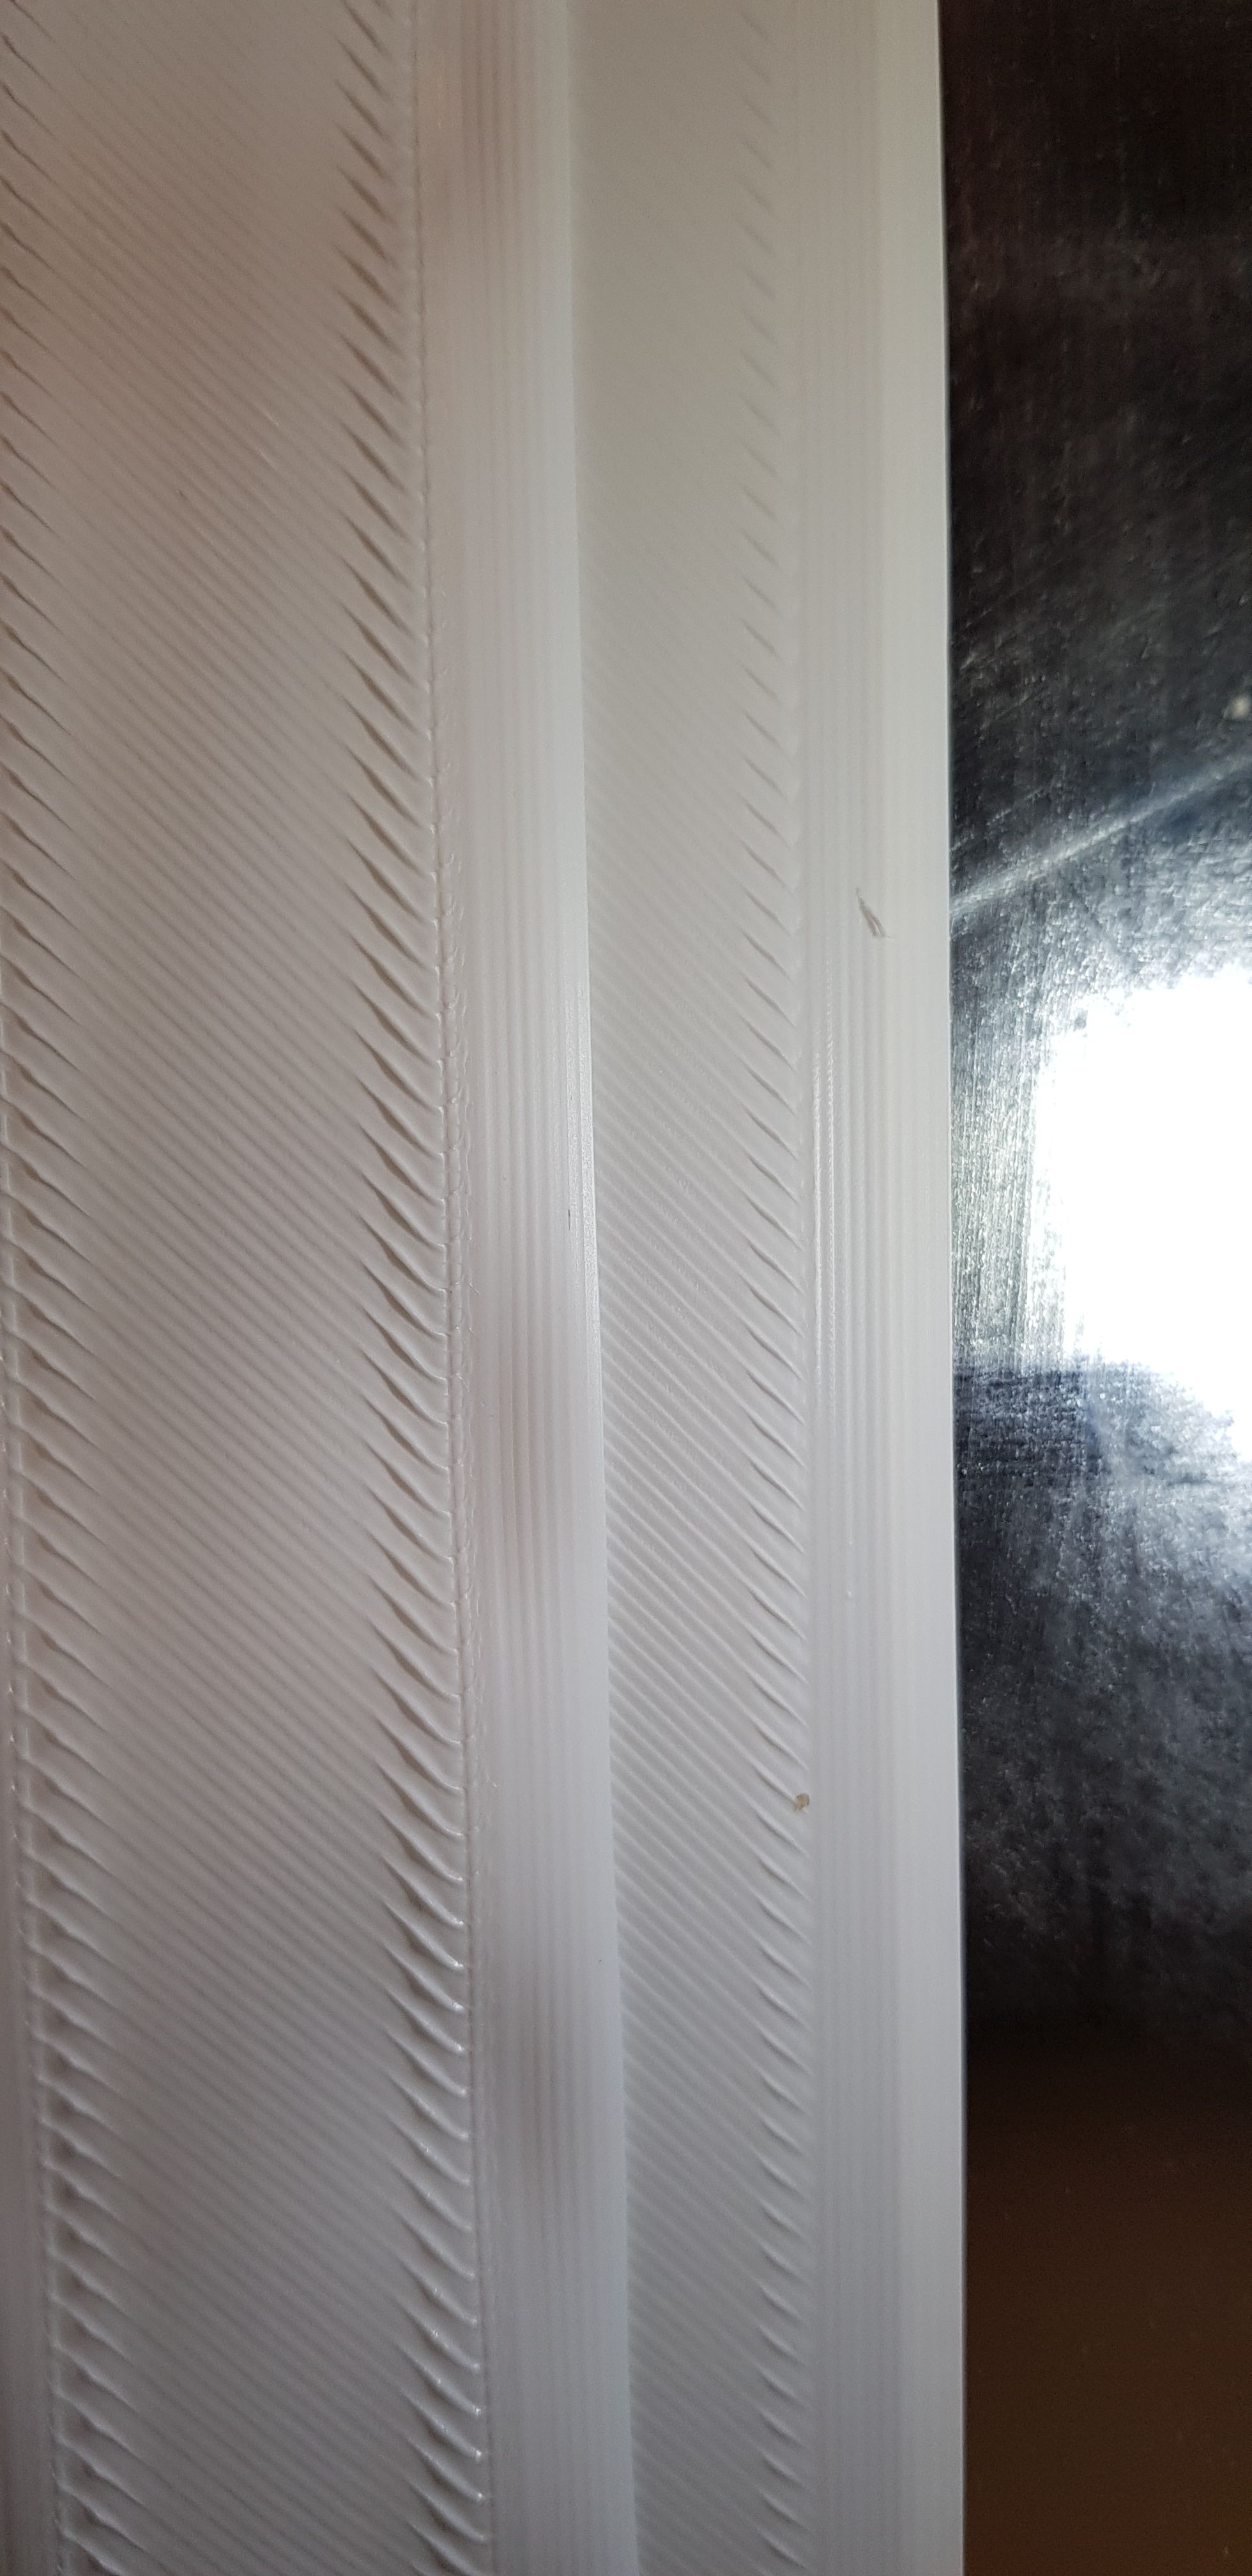
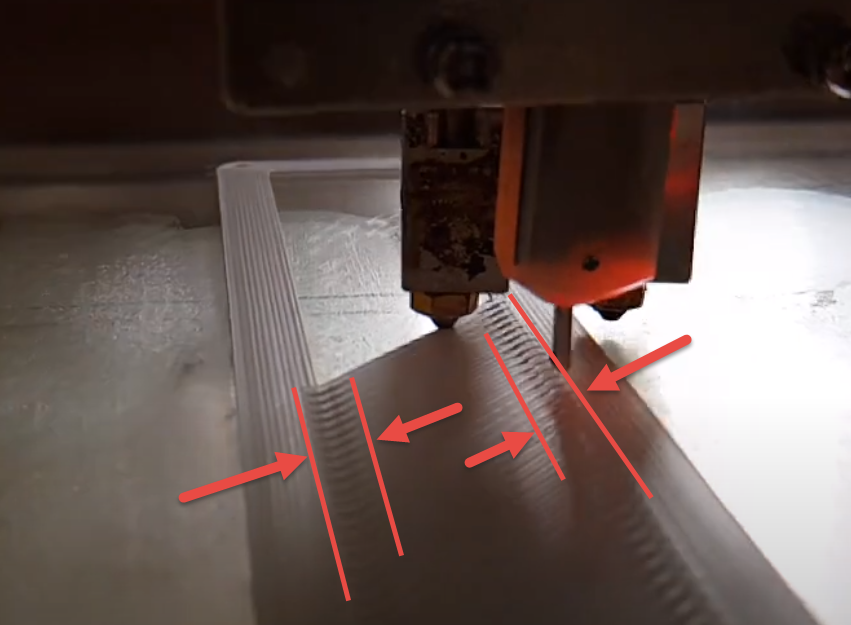
      @Marshal - Its hard to say if your problem is the same. I blame my issue on the slicer. I only have very simple start code - no M32 commands.

      M122 output below:

      M122: === Diagnostics ===
      RepRapFirmware for Duet 2 WiFi/Ethernet version 2.05 running on Duet WiFi 1.02 or later + DueX5
      Board ID: 08DJM-9178L-L2MSD-6JKD6-3S86K-19D2N
      Used output buffers: 1 of 24 (14 max)
      === RTOS ===
      Static ram: 25712
      Dynamic ram: 94484 of which 0 recycled
      Exception stack ram used: 520
      Never used ram: 10356
      Tasks: NETWORK(ready,596) HEAT(blocked,1232) DUEX(suspended,160) MAIN(running,1664) IDLE(ready,160)
      Owned mutexes:
      === Platform ===
      Last reset 78:43:40 ago, cause: power up
      Last software reset at 2021-05-20 18:12, reason: User, spinning module GCodes, available RAM 10404 bytes (slot 2)
      Software reset code 0x0003 HFSR 0x00000000 CFSR 0x00000000 ICSR 0x0441f000 BFAR 0xe000ed38 SP 0xffffffff Task 0x4e49414d
      Error status: 0
      Free file entries: 9
      SD card 0 detected, interface speed: 20.0MBytes/sec
      SD card longest block write time: 211.0ms, max retries 0
      MCU temperature: min 25.4, current 31.8, max 36.5
      Supply voltage: min 11.4, current 11.7, max 12.4, under voltage events: 0, over voltage events: 0, power good: yes
      Driver 0: ok, SG min/max 0/664
      Driver 1: ok, SG min/max 0/880
      Driver 2: standstill, SG min/max not available
      Driver 3: standstill, SG min/max not available
      Driver 4: standstill, SG min/max 0/1023
      Driver 5: standstill, SG min/max 0/418
      Driver 6: standstill, SG min/max 0/500
      Driver 7: standstill, SG min/max 0/387
      Driver 8: standstill, SG min/max 0/494
      Driver 9: standstill, SG min/max not available
      Date/time: 2021-05-24 19:55:28
      Cache data hit count 4294967295
      Slowest loop: 628.52ms; fastest: 0.07ms
      I2C nak errors 0, send timeouts 0, receive timeouts 0, finishTimeouts 0, resets 0
      === Move ===
      Hiccups: 0, FreeDm: 158, MinFreeDm: 97, MaxWait: 1487703ms
      Bed compensation in use: mesh, comp offset 0.000
      === DDARing ===
      Scheduled moves: 1909091, completed moves: 1909075, StepErrors: 0, LaErrors: 1454, Underruns: 0, 3
      === Heat ===
      Bed heaters = 0 -1 -1 -1, chamberHeaters = -1 -1
      Heater 0 is on, I-accum = 0.4
      Heater 1 is on, I-accum = 0.3
      === GCodes ===
      Segments left: 1
      Stack records: 2 allocated, 0 in use
      Movement lock held by null
      http is idle in state(s) 0
      telnet is idle in state(s) 0
      file is doing "G1 F6000 X387.506 Y471.215 E1.89808" in state(s) 0
      serial is idle in state(s) 0
      aux is idle in state(s) 0
      daemon is idle in state(s) 0
      queue is idle in state(s) 0
      autopause is idle in state(s) 0
      Code queue is empty.
      === Network ===
      Slowest loop: 204.40ms; fastest: 0.00ms
      Responder states: HTTP(0) HTTP(0) HTTP(0) HTTP(0) FTP(0) Telnet(0) Telnet(0)
      HTTP sessions: 1 of 8
      - WiFi -
      Network state is running
      WiFi module is connected to access point 
      Failed messages: pending 0, notready 0, noresp 0
      WiFi firmware version 1.21
      WiFi MAC address cc:50:e3:e3:b1:11
      WiFi Vcc 3.28, reset reason Turned on by main processor
      WiFi flash size 4194304, free heap 16232
      WiFi IP address 192.168.0.112
      WiFi signal strength -55dBm, reconnections 0, sleep mode modem
      Socket states: 0 0 0 0 0 0 0 0
      === Filament sensors ===
      Extruder 0: pos 0.84, errs: frame 187 parity 4 ovrun 71 pol 348 ovdue 0
      
      posted in Tuning and tweaking
      Gerrardundefined
      Gerrard
    • Blobs and zits - stuttering movement

      Hi All,

      I'm been debugging a new build, and I have a problem that I've allowed to hang around for a little while, but my current print is suffering more than others so I need it solved.

      I suspect it's a slicer problem, so I've posted it one the Cura foums but I know there is plenty of knowledgeable users here who might be able to help.

      So apologies for referring you to the Cura forums here:

      https://community.ultimaker.com/topic/37053-blobs-and-zits-stuttering-movement/

      Thanks and advance

      posted in Tuning and tweaking slicer cura
      Gerrardundefined
      Gerrard
    • RE: Have you ever observed this layer thickness problem?

      The problem has a distinctly "hysteresis" feel about it. That is to say, that travelling in one direction does not result in the same path as movement in the other direction. Belt tension would be an easy culprit for this problem, but as such, it's the first one to be resolved.

      Here's what I suggest. Isolate travel direction as the problem - Print a simple thin walled square (50x50 should do), go CW for 10-20 layers, then CCW for 10-20 layers. If hysteresis is the problem you should get the same bands appearing with direction change. I imagine you'll need to generate this code manually to control the travel direction.

      If this occurs, you'll need to look for anything that gives you some uncontrolled movement - it could be as subtle as flexibility in the hot end, or a pulley (or many pulleys in the case of a CoreXY) that move slightly on their shaft. Remember you're looking for problems that add up to a total of a fraction of a line width - so perhaps 0.1mm or less.

      Best of luck.

      posted in Tuning and tweaking
      Gerrardundefined
      Gerrard
    • RE: Bed mesh zero reference point?

      @sirkris, Firstly, this isn't a problem, it shouldn't effect your print. Someone else will be able to confirm, but I suspect the reference point is taken as the average (or some other normalization) of all z heights - which may mean no single point on your bed is Z 0.000mm.

      Download your heightmap.csv file (from the /sys folder), and take a look at your Z values - you may be able to figure out how it's rationalised.

      posted in Tuning and tweaking
      Gerrardundefined
      Gerrard
    • RE: Slow motion hot end shows complex movement - why?

      @Phaedrux, I've run the pressure advance script (here) several times, and I've picked a value that gives the best results (0.025 in my case), but it hasn't helped. Based on the explanation here it seems that pressure advance is simply a multiplier applied to the acceleration - a higher number means more extrusion during acceleration/deceleration.
      In my observations however, As I increased the pressure advance value, I noticed that the mid-line regions (constant speed regions) became under extruded - for higher values the lines wouldn't touch. For low values I noticed that the ends became shorter - and for really low values not quite touching the perimeter lines.

      To be honest, I've only tested this "on the fly", and I haven't dedicated any real time to it, so it's possible that other effects are at play.

      The main intent of exploring this avenue was to explain my observation that the motor went backwards slightly - job done.

      posted in Tuning and tweaking
      Gerrardundefined
      Gerrard
    • RE: Using bed leveling screws with independent z motors

      @CaLviNx "Best approach" is subject to perspective. I agree with @Piet here - you build the most light weight frame that you can (because it's cheaper) and you let the software/hardware smarts take care of the rest for you - because it can. It's very normal for machines to require commissioning before being ready for use.

      Remember that 3 points is the most stable, only if you assume a rigid body. In real life "rigid" doesn't exist. All bodies are elastic to some extent.

      posted in General Discussion
      Gerrardundefined
      Gerrard
    • RE: Slow motion hot end shows complex movement - why?

      Mystery solved.

      I started working with @Phaedrux's suggeestion of using Slic3r, and I noticed that they didn't have a "Lines" pattern for the top/bottom layers. So in order to keep the test fair, I used "zig zag" in Cura to keep the playing field level.

      During the test print, I immediately noticed that the stepper wasn't going backwards any more - So I came back to Cura and realised that "Travel" moves were turned off. You can see in the image below, small joining moves that extend horizontally. So, the motor is going backwards, but only because of the CoreXY geometry. A Cartesian printer wouldn't see the same effect.

      2020-11-19_18-37-07.png

      Here's the same print, sliced with the "Zig Zag" pattern instead.
      2020-11-19_18-37-43.png

      so after all that - did it help?
      Yes - but only slightly.

      The image below shows the Lines pattern on the left, and the Zig zag pattern on the right. I've used the lighting here to show that the lines pattern has slightly higher ridges, whereas the zig zag pattern is flatter. It's not a huge difference to the touch though, but its visually cleaner.
      For what it's worth, this was done with a 0.8mm nozzle too, so the effect would be lesser on a 0.4mm nozzle.

      20201119_190614.jpg

      posted in Tuning and tweaking
      Gerrardundefined
      Gerrard
    • RE: Slow motion hot end shows complex movement - why?

      @Phaedrux said in Slow motion hot end shows complex movement - why?:

      easiest way would be to compare to a print sliced in a different slicer. Slic3r for expample.

      I'll have to give this a go later...

      @PCR said in Slow motion hot end shows complex movement - why?:

      Can you Upload the Test gcode?

      Here's the file I'm currently printing - the same one the videos came from.
      CFFFP_base jack.gcode

      posted in Tuning and tweaking
      Gerrardundefined
      Gerrard
    • RE: Slow motion hot end shows complex movement - why?

      @Phaedrux: Using Cura 4.7.1. There's nothing obvious in the preview - hence why I figured it was a duet config thing. I know there's a few smarts in the Duet that I don't understand yet, so I was kind of expecting an easy solve.
      It's definitely a deliberate move... I haven't looked, but I expect that it occurs on (almost?) all moves. but it's most easily observable in this case due to repetition of moves.

      2020-11-19_10-27-08.png

      posted in Tuning and tweaking
      Gerrardundefined
      Gerrard
    • Slow motion hot end shows complex movement - why?

      Hi All,

      I've been trying to diagnose and eliminate the small ridges you get near the end of a line on the top/bottom surface of a print (see pic below).

      2020-11-19_9-26-38.png

      I've seen the suggestion that it's related to pressure advance, but I've tried tuning this a few times, and my settings look great in some areas, but this artifact has never changed.

      I decided to take some slo motion footage of my hot end this morning to focus on an observation that I made whereby the hot end is moving back before it moves forward. (1 step back, 2 steps forward so to speak).

      Here's a video of the hotend: https://youtu.be/YFrgpzjwwSo

      Some portions of this motion are clearly deliberate, and some are due to the elasticity of the system (it's a very large CoreXY btw). There's a very small step where the nozzle seems to step forward (away from the camera), then bounce back toward the camera which pushes the little ridge up...
      EDIT: I was watching the machine after posting this, and the ridge gets pushed up as its decelerating toward the end of each line, not after it bounces (it does bounce, but that doesn't appear to be a problem). So this directly corresponds with the motion I'm observing at the motor (see below).

      Here's a video of what's happening at one of the motors (the one responsible for incrementing the line count): https://youtu.be/VTV4re0dDP4

      Here you can see that the motor steps backwards slightly before progressing forward.

      Now, it's not clear in my mind whether these two observations are linked (though I struggle to see how they're not). (Edit: Now it is). So, my questions are:

      • What causes the nozzle to bounce back like we see in the first video; OR
      • Is there a setting that compensates for this effect?
      • Why is the stepper motor moving backwards before it moves forward?
      • Is there any other explanation to what I'm observing?

      I thought it might have been DAA (M593), so I disabled that and it had no effect.

      Here's my Config.g incase that helps.

      ; Configuration file for Duet WiFi (firmware version 2.03)
      ; executed by the firmware on start-up
      ;
      ; generated by RepRapFirmware Configuration Tool v2.1.8 on Mon Mar 30 2020 11:14:18 GMT+1000 (Australian Eastern Standard Time)
      
      ; General preferences
      G90                                       ; send absolute coordinates...
      M83                                       ; ...but relative extruder moves
      M550 P"Point Zero CoreXY"                 ; set printer name
      
      M667 S1                                   ; select CoreXY mode
      
      ; Network
      M552 S1                                   ; enable network
      M586 P0 S1                                ; enable HTTP
      M586 P1 S0                                ; disable FTP
      M586 P2 S0                                ; disable Telnet
      
      ; Drives
      M569 P0 S1                                ; physical drive 0 goes backwards
      M569 P1 S1                                ; physical drive 1 goes forwards
      M569 P5 S1                                ; physical drive 5 goes backwards
      M569 P6 S1
      M569 P7 S1
      M569 P8 S1
      M569 P4 S0                                ; physical drive 3 goes backwards
      M569 P3 S1
      M584 X1 Y0 Z5:6:7:8 E4:3                  ; set drive mapping
      M671 X-60:-60:875:875 Y200:400:200:400 S5.0	  ; Set location of z leadscrews for independant bed levelling.
      M350 X16 Y16 Z16 E16:16 I1                   	; configure microstepping with interpolation 
      M92 X80.00 Y80.00 Z1600.00 E412.0:412.0         ; set steps per mm
      M566 X2000.00 Y2000.00 Z20.00 E5000.00:5000.0   ; set maximum instantaneous speed changes (mm/min)
      M203 X18000.00 Y18000.00 Z400.00 E5000:5000     ; set maximum speeds (mm/min)
      M201 X800.00 Y800.00 Z100.00 E2000.00:2000.00   ; set accelerations (mm/s^2)
      M204 P1200 T4000			  			  		; print and travel acceleration
      M906 X1600 Y1600 Z1200 E1200:1200 I30           ; set motor currents (mA) and motor idle factor in per cent
      M84 S30                                   ; Set idle timeout
      M593 F80				  				  ; Set Dynamic Acceleration Adjustment
      M572 D0 S0.025				  			  ; Set extruder pressure advance
      ;M915 P0:1 S5 F1 H200 R3			      ; Set up stall detection
      
      
      ; Axis Limits
      M208 X0 Y0 Z0 S1                          ; set axis minima
      M208 X860 Y800 Z750 S0                    ; set axis maxima
      
      ; Endstops
      M574 X1 Y1 S1
      M574 Z0 S0                          	  ; set active high endstops
      M591 D0 P5 C3 R5:120 E20.0 S1		  	  ; Configure Laser filament sensor for extruder drive 0.
      
      ; Z-Probe
      M307 H3 A-1 C-1 D-1                       ; disable heater on PWM channel for BLTouch
      M558 P9 H5 F120 T6000                     ; set Z probe type to bltouch and the dive height + speeds
      G31 P500 X-21.6 Y9.4 Z1.842               ; set Z probe trigger value, offset and trigger height - refer to: https://duet3d.dozuki.com/Wiki/Gcode#Section_M564_Limit_axes
      M557 X40:800 Y40:760 S78                  ; define mesh grid - AS DESIGNED
      ;M557 X270:530 Y270:530 S52               ; define mesh grid - FOR TESTING ONLY
      M376 H10				  				  ; Set bed compensation taper (layers to fade out bed compensation)
      ;G29 S1
      
      ; Heaters
      M307 H0 B0 S1.00                          ; disable bang-bang mode for the bed heater and set PWM limit
      M305 P0 T100000 B4138 R4700 S"Bed"        ; set thermistor + ADC parameters for heater 0
      ;M140 H0 S75 R50
      M143 H0 S120                              ; set temperature limit for heater 0 to 120C
      M305 P1 T100000 B4138 R4700 S"Extruder 1" ; set thermistor + ADC parameters for heater 1
      M143 H1 S280                              ; set temperature limit for heater 1 to 280C
      M305 P2 T100000 B4267 R4700 S"Extruder 2" ; set thermistor + ADC parameters for heater 2
      M143 H2 S280                              ; set temperature limit for heater 1 to 280C
      
      M305 P101 S"Duet 2" T100000 B4725 R4700	  ; Duet 2 Drivers Over Temp Warning
      M305 P102 S"Duex 5" T100000 B4725 R4700	  ; Duex 5 Drivers Over Temp Warning
      
      ; Fans
      M106 P0 S0 I0 F25000 H1 T45               ; set fan 0 value, PWM signal inversion and frequency. Thermostatic control is turned on
      M106 P1 S1 I0 F500 H-1                    ; set fan 1 value, PWM signal inversion and frequency. Thermostatic control is turned off
      
      ; Tools
      M563 P0 D0 H1 F0                          ; define tool 0
      G10 P0 X0 Y0 Z0                           ; set tool 0 axis offsets
      M563 P1 D1 H2 F0                          ; define tool 1
      G10 P1 X-20 Y00 Z0                          ; set tool 1 axis offsets
      ;G10 P1 R190 S150
      ;G10 P0 R190 S150                              ; set initial tool 0 active and standby temperatures to 0C
      
      ; Custom settings are not defined


      Thanks in advance.

      posted in Tuning and tweaking
      Gerrardundefined
      Gerrard
    • RE: Using bed leveling screws with independent z motors

      Hi All,

      I've skimmed over this topic a little, but having just figured out this problem I thought I would add my 2c.

      I have a very large bed - roughly 800x800, with 16 manual adjustment screws (4x4 arrangement), and 4 independent Z motors.

      In my case, I have (at some point) needed to manually level both the lead screws, and the manual adjustment screw - I have also used G32 and G29 bed levelling.

      I partially agree that there is a hierarchy to bed levelling, which needs to be done after assembly, maintenance or a component failure (like a loose screw on a Z motor coupling for example?). With so many components there's plenty of opportunity for something to go wrong, so the correct procedure helps.

      I manually adjust the Z screws with the hot end close to the screws first - this gets the nozzle within a reasonable range for G32 to work its magic. Then I run G29 to do a mesh bed levelling - now that all 4 motors are coplanar this gives me a good idea on the flatness of the bed. If the min/max deviation of the mesh bed levelling is less than 1mm (an arbitrary number I've decided to use), then I'll leave it be - otherwise, I'll adjust the manual levelling screws...

      A more thorough method would be to look for a deviation greater than Xmm (some number) between any two neighboring points in the mesh bed levelling, but for now I'm satisfied with maximum deviation...

      On smaller printers like your typical 300x300 size, then I think a similar approach is easy enough to do, so it doesn't really matter whether it's necessary - do what ever you feel works best for you.

      posted in General Discussion
      Gerrardundefined
      Gerrard
    • RE: Pause print on driver overheat?

      I'm referring to an insurance policy, but i've made the suggested changes, so we'll see how it goes.

      posted in Duet Hardware and wiring
      Gerrardundefined
      Gerrard
    • RE: Independent lead screw bed levelling

      How about that... syntax was the problem!

      Thanks for the help

      2020-11-14_17-08-11.png

      posted in Tuning and tweaking
      Gerrardundefined
      Gerrard
    • RE: Pause print on driver overheat?

      @Phaedrux Sorry for the confusion... those 2100mA motors were for the X and Y.

      These are the motors for the Z axis.

      I take your point on motor current for these too - I've now set that to 1200mA (80% of 1500mA).

      Still doesn't give me a lot of confidence - if the Z motors fail again (and they could), then I have a guaranteed crash. But if there's nothing I can do about it, then so be it.

      posted in Duet Hardware and wiring
      Gerrardundefined
      Gerrard
    • RE: Independent lead screw bed levelling

      There's a few things here to digest, so I hope I've understood your points correctly.

      @Phaedrux said in Independent lead screw bed levelling:

      However, you're not using the independent lead screw leveling as described in that link, your just using bed.g to probe a list of points and make a fitted plane, which is just a crude for of mesh bed leveling.

      This is what I'm observing, but not what I expected.

      To do the leveling automatically you need to define the position of the lead screws in your config.g with M671 based on their location relative to 0,0. Then probe close as possible to them in bed.g.
      Isn't this what I've done in my config.g (above)?

      M671 X200,400,200,400 Y-60,-60,875,875 S5.0   ; Set location of z leadscrews for independant bed levelling.
      

      Oh... I think I have the coordinates wrong - some time ago my X and Y were rotated 90deg... my X and Y coordinates should be transposed.
      My coordinates are: (-60,200), (-60, 400), (875,400), (875,200)

      I take your point about the P2 Parameter - I've removed that. I misunderstood what was written in the wiki.

      Are the points probed in the same order as the drivers are listed in M584?

      No, drivers 5 and 6 are swapped for no particular reason. I'll correct that too.

      Agree with your order of operations - that's what I have been doing.

      So, with M671 correctly defined, is bed.g right?

      posted in Tuning and tweaking
      Gerrardundefined
      Gerrard
    • RE: Pause print on driver overheat?

      @Veti So the board is setup on a bench, with heat sinks and a fan blowing across - it's not ducted, but there's plenty of air flow.

      What would this macro look like?

      posted in Duet Hardware and wiring
      Gerrardundefined
      Gerrard
    • RE: Pause print on driver overheat?

      @Veti I do...

      I'm assuming there's nothing I can do about pausing...

      posted in Duet Hardware and wiring
      Gerrardundefined
      Gerrard