Duet3D Logo Duet3D
    • Tags
    • Documentation
    • Order
    • Register
    • Login
    1. Home
    2. oryhara
    3. Posts
    • Profile
    • Following 0
    • Followers 0
    • Topics 8
    • Posts 80
    • Best 8
    • Controversial 0
    • Groups 0

    Posts made by oryhara

    • RE: Smart Effector 8-pin cable connector failure

      @dc42

      I had a similar idea. its much bulkier than it needs to be for sure. I'm not obsessed with speed. I'd rather have rock-solid reliability.

      smart effector strain relief.png

      In use, I found the cables wiggled enough for the conductor within to break at the point where they are 'clamped' to the strain relief part(the 2 flat bars pictured clamp wires to the strain relief piece). I think I was also clamping it too tightly.

      posted in Smart effector for delta printers
      oryharaundefined
      oryhara
    • Smart Effector 8-pin cable connector failure

      I have observed numerous failures now of the 8-pin cable on my Smart Effector. I have seen this on 2 3.0 models and now a 4.0. The 4.0 has not completely failed yet, but I have seen some 'noise' in the temperature readings, especially when the printer is making small moves back and forth quickly, such as filling narrow areas.
      I crimp the 8-pin JST connector with the following tool according to its instructions:
      https://www.amazon.com/gp/product/B002AVVO7K/ref=ppx_yo_dt_b_search_asin_title?ie=UTF8&th=1

      The readings are without issue for quite some time, months maybe depending on how much I use the printer, but eventually become noisy and cause spikes and temperature faults during a print.

      Is there a way to glue the pins into the connector to provide some strain relief?
      Silastic or hot glue, maybe?

      The printer is an anycubic Predator, so the cable from the Duet 3 mini 5+ and the effector is about 1 meter long.

      I can provide further details about the cable and my attempts at strain relief if that would be helpful.

      posted in Smart effector for delta printers
      oryharaundefined
      oryhara
    • RE: Chamber heater plan

      @mrehorstdmd Yea i learned my lesson soldering the TCO doesn't work. did that with the first one.
      I bought a pack of ten off amazon so no safety certification at all. but at least I have spares.

      I tried a 220V fan initially but it wasn't 'cooling' the heater adequately. The back wall got too hot(for my comfort) and the thermistor didn't rise above 36C. So now its a 110V fan and yes it runs at full speed. 34CFM iirc the specs. Could be what was causing the warp since that happened 'downwind' of the general direction the fan is blowing. Maybe i'll move the whole assembly up a bit on that extrusion so its not blowing at the bottom of the print area there where it can cause problems with this object.

      I agree first layer adhesion is a different issue. that's why im trying again after cleaning the build surface well. It hadn't been done in a while so probably might have contributed to the adhesion problem.

      posted in General Discussion
      oryharaundefined
      oryhara
    • RE: Chamber heater plan

      the leads on the TCO aren't long enough to move it further out of the anderson connectors.
      Good idea on connecting the heater from below I'll get on that.
      But i can't put the heater in another orientation or it won't fit(without compromizing build volume) unless I move it to the top of the enclosure.
      The fan keeps the back wall cool by moving hot air off the heater so it doesn't make the back wall hot. It's really not that close despite the angle of the picture.
      The TCO should trip before the back wall melts according its melting temp. Granted I haven't tested that scenario. It doesn't get more than 'warm' to touch. you can see my hand smudges on the outside of the window in this picture.
      PXL_20201224_163255859.jpg
      That's taken with my phone right against the plexiglass.
      Though I guess if the fan fails then I might be in a pickle.

      My test print was a failure. It still warped. THen when I tried it with a brim it wouldn't even get the first layer down without peeling up.
      I'll try again later with a PEI build surface instead of this whatever-material that came with the printer. Or maybe I'll put down some ABS juice.

      posted in General Discussion
      oryharaundefined
      oryhara
    • RE: Chamber heater plan

      @mrehorstdmd said in Chamber heater plan:

      @oryhara Photo of the assembly?

      here's the SSR up top in the electronics area.
      SSR.jpg
      here's the heater and fan.
      The brackets made acquaintance with a belt sander to clean up the bandsaw cuts, per CalvinX's suggestion.
      PXL_20201224_115959820.jpg
      and the tco
      PXL_20201224_120003402.jpg
      It's not exactly like the wiring diagram. I'd rather the TCO killed just the heater and not the heater and fan but that cabling would be much more complicated.

      Now I'm testing how much warp i get on an ABS print by printing something that would totally warp without a chamber heater. This V-shaped shelf bracket:
      281a030d-bf54-4a74-8d61-4a98103dbace-image.png

      posted in General Discussion
      oryharaundefined
      oryhara
    • RE: Chamber heater plan

      It works. Took about 23 minutes to reach 50 degrees.
      I want to thank everyone here for their help.

      In case anybody wants to repeat my success, here is what I did:
      this heater element:
      https://www.mcmaster.com/3575K411/
      with this fan:
      https://www.mcmaster.com/1976K95/
      this SSR:
      https://www.amazon.com/gp/product/B07FVR37QN/ref=ppx_yo_dt_b_asin_title_o01_s00?ie=UTF8&psc=1
      this thermistor:
      https://www.amazon.com/gp/product/B07V6YBFSY/ref=ppx_yo_dt_b_asin_title_o01_s00?ie=UTF8&psc=1
      and this TCO:
      https://www.amazon.com/gp/product/B07JM2DB67/ref=ppx_yo_dt_b_asin_title_o04_s00?ie=UTF8&psc=1

      Wired them up per this diagram

      @mrehorstdmd said in Chamber heater plan:

      Wiring:

      alt text

      posted in General Discussion
      oryharaundefined
      oryhara
    • RE: DIY Filament Drybox

      this may be a stupid question, but why are you bothering to dry ABS?
      I thought ABS was hydrophobic and therefore won't absorb water.

      posted in 3D Printing General Chat
      oryharaundefined
      oryhara
    • RE: Chamber heater plan

      Yea bang-bang mode with manually-configured heater model worked ok.
      Well I say ok. The firmware ran it without complaint. But 20 minutes later and my chamber temp didn't read more than 36degrees. Running both bed and heater I expected more.
      And the clear panel nearest the heater element got too hot to touch and started to bow inward. Probably is too close.
      I think I need a more powerful fan on the heater element. the 220V is moving but probably not enough if its radiating heat like that and not getting hot air to the thermistor.

      Also my thermistor is in a metal casing which might be throwing off the reading by acting as a heat sink. maybe? I'm no expert. I bought this: https://www.amazon.com/DROK-Waterproof-Temperature-Thermistor-Transimitter/dp/B01MR37GOQ/ref=sr_1_6?dchild=1&keywords=thermistor&qid=1608467027&sr=8-6
      for my chamber heater sensor. maybe I should have bought a bare thermistor.

      Im going to order a 110V fan and see if that improves the chamber heater performance. 'cooling' the heater element faster should raise the ambient air temp in my enclosure faster. until they reach equilibrium. This base on my imperfect memory of high school science class. Of course there are losses to the air outside my enclosure based on the insulation effectiveness. My 1/8" clear plexiglass panels are not as good as corrugated ones. And my enclosure isn't perfectly airtight. There are holes for cabling.

      posted in General Discussion
      oryharaundefined
      oryhara
    • RE: Chamber heater plan

      still no joy with M303 but with a gain set nice and low M141 seems to be working ok. I set the model parameters manually per the instructions:
      https://duet3d.dozuki.com/Wiki/Tuning_the_heater_temperature_control#Section_Setting_the_model_parameters_manually

      so now I get to make it pretty.
      @CaLviNx you said something about a file? what needs filing?
      you want I should round off the corners of the mounting bracket?

      posted in General Discussion
      oryharaundefined
      oryhara
    • RE: Chamber heater plan

      @CaLviNx form follows function

      like i said I'll make it pretty when it works.
      which it doesn't at the moment. I can't get M303 to run because it heats so slowly, even with the bed at 100 degrees.

      @mrehorstdmd I'm curious how you got your chamber heater model to work, given you said it takes 20 minutes to get to 50C

      posted in General Discussion
      oryharaundefined
      oryhara
    • RE: Chamber heater plan

      @CaLviNx
      I'll make it pretty after i make it work. if it don't work it doesn't matter how pretty it looks.

      @mrehorstdmd It's not that close. about 50 or 60 mm away. The picture isn't at the best angle. and the fan duct is just to try and keep the fan from blowing right on the part.

      Update: I've got it wired up. now trying to get the heater tuned. The problem is the temp rise is so slow that m303 fails to detect any rise at all. I set the dead time to 60 seconds but i think i need to change the gain so the m303 will work.

      posted in General Discussion
      oryharaundefined
      oryhara
    • RE: Chamber heater plan

      I've got the heater and fan mounted in my enclosure. The effector just misses the brackets there at the edge of its travel.

      HeaterAndFan.jpg

      Now I just need to wire them up.

      posted in General Discussion
      oryharaundefined
      oryhara
    • RE: Chamber heater plan

      So my new plan is to use the bolt-mount heater and 220V fan like @mrehorstdmd setup. I ordered them yesterday before @macguyver 's post about stego heaters, which I agree would be the 'proper' way to heat my enclosure.

      I'm curious now how to place them.
      it's a delta, so the bottom is always where the print starts. I know heat rises, so bottom is the best placement.
      My question is fan placement. Should it aim at the print, the 0,0,0 coordinate, center of the build area?
      or I could point it along the side of the enclosure, basically perpendicular to being aimed at 0,0,0, and hope that the air will circulate around without directly blowing on my part.

      Is there conventional wisdom on direct vs indirect hot air blowing on a print? or does the low CFM from using a 220V fan at half its rated voltage mean where it aims is moot?

      posted in General Discussion
      oryharaundefined
      oryhara
    • RE: Chamber heater plan

      @mrehorstdmd what temperature would you recommend getting a TCO at?

      I've seen them all the way down to 60C but they were all non-resettable temperature fuses.

      I'm not overly concerned with the cost. I was just summing up the various things mentioned. I'm actually leaning towards the most expensive of the listed options because its the one that is intended for this use. "The right tool for the right job" and all that. Or maybe the heat lamp but I'm not sure I can fit that into my enclosure without compromising build volume or gantry travel.

      posted in General Discussion
      oryharaundefined
      oryhara
    • RE: Chamber heater plan

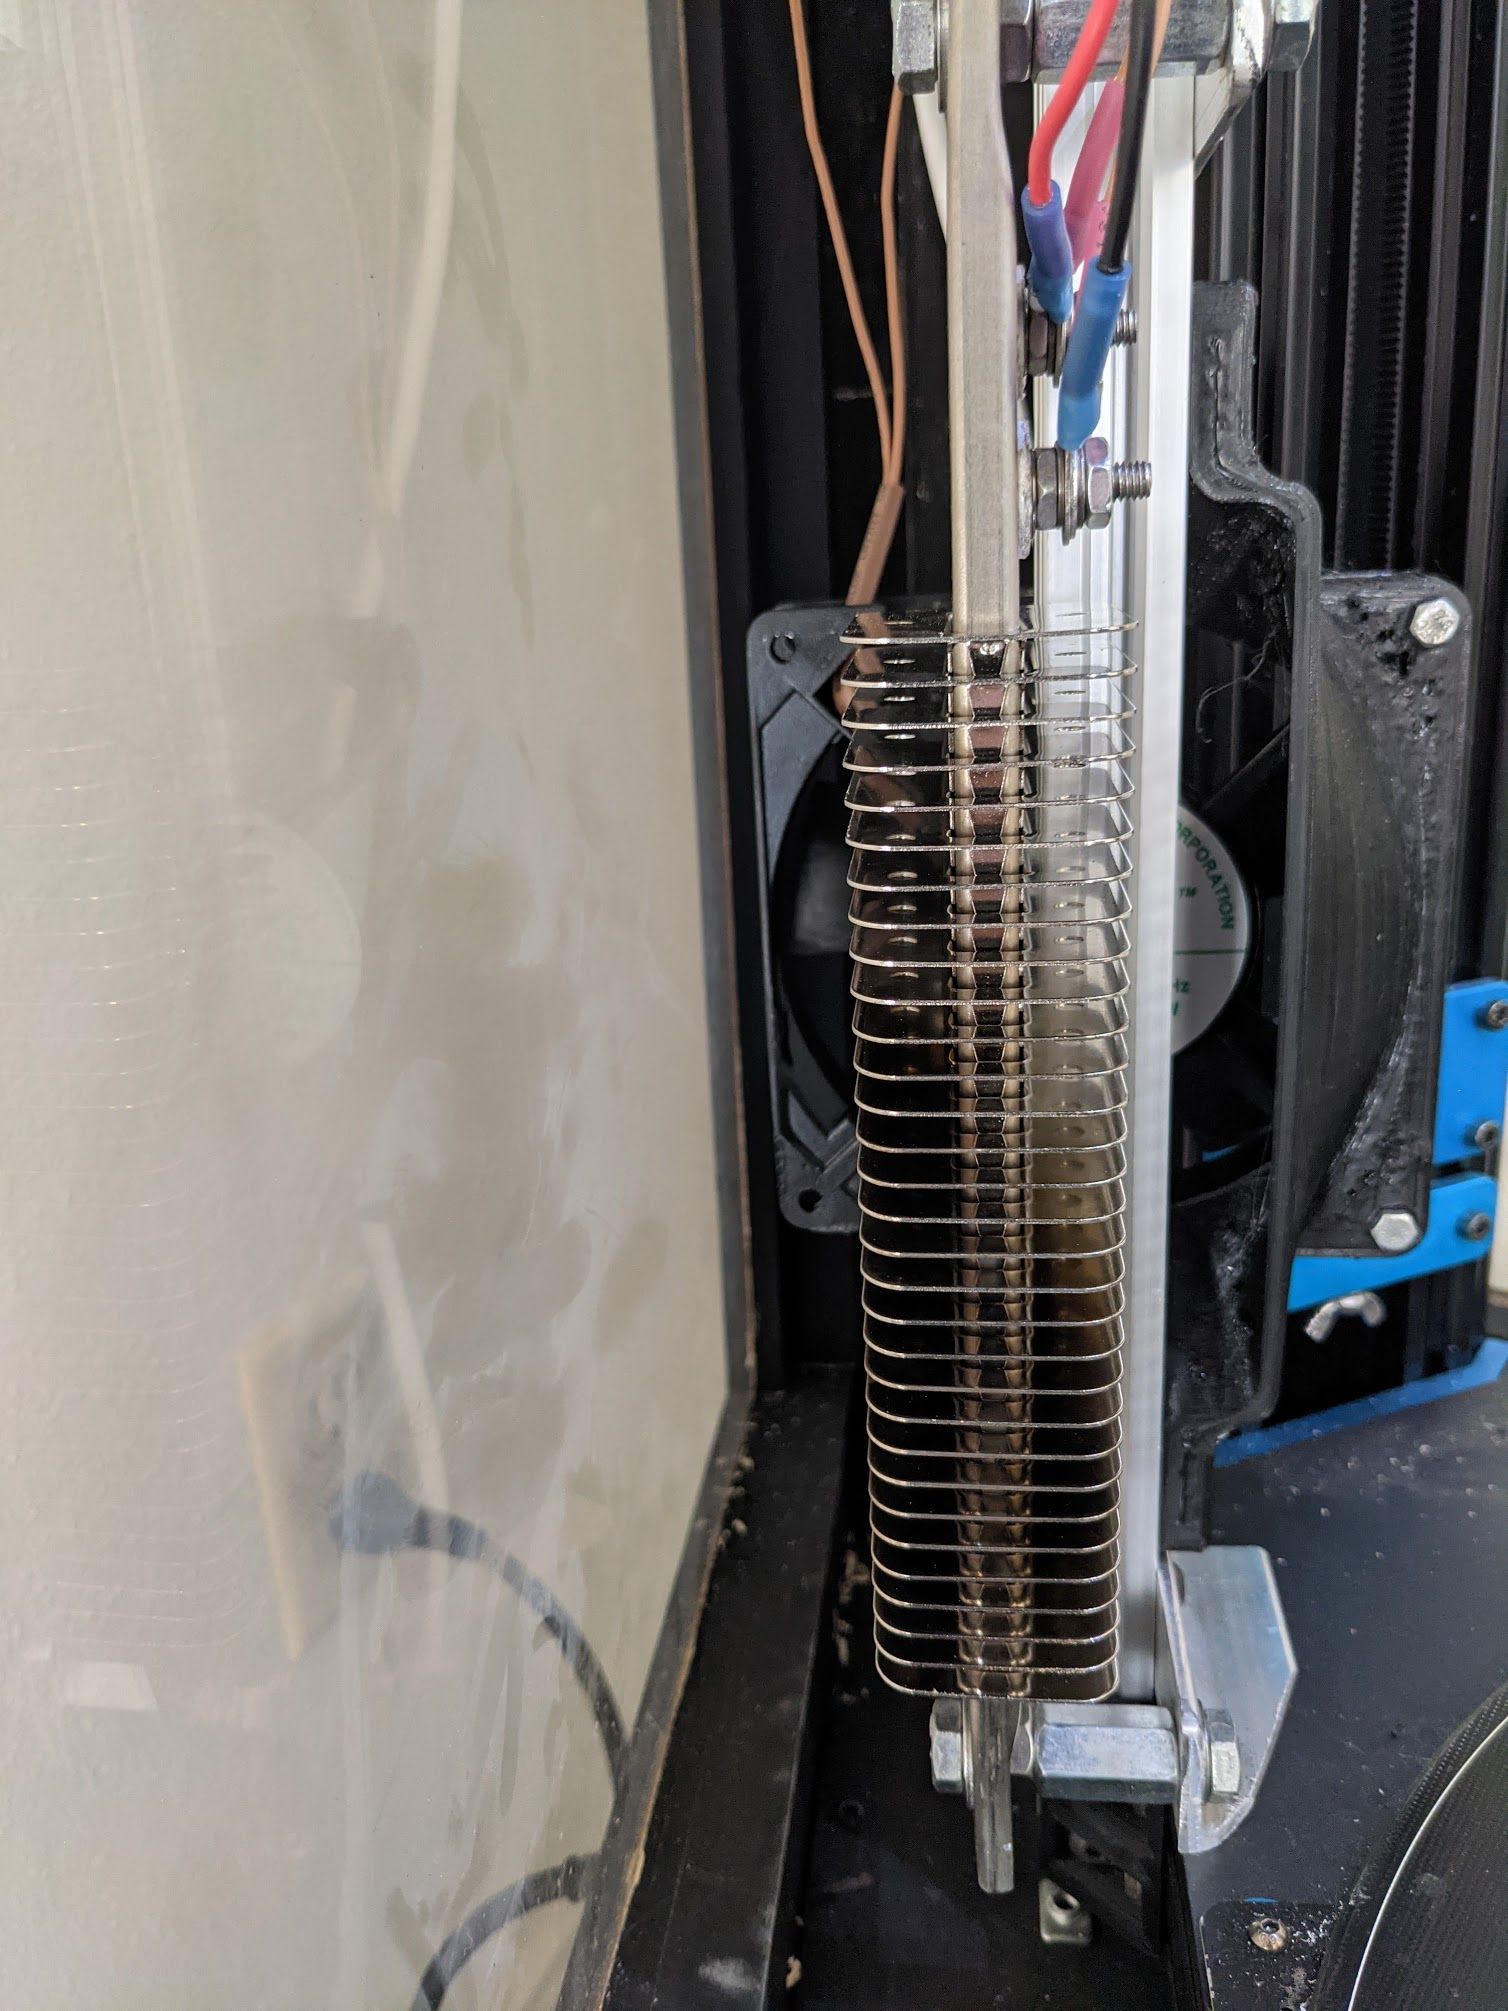
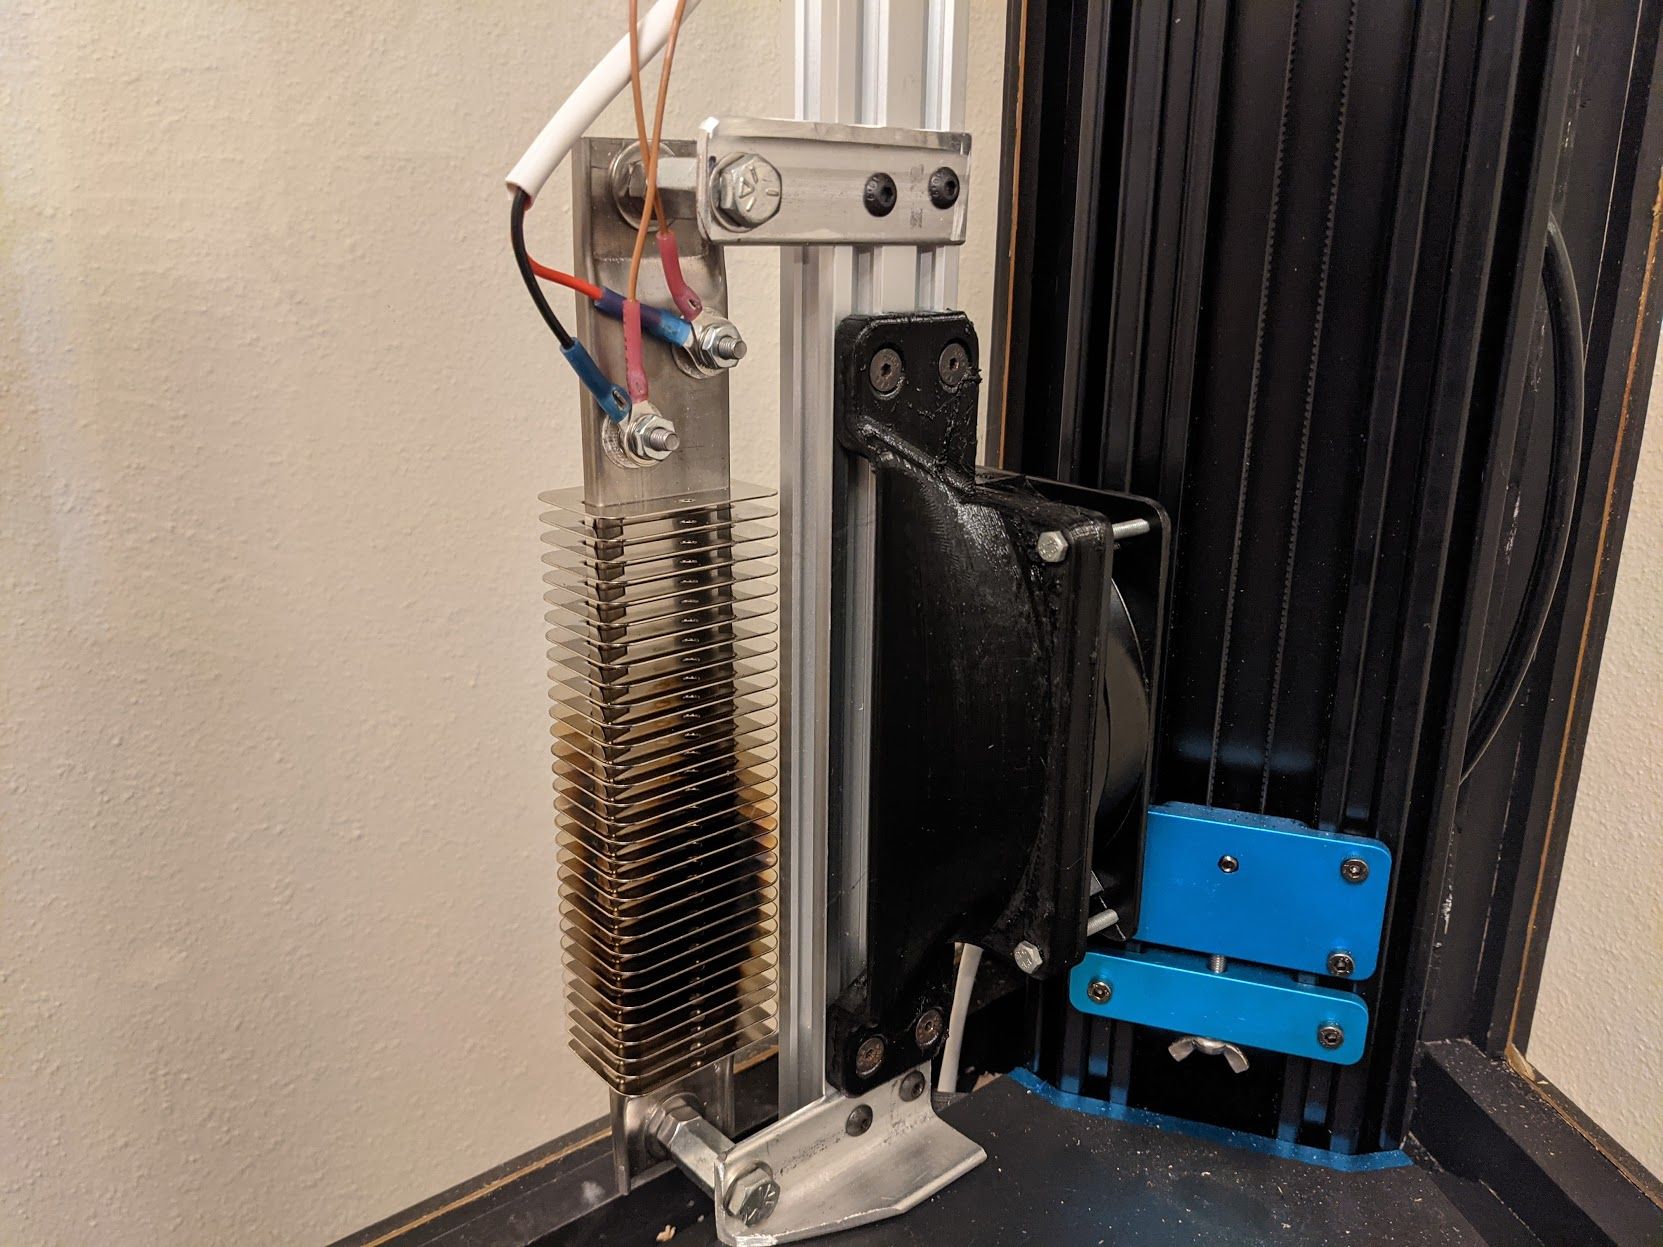
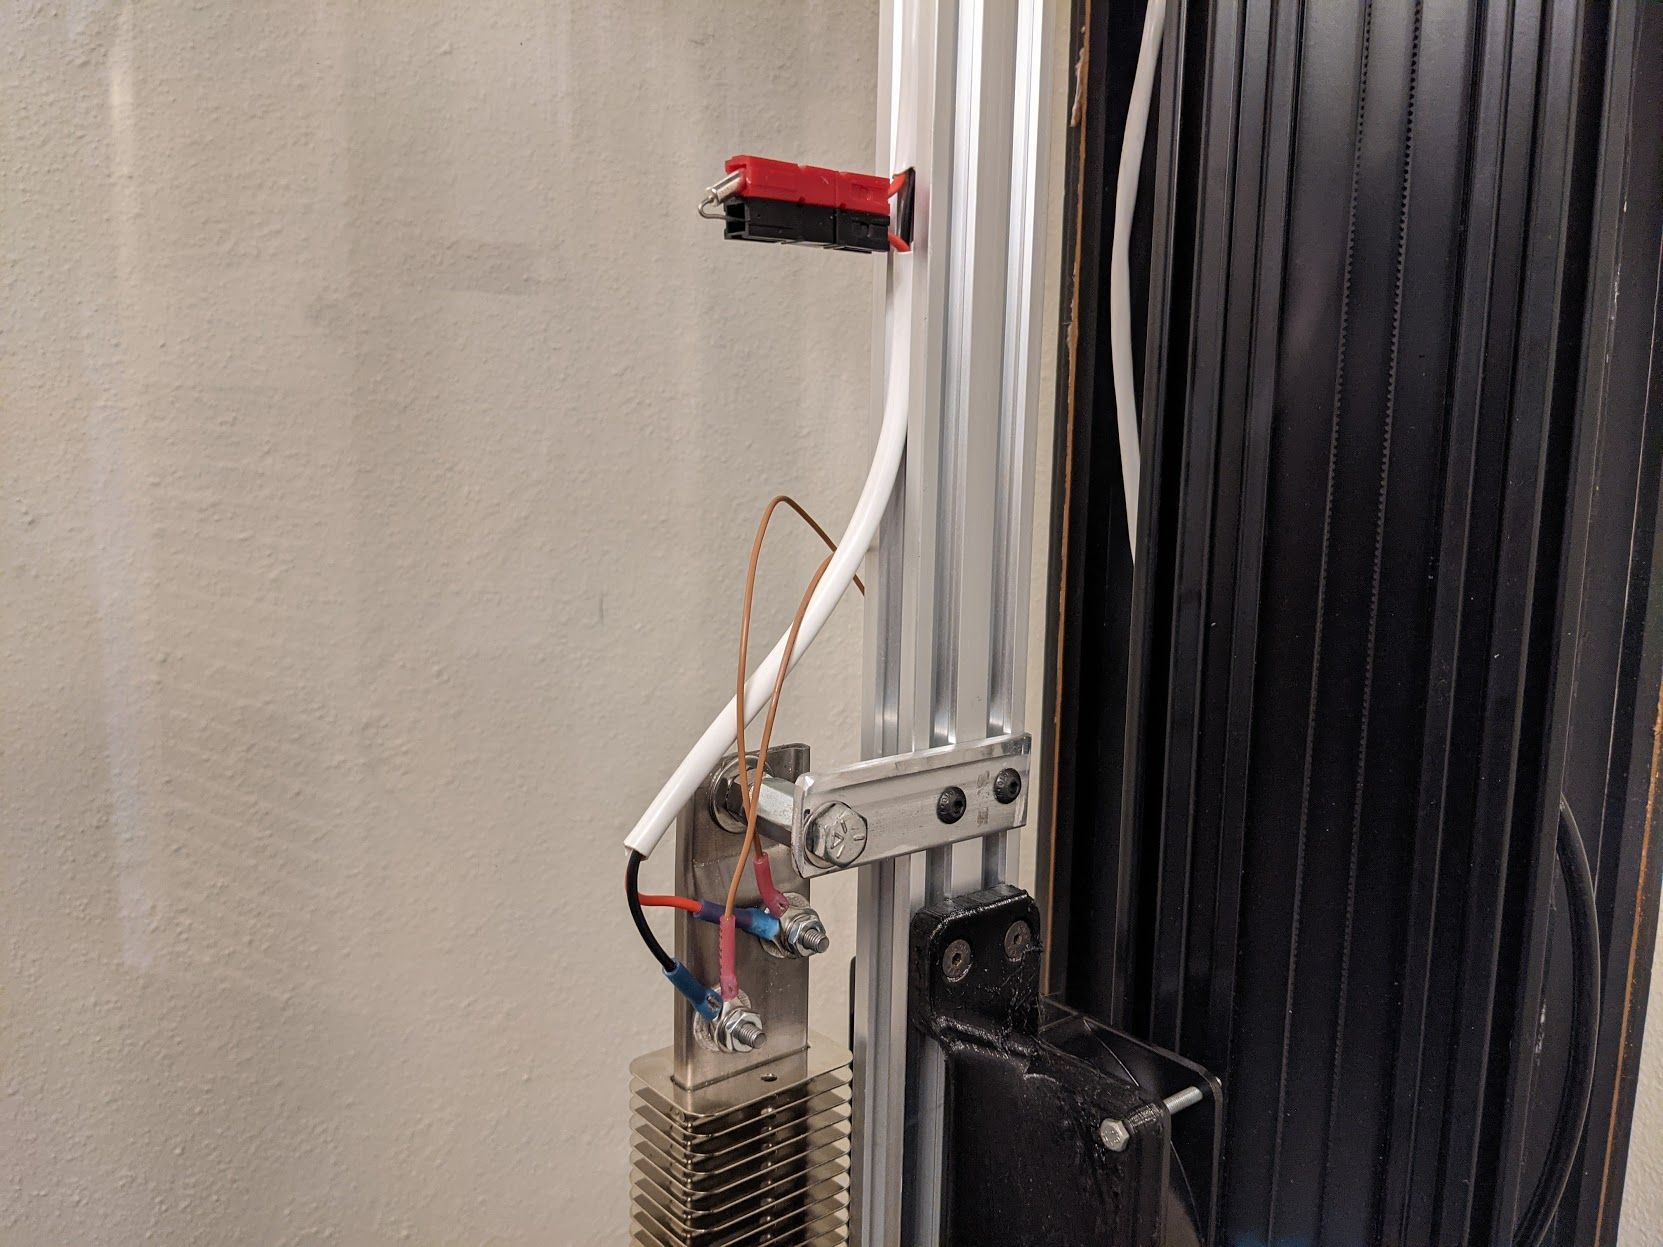
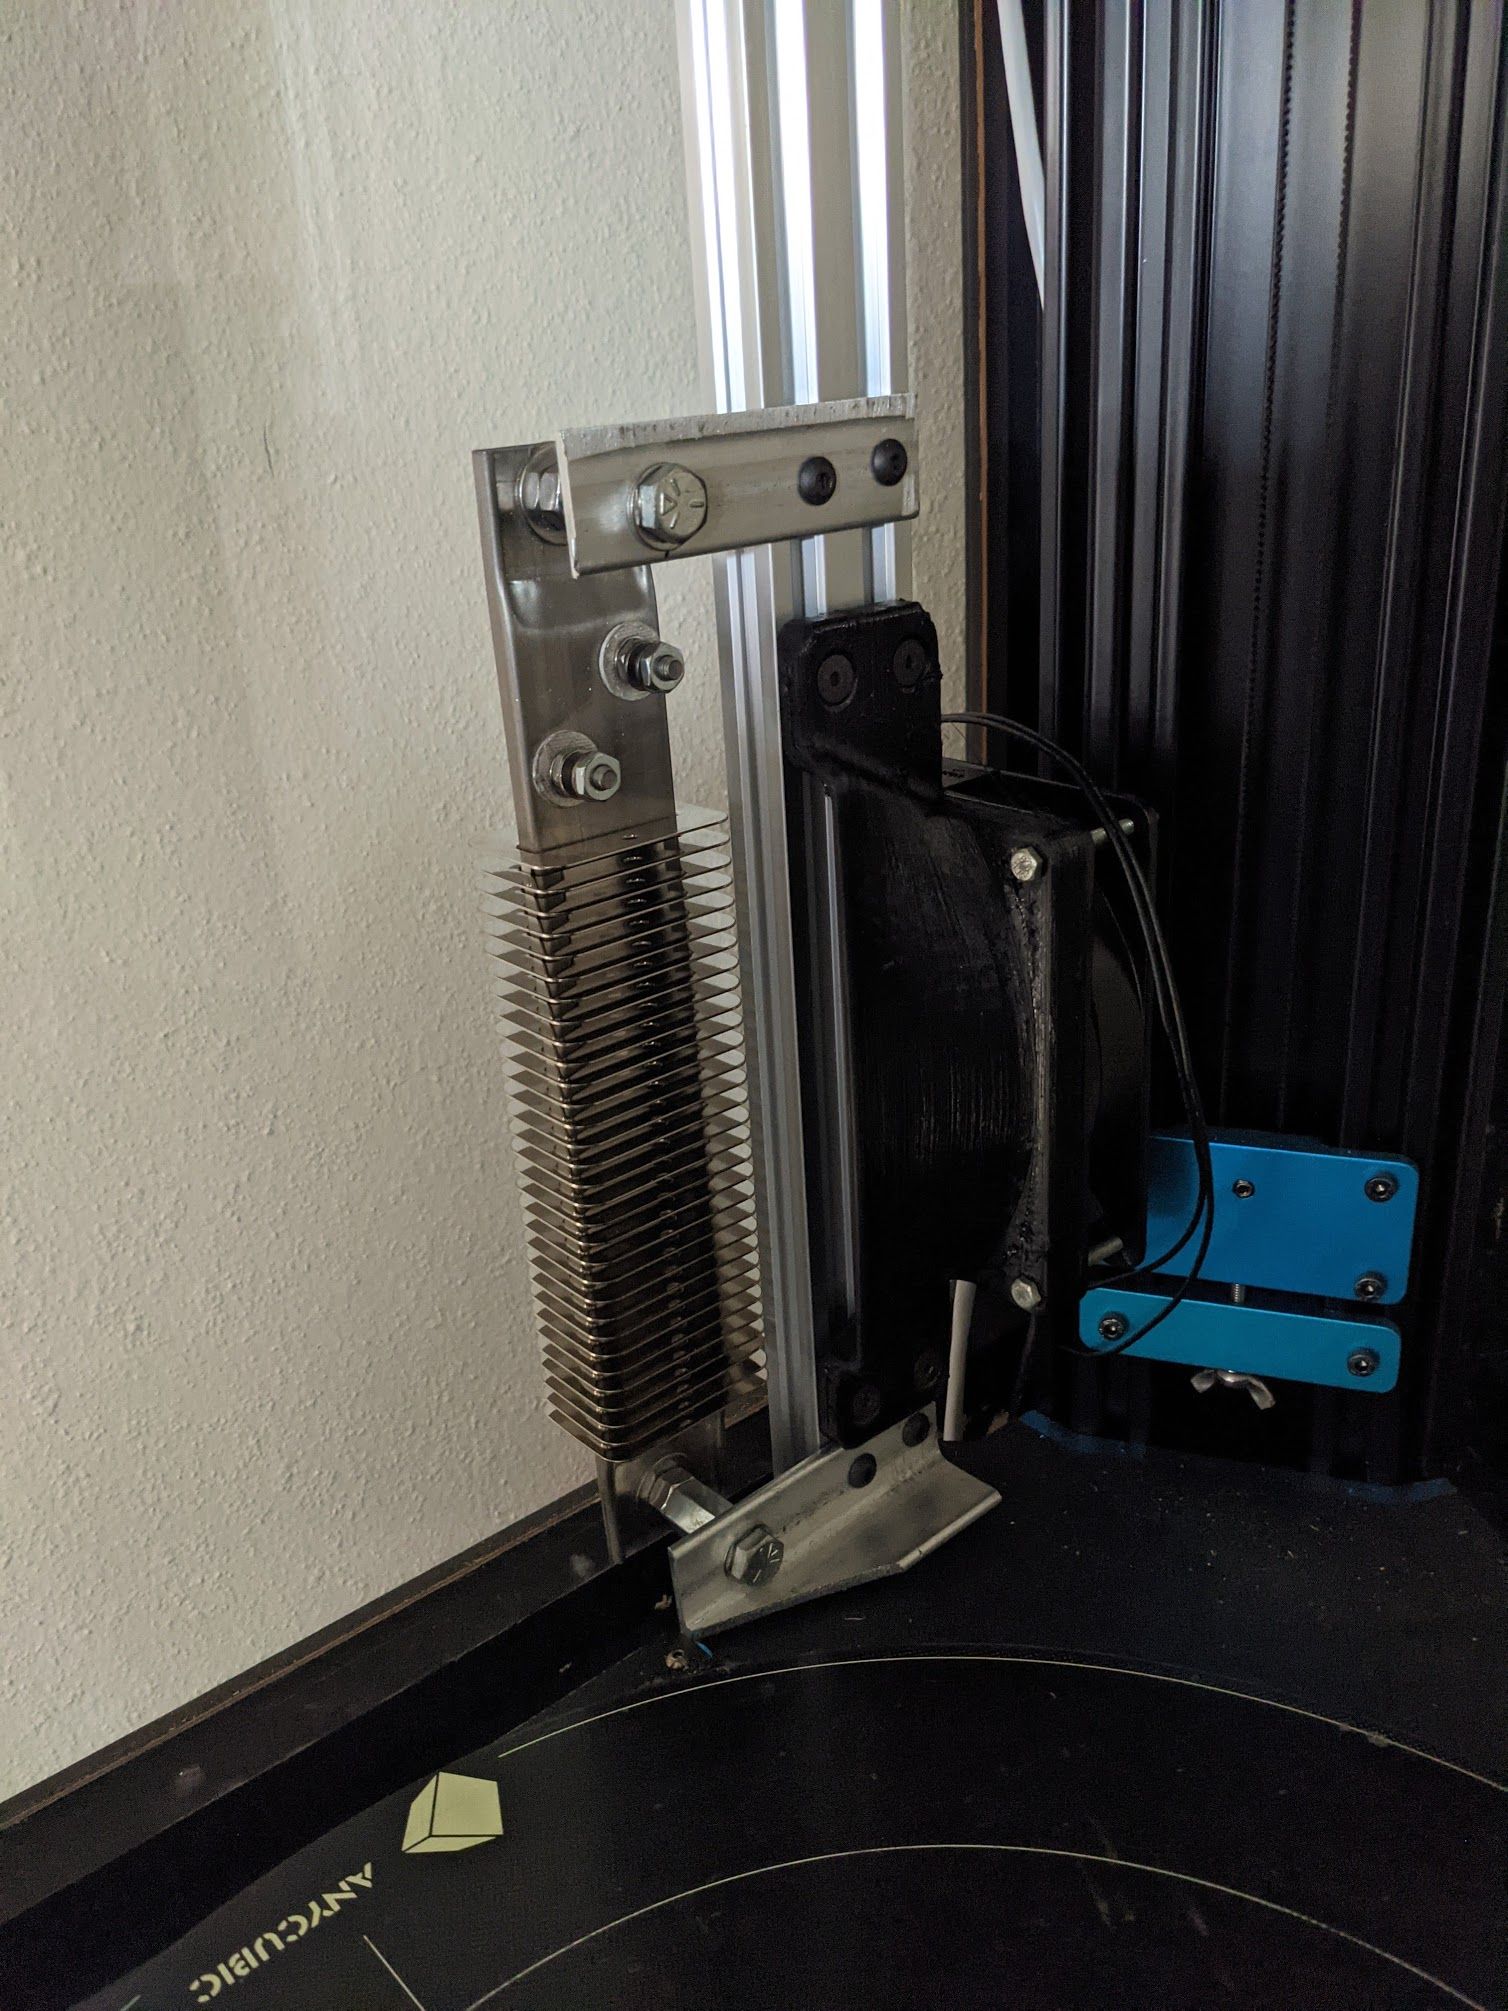
      So it seems the heat gun is out. A number of other heat source options have been put forward in this thread. They are as follows.

      $65 500W Bolt-Mount Heater from mcmaster who also sells a
      $30 500W ceramic lamp heater which are also at amazon as
      $16 200W ceramic lamp heaters(suggested to use 2) and I also found
      $20 500W PTC heating element, available in many wattages, i just list the 500W for comparison sake

      all of these will require a fan to circulate the heat generated, so I'm not factoring that into the comparison.

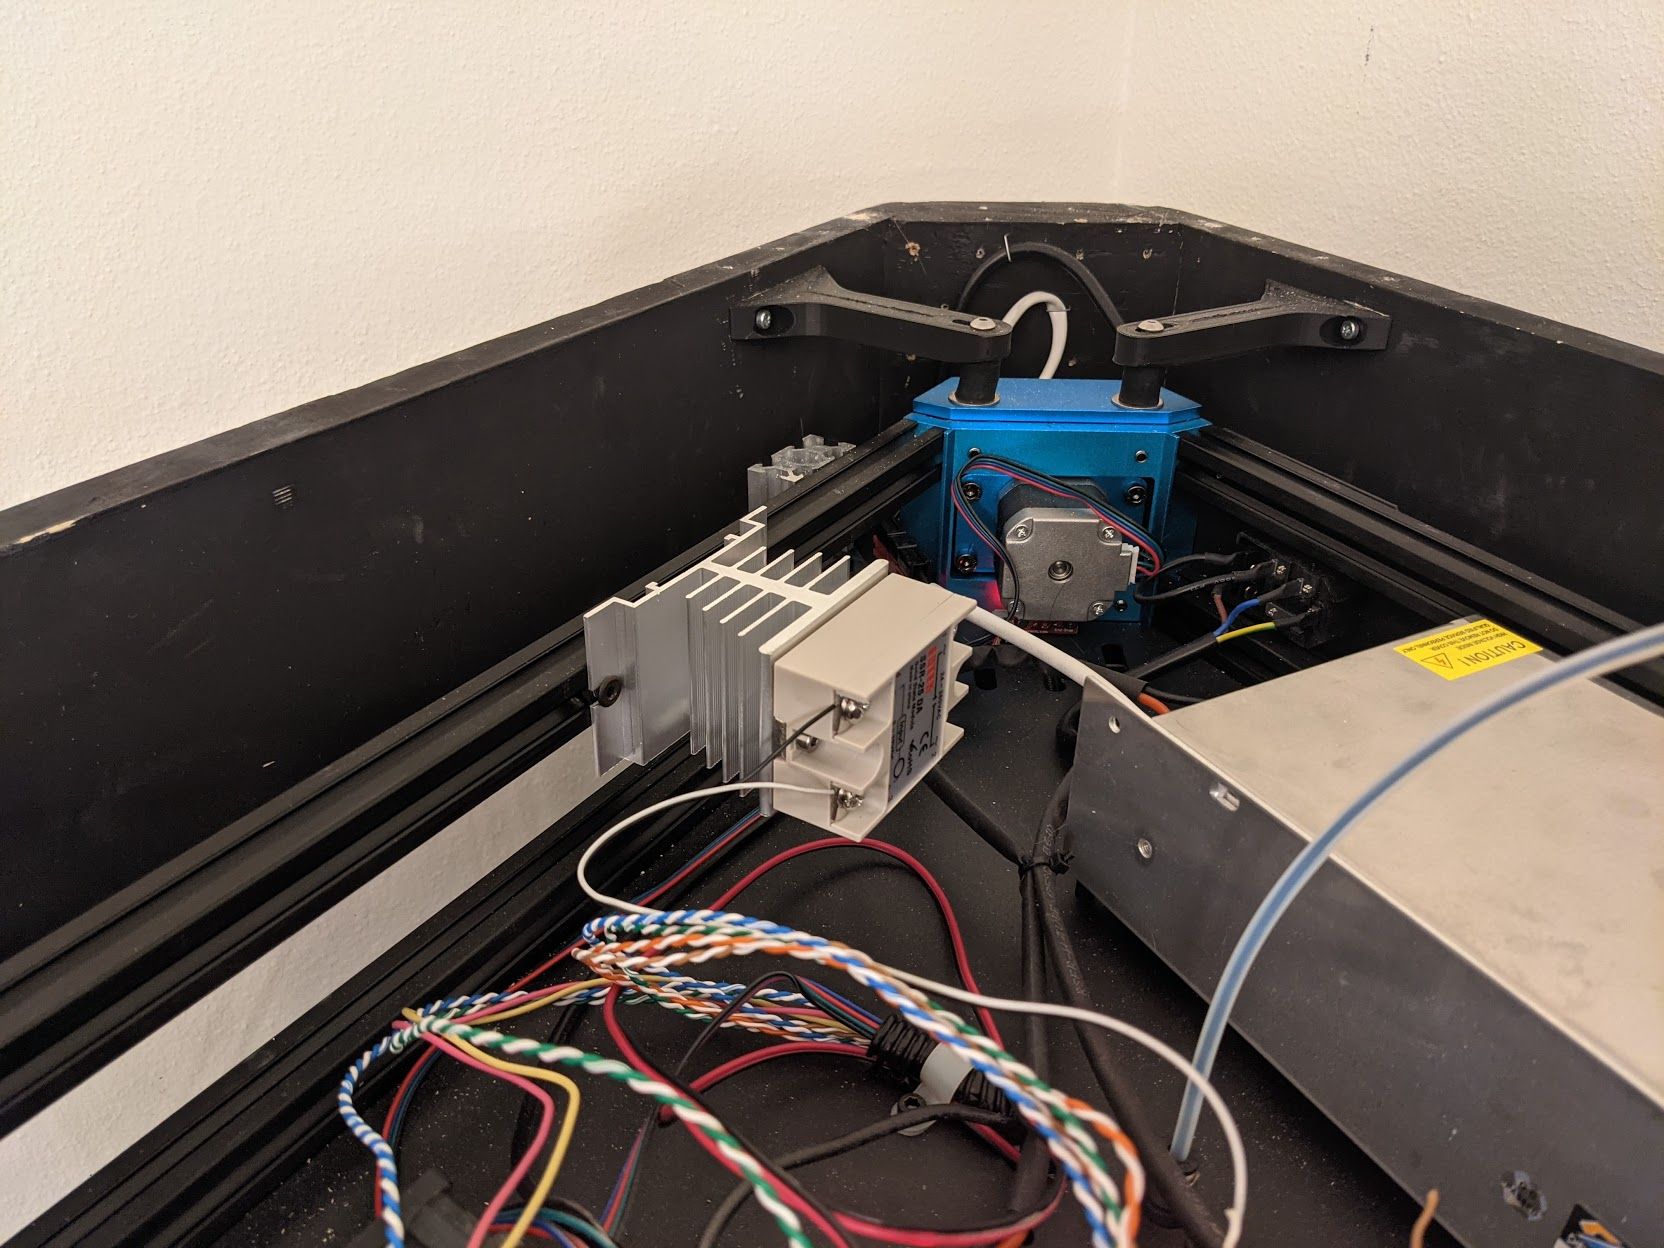
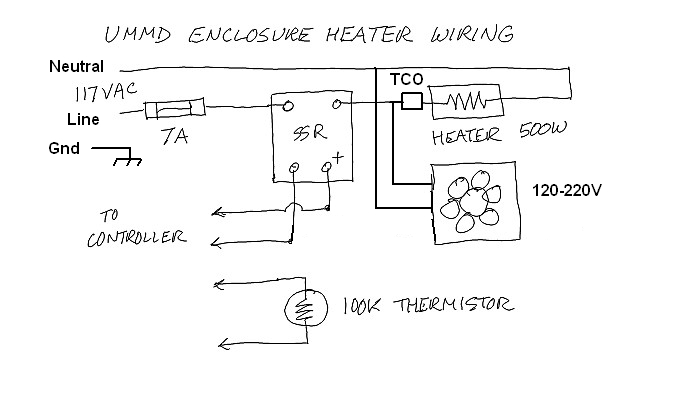
      I'd rather use the maestro to control the heater so it turns on and off with the print than a standalone controller i'd have to manually turn on and off for printing.

      And of course all this work is to print ABS(without warping) which I've largely migrated away from in favor of PETG. But I've got a pretty big stockpile of ABS and it would be nice to not have it go to waste. also i like acetone smoothed ABS. its so shiny.

      oh and a side note, I just did some quickmafs on my enclosure. It is about 350 liters in volume.

      posted in General Discussion
      oryharaundefined
      oryhara
    • RE: Chamber heater plan

      @zemlin
      did you have it running constantly in the chamber?

      Maybe i should rethink my plan and use a different heat source...

      posted in General Discussion
      oryharaundefined
      oryhara
    • RE: Chamber heater plan

      @zemlin
      When you say it melted down, what do you mean?

      posted in General Discussion
      oryharaundefined
      oryhara
    • RE: Chamber heater plan

      What is a TCO?

      posted in General Discussion
      oryharaundefined
      oryhara
    • RE: Chamber heater plan

      I had not considered the longevity of the heat gun, but it was only $10 so replacing it will not be a burden. If heat guns burn out quickly I'll see about getting something else.

      The noise will not be a problem. The enclosure dampens most sound and the room is not used for anything but the printer so no one will be bothered.

      posted in General Discussion
      oryharaundefined
      oryhara