@droftarts I didn't even think the accelerometer showed up in M122?
Here's the latest, but I can't spot an Accelerometer mention?
M122
=== Diagnostics ===
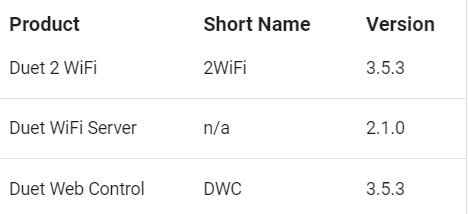
RepRapFirmware for Duet 2 WiFi/Ethernet version 3.5.0-rc.3 (2024-01-24 17:56:24) running on Duet WiFi 1.02 or later + DueX5
Board ID: 08DGM-917DA-G4MS8-6J9FL-3SN6N-TVVR9
Used output buffers: 2 of 26 (26 max)
=== RTOS ===
Static ram: 23224
Dynamic ram: 77824 of which 0 recycled
Never used RAM 11832, free system stack 138 words
Tasks: NETWORK(1,ready,12.4%,221) ACCEL(6,nWait 5,0.0%,346) HEAT(3,nWait 5,0.1%,327) Move(4,nWait 5,0.0%,261) DUEX(5,nWait 5,0.0%,24) MAIN(1,running,85.9%,742) IDLE(0,ready,1.6%,30), total 100.0%
Owned mutexes:
=== Platform ===
Last reset 00:00:52 ago, cause: power up
Last software reset at 2024-02-11 15:48, reason: User, Gcodes spinning, available RAM 8392, slot 1
Software reset code 0x0003 HFSR 0x00000000 CFSR 0x00000000 ICSR 0x0041f000 BFAR 0xe000ed38 SP 0x00000000 Task MAIN Freestk 0 n/a
Error status: 0x04
Aux0 errors 0,0,0
MCU temperature: min 18.2, current 23.4, max 23.6
Supply voltage: min 24.1, current 24.3, max 24.6, under voltage events: 0, over voltage events: 0, power good: yes
Heap OK, handles allocated/used 0/0, heap memory allocated/used/recyclable 0/0/0, gc cycles 0
Events: 0 queued, 0 completed
Driver 0: ok, SG min 148
Driver 1: ok, SG min 153
Driver 2: standstill, SG min 0
Driver 3: standstill, SG min n/a
Driver 4: standstill, SG min n/a
Driver 5: standstill, SG min n/a
Driver 6: standstill, SG min n/a
Driver 7: standstill, SG min 0
Driver 8: standstill, SG min n/a
Driver 9: standstill, SG min n/a
Driver 10:
Driver 11:
Date/time: 2024-03-28 07:56:16
Cache data hit count 1959708808
Slowest loop: 24.28ms; fastest: 0.17ms
I2C nak errors 0, send timeouts 0, receive timeouts 0, finishTimeouts 0, resets 0
=== Storage ===
Free file entries: 8
SD card 0 detected, interface speed: 20.0MBytes/sec
SD card longest read time 2.7ms, write time 0.0ms, max retries 0
=== Move ===
DMs created 83, segments created 11, maxWait 39308ms, bed compensation in use: none, height map offset 0.000, max steps late 0, ebfmin 0.00, ebfmax 0.00
next step interrupt due in 104 ticks, disabled
Moves shaped first try 1, on retry 0, too short 0, wrong shape 0, maybepossible 0
=== DDARing 0 ===
Scheduled moves 5, completed 4, hiccups 0, stepErrors 0, LaErrors 0, Underruns [0, 0, 0], CDDA state 3
=== Heat ===
Bed heaters 0 -1 -1 -1, chamber heaters -1 -1 -1 -1, ordering errs 0
=== GCodes ===
Movement locks held by HTTP
HTTP is idle in state(s) 2 0 15, running macro
Telnet is idle in state(s) 0
File is idle in state(s) 0
USB is idle in state(s) 0
Aux is idle in state(s) 0
Trigger is idle in state(s) 0
Queue is idle in state(s) 0
LCD is idle in state(s) 0
Daemon is idle in state(s) 0
Autopause is idle in state(s) 0
Q0 segments left 0
Code queue 0 is empty
=== DueX ===
Read count 1, 1.13 reads/min
=== Network ===
Slowest loop: 24.42ms; fastest: 0.00ms
Responder states: HTTP(0) HTTP(0) HTTP(0) FTP(0) Telnet(0)
HTTP sessions: 1 of 8
=== WiFi ===
Interface state: active
Module is connected to access point
Failed messages: pending 0, notrdy 0, noresp 0
Firmware version 2.1beta6
MAC address ec:fa:bc:2d:df:4f
Module reset reason: Turned on by main processor, Vcc 3.39, flash size 2097152, free heap 43064
WiFi IP address 192.168.178.30
Signal strength -52dBm, channel 13, mode 802.11n, reconnections 0
Clock register 00002002
Socket states: 0 0 0 0 0 0 0 0
")