Duet3D Logo Duet3D
    • Tags
    • Documentation
    • Order
    • Register
    • Login
    1. Home
    2. yngndrw
    3. Posts
    • Profile
    • Following 0
    • Followers 0
    • Topics 12
    • Posts 77
    • Best 10
    • Controversial 0
    • Groups 0

    Posts made by yngndrw

    • RE: Advice on adding plasma torch height control

      @o_lampe said in Advice on adding plasma torch height control:

      @yngndrw said in Advice on adding plasma torch height control:
      Moving a bed, complete with water, doesn't sound like fun. Aside from the mass, you'd also have to deal with the sloshing.

      I'm doing the trick with a submerged inflatable tire-tube to lower the water level for transport. It's also the easiest way to adjust water level while cutting
      I mean when the bed is moving, not when you're transporting the machine. Unless it's moving really slowly, the water will be sloshing out whenever it changes direction.

      @OwenD said in Advice on adding plasma torch height control:

      @yngndrw
      I think that 40mm is too shallow for a water table even at 40 amps
      The compressed air will blow it out.
      You'll need to look at 100-150mm in depth.
      If the air pushes aside the water all the way to the bottom it won't trap any fumes. Plus it'll splash everywhere.

      Industrial filters capture particles small enough to directly enter the blood stream via the lungs.
      It's not just dust, there are factors such as hexavalent chrome etc.
      You should read here for a start
      https://www.kemper.eu/en/worth-knowing/welding-smoke-regulations-and-legistlation/1.-overview
      The KEMPER filters for cnc tables have a self cleaning system as well.

      As far as slats go, all they have to be is ordinary flat mild steel. 50 x 3 would suffice. If they're 76 or 100 you can flip them as they are damaged.
      The usual arrangement is the have three vertical pieces of flat running lengthways down the table.
      These have slots in them about every 50mm.
      When you put your slats in, you bend them in a curve so that the middle is 50mm further up than the ends.
      This stops cross cuts being on top of a slat for long.
      All the slats can then be the same length.
      Ah that's good to know, I suppose I'll have to make my own deep water table then.

      I did look at water scrubbers for a downdraft table after realising how simple they are, but then I realised the airflow requirements are silly even for a modest table. For a 0.5 square meter table, Hypertherm is suggesting over 3000 cubic meters per hour which is an order of magnitude larger than "metal dust collectors" I can find. It's therefore unreasonable to try to move that volume of air, especially if you're trying to filter it to say 1-3 microns. In fact, it gets to the point where the downdraft fan motor draws more power than the plasma cutter, which added to the air compressor will be too much for my workshop. Hexavalent chrome appears to require 5-micron filtration and I'd really like to be able to work with stainless, so I think the water table option is more reasonable.

      I'll probably aim for a tray depth of 150mm and a water/slat level of 100mm to prevent splashing. I just need to work out how to build it.
      posted in Firmware developers
      yngndrwundefined
      yngndrw
    • RE: Advice on adding plasma torch height control

      @OwenD Thanks for the software suggestions, I'll have a look into those.

      I wasn't aware of the explosion risk with aluminium and water, that's good to know. What filtration systems do the industrial downdraft systems use? I'm wondering if a DIY version can be made for a smaller work area with sufficient flow.

      @o_lampe I don't know if this is any help for your project but I always try to start designing around the bits I want to buy in. In my case that's the magnetic breakaway torch holder (I have not found one yet) and the water table (As I have zero confidence that my welds won't leak!)

      For the water table I've been looking at these 1000x500x40mm stainless trays:
      https://www.amazon.co.uk/dp/B0CFV84HZG/?th=1

      ... Along with these packs of slats:
      https://www.ebay.co.uk/itm/196266001091

      I'd rather use a taller water table, but it's the right size for the pre-made slats to have a slight curve. My plan was to add a slotted angle frame on the inside to hold the slats and they are easy to replace with off-the-shelf items.

      Moving a bed, complete with water, doesn't sound like fun. Aside from the mass, you'd also have to deal with the sloshing.

      posted in Firmware developers
      yngndrwundefined
      yngndrw
    • RE: Advice on adding plasma torch height control

      @OwenD Thank you for this, it's always interesting to hear about how things are done on production systems.

      I don't personally baulk at paying for software, as long as it's affordable. The issue is that sometimes the software is only priced for large industry players where there's no suitable pricing model for hobbyists. Do you have any suggestions for software at this sort of level? Sheetcam appears to be commonly used at our level, but I'm finding it difficult to work out exactly what its capabilities are as their website is rather light on detail.

      On fume extraction, do you have any suggestions on what approach to go for - For a smaller, hobby-use system? The main approaches appear to be downdraft or a water table, but each appears to have serious downsides:

      • Downdraft, how do you filter the air if you don't want to just dump it outside? I've not yet seen a filter design which wouldn't clog almost instantly.
      • Water table, cleanup is a pain, as is the problem of stale water over time. Some people filter their water, but I'm not convinced about filter clogging for this either as the particulates appear to be extremely fine and there's very little in terms of information about the long-term performance of the various filter designs.
      posted in Firmware developers
      yngndrwundefined
      yngndrw
    • RE: Advice on adding plasma torch height control

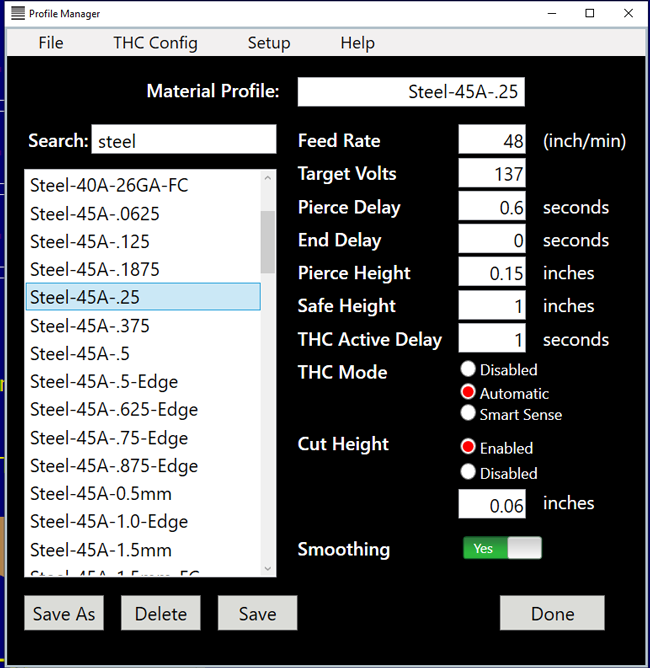
      @o_lampe My gut feeling was that, like in 3D printing, the material section would be the responsibility of the CAM (Slicer) but looking into it, it does typically appear to be the THC that has control over this.

      Here's a screenshot from the Centroid THC profile manager:
      04c72177-1941-4eba-8875-069ee0eb5c53-image.png

      It's interesting because as OwenD mentioned above, the feed rate depends on the cornering so in reality both the CAM and the THC need to know about the material.

      If the THC does need this information, then I think you're right that the filament system is the appropriate place.

      Hypertherm do provide timing diagrams for moving piercing on the much larger systems, so I've asked if they have the same diagrams for standard piercing on smaller machines:
      https://www.hypertherm.com/Download?fileId=HYP113984&zip=False

      posted in Firmware developers
      yngndrwundefined
      yngndrw
    • RE: Advice on adding plasma torch height control

      @ddt154

      I'm also wondering if there has been are work on this area, I couldn't see much in the forums about THC aside from another thread about an external controller.

      Hypertherm provide some cut charts showing the sort of values expected for pierce height, pierce delay, nominal heights and feed rates. (Attached)
      GDE_810050_R0_Duramax_Cut_Charts_Powermax45.pdf

      In addition to their normal CNC interface (Divided arc voltage output, trigger input, arc transfer/okay output) they also have a second serial interface for additional information and control. (E.g: Mode, current set, actual current, type of nozzle) (Also attached)
      GDE_810400_R2.pdf

      I really like the Duet3D platform and would love to use it for my upcoming CNC plasma cutter build.

      posted in Firmware developers
      yngndrwundefined
      yngndrw
    • RE: PrintEye; simple information panel for Duet boards.

      @dc42 said in PrintEye; simple information panel for Duet boards.:

      @yngndrw said in PrintEye; simple information panel for Duet boards.:

      I'm just advising that memory might become an issue for the JSON parsing, that's all

      You might like to look at the PanelDueFirmware code on github. It uses a Json parser that uses minimal RAM.

      Ohh I didn't notice that library, I'll have to give JSMN a try in my own projects! Thanks.

      posted in General Discussion
      yngndrwundefined
      yngndrw
    • RE: PrintEye; simple information panel for Duet boards.

      @EasyTarget No worries, I'm sorry my message came across badly - It was probably not the best judgement for my first post on here in years to be a "have you considered X hardware" post. The issue only came to mind because I'd recently used an RP2040 (Specifically the W5500-EVB-Pico, a fantastic board if you need ethernet in a project) on a commercial project and hit the memory limit a number of times. At the end of the day the "right" thing to use is whatever you're comfortable with - It's all personal preference as long as you're aware of the limits and trade-offs.

      posted in General Discussion
      yngndrwundefined
      yngndrw
    • RE: PrintEye; simple information panel for Duet boards.

      @EasyTarget I'm just advising that memory might become an issue for the JSON parsing, that's all. I did say I adore the RP2040, it's my go-to when memory isn't an issue - They all have their place. I'll keep to myself next time, sorry to bother you.

      posted in General Discussion
      yngndrwundefined
      yngndrw
    • RE: PrintEye; simple information panel for Duet boards.

      @EasyTarget You may want to consider an ESP32 over the RP2040. I adore the RP2040 and use it whenever I can but I often find that for projects which involve a lot of JSON, the memory limit becomes an issue. The ESP32 has the advantage that it can use external memory, whilst still being a modern dual-core microcontroller.

      posted in General Discussion
      yngndrwundefined
      yngndrw
    • 1XD with encoder inputs (Homing based on incremental encoders)

      Hello,

      The 1XD board is a great step towards proper servo drives for CNC usage. With a proper AC servo which has closed loop control between the motor and the driver, end-to-end closed loop control isn't really needed especially if the error/fault output of the servo drive is used. There is however a second use for encoder inputs - Homing.

      Proper servo drives often have buffered encoder outputs, which are the full complement of encoder signals including the index. If a "course" homing switch is included on the axis to get within one motor revolution of the final home location, the final homing can be completed using the encoder by allowing it to continue rotating in a given direction until the index signal is raised. This is far more repeatable than a homing switch (Subject to backlash) and operates with the same resolution of the servo motor.

      Obviously this also puts in the ground-work for end-to-end closed loop control with external drivers if that's implemented.

      So my proposal is to build another version of the 1XD with some more I/O:

      • 3x differential driver outputs: Step/Direction/Enable [As it currently has]
      • 1x high-current brake output [As it currently has]
      • 3x differential encoder inputs: A/B/I
      • 1x differential error/fault input
      • 2x single-ended endstop inputs (Can be GPIO) [As it currently has]

      See page #57 for an example encoder output from a servo drive:
      https://www.applied-motion.com/sites/default/files/hardware-manuals/SV200_AC_Hardware_Manual_920-0096H.pdf

      The other option of course is something like EtherCat, but that's a whole separate topic.

      Thanks,
      -Andrew.

      posted in Hardware wishlist
      yngndrwundefined
      yngndrw
    • RE: CNC-Specific Board

      @tenaja I've not seen those before, they look like a very interesting concept.

      I think for this usage they will take up too much space and cost too much, but I do wonder if the concept could be used - Maybe add-on boards that can adapt banks of outputs to meet various requirements. For example you might want relay outputs, or open collector outputs, 5V outputs, 24V outputs.

      I'm trying to balance this with the space usage because I think for the people who are likely to use it (For "desktop" to medium CNC machines essentially), they are likely to have limited space in their control enclosures. For myself, I need to fit everything in a steel enclosure which will slide out beneath an Ikea Lack table which gives me about 500x400x200mm - VFD and all. I think I can get the size down to about 100x50mm or less.

      I've also been considering the selection of some of the connectors. I've chosen a right angled RJ45 & RJ11 connector with the release tab on the top, a "flip up" SD card holder which could be mounted away from the edge of the board and a "vertical" micro USB connector which again can be mounted away from the edge of the board. I might even do away with the reset button / external reset input as I don't think it's really required for this application. On the flip side, I'm going to add a lot of status LEDs for every input and output for example.

      I typically use EasyEDA as I really like their library integration and I'd probably use JLCPCB's assembly service, but sadly some of the components (The processor for example) do not seem to have footprints right now. I've tried all of the PCB / Schematic software packages and I'm yet to find one I'm really happy with.

      https://lcsc.com/product-detail/Ethernet-Connectors-Modular-Connectors-RJ45-RJ11_CONNFLY-Elec-DS1133-S60APX_C77858.html
      https://lcsc.com/product-detail/Ethernet-Connectors-Modular-Connectors-RJ45-RJ11_UDE-Corp-S22-ZZ-0019_C711502.html
      https://lcsc.com/product-detail/USB-Connectors_Korean-Hroparts-Elec-U-D-M5DD-W-1_C145795.html
      https://lcsc.com/product-detail/Card-Sockets-Connectors_MOLEX-472192001_C164170.html

      posted in Hardware dev
      yngndrwundefined
      yngndrw
    • RE: CNC-Specific Board

      @tenaja Yea that was the main aim really, to replace a ~£300 200x100mm Duet 3 Mini 5+ / 4x Duet 3 Expansion 1XD setup with a ~£150 100x100mm board, while still supporting the latest from the Duet platform. (I.e. CAN)

      Another goal is to have something which properly integrates with a safety relay, I see so many people mess up their emergency stop wiring both with and without a safety relay. Something is bound to go wrong if somebody doesn't step in so that's why I'm going to add first class support. (I plan to make it difficult to cut corners, I'm only going to provide diagrams showing how to use it with the safety circuits.)

      I've updated the first post with the latest.

      posted in Hardware dev
      yngndrwundefined
      yngndrw
    • RE: CNC-Specific Board

      @tenaja The main goals are both a cost reduction and a reduction in the overall size for those using separate drivers. (The Duet 3 Expansion 1XD is nice, but it's simply way too large and expensive for a single axis - If you want to drive four axes you're nearly doubling both the price and space required)

      Sorry I forgot to update the original post with the latest specs, after @o_lampe's comments I was planning on dropping the higher voltage input altogether and just accepting a regulated 5V input which greatly simplifies the board and means that there's no limitations in motor supply voltage. For my own machine I plan on using a Mean Well HRPG-600-36 (36V @ 17.5A / 600W) for the brushless servos and a Mean Well RD-65B (5V @ 8A / 24V @ 3A / 65W) for both the controller and the safety circuit.

      My latest considerations are around whether or not to make this a stand-alone board or build it around the Raspberry Pi CM4 SBC. I personally really like the way I interact with my Duet 2 on my 3D printer so I wasn't originally planning on going down the SBC route due to the added complexity and space usage, but MPGs complicate that somewhat. There is a thread (https://forum.duet3d.com/topic/11389/cnc-style-pendant/150) about building a serial MPG which interfaces with the standalone Duet boards so if gives smooth jogging then I probably won't bother with the SBC route, but if I were going to go down the SBC route I think I'd rather go all-in with the board and accept (Require) a compute module directly - This would mean the removal of the SD card and the ethernet controller from the Duet processor. I'm not sure I see enough benefit for the extra cost, complexity and space though. ( @dc42: Are there any plans to drop support for the "standalone" Duet mode, or will the SBC always be optional?)

      posted in Hardware dev
      yngndrwundefined
      yngndrw
    • RE: CNC-Specific Board

      @o_lampe
      Yes that's what I meant about not allowing remote resetting. You should need to physically return to the machine in order to reset and re-arm the machine.

      I think from a software point of view, this means that there should be slightly different terminology within the software. You can trigger the emergency stop and you can clear the fault from the software's point of view, but you cannot reset the emergency stop from there. From a documentation point of view, I'd try to push people down the route of using a real safety relay with redundancy and dual channel emergency stops.

      I'd recommend #5 from my list above for your machine if your drivers support it, it should be the easiest to configure and it will prevent burning out motors / drives and destroying mechanical parts if the same thing happens again. (Or at least, it will in some scenarios!)

      posted in Hardware dev
      yngndrwundefined
      yngndrw
    • RE: CNC-Specific Board

      @o_lampe
      Thank you for your responses. I've made a couple of changes to the original list (In square brackets) after sleeping on it, the main things are the removal of PS_ON and the removal of the Vin output for the 0-10V converter as this is usually powered directly from the VFD. I've removed PS_ON from the list because it somewhat conflicts with the concept of a safety relay managing the power supply and reset conditions - We're talking about a CNC machine rather than a 3D printer so being able to remotely turn it on or reset an emergency stop condition is a no-no.

      [A1] This leads on to your first question, why use a 24V input. It really comes down to convenience as 24V is very common in industrial systems and is also the voltage of choice for most safety relays. Having said that I think you're right that just using an external 5V power supply isn't an issue and probably fits a CNC application better, where DIN mounted power supplies are both plentiful and cheap. It would also make it harder for a user to share a power supply between the safety system and the controller, which I think is best to avoid.

      [A2] These would just be conventional inputs, mapped as required. The 30V tolerance should allow for 24V sensors with PNP outputs, while also allowing for just about any other configuration. You could also use an external board via CAN. I'll try and add more inputs seems as there are no-longer any thermistor inputs so there should be plenty of spare pins.

      [A3] I don't actually like fully closed loop setups, let me explain. I think they have their place where backlash is a major issue, but if you're going down the rabbit hole of using AC servos with proper drivers (Using velocity or torque control, not step / direction) and have proper linear scales on your machine (Motor-mounted encoders are pointless for full closed loop control as they cannot prevent any backlash), a budget version of the Duet 3 controller is probably not right for you. In this scenario you'd probably be looking at something like the Centroid Oak controller, which costs around $1250 - Small change considering the other costs.

      This brings me onto these partially closed loop setups, I like these setups. (The CNC I'm building has JMC 180W brushless servos) You get the maximum performance from the motor without any instability and it draws the line where I think it should - You should be able to trust the controller to motor driver communication. If you're losing steps due to interference for example, you're better served fixing your wiring. The only real disadvantage (Aside from the backlash as mentioned above, for machines in this category anti-backlash mechanics are the solution) from not having a fully closed loop setup is that you have to tune an additional positional PID loop, but that's not a bit issue.

      As for your dual Y axis issue, I think there's a couple of questions to be asked and possibly some other solutions which are a better fit:

      1. Why did your motor stall in the first place? Is it running too close to the edge of its limits or did you have issues with midband-instability?
      2. Why did the second motor have enough torque to cause an issue if the first motor stalled? Is one side binding or is the frame misaligned?
      3. If your motors have enough torque to destroy your frame, the frame isn't strong enough. This would have caused machining issues so the frame probably needs to be stronger.
      4. If the motors are still too strong, it may be worth setting a torque limit if you can depending on the driver you're using. It may be that you need a powerful motor for higher speeds, but at lower speeds they are providing too much torque. A torque limit could flatten this to an acceptable level across the whole speed range.
      5. The motor drivers should output a fault signal which should be used to stop the machine, preventing damage. The fault could be that too much torque is being demanded, the motor is too far from its commanded position (Either a tuning issue or a faulty encoder causing runaway?) or that the driver or motor has overheated.
      posted in Hardware dev
      yngndrwundefined
      yngndrw
    • CNC-Specific Board

      I was thinking of putting together a new board design based heavily off of the Duet 3 6HC mainboard, but specifically designed for CNC usage. I'm targeting the price of the Duet 3 Mini 5+ board.

      This is the feature list I've put together, I was just hoping for some of your thoughts before I start doing any work:

      Screw terminals (Or JST VH connectors) used throughout (Allows for a decent wire size - The EN60204-1 recommendations suggest a minimum of 1.5mm² for power wires, a minimum of 0.75mm² for control wires or 0.5mm² for I/O / PLC wiring)
      DIN rail mountable
      Main Input: 12-24V (12-32V) 5V [No need for a high voltage input]
      External 5V input with PS_ON output [Not needed, there should be physical controls for power on a CNC machine]
      Processor: ATSAME70Q20B
      USB & Ethernet
      2x CAN
      SD card
      SBC connector [There will not be a 40 pin connector for an SBC, if SBC integration is to be included (still up for debate) it will be a requirement to use a Raspberry Pi CM4 and the Duet processor will not have an SD card or ethernet port]
      2x Serial connector (PanelDue & VFD) [Possibly a third for an MPG, maybe one should be RS485]
      6x 5V differential Step, Dir and Enable outputs for external stepper drivers (Molex KK 254 connectors for their slightly higher density, but this only allows for up to 0.5mm²)
      1x PWM output with Vin supply for a PWM to 0-10V converter (Molex KK 254 connector) [Vin supply is not needed as this should be taken from the VFD - This should be a regular output]
      9x Opto-isolated open-collector digital outputs, each with indicator LEDs [Must be suitable for driving relays]
      9x 30V-tolerant digital inputs, each with indicator LEDs [More inputs are required?]
      2x Separate charge-pump outputs, one discrete and one using a small micro-controller (Opto-isolated open-collector output: https://www.machsupport.com/wp-content/uploads/2013/02/ChargePumpSafety.pdf / http://wiki.linuxcnc.org/cgi-bin/wiki.pl?About_Charge_Pumps - A mechanism to monitor an external safety circuit will also be included)

      Again a lot of this is based upon the 6HC mainboard. The main changes are the removal of the built-in stepper drivers and inclusion of outputs for external drivers. Also there's the change to opto-isolated open-collector outputs (No fan outputs, no high current outputs), LED indicators all over the board and the two charge pump channels for safety circuit integration. (Running at a frequency that can be easily bit-banned from the processor) Everything is based upon 24V being the main control voltage.

      I did consider a built-in safety circuit to disable various outputs, but decided against this as the safety portion should be handled via external safety relays. The charge pumps are there to handle a scenario where the software hangs and will allow it to trip the safety relay.

      Finally there's the use of either screw terminals or JST VH connectors for almost everything so that proper-sized wiring can be used. (0.75mm² and above for handling rather than current capacity) It's worth noting that in the EN60204-1 recommendations, for signal wiring 0.5mm² is prefered for PLC I/O wiring, 0.75mm² is the minimum for "general panel wiring" and 1.5mm² is the minimum for any power wiring.

      posted in Hardware dev
      yngndrwundefined
      yngndrw
    • RE: Warning to users of servomotors!

      Back in the days of GeckoDrive, they documented a simple circuit to clamp the supply in situations like this:
      https://www.geckodrive.com/support/returned-energy-dump.html

      I'm thinking that a sufficiently sized TVS diode would would resolve the issue, although given that the JMC iHSV servos are rated up to 50V with 36V nominal, you're probably better running them at 36V separate from the Duet anyway as suggested above.

      posted in Using Duet Controllers
      yngndrwundefined
      yngndrw
    • RE: RepRapFirmware road map Q1 2021

      Very excited about the input shaping, especially after this video was released yesterday:
      https://www.youtube.com/watch?v=6JBIEJan6zs&ab_channel=Vez3D

      posted in Future Direction
      yngndrwundefined
      yngndrw
    • RE: Homing issue when homey.g

      RC5 is working fine so it looks like that bug was the issue.

      Thank you all for your time and help.

      posted in General Discussion
      yngndrwundefined
      yngndrw
    • RE: Homing issue when homey.g

      @Phaedrux said in Homing issue when homey.g:

      @yngndrw said in Homing issue when homey.g:

      it is sufficient to move the axis as it was working like this previously and the M913 documentation does suggest that this can be used to protect your endstops so that's why I left it in.

      Yes reducing the current is a good idea, but you must ensure that it's still set high enough to guarantee reliable movement. So you'll need to experiment. Try 30% or 40%.

      Okay I'll increase it a little to be safe.

      @yngndrw said in Homing issue when homey.g:

      It appears to be hanging on the G1 H1 Y-2 F300line for some reason.

      try increasing the movement distance. 2mm should be enough based on the distance of the previous move, but setting it higher still just to be safe.

      RC6 seems to have some issues of it's own at the moment and RC7 appears to be right around the corner, so maybe hold out for that.

      I just tried 10mm but that didn't resolve it - It doesn't even try to move for that line.

      I did notice in the release notes for RepRapFirmware 3.01-RC3:

      Bug fixes:
      * When homing switches were already triggered at the start of a homing move, sometimes the move queue got stuck, requiring a reboot
      

      ... so this looks to be the issue that I'm seeing. I've still not finished reading through the release notes but it looks like I shouldn't have to change anything in order to upgrade. If RC6 is having issues, I might upgrade to RC5 for the time being.

      posted in General Discussion
      yngndrwundefined
      yngndrw