Programing issues
-
@engikeneer
M115
FIRMWARE_NAME: RepRapFirmware for Duet 2 WiFi/Ethernet FIRMWARE_VERSION: 3.3 ELECTRONICS: Duet WiFi 1.02 or later FIRMWARE_DATE: 2021-06-15 21:45:03When I home x or y bed moves up a little then x or y move backwards a little. Bed then moves back down and it stops. If i home z it moves down and does not stop.
I have used the rrf config tool. something doesnt seem right. I had a config update lose connection part way thru and had to reprogram board. I had x and y working correct (after lost update) then it just started this.
CONFIG G FILE
; Configuration file for Duet WiFi (firmware version 3.3)
; executed by the firmware on start-up
;
; generated by RepRapFirmware Configuration Tool v3.3.10 on Fri Jan 14 2022 15:32:45 GMT-0800 (Pacific Standard Time); General preferences
G90 ; send absolute coordinates...
M83 ; ...but relative extruder moves
M550 P"Thor" ; set printer name; Network
M552 S1 ; enable network
M586 P0 S1 ; enable HTTP
M586 P1 S0 ; disable FTP
M586 P2 S0 ; disable Telnet; Drives
M569 P0 S1 ; physical drive 0 goes forwards
M569 P1 S1 ; physical drive 1 goes forwards
M569 P2 S1 ; physical drive 2 goes forwards
M569 P3 S1 ; physical drive 3 goes forwards
M584 X0 Y1 Z2 E3 ; set drive mapping
M350 X16 Y16 Z16 E16 I1 ; configure microstepping with interpolation
M92 X80.00 Y80.00 Z400.00 E420.00 ; set steps per mm
M566 X900.00 Y900.00 Z60.00 E120.00 ; set maximum instantaneous speed changes (mm/min)
M203 X6000.00 Y6000.00 Z180.00 E1200.00 ; set maximum speeds (mm/min)
M201 X500.00 Y500.00 Z20.00 E250.00 ; set accelerations (mm/s^2)
M906 X800 Y800 Z800 E800 I30 ; set motor currents (mA) and motor idle factor in per cent
M84 S30 ; Set idle timeout; Axis Limits
M208 X0 Y0 Z0 S1 ; set axis minima
M208 X330 Y330 Z350 S0 ; set axis maxima; Endstops
M574 X1 S1 P"xstop" ; configure switch-type (e.g. microswitch) endstop for low end on X via pin xstop
M574 Y1 S1 P"ystop" ; configure switch-type (e.g. microswitch) endstop for low end on Y via pin ystop
M574 Z1 S2 ; configure Z-probe endstop for low end on Z; Z-Probe
M558 P1 C"zprobe.in" H5 F120 T6000 ; set Z probe type to unmodulated and the dive height + speeds
G31 P500 X0 Y0 Z2.5 ; set Z probe trigger value, offset and trigger height
M557 X15:215 Y15:195 S20 ; define mesh grid; Heaters
M308 S0 P"bedtemp" Y"thermistor" T100000 B4138 ; configure sensor 0 as thermistor on pin bedtemp
M950 H0 C"bedheat" T0 ; create bed heater output on bedheat and map it to sensor 0
M307 H0 B1 S1.00 ; enable bang-bang mode for the bed heater and set PWM limit
M140 H0 ; map heated bed to heater 0
M143 H0 S120 ; set temperature limit for heater 0 to 120C
M308 S1 P"e0temp" Y"thermistor" T100000 B4138 ; configure sensor 1 as thermistor on pin e0temp
M950 H1 C"e0heat" T1 ; create nozzle heater output on e0heat and map it to sensor 1
M307 H1 B0 S1.00 ; disable bang-bang mode for heater and set PWM limit
M143 H1 S280 ; set temperature limit for heater 1 to 280C; Fans
M950 F0 C"fan0" Q500 ; create fan 0 on pin fan0 and set its frequency
M106 P0 S0 H-1 ; set fan 0 value. Thermostatic control is turned off
M950 F1 C"fan1" Q500 ; create fan 1 on pin fan1 and set its frequency
M106 P1 S1 H1 T45 ; set fan 1 value. Thermostatic control is turned on; Tools
M563 P0 D0 H1 F0 ; define tool 0
G10 P0 X0 Y0 Z0 ; set tool 0 axis offsets
G10 P0 R0 S0 ; set initial tool 0 active and standby temperatures to 0C; Custom settings are not defined
-
HOME X
; homex.g
; called to home the X axis
;
; generated by RepRapFirmware Configuration Tool v3.3.10 on Fri Jan 14 2022 15:32:45 GMT-0800 (Pacific Standard Time)
G91 ; relative positioning
G1 H2 Z5 F6000 ; lift Z relative to current position
G1 H1 X-235 F1800 ; move quickly to X axis endstop and stop there (first pass)
G1 H2 X5 F6000 ; go back a few mm
G1 H1 X-235 F360 ; move slowly to X axis endstop once more (second pass)
G1 H2 Z-5 F6000 ; lower Z again
G90 ; absolute positioningHOME Y
; homey.g
; called to home the Y axis
;
; generated by RepRapFirmware Configuration Tool v3.3.10 on Fri Jan 14 2022 15:32:45 GMT-0800 (Pacific Standard Time)
G91 ; relative positioning
G1 H2 Z5 F6000 ; lift Z relative to current position
G1 H1 Y-215 F1800 ; move quickly to Y axis endstop and stop there (first pass)
G1 H2 Y5 F6000 ; go back a few mm
G1 H1 Y-215 F360 ; move slowly to Y axis endstop once more (second pass)
G1 H2 Z-5 F6000 ; lower Z again
G90 ; absolute positioningHOME Z
; homez.g
; called to home the Z axis
;
; generated by RepRapFirmware Configuration Tool v3.3.10 on Fri Jan 14 2022 15:32:45 GMT-0800 (Pacific Standard Time)
G91 ; relative positioning
G1 H2 Z5 F6000 ; lift Z relative to current position
G90 ; absolute positioning
G1 X15 Y15 F6000 ; go to first probe point
G30 ; home Z by probing the bed; Uncomment the following lines to lift Z after probing
;G91 ; relative positioning
;G1 Z5 F100 ; lift Z relative to current position
;G90 ; absolute positioning -
@tinkerworksgarage okay. When you say x and y move backwards a little, do you mean they both move away from the endstops (by about 5mm)? If so then your x and y directions are correct.
Your z direction is incorrect (the bed moves up when it should move down) so change
M569 P2 S1 ; physical drive 2 goes forwardsTo
M569 P2 S0 ; physical drive 2 goes backwardsNext onto your homing. It should like your x and y endstops are already triggered so as soon as it starts the homing move, it thinks it's at the endstops
G1 H1 X-235 F1800 ; move quickly to X axis endstop and stop there (first pass)This is the long homing move to xmin (where your endstop is). It doesn't do this move because the endstop is already triggered.
So you need to test your endstops and reconfigure them. Send M119 and it will report the current state of the endstops. Try this with and without the endstops pressed.
My guess is you will need to invert both x and y endstops by adding an exclamation mark to the pin name. E.g. change
M574 X1 S1 P"xstop" ; configure switch-type (e.g. microswitch) endstop for low end on X via pin xstopTo
M574 X1 S1 P"!xstop" ; configure switch-type (e.g. microswitch) endstop for low end on X via pin xstop and invertLet us know how you get on from there
Not sure if you've found all the Duet documentation but all this should be covered there. A couple of good ones to read through are:
https://duet3d.dozuki.com/Wiki/ConfiguringRepRapFirmwareCoreXYPrinter
https://duet3d.dozuki.com/Wiki/ConfiguringRepRapFirmwareCartesianPrinter
https://duet3d.dozuki.com/Guide/Ender+3+Pro+and+Duet+Maestro+Guide+Part+3:+Commissioning/39 (granted this one is a different printer/board but the steps to take are all the same)
https://duet3d.dozuki.com/Guide/Ender+3+Pro+and+Duet+Maestro+Guide+Part+3:+Commissioning/39Edit: corrected my mistake on M569. Thanks @jay_s_uk

-
@engikeneer said in Programing issues:
M569 P2 S2 ; physical drive 2 goes backwards
S2 isn't valid. It's S0 or S1
-
@tinkerworksgarage said in Programing issues:
M558 P1 C"zprobe.in" H5 F120 T6000 ; set Z probe type to unmodulated and the dive height + speeds
G31 P500 X0 Y0 Z2.5 ; set Z probe trigger value, offset and trigger height
M557 X15:215 Y15:195 S20 ; define mesh gridyou also don't have a servo defined so the BLTouch will never deploy
-
@tinkerworksgarage said in Programing issues:
; Z-Probe
M558 P1 C"zprobe.in" H5 F120 T6000 ; set Z probe type to unmodulated and the dive height + speeds
G31 P500 X0 Y0 Z2.5 ; set Z probe trigger value, offset and trigger height
M557 X15:215 Y15:195 S20 ; define mesh gridThe BLTouch should be setup with M558 P9, and the position in reference to the nozzle of X and Y must be defined in G31 (otherwise the mesh compensation is at a wrong place later), please check both in
https://duet3d.dozuki.com/Wiki/Connecting_a_Z_probe#Section_BLTouch
If you are in front of the printer, a positive X means the BLTouch is right to the nozzle, and a positive Y means it is behind the nozzle, values being mm. -
Thank you all for the help!!!!!!!!!!! Finally getting it figured out some. Next issue is when homing x the y will hit end and just keep trying to move. same when home y the x will hit end and just keep trying to move. How do I cure it so when homing either the other will move relatively so not to crash?
-
I am also in testing so not everything is mounted or mounted permanent like hotend or bltouch. That is
why I had no values as those will be entered later. -
; homex.g ; called to home the X axis ; ; generated by RepRapFirmware Configuration Tool v3.3.10 on Fri Jan 14 2022 15:32:45 GMT-0800 (Pacific Standard Time) G91 ; relative positioning G1 H2 Z5 F6000 ; lower Z relative to current position G1 H1 X20 F1800 G1 H1 X-505 F1800 ; move quickly to X axis endstop and stop there (first pass) G1 H2 X5 F6000 ; go back a few mm G1 H1 X-505 F500 ; move slowly to X axis endstop once more (second pass) G1 H2 Z-5 F6000 ; lift Z again G90 ; absolute positioning -
; homex.g
; called to home the X axis
;
; generated by RepRapFirmware Configuration Tool v3.3.10 on Fri Jan 14 2022 15:32:45 GMT-0800 (Pacific Standard Time)
G91               ; relative positioning
G1 H2 Z5 F6000    ; lower Z relative to current position
G1 H1 X20 F1800   ; BACK OFF TO CLEAR STOP
G1 H1 Y-20 F1800  ;MOVE Y BACK SAME AS X MOVES TO HOLD POSITION
G1 H1 X-505 F1800 ; move quickly to X axis endstop and stop there (first pass)
G1 H1 Y505 F1800   ;MOVE Y BACK SAME AS X TO HOLD POSITION
G1 H2 X5 F6000    ; go back a few mm
G1 H1 X-505 F500  ; move slowly to X axis endstop once more (second pass)
G1 H1 Y505 F500    ;MOVE Y BACK SAME AS X TO HOLD POSITION
G1 H2 Z-5 F6000   ; lift Z again
G90               ; absolute positioning
Would to this work to hold position for y as x moves to home. same would be done for x as y homes?
-
@tinkerworksgarage said in Programing issues:
Next issue is when homing x the y will hit end and just keep trying to move.
I don't quite understand why your Y axis would move when you command a move in the X axis.
Can you try entering G1 X moves one way and the other and verify that the Y axis does not move at all? It shouldn't.
G91               ; relative positioning
G1 X20 F1800
G1 X-20 F1800
Entering these should move ONLY the X-axis right 20mm and then left 20mm
SeemeCNC Rostock Max V3 converted to V3.2 with a Duet2 Ethernet Firmware 3.2 and SE300
-
; homex.g
; called to home the X axis
G91               ; relative positioning
G1 H2 Z5 F6000    ; lower Z relative to current position
G1 H1 X20 Y20 F1800   ; BACK OFF TO CLEAR STOP
G1 H1 X-505 Y-540 F1800 ; move quickly to X axis endstop and stop there (first pass)
G1 H2 X5 Y10 F6000    ; go back a few mm
G1 H1 X-505 Y-540 F500  ; move slowly to X axis endstop once more (second pass)
G1 H2 Z-5 F6000   ; lift Z again
G90               ; absolute positioning
Ok so tried this and y stays still as x homes but x hits endstop switch and keeps trying to move more.
-
@alankilian
It will not let me as axis is not homed already. -
I don't get it. I had x working decent but y would still move some. Also had y moving decent but x would still move some. Even had Y staying still and was able to home x. then all of a sudden it all went haywire again. I even did M669 K1 to make sure was still in corexy mode. Back to moving and crashing
-
You can do M564 to allow movements without homing.
Please post your complete config.g
The one your posted earlier has your machine configured in Cartesian mode which would cause all these problems.
-
; Configuration file for Duet WiFi (firmware version 3.3)
; executed by the firmware on start-up
;
; generated by RepRapFirmware Configuration Tool v3.3.10 on Fri Jan 14 2022 15:32:45 GMT-0800 (Pacific Standard Time)

; General preferences
G90                                            ; send absolute coordinates...
M83                                            ; ...but relative extruder moves
M550 P"Thor"                             ; set printer name

; Network
M552 S1                                        ; enable network
M586 P0 S1                                     ; enable HTTP
M586 P1 S0                                     ; disable FTP
M586 P2 S0                                     ; disable Telnet

; Drives
M569 P0 S1                                     ; physical drive 0 goes forwards
M569 P1 S0                                     ; physical drive 1 goes forwards
M569 P2 S0                                     ; physical drive 2 goes forwards
M569 P3 S1                                     ; physical drive 3 goes forwards
M584 X0 Y1 Z2 E3                               ; set drive mapping
M350 X16 Y16 Z16 E16 I1                        ; configure microstepping with interpolation
M92 X80.00 Y80.00 Z400.00 E420.00              ; set steps per mm
M566 X900.00 Y900.00 Z60.00 E120.00            ; set maximum instantaneous speed changes (mm/min)
M203 X6000.00 Y6000.00 Z180.00 E1200.00        ; set maximum speeds (mm/min)
M201 X500.00 Y500.00 Z20.00 E250.00            ; set accelerations (mm/s^2)
M906 X1500 Y1500 Z1500 E1500 I30                   ; set motor currents (mA) and motor idle factor in per cent
M84 S30                                        ; Set idle timeout

; Axis Limits
M208 X0 Y0 Z0 S1                               ; set axis minima
M208 X330 Y330 Z350 S0                         ; set axis maxima

; Endstops
M574 X1 S1 P"!xstop"                            ; configure switch-type (e.g. microswitch) endstop for low end on X via pin xstop
M574 Y1 S1 P"!ystop"                            ; configure switch-type (e.g. microswitch) endstop for low end on Y via pin ystop
M574 Z2 S2                                     ; configure Z-probe endstop for low end on Z

; Z-Probe
M950 S0 C"exp.heater7"                          ; Duet 2 WiFi/Ethernet
M558 P31 C"^zprobe.in" H5 F120 T6000 A10 R0.5 S0.005 B0           ; set Z probe type to unmodulated and the dive height + speeds
G31 P500 X35 Y0 Z0.26                            ; set Z probe trigger value, offset and trigger height
M557 X10:300 Y20:310 S50                       ; define mesh grid

; Heaters
M308 S0 P"bedtemp" Y"thermistor" T100000 B4138 ; configure sensor 0 as thermistor on pin bedtemp
M950 H0 C"bedheat" T0                          ; create bed heater output on bedheat and map it to sensor 0
M307 H0 B0 S1.00                               ; enable bang-bang mode for the bed heater and set PWM limit
M140 H0                                        ; map heated bed to heater 0
M143 H0 S120                                   ; set temperature limit for heater 0 to 120C
M308 S1 P"e0temp" Y"thermistor" T100000 B4138  ; configure sensor 1 as thermistor on pin e0temp
M950 H1 C"e0heat" T1                           ; create nozzle heater output on e0heat and map it to sensor 1
M307 H1 B0 S1.00                               ; disable bang-bang mode for heater  and set PWM limit
M143 H1 S280                                   ; set temperature limit for heater 1 to 280C

; Fans
M950 F0 C"fan0" Q500                           ; create fan 0 on pin fan0 and set its frequency
M106 P0 S0 H-1                                 ; set fan 0 value. Thermostatic control is turned off
M950 F1 C"fan1" Q500                           ; create fan 1 on pin fan1 and set its frequency
M106 P1 S1 H1 T45                              ; set fan 1 value. Thermostatic control is turned on

; Tools
M563 P0 D0 H1 F0                               ; define tool 0
G10 P0 X0 Y0 Z0                                ; set tool 0 axis offsets
G10 P0 R0 S0                                   ; set initial tool 0 active and standby temperatures to 0C

; Custom settings are not defined
Ok here is complete config.g file with what I have setup right now. I believe it is setup for corexy but am not sure how to check to see. I also believe that this could be one of the main problems (possibly could be reverting back to cartesian on its own) If it is reverting back how do I get it to stay in corexy.
-
@tinkerworksgarage said in Programing issues:
I even did M669 K1 to make sure was still in corexy mode
That is not enough to insure that XY motions are correct.
Did you read the docs on how to get your steppers configured and wired correctly?
Frederick
-
@tinkerworksgarage said in Programing issues:
I believe it is setup for corexy but am not sure how to check to see.
You must have Cartesian checked in the Reprap Configuration Tool.
Your config.g is NOT set for corexy. If it was it would have an M669 K1 near the top.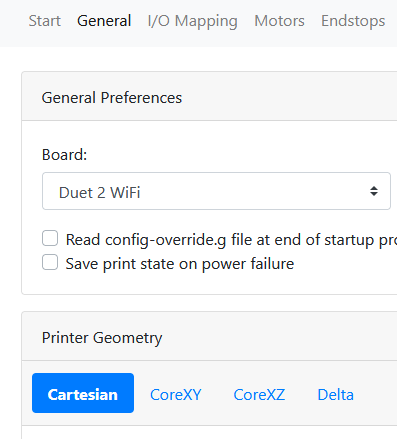
HERE is the document that tells you step-by-step how to configure it and get the motor-direction descriptions right. (Thanks @fcwilt)
-
@alankilian
I had selected corexy when setting it up in reprap configurator. Thats why I think something keeps resetting back and not keeping changes. -
something keeps resetting back and not keeping changes
That's not really something that happens.
- Run the RRF configurator
- Download the zip file
- Unzip the zip file
- Post the config.g from the unzipped folder
We'll then be able to see the Kinematic configuration
- Upload the WHOLE ZIP file to your Duet and update it.
- Power-cycle your printer
- Download the config.g from your printer
- Post that config.g
We'll THEN see if your printer updated appropriately.