Duet3D Logo Duet3D
    • Tags
    • Documentation
    • Order
    • Register
    • Login
    1. Home
    2. fxstein
    3. Posts
    • Profile
    • Following 0
    • Followers 0
    • Topics 2
    • Posts 17
    • Best 5
    • Controversial 0
    • Groups 0

    Posts made by fxstein

    • RE: Is my extruder set up properly?

      @oliof said in Is my extruder set up properly?:

      @fxstein somewhat offtopic nit-pick, but "direct drive" and "direct" are two different things. "Direct drive" usually means an ungeared extruder (while I am nit-picking, I'll nitpick on myself and mention that this should be "filament feeder", with the opposite being geared extruder (like Bondtech or Hemera). The "direct" versus "Bowden" (no drive) are really "short distance" vs "long distance" (between filament feeder and hotend).

      I know exactly what you mean. We - no I am are butchering a bunch of terms. Guilty as charged. Having said so, the vast majority will understand the meaning of it - might even be less confused than when we speak more precisely.

      posted in Tuning and tweaking
      fxsteinundefined
      fxstein
    • RE: How to put LED control on the web interface and touch screen

      And found a way to lower the light level after 30 mins. A bit of a hack but uses the fan controls blip timer:

      ; LED Lights - Duex5
      M307 H6 A-1 C-1 D-1				; Use heater 5 for LED lights on Duex5
      M106 P6 B1800 C"LEDs" A6			; Map to fan control, name and set to full bright for 30 min
      M106 P6 S0.01					; Trigger burst of 1800 sec 30 min full bright than go to 1%
      

      This will turn on the LEDs to full bright on startup or whenever coming off 0%, then go to the selected percentage.

      Only downside is that you cannot dim the LEDs during those 30 min, but you can turn them off.

      posted in Duet Web Control
      fxsteinundefined
      fxstein
    • RE: Is my extruder set up properly?

      Glad it worked.

      I found there is a pretty universal rule of thumb for retractions:

      0.5-2.5 mm + 1% of bowden tube length

      For direct drive there is no bowden part so you are just left with 0.5-2.5mm (found that even at 2.5 mm you can see popping)

      For bowden drive on e.g. 500mm bowden tube you end up with 0.5-2.5mm + 5mm -> often in the 6.5mm range

      Also found that its true for wether you run a V6 style hotend or a Volcano. Despite some online suggestions that a Volcano should have longer retractions because of its longer meltzone. Above 2mm even Volcanos will start popping because in the end its not about the top of the melting zone, but the bottom of the nozzle.
      Once you pull up the filament past 1-2mm you get air into the melting chamber, that violently overheats once re-primed.

      posted in Tuning and tweaking
      fxsteinundefined
      fxstein
    • RE: How to put LED control on the web interface and touch screen

      @jay_s_uk said in How to put LED control on the web interface and touch screen:

      You can certainly use a heater output has a fan.

      Your M307 command is disabling heater 6 from being a heater so you're halfway there.
      You can then use M106 to assign P6 as a fan and control it that way.

      In RRF3, its much easier to assign pins as nothing has a default use

      Ah - just what I was looking for.

      Here is the new config.g snippet in case others are looking to control LEDs with the Duet/Duex through the web interface:

      ; LED Lights - Duex5
      M307 H6 A-1 C-1 D-1				; Use heater 5 for LED lights on Duex5
      M106 P6 S1.0 C"LEDs" A6				; Map to fan control, name and set to full bright


      Now with a web frontend slider:

      Screen Shot 2020-06-09 at 11.45.20 PM.png

      Thank you very much!

      posted in Duet Web Control
      fxsteinundefined
      fxstein
    • RE: How to put LED control on the web interface and touch screen

      @dc42 Upgrading to 3.1 is on my roadmap. As soon as we get the next printer put together I will go there.

      Thanks a lot for the suggestion!

      posted in Duet Web Control
      fxsteinundefined
      fxstein
    • RE: Is my extruder set up properly?

      @jay_s_uk said in Is my extruder set up properly?:

      Popping is usually a sign of wet filament.
      Maybe think about trying some other filament if you have some?

      Other than that, its generally a good looking benchy

      Agreed.

      Popping sounds are little steam explosions that rip the layer apart. They can be cause by

      • wet filament - try drying it before using it or use an inline dryer for your prints
      • too much retraction - I found that when retracting too much I get ambient air pulled into the nozzle, that will produce the same effect a few millimeters after the start of a new line.

      Good looking benchy indeed

      posted in Tuning and tweaking
      fxsteinundefined
      fxstein
    • RE: How to put LED control on the web interface and touch screen

      @jay_s_uk Can a heater output be turned into a fan? The reason I had to hook it up to heater 5 was because I am drawing some 4A for all the combined LEDs, whereas fan outputs only support 1.5A

      M950 does not seem to allow both heater and fan to be specified at the same time.

      Thanks!

      posted in Duet Web Control
      fxsteinundefined
      fxstein
    • How to put LED control on the web interface and touch screen

      Hi,

      Have wired all my LED strips on to heater 5 of the Duex 5 board. Some 80W of high power LEDs to light out a black encased Modix3D Big60V3.
      Like the fact that I can share a single 24V power supply and have g-code control over the amount of light it creates. 100% PWM is super bright and allows for filming of fast movement speeds. 10% PWM is decent for more of a standby light when you walk up.

      Here is how it is configured in config.g:

      ; LED Lights - Duex5
      M307 H6 A-1 C-1 D-1				; Use heater 5 for LED lights on Duex5
      M42 P6 S1.0					; Set full bright
      

      My question: How do I get a slider or control onto the web control page as well as the touch panel? Would like to walk up and change the brightness with a simple touch (or slider on the web interface).

      As an added benefit: Is there a way to reset the brightness to e.g. 10% PWM after x seconds?

      Thanks a lot!

      posted in Duet Web Control
      fxsteinundefined
      fxstein
    • RE: What's the best brand of fan to use

      Depends on the type of fan or blower. For 5015 blower style fans I found that this Sunon to be the best:
      https://www.mouser.com/ProductDetail/369-MF50151VXB00UA99

      Most powerful I could find. Running them at 60% for regular prints and at 100% for bridging or short layer times. Have tested it down to 5% PWM. It will start spinning at that low of a setting, when most other fans just make a humming noise, but refuse to start.

      It's one of the few ones that actually creates decent pressure, so you can force the air through a smaller nozzle to increase air velocity (tested and measured) .

      It's also based on a maglev system that should theoretically last forever.

      posted in General Discussion
      fxsteinundefined
      fxstein
    • RE: Asymetric motor amperage on combined axis

      FYI: Tried to mark the original post as (SOLVED) but being told by the forum that I can only edit a post for 3600 seconds

      posted in Duet Hardware and wiring
      fxsteinundefined
      fxstein
    • RE: Asymetric motor amperage on combined axis

      @deckingman

      Just getting to it now that the print has finished.

      First I did try your suggestion:

      M584 U6 V7 W8
      ; followed by
      M906
      Motor current (mA) - X:2000, Y:2000, Z:1800, U:1000, V:1000, W:1000, E:1000:1000:1000:1000:1000:1000, idle factor 30%
      

      It is validating the theory that the drivers on the Duex have default assignments of extruders and as such inheriting the amperage of those. Running the M906 without parameters was a good start and unmapping the axis confirmed that. Need to remember that.

      Ok. Changed config.g drive mapping to:

      ; Setup combined axis
      M584 X0:5					; combine drive 0 (X1) and 5 (X2) for X-Axis
      M584 Y1						; single drive 1 for Y-Axis
      M584 Z2:6:7:8					; combine drives 2 (ZL1), 6 (ZL2), 7 (ZR1), 8(ZR2) for Z-Axis
      M584 E3:4					; only 2 extruders to release the remaining Duex5 drivers from default extruder mapping
      

      When I now run M906 and also unmap the axis I get:

      M906
      Motor current (mA) - X:2000, Y:2000, Z:1800, E:1000:1000, idle factor 30%
      
      M584 U6 V7 W8
      M906
      Motor current (mA) - X:2000, Y:2000, Z:1800, U:1800, V:1800, W:1800, E:1000:1000, idle factor 30%
      

      SHowing the correct motor amperages for all motors involved (same for the second X-axis). That solved the mystery.

      Summary
      Basically all drivers on the Duex5 are by default mapped as extruders. All axis and all extruders should explicitly be mapped to their respective axis. This can be done by multiple M584 statements (like I did by axis in order to better document) and in no specific order as long as all of them come before the likes of M350 and M906.

      I will mark this thread as SOLVED. Thank you very much for your help getting to the bottom of this.

      posted in Duet Hardware and wiring
      fxsteinundefined
      fxstein
    • RE: Asymetric motor amperage on combined axis

      @deckingman Just ran an M906 while the print is running. And I think you were right all along with the axis default assignment.
      Could not find any documentation to explaining the default assignments.

      It looks like ALL Duex5 channels are by default assigned as extruders. I assumed only the Duet channels had default assignments.

      M906
      Motor current (mA) - X:2000, Y:2000, Z:1800, E:1000:1000:1000:1000:1000:1000:1000, idle factor 30%
      

      So I have been testing and tuning the machine with 4 out of 7 motors running at 50% of their current. Cannot wait to change that and retune...

      Soon time to switch to 3.x and forget all those default assignments...

      Overnight print is at 92%...
      Screen Shot 2020-06-09 at 11.04.58 AM.png

      posted in Duet Hardware and wiring
      fxsteinundefined
      fxstein
    • RE: Asymetric motor amperage on combined axis

      @deckingman I first thought of all the same reasons you mention for X. And I have read the wiki.

      But then I see the exact same behavior on the Z-axis with the one motor on the Duet running significantly hotter than the other 3 on the Duex.

      And there is a significant difference in the Stallguard numbers for X1 vs X2 and the same for ZL1 vs ZL2/ZR1/ZR2.

      Need to wait for a current larger print to finish before I can try out the earlier suggestions. Thanks!

      posted in Duet Hardware and wiring
      fxsteinundefined
      fxstein
    • RE: Asymetric motor amperage on combined axis

      @deckingman said in Asymetric motor amperage on combined axis:

      @fxstein Try explicitly assigning all your motors to axes and extruders in your M584. Currently you have only assigned motors to X and Z. When you do that, it doesn't necessarily remove the default assignment unless you explicitly make it so, and strange things can happen. So your M584 needs to have settings for Y and any Es as well as X and Z.

      Thank you!

      To be hontest I still don’t fully understand the ‘default assignments’ part. I guess I was thinking that because I am using all Duet2 WiFi drivers in their default assignments that all extra motors/channels on the Duex5 are the only ones I have to worry about.

      Also the default config on the Modix did not come with an M584 to begin with - and I just kept adding on.

      Makes total sense to define all motors/axis and even if it only to have a clean definition.

      Will try and report back.

      Other than measuring the motor temps, is there any way to tell what amperage or load any particular driver is running at? Can the SG values of the M122 be leveraged for that? (Trying to get to a systematic and then automated approach to validate optimal operation Of a particular system)

      Thank you very much!

      posted in Duet Hardware and wiring
      fxsteinundefined
      fxstein
    • RE: Asymetric motor amperage on combined axis

      @jay_s_uk said in Asymetric motor amperage on combined axis:

      I'm guessing that the motors for the remainder in the group are getting whatever the default amps setting is.

      Thought so too.

      Have you tried explicitly setting the currents for each motor?

      e.g.

      M906 X2000:2000 Y2000 Z1800:1800:1800:1800 E1000 I30
      

      I have not tried that mainly because @dc42 says not to do it in various threads on the forum. Will test to see if it makes a difference.

      Its also not recommended to run at maximum current but more in the 70-90% mark.

      Thank you! Well aware of the motor limits - have been discussed in multiple threads. With microstepping you can actually go over 100% if needed. It’s a question of torque needed vs weight and resulting speed/acceleration capabilities.

      The reason I am always measuring is to make sure I am operation within safe margins of error. 50-60C after extended runs are totally within spec for the motors I am using.

      Having said so, I fully expect to be able to lower to motor amperage once I get them all symmetrical.

      Once again Thank you!

      posted in Duet Hardware and wiring
      fxsteinundefined
      fxstein
    • RE: Asymetric motor amperage on combined axis

      Forgot to mention - these are all identical motors on all axis (except the extruders)

      posted in Duet Hardware and wiring
      fxsteinundefined
      fxstein
    • Asymetric motor amperage on combined axis

      Hi,

      I ams seeing a very strange phenomenon. When I combine multiple motors into a single axis, I have the first motor in the group run significantly hotter (measured) than the other motor(s). I first witnessed the issue on the X-axis, but then also on Z.

      I am running a Modix3D Big60V3 that I upgraded to separate motor control with a Duex5 expansion. The machine comes stock with 2 X-axis and 4 Z-axis motors but all of them in series (or series/parallel on Z). In order to gain better control, accuracy and higher speeds I rewired all of them on to separate channels and developed a new config matching the physical layout. Tried to be diligent to read the GCODE pages on what order has to be followed when setting up the various parameters.

      Attached the current config.g (work in progress).

      Summary of changes:

      • Broke out all motors on separate channels
      • Eliminated the Bed PID controller and leveraged the K-type sensor and SSR to control the bed via Duet
      • High power LED lighting via heater 6 on the Duex5
      • Upgraded power supply
      • Tuned extraction, temperatures, speed, acceleration & jerk, frequency, ...

      For both the X (X1 & X2) and Z axis (ZL1, ZL2, ZR1 & ZR2) I see as much as 15-20C temperature difference between the first motor in the group (X1 & ZL1) (hotter) and the rest of the group. The first motors are on the Duet2 Wifi and the others are all on the Duex5.

      The Duet2 Wifi and the Duex are connected (bridged) at their power connectors via 10AWG silicone wire to ensure stable voltage.

      I am setting up the motor groups first, then later the amperage and the likes of steps...

      When running, the first motors also have higher torque compared to the rest. When tuning for stall detection, it is always the Duex5 attached motors (X2, ZL2, ZR1 & ZR2) that stall early.

      These are all 2000mA motors, originally setup to 1800mA but now setup to run at 2000mA.

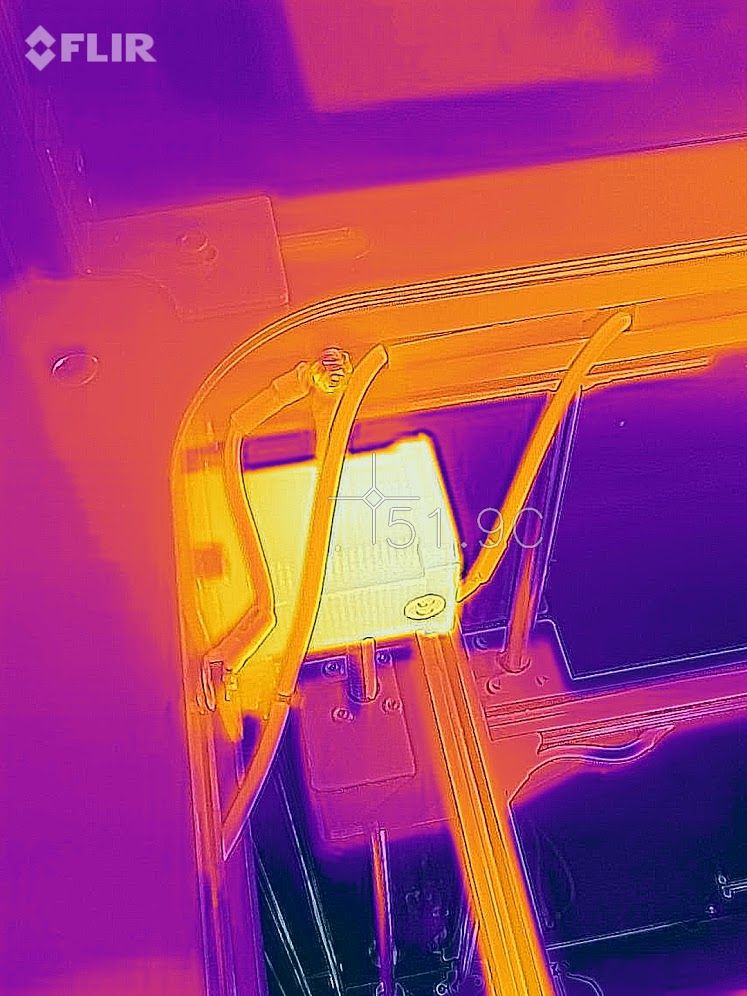
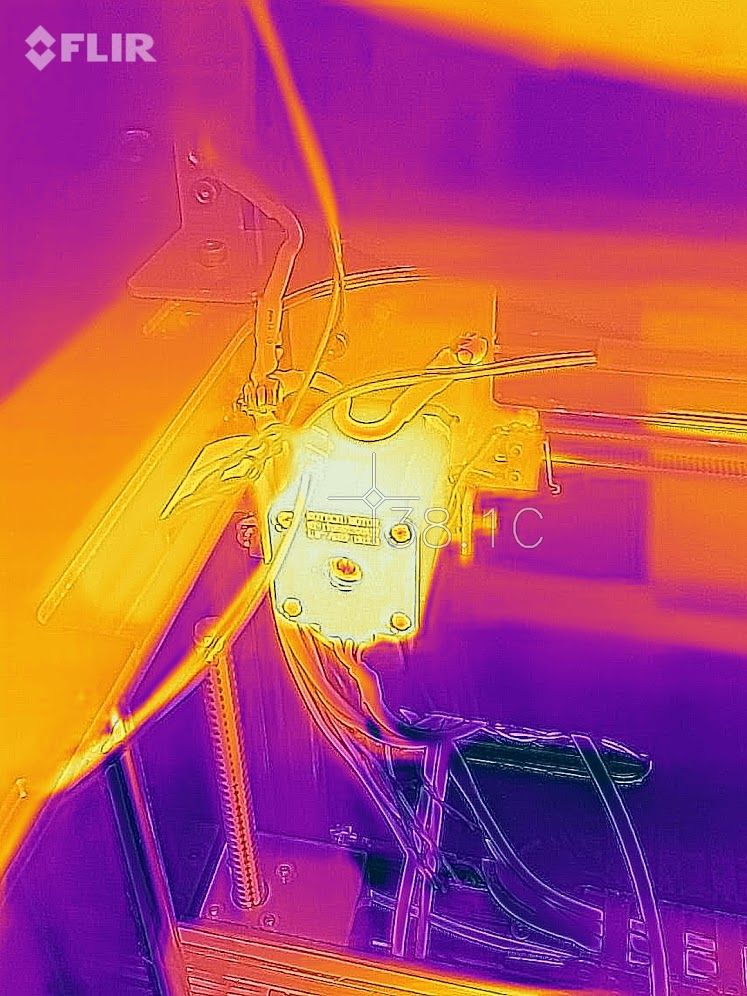
      I am also attaching two heat camera shots that show the difference between X1 and X2 after approx 12 hours of printing inside the enclosure with a filter-fan pulling out the warm air (in this case testing with PLA - would recycle for the likes of ABS).

      Can't figure out what I am missing. I have not yet upgraded to 3.X as I wanted to get everything up and running and tuned first before introducing another significant change.

      Diagnostics:

      M122
      === Diagnostics ===
      RepRapFirmware for Duet 2 WiFi/Ethernet version 2.05 running on Duet WiFi 1.02 or later + DueX5
      Board ID: XXXXX-XXXXX-XXXXX-XXXXX-XXXXX-XXXXX 
      Used output buffers: 3 of 24 (14 max)
      === RTOS ===
      Static ram: 25712
      Dynamic ram: 94140 of which 0 recycled
      Exception stack ram used: 472
      Never used ram: 10748
      Tasks: NETWORK(ready,628) HEAT(blocked,1176) DUEX(suspended,160) MAIN(running,1300) IDLE(ready,160)
      Owned mutexes:
      === Platform ===
      Last reset 04:58:20 ago, cause: software
      Last software reset at 2020-06-08 16:06, reason: User, spinning module GCodes, available RAM 10732 bytes (slot 0)
      Software reset code 0x0003 HFSR 0x00000000 CFSR 0x00000000 ICSR 0x0441f000 BFAR 0xe000ed38 SP 0xffffffff Task 0x4e49414d
      Error status: 0
      Free file entries: 8
      SD card 0 detected, interface speed: 20.0MBytes/sec
      SD card longest block write time: 48.4ms, max retries 0
      MCU temperature: min 37.6, current 40.2, max 41.2
      Supply voltage: min 23.8, current 23.9, max 24.2, under voltage events: 0, over voltage events: 0, power good: yes
      Driver 0: ok, SG min/max 246/1023
      Driver 1: ok, SG min/max 48/1023
      Driver 2: ok, SG min/max 74/1023
      Driver 3: ok, SG min/max 0/1023
      Driver 4: standstill, SG min/max not available
      Driver 5: ok, SG min/max 81/1023
      Driver 6: ok, SG min/max 141/1023
      Driver 7: ok, SG min/max 121/1023
      Driver 8: ok, SG min/max 140/1023
      Driver 9: standstill, SG min/max not available
      Date/time: 2020-06-08 21:04:25
      Cache data hit count 4294967295
      Slowest loop: 75.47ms; fastest: 0.07ms
      I2C nak errors 0, send timeouts 0, receive timeouts 0, finishTimeouts 0, resets 0
      === Move ===
      Hiccups: 0, FreeDm: 153, MinFreeDm: 103, MaxWait: 1753764ms
      Bed compensation in use: mesh, comp offset -0.044
      === DDARing ===
      Scheduled moves: 28571, completed moves: 28552, StepErrors: 0, LaErrors: 0, Underruns: 0, 0
      === Heat ===
      Bed heaters = 0 -1 -1 -1, chamberHeaters = -1 -1
      Heater 0 is on, I-accum = 0.0
      Heater 1 is on, I-accum = 0.7
      === GCodes ===
      Segments left: 1
      Stack records: 2 allocated, 0 in use
      Movement lock held by null
      http is idle in state(s) 0
      telnet is idle in state(s) 0
      file is doing "G1 X188.375 Y199.424 E0.10137" in state(s) 0
      serial is idle in state(s) 0
      aux is idle in state(s) 0
      daemon is idle in state(s) 0
      queue is idle in state(s) 0
      autopause is idle in state(s) 0
      Code queue is empty.
      === Network ===
      Slowest loop: 87.08ms; fastest: 0.00ms
      Responder states: HTTP(0) HTTP(0) HTTP(0) HTTP(0) FTP(0) Telnet(0) Telnet(0)
      HTTP sessions: 1 of 8
      - WiFi -
      Network state is running
      WiFi module is connected to access point
      Failed messages: pending 0, notready 0, noresp 0
      WiFi firmware version 1.23
      WiFi MAC address xx:xx:xx:xx:xx:xx
      WiFi Vcc 3.37, reset reason Turned on by main processor
      WiFi flash size 4194304, free heap 24416
      WiFi IP address 192.168.xx.xx
      WiFi signal strength -48dBm, reconnections 0, sleep mode modem
      Socket states: 0 0 0 0 0 0 0 0
      === Filament sensors ===
      Extruder 0 sensor: ok
      Extruder 1 sensor: ok
      

      config.g:

      ; Generated by Modix - 1.3
      ; Modified by fxstein 2020-05-31
      ;
      ; Changelog:
      
      ; Duet2Wifi Only:
      ; - Converted bed heater to Duet controller via k-coupler daughter board
      ; - Force join wireless network to support hidden SSID
      ; - Increased extruder max speed from 1200mm/min to 12000mm/min for quicker retractions
      ; - Increased extruder max acceleration from 250mm/s^2 to 8000mm/s^2 for quicker retractions
      ; - Increased extruder max instantaneous speed change from 120mm/min to 3000mm/min for quicker retractions
      ;   Quicker retractions aid in elimination of Volcano stringing
      ; - Equalize X and Y max instantaneous speed change from 300/500 to 300/300 to avoid inner wall separation during high infill speeds
      ; - Increase X and Y max speed to 12000mm/min or 200mm/s
      ; - Increase Z max speed from 200mm/min to 300mm/min or 5mm/s for quicker z-hops
      ; - Recalibrated extruder steps per mm
      ;
      ; Duet2Wifi + Duex5 (work in progress)
      ; - Split x-axis to individual drives 0+5
      ; - Setup stall control for both X and Y axis - now with individual motor control possible
      ; - Increase max speed for X & Y to 18000 or 300mm/s
      ; - Increase max acceleration for X & Y to 2000 mm/s^2
      ; - Increase max travel acceleration to 2000 mm/s^2
      ; - Increase X & Y max instantaneous speed change to 400 mm/min
      ; - Add Duet and Duex PWM fans
      ; - Switch permanent cooling tool cooling fans to temperature control
      ; - Increase max amperage for X & Y motors to 2000mA
      ; - Increase acceleration for X & Y to 4000mm/s^2 for testing  
      ;
      ; Modix Big-60, Dual Printhead
      
      ; General preferences
      G90						; Send absolute coordinates...
      M83						; ...but relative extruder moves
      
      ; Network
      M550 P"BIG60V3"					; Set machine name
      						; See secrets.g for setting passwords and sensitive information
      ; Set secrets and passwords
      M98 P"secrets.g"
      
      ; Logging
      M929 P"eventlog.txt" S1 			; Start logging to file eventlog.txt for e.g. stalls and other significant events
      
      ; Finish network setup
      M552 P"IoT Network" S1				; Enable network and force join (if hidden) network
      M586 P0 S1					; Enable HTTP
      M586 P1 S0					; Disable FTP
      M586 P2 S0					; Disable Telnet
      
      ; Drives
      M569 P0 S1					; Physical drive 0 goes forwards. X-Axis. X1
      M569 P1 S0					; Physical drive 1 goes backwards. Y-Axis.
      M569 P2 S0					; Physical drive 2 goes backwards. Z-Axis. ZL1
      M569 P3 S1					; Physical drive 3 goes forwards. E0-Extruder.
      M569 P4 S0					; Physical drive 4 goes backwards. E1-Extruder.
      
      ; Duex5 expansion must come before M350 and M906
      M569 P5 S0					; Physical drive 5 goes backwards. X-Axis. X2
      M569 P6 S0					; Physical drive 6 goes backwards. Z-Axis. ZL2
      M569 P7 S0					; Physical drive 7 goes backwards. Z-Axis. ZR1
      M569 P8 S0					; Physical drive 8 goes backwards. Z-Axis. ZR2
      
      ; Setup combined axis
      M584 X0:5					; combine drive 0 (X1) and 5 (X2) for X-Axis
      M584 Z2:6:7:8					; combine drives 2 (ZL1), 6 (ZL2), 7 (ZR1), 8(ZR2) for Z-Axis
      
      ; Continue Drives setup
      M350 X16 Y16 Z16 E16 I1				; Configure microstepping with interpolation
      M92 X100 Y100 Z2000 E399			; Set steps per mm
      M906 X2000 Y2000 Z1800 E1000 I30		; Set motor currents (mA) and motor idle factor in %
      M84 S30						; Set idle timeout
      ;M915 X Y S5 H200 F1 R2				; Stall detection. For X & Y axis. Pause print
      ;M915 X Y S20 H200 F0 R1			; Stall detection. For X & Y axis. Just log it.
      M915 X S15 H200 F0 R2				; Stall detection. For X axis. Pause print
      M915 Y S17 H200 F0 R2				; Stall detection. For Y axis. Pause print
      M915 Z S20 H200 F0 R2				; Stall detection. For Z axis. Pause print
      
      ; Speed Settings
      M201 X3000 Y3000 Z150 E8000			; Set maximum accelerations (mm/s^2)					*
      M203 X18000 Y18000 Z900 E12000			; Set maximum speeds (mm/min)						*
      M204 P1000 T2000				; Set print and travel accelerations  (mm/s^2)				*
      M566 X600 Y600 Z30 E3000			; Set maximum instantaneous speed changes (mm/min)			*
      M593 F30					; Cancel ringing at 30Hz						*
      
      ; Axis Limits
      M208 X0 Y0 Z0 S1				; Set axis minima
      M208 X600 Y600 Z660 S0				; Set axis maxima
      
      ; Endstops
      M574 X1 Y2 S1					; Set active low and disabled endstops
      
      ; Z-Probe
      M574 Z2 S2					; Set endstops controlled by probe
      ;M307 H3 A-1 C-1 D-1				; Disable heater on PWM channel for BLTouch
      M307 H7 A-1 C-1 D-1				; Disable heater on PWM channel for BLTouch via PWM5 (Heater 7) on Duex5
      ;M558 P9 H5 F120 T6000 A1 R0.7			; Set Z probe type to bltouch and the dive height + speeds
      M558 P9 H2 F120 T18000 A1 R0			; Set Z probe type to bltouch and the dive height + speeds
      G31 P500 X-13 Y-18 Z2.546			; Set Z probe trigger value, offset and trigger height(Z-Offset)
      M557 X0:580 Y0:580 P8:8				; Define mesh grid. 64 Points
      M376 H10					; Height (mm) over which to taper off the bed compensation
      
      ; Z leadscrew positions - mainly when used with Duex5 expansion and individual z motor drivers
      M671 X0:0:600:600 Y0:600:0:600			; Z leadscrews are approx at (0,0), (0,600), (600,0) and (600,600)
      
      ; Heaters
      ;Bed:
      ;M140 H-1					; To disable heated bed
      M305 P0 X150					; Add K-type thermocoupler for bed heater
      M140 H0						; Enable heated bed
      M143 H0 S120					; Set temperature limit for heater 0 to 120C
      ;M307 H0 A# C# D# V# S1.0 B0			; PID calibration template
      M307 H0 A19 C26 D4 V24 S1.0 B0			; PID calibration from macro run
      
      ;E0:
      M305 P1 T100000 B4725 C7.060000e-8 R4700	; Set thermistor + ADC parameters for heater 1
      M143 H1 S285					; Set temperature limit for heater 1 to 285C
      ;M307 H1 A# C# D# V# S1.0 B0			; PID calibration template
      ;M307 H1 A19 C26 D4 V24 S1.0 B0			; PID calibration from macro run
      
      ;E1:
      M305 P2 T100000 B4725 C7.060000e-8 R4700	; Set thermistor + ADC parameters for heater 2
      M143 H2 S285					; Set temperature limit for heater 2 to 285C
      ;M307 H2 A# C# D# V# S1.0 B0			; PID calibration template
      ;M307 H2 A19 C26 D4 V24 S1.0 B0			; PID calibration from macro run
      
      ; Fans
      M106 P0 S0 I0 F500 H-1 C"E0 Print Fan"		; Set fan 0 value, PWM signal inversion and frequency. Thermostatic control is turned off
      M106 P1 S0 I0 F500 H-1 C"E1 Print Fan"		; Set fan 1 value, PWM signal inversion and frequency. Thermostatic control is turned off
      ; Duex5 expansion
      M106 P2 T35:65 B10 H100:101:102 C"Duet Fan"	; Thermostatic fan to cool the Duet2
      M106 P3 T35:65 B10 H100:101:102 C"Duex Fan"	; Thermostatic fan to cool the Duex5
      M106 P4 T40:50 B10 H1 C"E0 Cool Fan"		; Thermostatic fan for cool side of E0 only when tool is heated
      M106 P5 T40:50 B10 H2 C"E1 Cool Fan"		; Thermostatic fan for cool side of E1 only when tool is heated
      
      ; Tools
      M563 P0 S"E0" D0 H1 F0				; Define tool 0
      G10 P0 X0 Y0 Z0					; Set tool 0 axis offsets
      G10 P0 R190 S210				; Set initial tool 0 active and standby temperatures to 0C
      M563 P1 S"E1" D1 H2 F1				; Define tool 1
      G10 P1 X0 Y51.5 Z0				; Set tool 1 axis offsets
      G10 P1 R190 S210				; Set initial tool 1 active and standby temperatures to 0C
      
      ; Automatic power saving
      M911 S22.5 R29.0 P"M913 X0 Y0 G91 M83 G1 Z3 E-5 F1000"	; Set voltage thresholds and actions to run on power loss. Power Failure Pause
      
      ; LED Lights - Duex5
      M307 H6 A-1 C-1 D-1				; Use heater 5 for LED lights on Duex5
      M42 P6 S1.0					; Set full bright
      
      ; Custom settings
      ;M564 H0 S0					; Negative movements are allowed
      G29 S1						; Load the height map from file and activate bed compensation
      ;M915 P1 S4 H400 F1 R2				; Stall detection. For Y motor. Pause print moved to drive section
      M591 D0 P1 C3 S1				; Regular filament sensor for E0
      M591 D1 P1 C4 S1				; Regular filament sensor for E1
      ;M581 E2 S1 T0 C0				; Optional external switch for emergency stop
      ;M593 F40					; Cancel ringing at 40Hz
      ;M592 D0 A0.01 B0.0005 L0.25			; The amount of extrusion requested is multiplied by (1 + min(L, A*v + B*v^2)) where v is the requested extrusion speed (calculated from the actual speed at which the move will take place) in mm/sec.
      ;M592 D1 A0.01 B0.0005 L0.25			; The amount of extrusion requested is multiplied by (1 + min(L, A*v + B*v^2)) where v is the requested extrusion speed (calculated from the actual speed at which the move will take place) in mm/sec.


      X1 heat signature (51.9C):

      X1heat.jpg

      X2 heat signature (38.1C):

      X2heat.jpg

      I have probably missed some important information - please let me know if I did.

      Your help is very much appreciated.

      posted in Duet Hardware and wiring
      fxsteinundefined
      fxstein