Guys,
Voron 2.4 350mm here, with aluminum everything instead of 3d printed parts. MJF Stealthburner parts with LGX light gear mod + hot end umbilical mod with PCB.
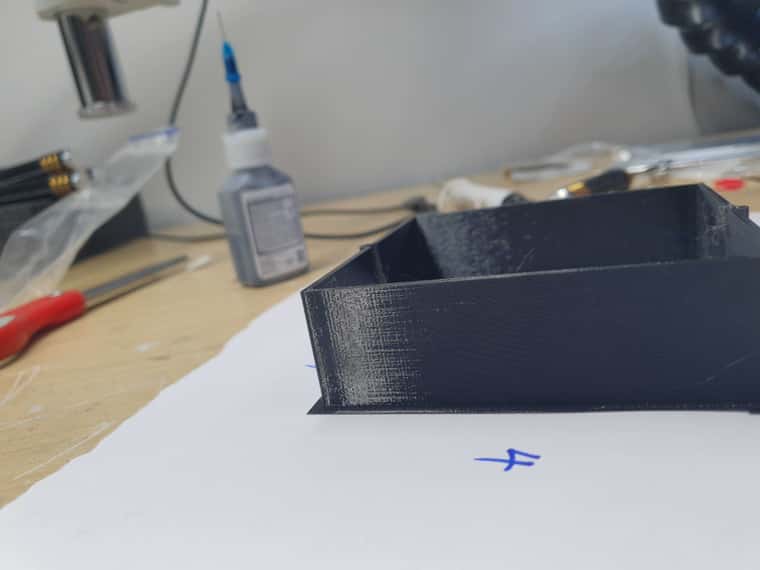
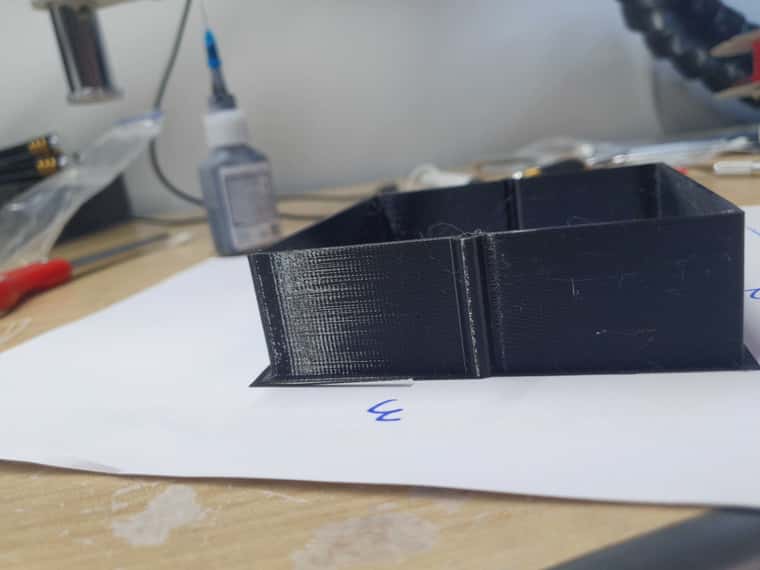
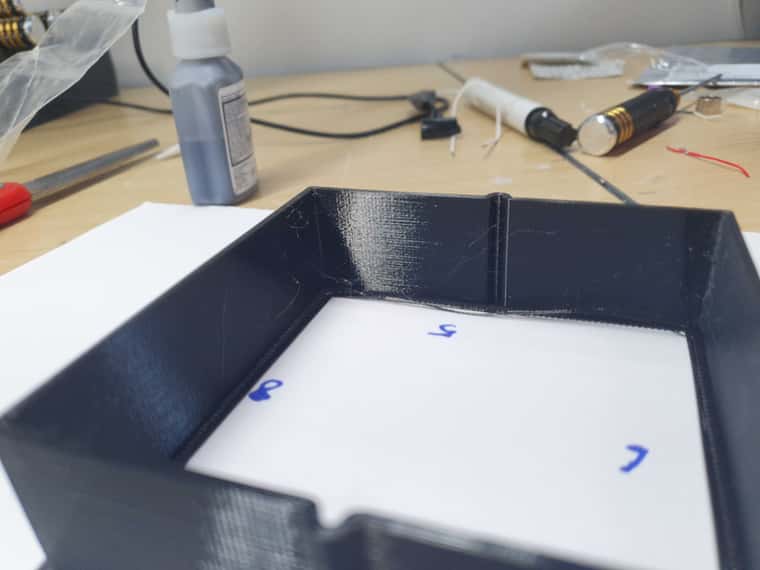
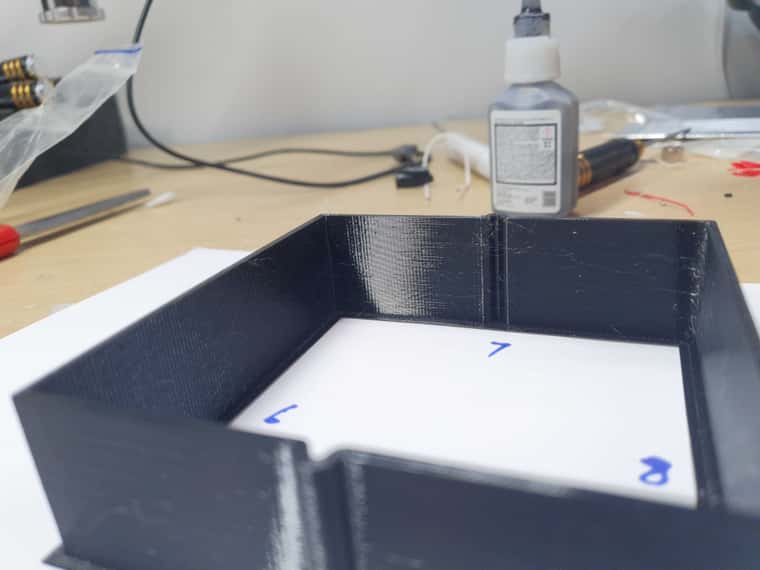
I am trying to tune PA values for PETG, print speed at 60mm/s. I am getting close but the significant vibration pattern on the test print piece is driving me up the wall 
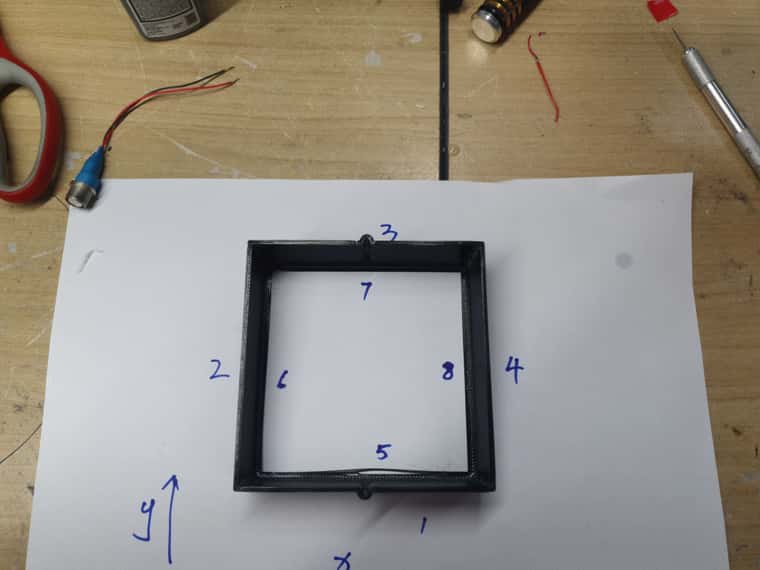
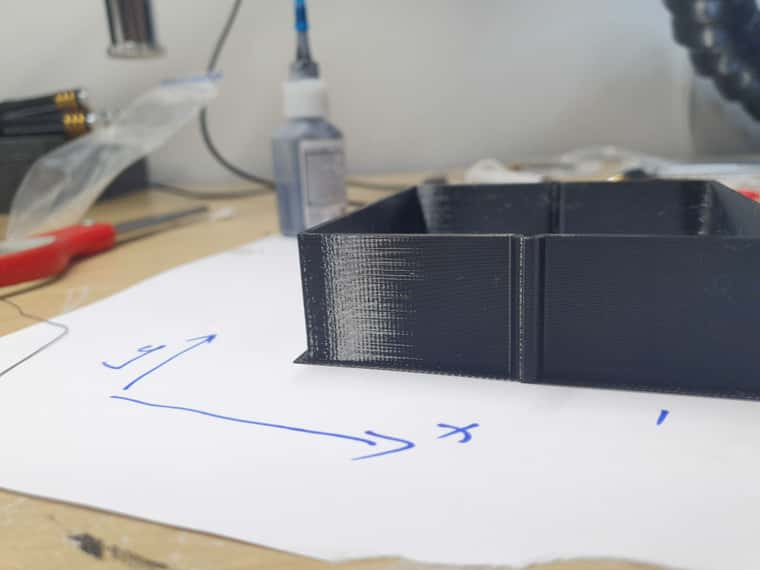
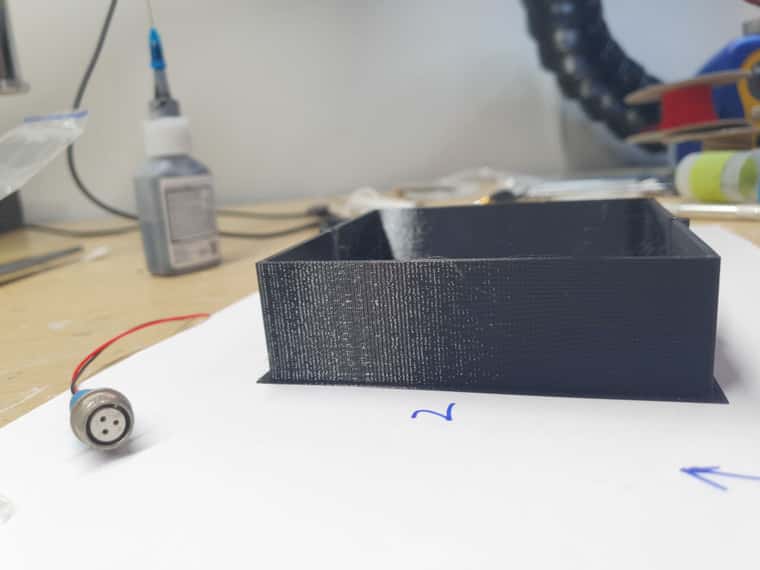
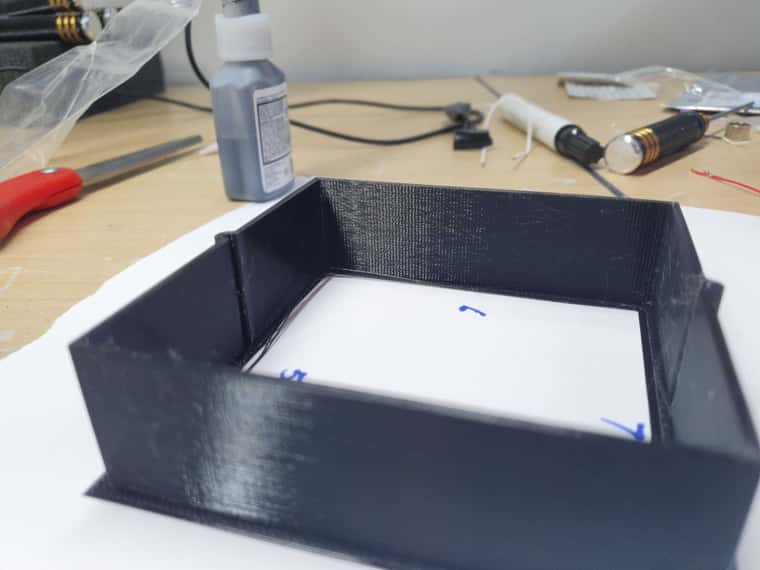
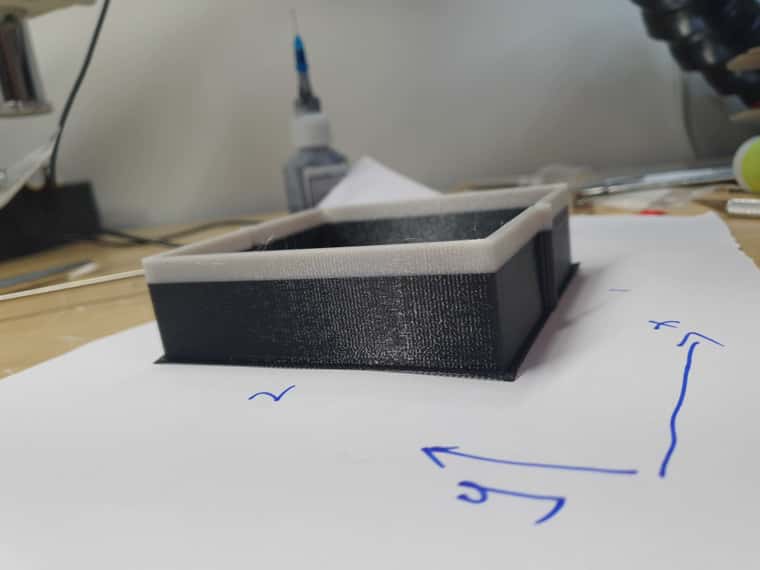
Please see attached pictures, there are considerable vibration pattern along both X and Y axis, Y axis being much worst. In addition to that, side 2 and 6 of the square has noticeably deeper vibration pattern when compared to side 4 and 8-------All 4 sides mentioned are on the Y axis and this is puzzling me.
Can anyone help shed some light on what is going on with the vibrations like this? It is so bad I can physically feel the bumps
See the pictures below, you will know what I mean.

below is my M122 output:
m122
=== Diagnostics ===
RepRapFirmware for Duet 3 MB6HC version 3.5.2 (2024-06-11 17:13:58) running on Duet 3 MB6HC v1.01 (SBC mode)
Board ID: 08DJM-956L2-G43S8-6JKDJ-3S86J-983AF
Used output buffers: 11 of 40 (40 max)
=== RTOS ===
Static ram: 155360
Dynamic ram: 92128 of which 2800 recycled
Never used RAM 91864, free system stack 117 words
Tasks: ACCEL(6,nWait 6,0.0%,237) SBC(2,ready,0.8%,789) HEAT(3,nWait 6,0.0%,321) Move(4,nWait 6,0.1%,211) CanReceiv(6,nWait 1,0.0%,771) CanSender(5,nWait 7,0.0%,327) CanClock(7,delaying,0.0%,346) TMC(4,nWait 6,9.6%,53) MAIN(2,running,89.3%,101) IDLE(0,ready,0.0%,29), total 100.0%
Owned mutexes: HTTP(MAIN)
=== Platform ===
Last reset 99:42:36 ago, cause: power up
Last software reset at 2024-07-25 19:32, reason: User, FilamentSensors spinning, available RAM 91504, slot 1
Software reset code 0x600d HFSR 0x00000000 CFSR 0x00000000 ICSR 0x0043c000 BFAR 0x00000000 SP 0x00000000 Task SBC Freestk 0 n/a
Error status: 0x04
Aux0 errors 0,0,0
MCU temperature: min 39.0, current 49.6, max 50.6
Supply voltage: min 23.8, current 24.0, max 24.1, under voltage events: 0, over voltage events: 0, power good: yes
12V rail voltage: min 12.0, current 12.1, max 12.1, under voltage events: 0
Heap OK, handles allocated/used 99/0, heap memory allocated/used/recyclable 2048/616/616, gc cycles 0
Events: 0 queued, 0 completed
Driver 0: standstill, SG min 0, mspos 568, reads 1203, writes 237 timeouts 0
Driver 1: standstill, SG min 0, mspos 952, reads 1203, writes 237 timeouts 0
Driver 2: standstill, SG min 0, mspos 120, reads 1320, writes 121 timeouts 0
Driver 3: standstill, SG min 0, mspos 984, reads 1320, writes 121 timeouts 0
Driver 4: standstill, SG min 0, mspos 136, reads 1320, writes 121 timeouts 0
Driver 5: standstill, SG min 0, mspos 392, reads 1320, writes 121 timeouts 0
Date/time: 2024-07-30 00:31:42
Slowest loop: 711.52ms; fastest: 0.05ms
=== Storage ===
Free file entries: 20
SD card 0 not detected, interface speed: 37.5MBytes/sec
SD card longest read time 0.0ms, write time 0.0ms, max retries 0
=== Move ===
DMs created 125, segments created 41, maxWait 232807265ms, bed compensation in use: mesh, height map offset -0.034, max steps late 0, min interval 0, bad calcs 0, ebfmin 0.00, ebfmax 0.00
no step interrupt scheduled
Moves shaped first try 24862, on retry 4449, too short 33209, wrong shape 166586, maybepossible 11645
=== DDARing 0 ===
Scheduled moves 68078, completed 68078, hiccups 0, stepErrors 0, LaErrors 0, Underruns [0, 0, 68], CDDA state -1
=== DDARing 1 ===
Scheduled moves 0, completed 0, hiccups 0, stepErrors 0, LaErrors 0, Underruns [0, 0, 0], CDDA state -1
=== Heat ===
Bed heaters 0 -1 -1 -1 -1 -1 -1 -1 -1 -1 -1 -1, chamber heaters -1 -1 -1 -1, ordering errs 0
Heater 0 is on, I-accum = 0.1
Heater 1 is on, I-accum = 0.0
=== GCodes ===
Movement locks held by null, null
HTTP* is doing "M122" in state(s) 0
Telnet is idle in state(s) 0
File* is idle in state(s) 0
USB is idle in state(s) 0
Aux is idle in state(s) 0
Trigger* is idle in state(s) 0
Queue* is idle in state(s) 0
LCD is idle in state(s) 0
SBC is idle in state(s) 0
Daemon is idle in state(s) 0
Aux2 is idle in state(s) 0
Autopause is idle in state(s) 0
File2 is idle in state(s) 0
Queue2 is idle in state(s) 0
Q0 segments left 0, axes/extruders owned 0x80000003
Code queue 0 is empty
Q1 segments left 0, axes/extruders owned 0x0000000
Code queue 1 is empty
=== Filament sensors ===
check 0 clear 0
Extruder 0 sensor: ok
=== CAN ===
Messages queued 3501655, received 7362086, lost 0, errs 1, boc 0
Longest wait 3ms for reply type 6029, peak Tx sync delay 385, free buffers 50 (min 48), ts 1794782/1794781/0
Tx timeouts 0,0,0,0,0,0
=== SBC interface ===
Transfer state: 5, failed transfers: 0, checksum errors: 0
RX/TX seq numbers: 61870/61870
SPI underruns 0, overruns 0
State: 5, disconnects: 0, timeouts: 0 total, 0 by SBC, IAP RAM available 0x24cfc
Buffer RX/TX: 0/0-0, open files: 0
=== Duet Control Server ===
Duet Control Server version 3.5.2 (2024-06-12 07:09:26, 32-bit)
HTTP+Executed:
Executing M122
Code buffer space: 4096
Configured SPI speed: 8000000Hz, TfrRdy pin glitches: 0
Full transfers per second: 38.85, max time between full transfers: 369.7ms, max pin wait times: 247.8ms/17.5ms
Codes per second: 1.04
Maximum length of RX/TX data transfers: 8184/1756
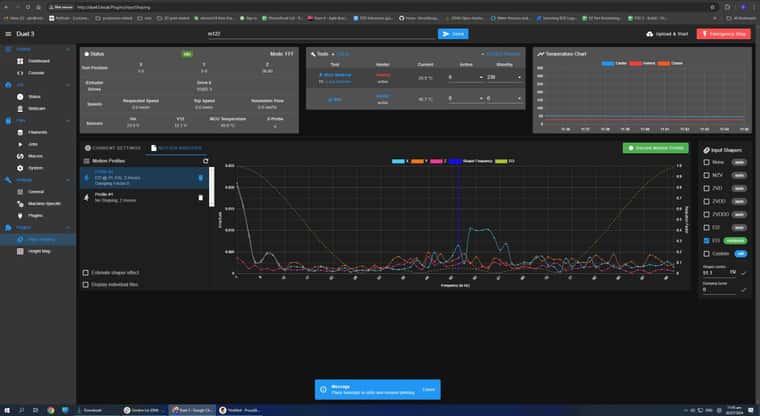
Also see attached pictures below for before and after input shaping numbers (I have no idea if these are good or bad numbers):

EDIT: Below is a print done with the same G code file but with input shaper disabled, same vibration pattern (pardon the filament change 
Any input is welcomed, thank you for your help.
Kind regards,
Gordon
")