Thank You!
I wasn't sure... Then I can check that off the list and figure out what else it must be.
Cheers,
Gumby
Thank You!
I wasn't sure... Then I can check that off the list and figure out what else it must be.
Cheers,
Gumby
I have been using my homebrew delta machine, and I am still fuzzy on the mesh comp commands.
Here is what I have been using on my start gcode in my slicer:
G28 ; home all axes
G30 ; Probe Z height
G29 ; Probe Bed comp
G1 Z5 F5000 ; lift nozzle
M80 ; start pump
So here is my question. I saw running M561 cancels mesh comp. So, do I need a command other than my G29 to enable it? I was running a large circular shape, and my nozzle was getting way too close on one side, so that made me think maybe the G29 command only created the mesh file, but did not enable it. Does anyone here have insight on this topic?
Thanks in advance.
Gumby
I changed a lot of variables, but it seemed to boil down to reducing acceleration and maximum instantaneous speed change.
It has introduced corner blobs, but now I will try to dial in pressure advance and accelerometer tuning.
So thanks for helping me work the issue out.
Cheers,
Gumby
It seems like it may be mechanical.
I have been trying several more fixes and will post when I come to some sort of conclusion in case it helps someone else.
Cheers,
Gumby
I have my machine up and running, but have this mysterious problem.
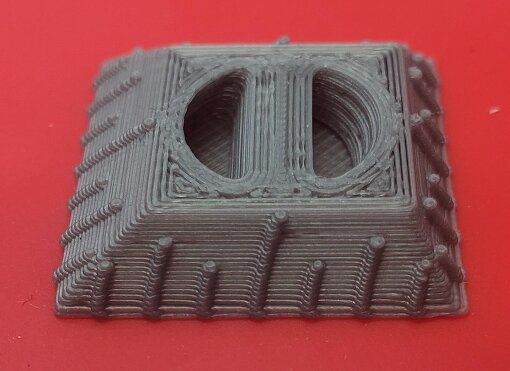
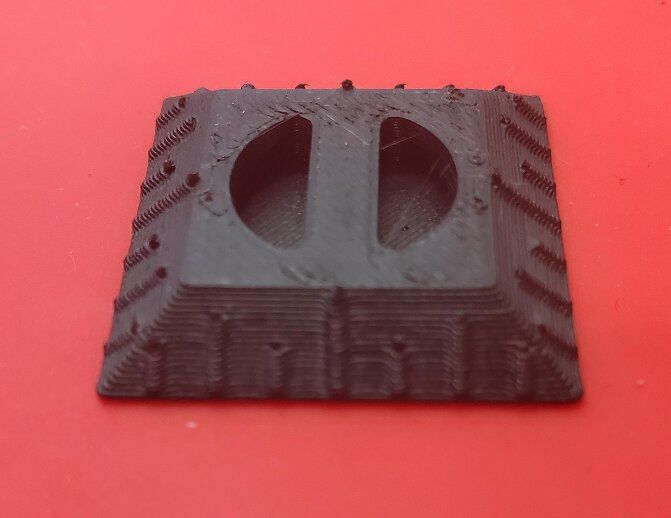
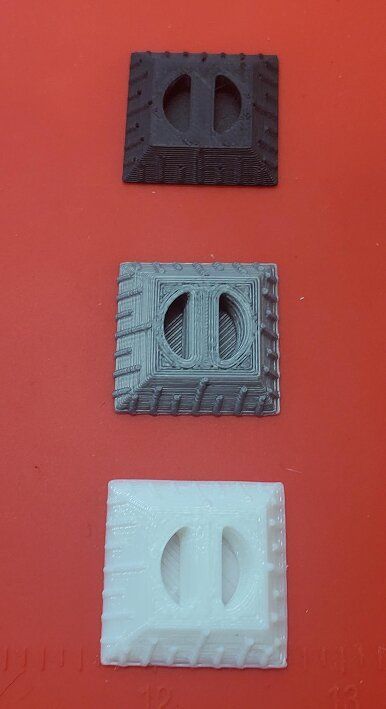
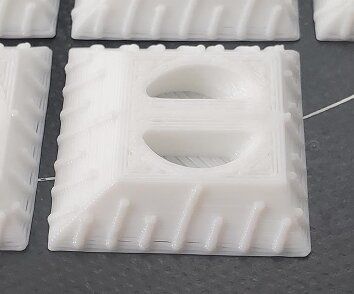
When I grow my parts, the one axis is slanted. (See Pics). ( I printed one good one on my other printer to show what they should look like.)
I have no idea why this is occurring. I have quadruple checked every parameter I can find. I re-sliced, changed settings, tried changing the amperage on the motors in case there was lost steps, but it has no skipping, and everything seems smooth. It is also repeatable, which makes a lost steps issue seem unlikely to me. Has anyone else seen this, or how I may approach troubleshooting this problem?
Thanks in advance.
Gumby
(Duet3 Mini+ Wifi, with Smart effector on a delta rig 24v. liquid cooled, zesty nimble extruder)
Here is my config file contents.
; Configuration file for Duet 3 Mini 5+ (firmware version 3.3)
; executed by the firmware on start-up
;
; generated by RepRapFirmware Configuration Tool v3.3.16 on Thu Apr 20 2023 10:24:19 GMT-0400 (Eastern Daylight Time)

; General preferences
G90                                           				; send absolute coordinates...
M83                                           				; ...but relative extruder moves
M550 P"Predator"                              				; set printer name
                                                          ;M665 X -0.137°, Y 0.131°, Z 0.000°
M665 R232.466 L450.7 B185 H408.062              			; Set delta radius, diagonal rod length, printable radius and homed height
M666 X0.43 Y-0.05 Z-0.38                                 	; put your endstop adjustments here, or let auto calibration find them
M81 C"!pson" 								  				; allocate the PS_ON pin to power control but leave power off
;M579 X1.0309 Y1.0245 Z.9935								; Scale Compensation

; Network
M552 S1                                       				; enable network
M586 P0 S1                                    				; enable HTTP
M586 P1 S1                                    				; enable FTP
M586 P2 S1                                    				; enable Telnet

; Drives
M569 P0.0 S1                                  				; physical drive 0.0 goes forwards
M569 P0.1 S1                                  				; physical drive 0.1 goes forwards
M569 P0.2 S1                                  				; physical drive 0.2 goes forwards
M569 P0.3 S1                                  				; physical drive 0.3 goes forwards
M584 X0.0 Y0.1 Z0.2 E0.3                      				; set drive mapping
M350 X16 Y16 Z16 E16 I1                       				; configure microstepping with interpolation
M92 X160.00 Y160.00 Z160.00 E5700             				; set steps per mm
M566 X3000.00 Y3000.00 Z3000.00 E36.00      				; set maximum instantaneous speed changes (mm/min)
M203 X18000.00 Y18000.00 Z18000.00 E1800.00   				; set maximum speeds (mm/min)
M201 X8000.00 Y8000.00 Z8000.00 E120.00      				; set accelerations (mm/s^2)
M906 X1200 Y1200 Z1200 E500 I30               				; set motor currents (mA) and motor idle factor in per cent
M84 S30                                       				; Set idle timeout
M591 D0.3 P2 C"io5.in" S1  					  				; filament monitor connected to E0 endstop
M591 D0.3									  				; display filament sensor parameters for extruder drive 0
M376 H30                                                    ; Taper mesh comp over 30mm of distance from Zero.

; Axis Limits
M208 X-9999:9999 Y-9999:9999 Z-9999:9999 					; set axis minima and maxima


; Endstops
M574 X1 S1 P"io6.in"                          				; configure switch-type (e.g. microswitch) endstop for high end on X via pin io0.in
M574 Y1 S1 P"io1.in"                          				; configure switch-type (e.g. microswitch) endstop for high end on Y via pin io1.in
M574 Z1 S1 P"io2.in"                          				; configure switch-type (e.g. microswitch) endstop for high end on Z via pin io2.in

; Z-Probe
M558 P8 R0.4 C"io3.in+io3.out" H5 F1200 T6000 				; set Z probe type to effector and the dive height + speeds
;M558 H30                                      				;*** Remove this line after delta calibration has been done and new delta parameters have been saved
G31 P100 X0 Y0 Z-0.1                              			; set Z probe trigger value, offset and trigger height
M557 R185 S40                                 				; define mesh grid

; Heaters
M308 S0 P"temp0" Y"thermistor" T100000 B4138  				; configure sensor 0 as thermistor on pin temp0
M950 H0 C"out0" T0                            				; create bed heater output on out0 and map it to sensor 0
M307 H0 R0.399 K0.380:0.000 D1.32 E1.35 S1.00 B0 			; disable bang-bang mode for the bed heater and set PWM limit
M140 H0                                       				; map heated bed to heater 0
M143 H0 S120                                  				; set temperature limit for heater 0 to 120C
M308 S1 P"temp1" Y"thermistor" T100000 B4138  				; configure sensor 1 as thermistor on pin temp1
M950 H1 C"out2" T1                            				; create nozzle heater output on out1 and map it to sensor 1
M307 H1 R2.382 K0.347:0.000 D6.45 E1.35 S1.00 B0            ; disable bang-bang mode for heater  and set PWM limit
M143 H1 S300                                  				; set temperature limit for heater 1 to 300C

; Fans
M950 F0 C"out5" Q500                          				; create fan 0 on pin out5 and set its frequency
M106 P0 S0 H-1                                				; set fan 0 value. Thermostatic control is turned off
M950 F1 C"out6" Q500                          				; create fan 1 on pin out6 and set its frequency
M106 P1 S1 H1 T45                             				; set fan 1 value. Thermostatic control is turned on

; Tools
M563 P0 D0 H1 F0                              				; define tool 0
G10 P0 X0 Y0 Z0                               				; set tool 0 axis offsets
G10 P0 R0 S0                                  				; set initial tool 0 active and standby temperatures to 0C

; Custom settings are not defined

; Miscellaneous
M575 P1 S1 B57600							 				;Panel Due enable command
T0                                           				; select first tool
Thank you everyone,
I will look into all of that info.
Cheers,
Gumby
I have a CNC machine that shows the active codes for the machine.
i.e. absolute/relative, pump on/pump off/ compensation, etc.
I really like having that info and I was wondering if that existed in the interface, or how to poll the machine for that info.
Thanks in advance.
Gumby
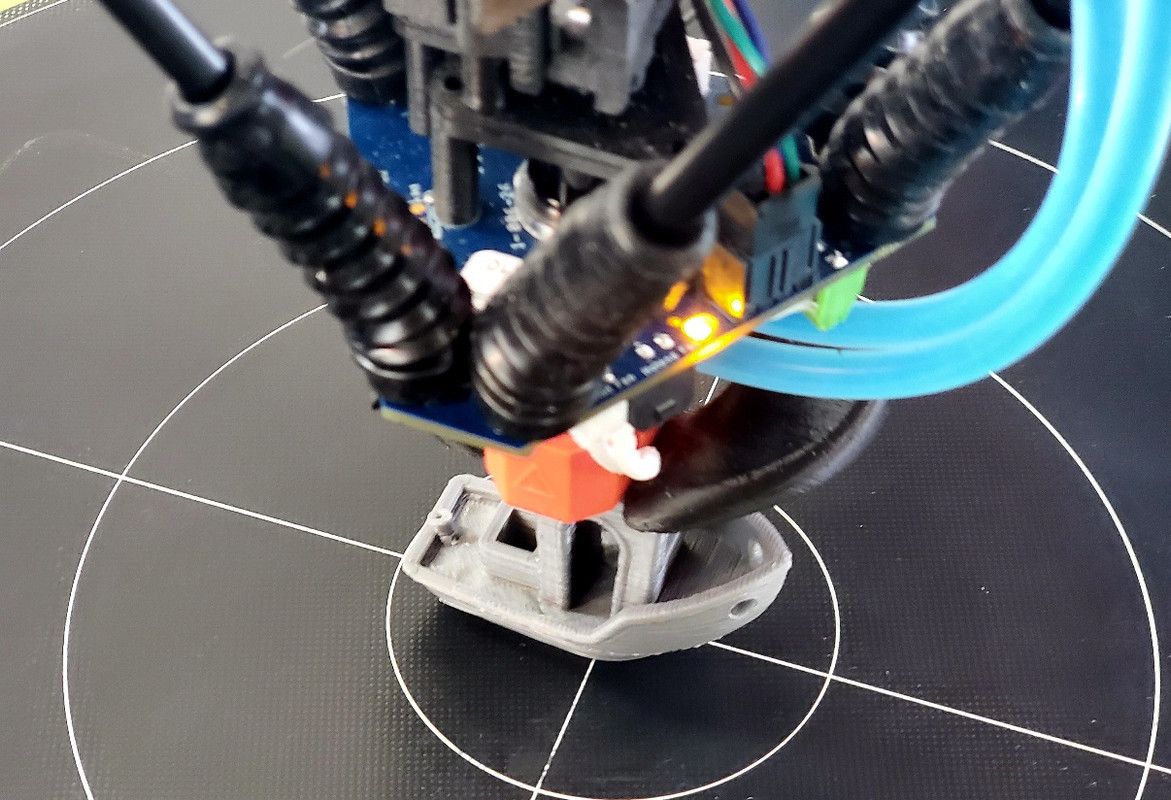
I finally did my first test print on my upgraded Anycubic Predator.
It still needs tons of tweaking, but I'm beyond excited that it even printed first try.
![20230508-074610[1].jpg](/assets/uploads/files/1683555724131-20230508-074610-1.jpg)
I was pretty intimidated to do my own home brew machine, but I love the predator footprint, but hated everything else. (Hotend, Control system, Delta Arms, cooling, etc.) So I decided to jump in the pool and try.
I want to first say thank you to the people on the forum that answered my questions. I was breaking lot of new ground here and was pretty intimidated, so thanks for getting me up and running when I got stuck.
Here is what I put together. Hayden Magarms, Zesty NImble V3 extruder, Duet3 mini 5+ wifi, liquid cooled hotend, Thermaltake liquid cooling system, Smart effector, PanelDue, relays controlling pump, and external fan controllers. I custom designed the cooling fan system based on a CFD duct system I saw on Youtube.
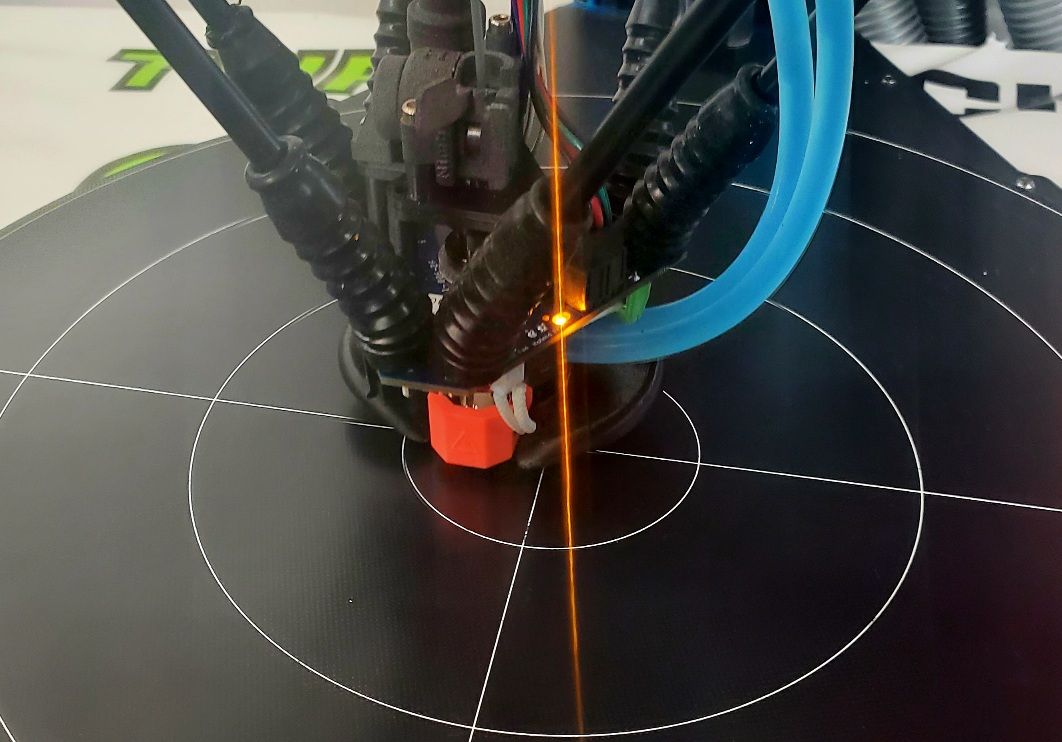
I am so jazzed to see it move. It felt like the eternal project and I hit a lot of roadblocks, but at least its running.
I realize now that I need to write an effective pre and post gcode, but that will be my next hurdle.
Anyway, just saying thank you, and can't wait to see this thing perform once I have the enclosure and gcode worked out.
Cheers,
Gumby
I have a Relay control on my upgraded Anycubic Predator.
I noticed I could enable the web interface to have the ON/OFF toggle for pson.
Is there a way to create functionality like that on PanelDue?
I looked several times in the documentation, but I cannot find info on macros or customizing.
Where do I get that information.
Duet3 5+ Wifi, Smart Effector, PanelDue 5, current stable firmware.
Thanks,
Gumby
Just to finalize the topic, I wanted to post that mixing pins from available headers worked like a charm.
PanelDue working now.
Thanks again to this community.
Cheers,
Gumby
@michaxy I was having similar mystery problems at first, and it was always associated with a low voltage error.
Could it be a power supply issue? Do you have a spare you could test it with?
Cheers,
Gumby
@CCS86 I always think of travel moves as rapids. G0. But I would second that printing moves involve the extruder. G1
Cheers,
Gumby
Good Morning,
I am upgrading my Anycubic Predator.
I have Duet3 5+ mini wifi, smart end effector, Filament Sensor, PanelDue, Optical Endstops, Relay board, stepper motors, and obviously an extruder.
So I am running out of pins.
Here is my ask. If I have unused pins on some of the IO_1-4 headers, and a free 5V pin, is there a reason not to Frankenstein a set of wires to random pins to get a new endstop?
The issue I am having, is that I did not know IO-0 and the PanelDue connector share the same circuit, and it said not to dual use it. So I need to free up IO_0 for the PanelDue which currently has an endstop attached to it,
One last note, I tried firing my optical endstop from 3.3V, (which would have solved the problem) but it did not have enough juice. So I have to get 5v and an empty input or sacrifice the PanelDue.
(Getting Close)

Thanks in advance for any wisdom on this topic.
Gumby
Just a quick note, I stumbled on the "pson" reference on IO4. I have not heard of this before so I dug around and found I can do exactly what I am trying to do by enabling the pson in the config file and now I have an on/off switch that is in the web interface. I can also control it via. M80 and M81 .
I am not declaring it a total victory yet, because I don't know if that snafus up something else in the process. But so far so good. Now I just have to figure out a way to incorporate it into my pre and post in my slicer when the time comes. I also want to make sure I have it working during filament changes/ hotend temps, etc.
Just thought it may help someone else as well.
Cheers,
Gumby
I see the M950 command to set up a pin. Where I am getting confused is how do I know what type of flag to add to the command.
Here is what it says...
  Hnn Heater number
Fnn Fan number
Jnn Input pin number (RRF 3.01 and later only)
Pnn or Snn Output/servo pin number.
Rnn Spindle number (RRF 3.3 and later only)
Dn (Duet 3 MB6HC running RRF 3.4 or later only) SD slot number. The only value supported is 1.
En (RRF 3.5 and later only) LED strip number
C"name" Pin name(s) and optional inversion status
Qnn (optional) PWM frequency in Hz.
Lbbb or Laaa:bbb (optional, for spindles only, RRF 3.3 and later)
Kaaa(:bbb[:ccc]) (optional, for spindles only, RRF 3.5 and later)
I just want an output pin to go to 5V when I send the command in Gcode. So I am not sure which type. Fans have speed and I don't need that... Heaters have PID or bang bang, but does that require a temp input? It's not exactly PWM, although it may be interesting to see if it could leverage PWM for the speed of the pump. It's not a spindle... gah... it's confusing...
Gumby
I am trying to do a liquid cooled hotend. I have a Thermaltake 12V pump, but all my other electronics on the Predator is 12V, so I thought the best way would be to control the pump from Gcode.
Gumby