I have a duet wifi board and wish to get some advise about the best bed calibration. Currently have an adjustable precision aluminium plate heated with a 220V silicone pad with a glass plate. As the printer is fully encased, the manual adjustment is difficult to tweak. What is the best option (not necessarily the cheapest) Which is the best probe around easily adaptable to my duet wifi?
mendelevium
@mendelevium
A level standard of education- studied physics, pure and applied mathematics, chemistry and Engineering. I have been in the Machining business for the past 30 years or so. Wire eroders, 5 axis wire cut, 5 axis turning and 4 axis milling centers.. All Self taught - but Year ago interested myself in 3d printing. Bought a Prusa kit which was mediocre and I built it in metal and has 4 extruders. It cost a bomb to do.. then I decided to build a large 350 x 350 3d printer... nearly done and its all metal cnc machined.
Was intended for Ramps but now will go for the duet.
I intend driving into the 3d printing entirely, producing high end printers. Duet seems to be the best option around.
I intend to build a single, dual, color mixing and a multicolor type. The printer has Hywin guides for all axis and now looking at possibility to modify my printer go for balls-crews as an option, closed filament.
Best posts made by mendelevium
-
Best probing choiceposted in IR Height Sensor
-
RE: Upgrading Firmware.posted in Firmware installation
many thanks all who put an imput. Its appreciated a lot. Have a nice weekend.
-
RE: Laser Filament sensor with Microswitchposted in Duet Hardware and wiring
@alankilian
Thanks again my friend... I found out that the ground wire was a bit short and I pulled it out from the ferrule of the connector... -
RE: Motors for duet 2 wifiposted in Tuning and tweaking
@Phaedrux
I wish to clarify some thing about my printer.
I have set the power to 1000. The Belts are not tight. Just tight enough.just to indicate my level of understanding on the matter, I own and run a CNC machine shop with various Vertical machining and turning centers/eroders/wire cut machines, programming and servicing for around 35 years.
This printer is one of two prototypes I designed and manufactured and spent much time with it. I wish to maybe market in the future. It is made entirely of metal,
This particular 3D printer runs reciprocating ball slides in X,Y and Z and I am prototyping running X and Y with reciprocating ball 12mm bal-lscrews. It has water cooling, twin extruders, and fully enclosed. Running it with a Duet is certainly a fitting suitable option.
The motors have to rotate faster and more with the balls-crews but certainly much stronger.
Yes the heat bed is a bit heavy as it is made from a 6mm machined frame and the bed is around 400 x 400 mm with a 3 mm borosilicate glass.
The extruders are custom made with a 1:3 reduction gearbox- spent around a year developing them.
The bottom line...
Now when I home- if I home at F100, the homing is smooth. Even movement is smooth, however on increasing the feed, like F500, there is noise and the motors vibrate... If I increase the feed like F1000, the motors will simply vibrate and whine and do not move.
I am thinking of switching to 24V and maybe go for the nema x 60mm larger motors. I can`t easily switch to an other type as it will involve extensive modifciations.
many thanks for your feedback.
Coming to ,
-
RE: Upgrading Firmware.posted in Firmware installation
managed to run the extruders now. Apparently, I edited the config as per suggestion on a forum.. don not know if it was this or any other honestly since I had found it days ago and screen shot it out, But the extruders are running nicely by command..
-
RE: Thermisors showing wrong temperaturesposted in Tuning and tweaking
@dc42
you were absolutely right in this as the sensors were thermistors. The resistance was 118 Ohms. Thermocouples do not have any or infinity. I was really misguided. I connected everything and tested and the temperatures showing are actual off by 1-2 degrees.My profound apologies for the din I created but I am sure I have learnt something else.
many thanks to everybody who lent a hand. -
RE: The back off might not be proper in relative position.posted in Tuning and tweaking
@dc42
took off that comment and the error vanished... thanks so much
the matter is closed..
Latest posts made by mendelevium
-
Setup for a small milling machineposted in CNC
I have successfully produced a large 3d printer with ballscrews with a duet wifi board.
I do have an additional one and I am thinking of converting a micro milling machine (X-100mm Y-50mm and Z 100mm- with a spare board I have. Have anybody done this and anybody can put some links here for me to follow? I am an experienced CNC machinist and built a lot of equipment in my life so it should be easy if it is doable...
Thanks for any help. -
RE: Tweaking my firmware for a better print.posted in Tuning and tweaking
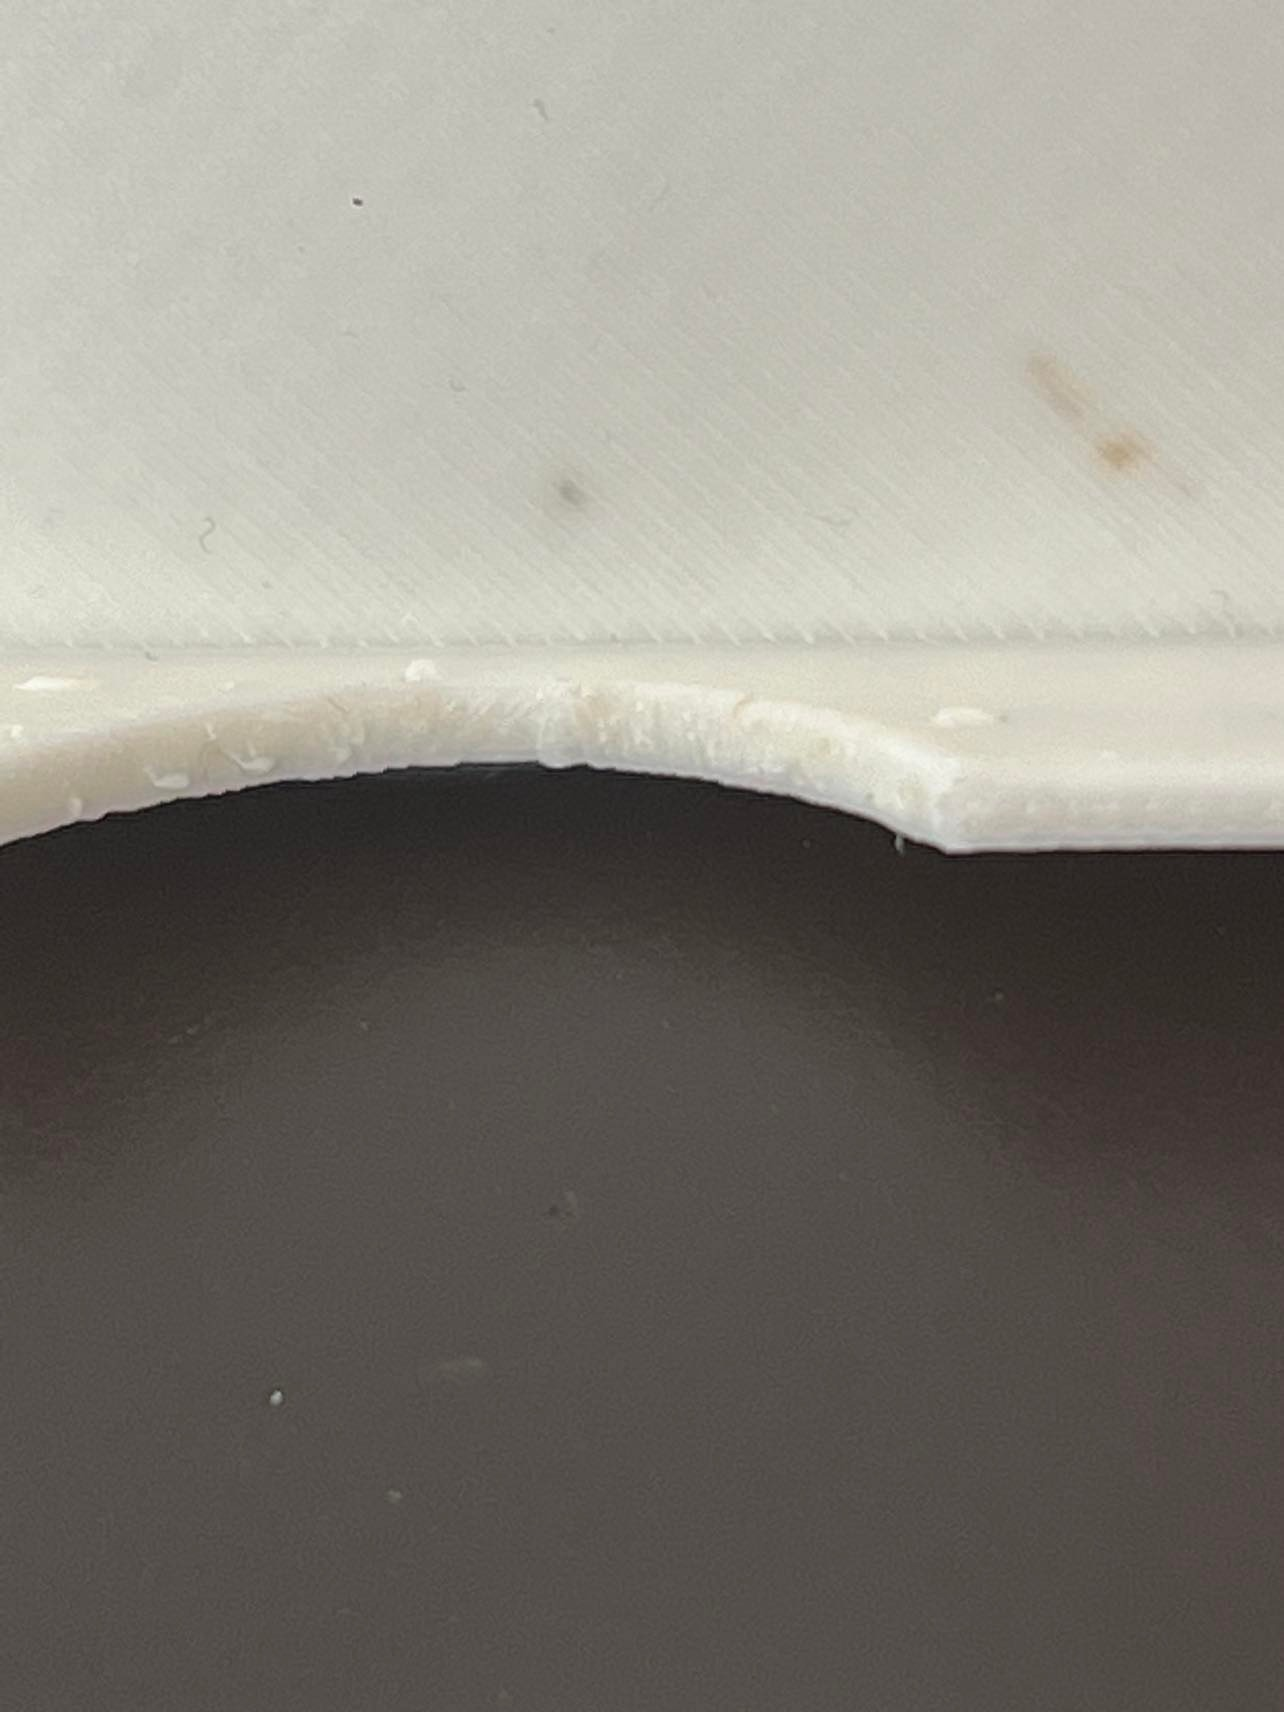
@Phaedrux have yo taken a look at the slicer settings? the machine has a bowden extruder
-
RE: Tweaking my firmware for a better print.posted in Tuning and tweaking
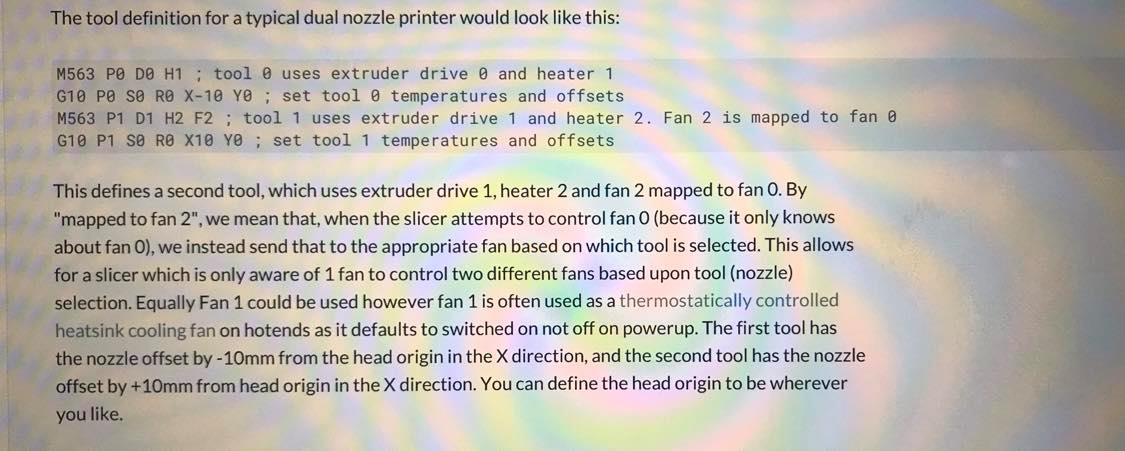
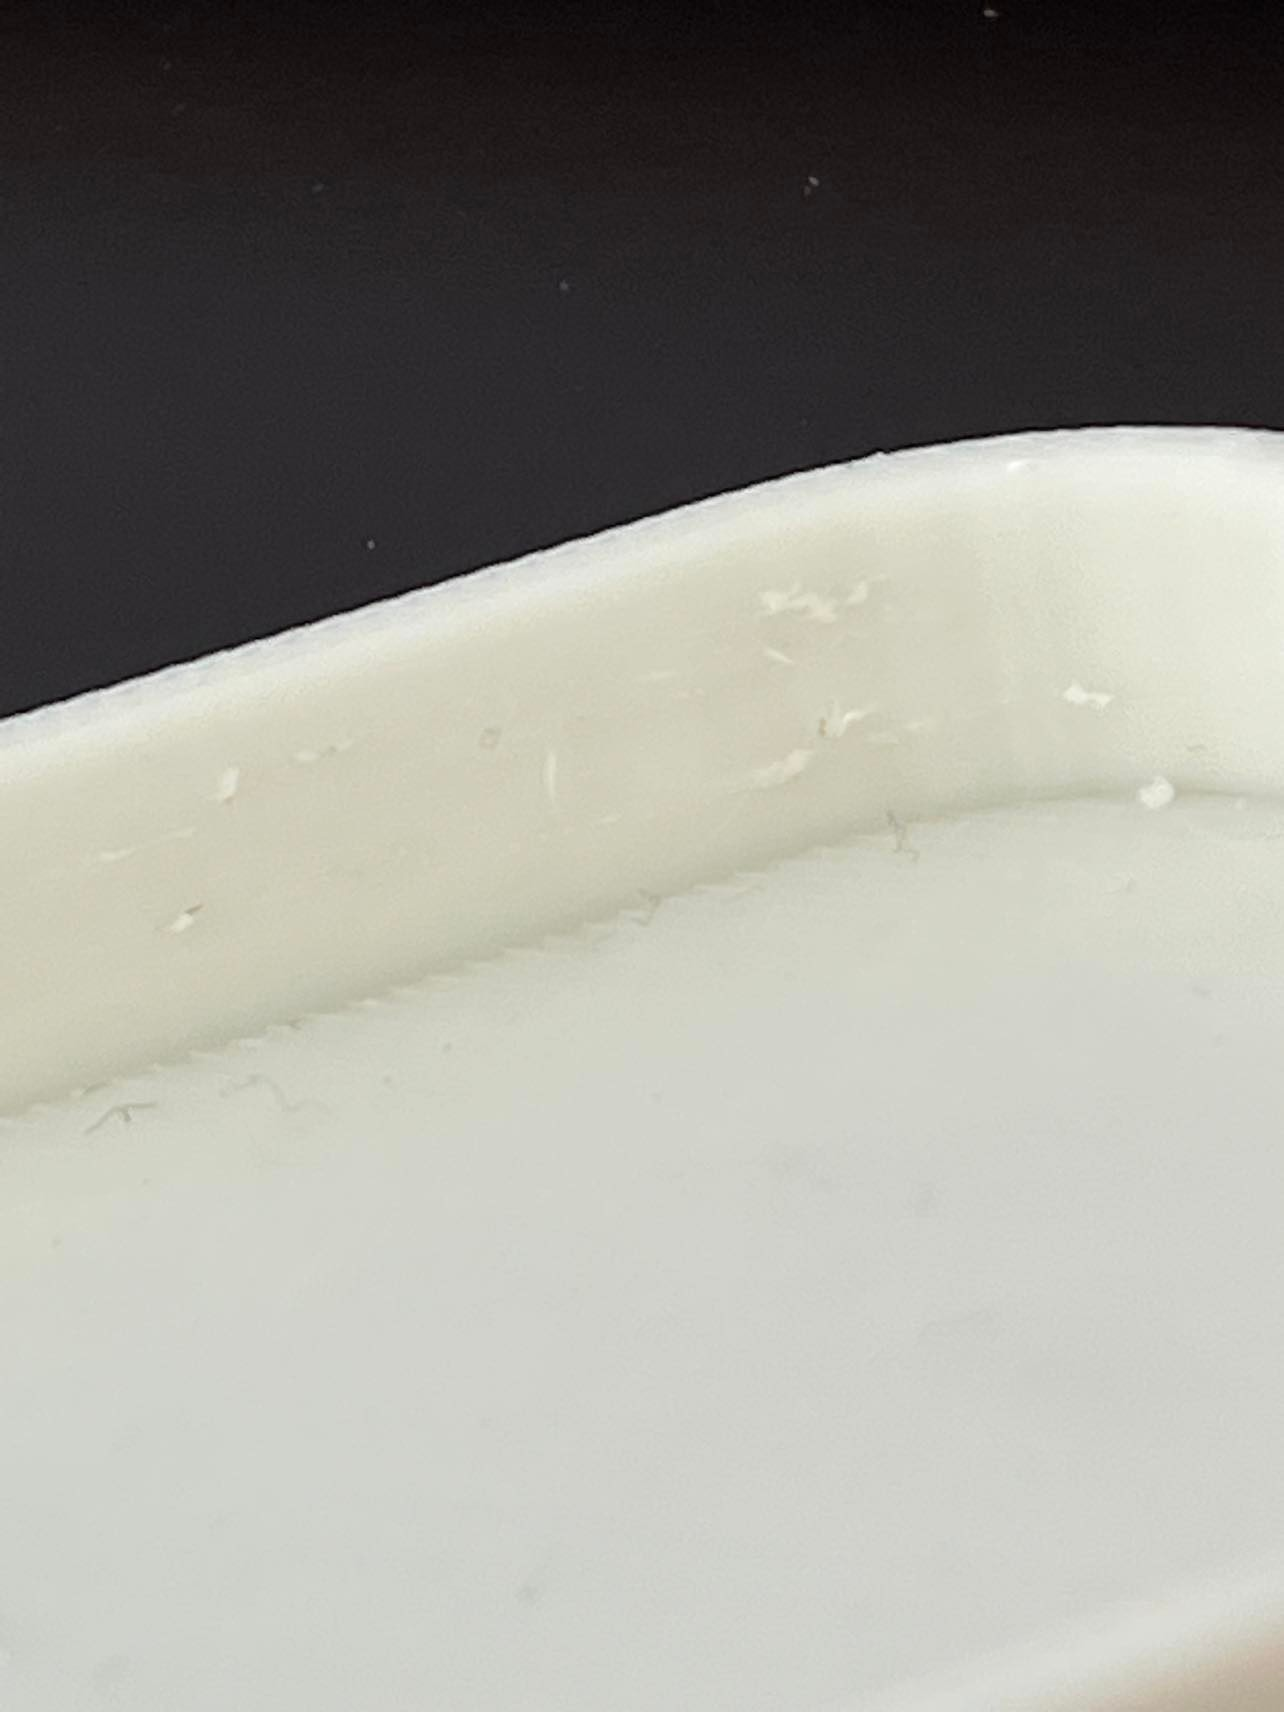
@Phaedrux the material does not look great but the blob pieces all over are what is bothering me more.
-
RE: Tweaking my firmware for a better print.posted in Tuning and tweaking
These were worse since I already had cleaned off the sides a bit...
-
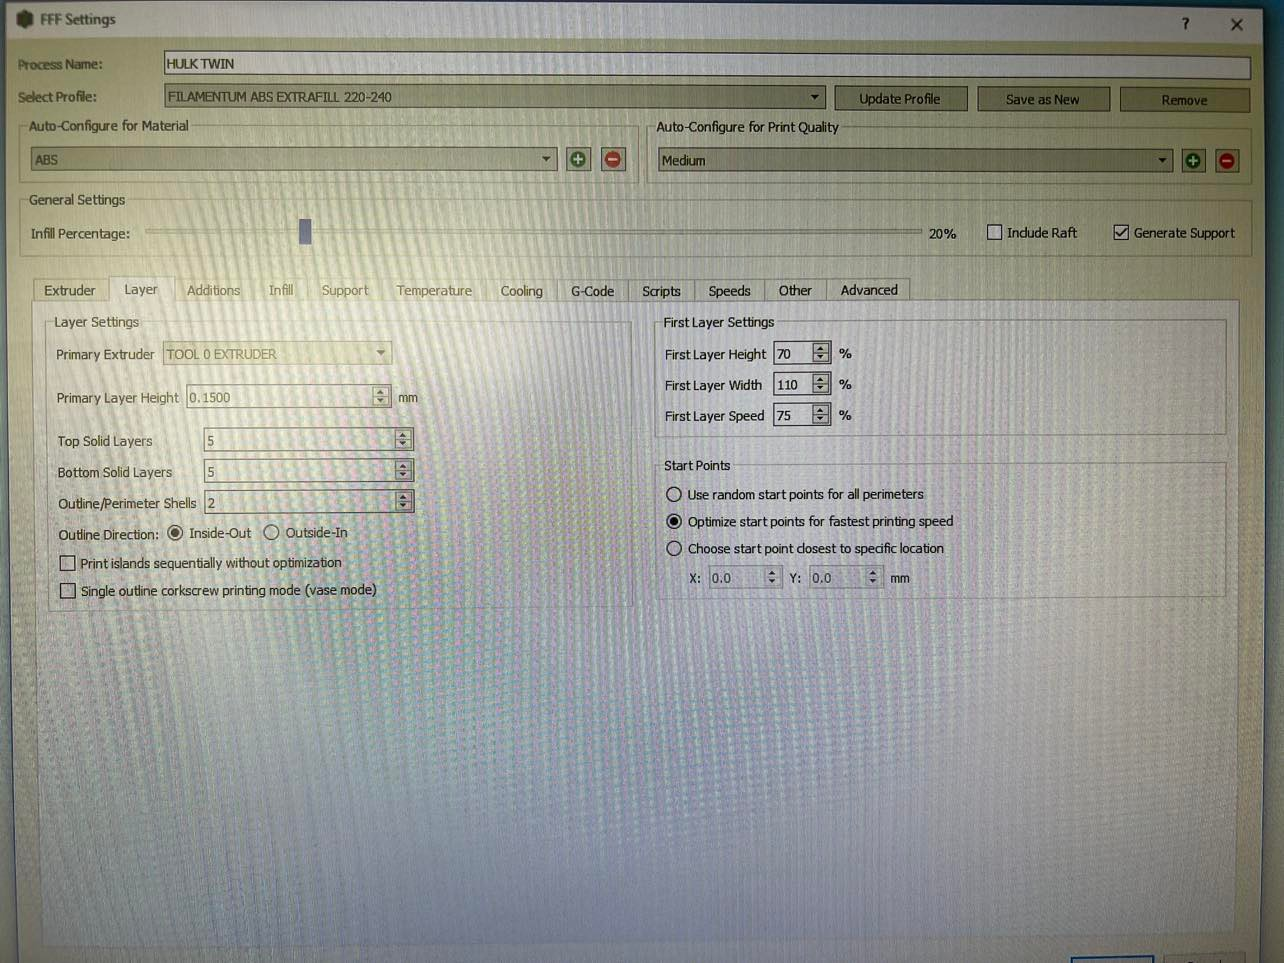
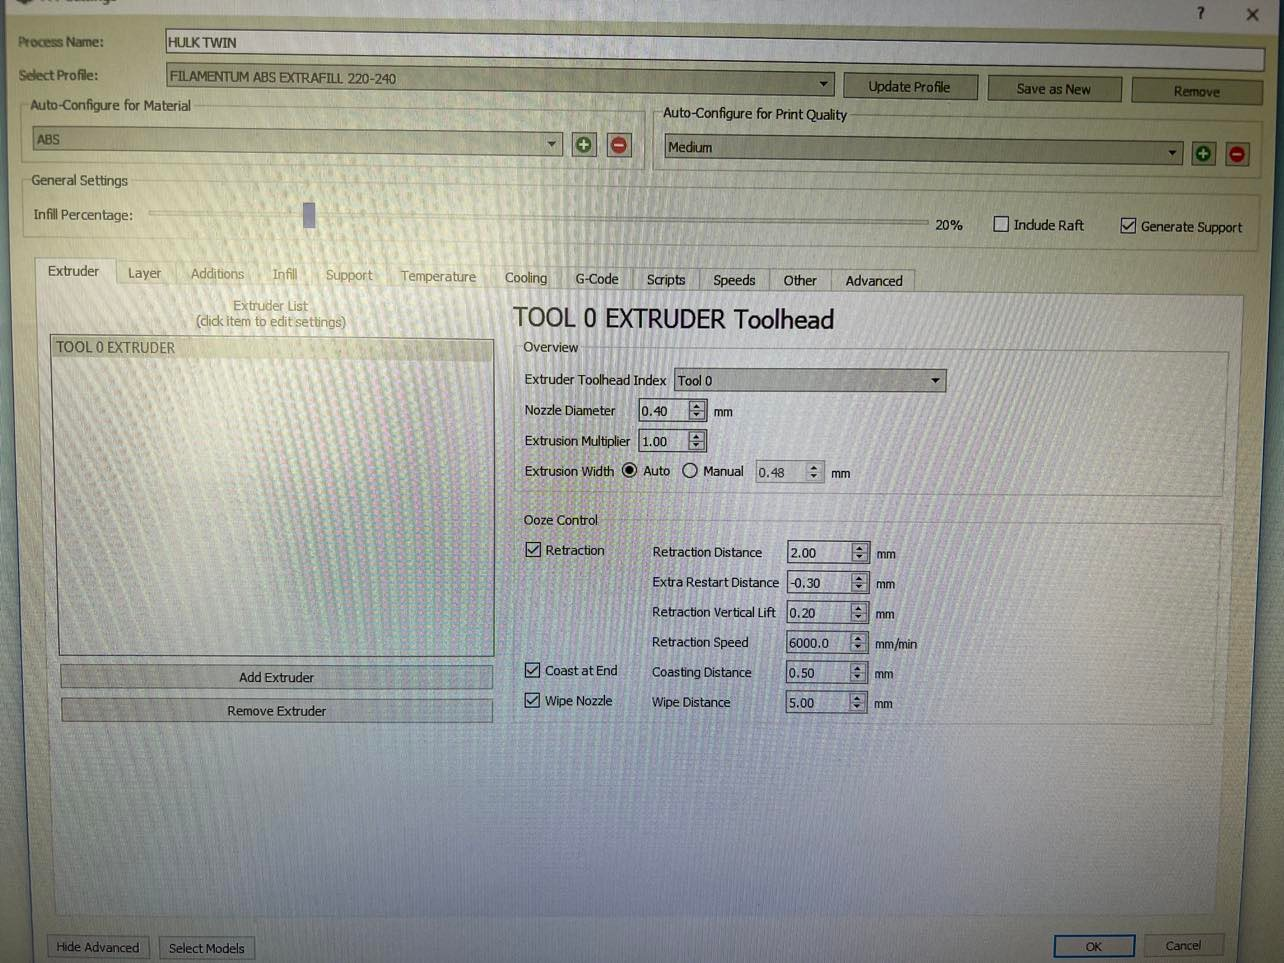
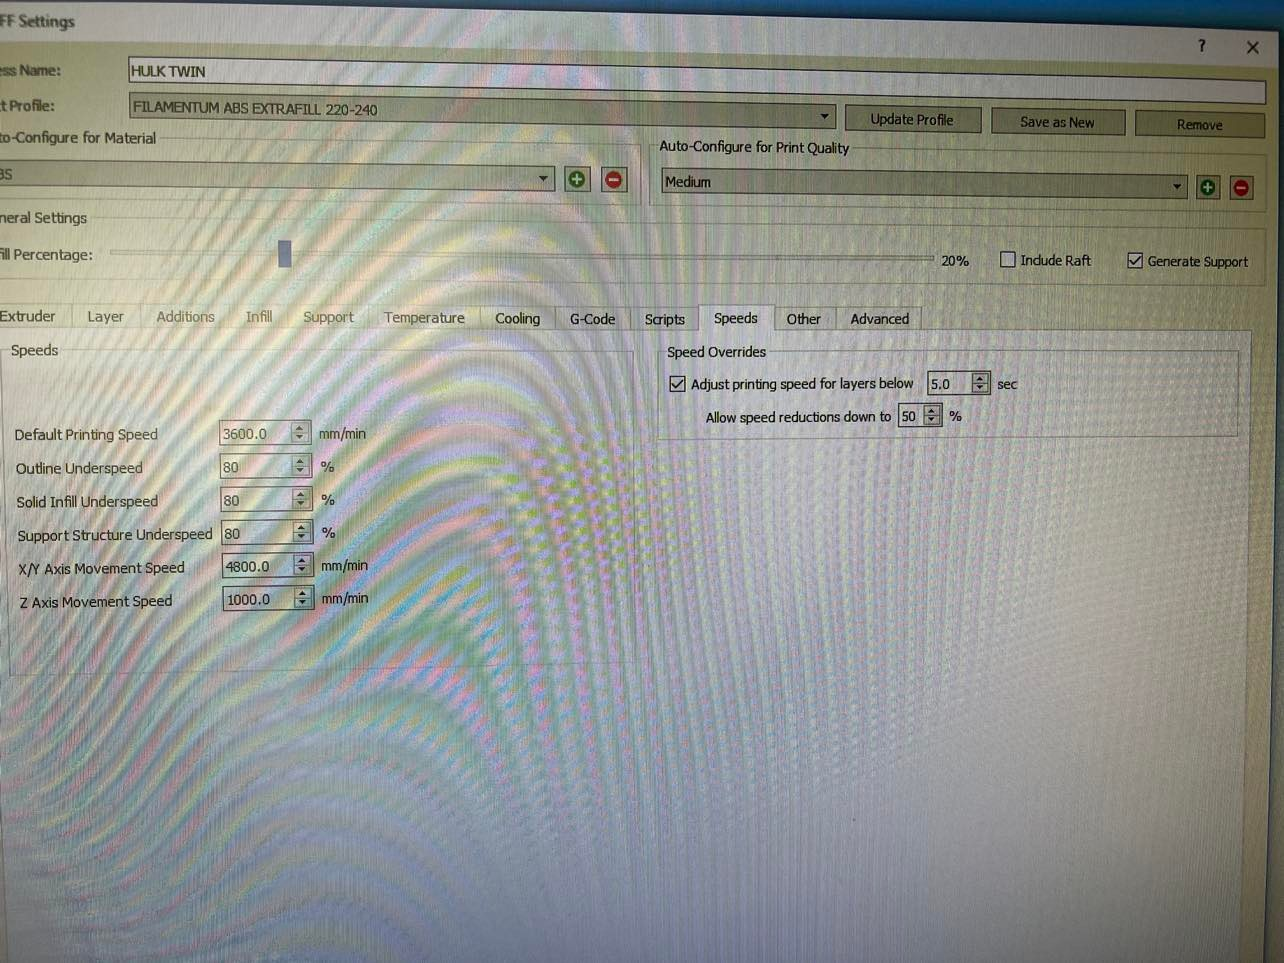
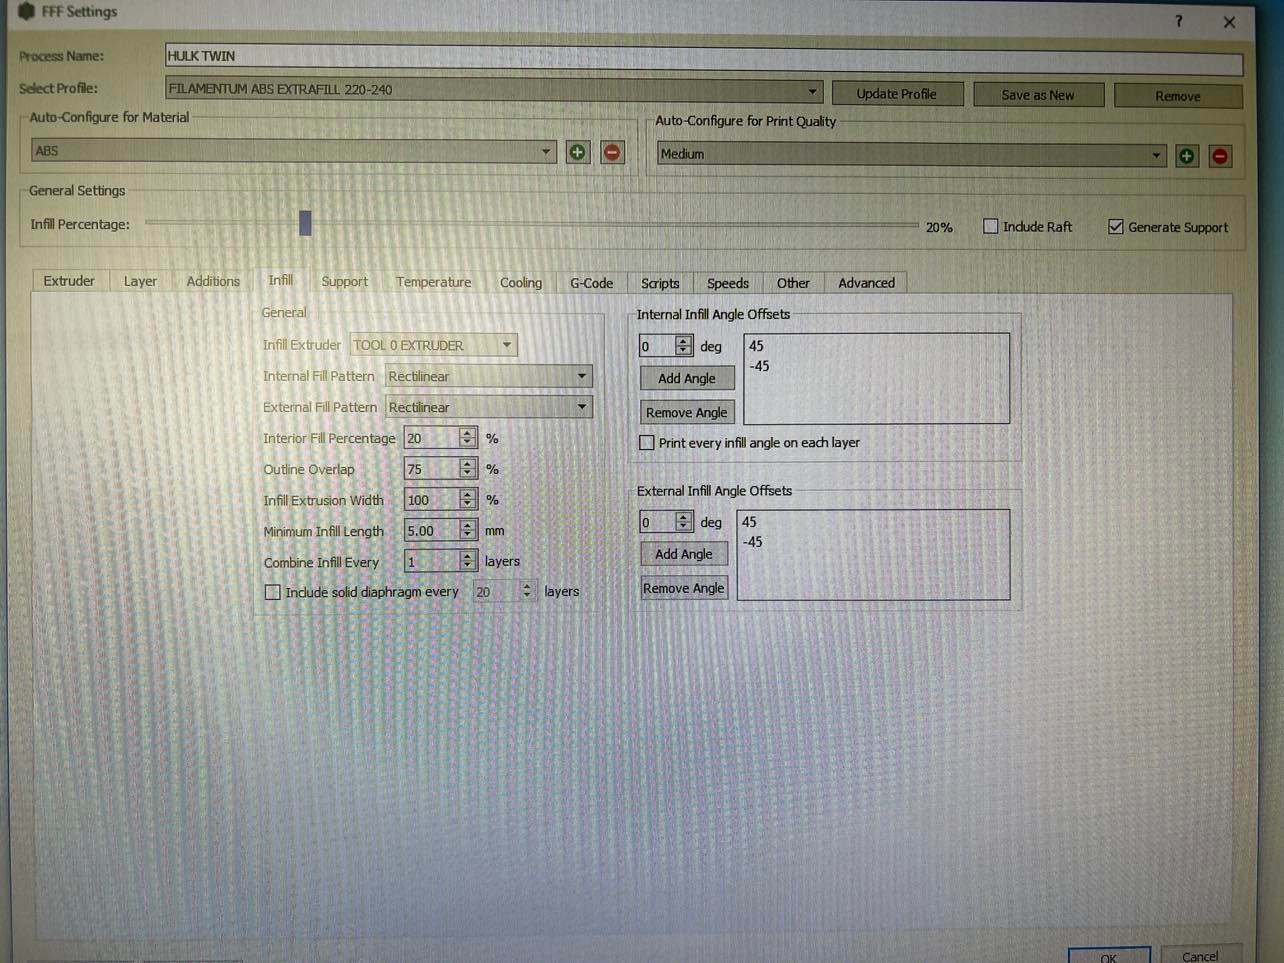
Tweaking my firmware for a better print.posted in Tuning and tweaking
I have a 3d printer which I produced. The X and Y movements are with a 2.5mm pitch x 16mm ball screws.
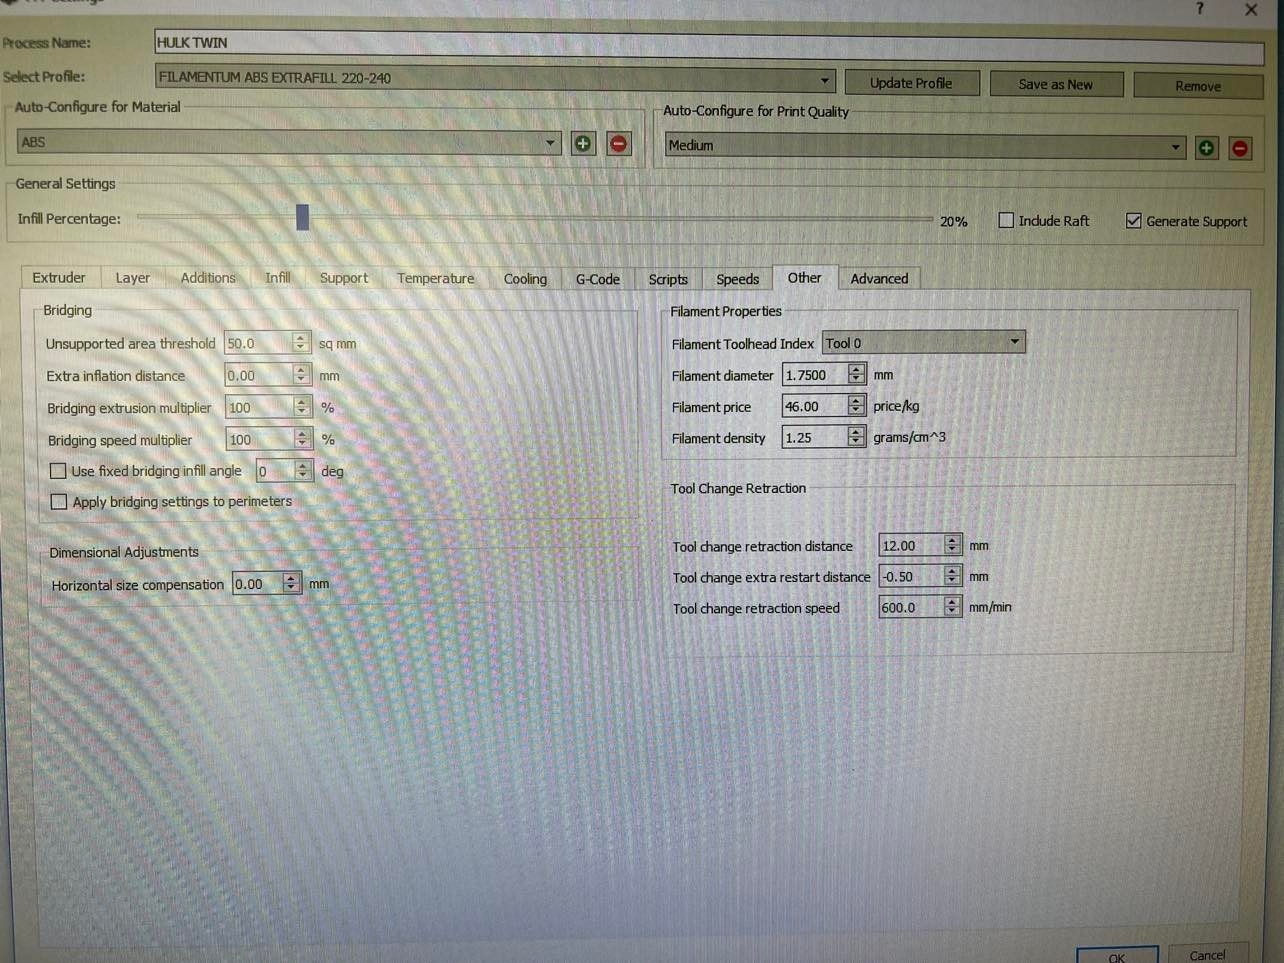
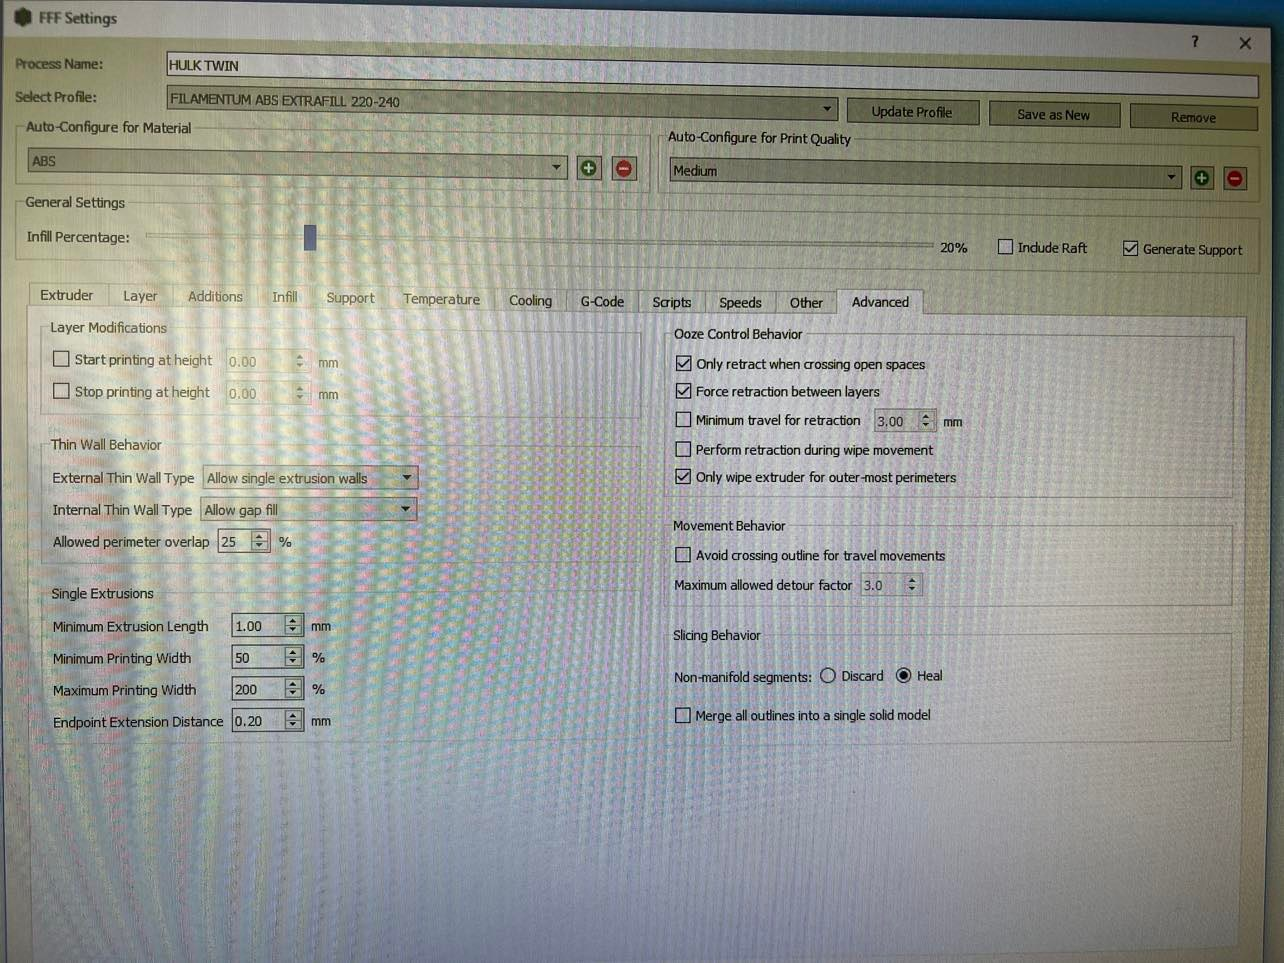
I am not so happy with the print quality and get various blobs... I have looked around and tweaked but still not happy with the print quality. The same printer produced impeccable prints with just a Ramps/Arduino board but I believe it must be some adjustments I need to make in the firmware. Now some commands are placed in the 3d Slicer. I use simplify 3D and I have pasted the startup and end script. Any suggestions by you experts with duet 3D welcome. what I am not happy most is that I get a lot of blobs all over. I have checked the interpolation steps and they are as suggested in the forum. Many thanks in advance.; Configuration file for Duet WiFi (firmware version 3)
; executed by the firmware on start-upM81 ; Pin PS ON (State is normally on but just in case it was put off by M code M80)
; PRESSURE ADVANCE
;M572 D0:1 S1.50:1.50
;placed pressure advance command in simplify 3d start script; GENERAL PREFERENCES
G90 ; send absolute coordinates...
M83 ; ...but relative extruder moves
M550 P"MENDELEVIUM 3D HULK TWIN TOOLS" ; set printer name; NETWORK SETTINGS
M552 S1 ; enable network
M586 P0 S1 ; enable HTTP
M586 P1 S0 ; disable FTP
M586 P2 S0 ; disable Telnet; NOTE DRIVES S0 FORWARD S1 REVERSE
;DRIVES ORIENTATION
M569 P0 S1 ; X physical drive 0 goes backwards
M569 P1 S1 ; Y physical drive 1 goes forwards
M569 P2 S1 ; Z physical drive 2 goes backwards
M569 P3 S0 ; E0 physical drive 3 goes backwards
M569 P4 S1 ; E1 physical drive 4 goes backwardsM584 X0 Y1 Z2 E3:4 ; set drive
;MAPPINGS
;M350 X16 Y16 Z16 E16:16 I1 ; configure;MICROSTEPPING WITH INTERPOLATION SETTINGS
M92 X160 Y160 Z400.00 E297.80:297.80 ; set steps per mm;SETTING OF INSTANTANEOUS MAXIMUM SPEED CHANGES IN MM/MIN
M566 X1000.00 Y1000.00 Z100.00 E750.00:750.00;MAXIMUM SPEEDS IN MM/MIN
M203 X4000.00 Y4000.00 Z2000.00 E2400.00:2400.00;SET ACCELERATION IN MM/SEC SQUARED
M201 X500.00 Y500.00 Z20.00 E250.00:250.00;MOTORS MAXIMUM CURRENT
; NOTE 60 mm steppeprs max current 2.1A
; NOTE Board max current 2.4A
M906 X2100 Y2100 Z2100 E1200:1200 I30;SET IDLE TMEOUT
M84 S30;AXIS LIMITS OF MINIMUM TRAVEL
M208 X0 Y0 Z0 S1;AXIS LIMITS OF MAXIMUM TRAVEL
M208 X345 Y301 Z261.05 S0; ENDSTOPS
M574 X2 S1 P"xstop" ; configure active-high endstop for high end on X via pin xstop
M574 Y2 S1 P"ystop" ; configure active-high endstop for low end on Y via pin ystop
M574 Z2 S1 P"zstop" ; configure active-high endstop for high end on Z via pin zstopM558 P1 I0 C"zprobe.in" H5 R0.2 F1000 X0 Y0 Z100 ; piezo inserted 12/12/22
;DEFINITION OF MESH GRID MOVED TO MACRO BED MAPPING
;M557 X15:215 Y15:195 S20;CONFIGURATION OF THERMISTORS
;HEATBED
M308 S0 P"bedtemp" Y"thermistor" T100000 B4138 ; configure sensor 0 as thermistor on pin bedtemp
;HOTENDS 0-e0
M308 S1 P"e0temp" Y"thermistor" T100000 B4138 ; configure sensor 1 as thermistor on pin e0temp
;Hotend 1-e1
M308 S2 P"e1temp" Y"thermistor" T100000 B4138 ; configure sensor 2 as thermistor on pin e1temp;MAPPING OF HEATER OUT PUT TO SPECIFIC SENSORS
;HEATBED
M950 H0 C"bedheat" T0 ; create bed heater output on bedheat and map it to sensor 0;MACHINE HEATERS
M950 H1 C"e0heat" T1 ; create nozzle heater output on e0heat and map it to sensor 1
M950 H2 C"e1heat" T2 ; create nozzle heater output on e1heat and map it to sensor 2;AUTOTUNED M307
;HEATBED
M307 H0 R1.058 C224.9 D2.17 S1.0 V24.3 ; autotuned value;HOTEND 0
M307 H1 R2.407 C189.6:163.8 D4.90 S1.00 V24.3 ; autotuned value;HOTEND 1
M307 H2 R2.562 C179.0:165.4 D3.60 S1.00 V24.3 ; autotuned value;MAXIMUM HEATER TEMPERATURES
;S VALUE IS MAX PERMITTED TEMPERATURE
;HEATER 0-BED
M143 H0 S110 ; set temperature limit for heater 0 to 120C;HOTEND 0
M143 H1 S310;HOTEND 1
M143 H2 S310HEATBED MAPPING
M140 H0 ; map heated bed to heater 0; FANS TO COOL PART ON NOZZLE 1 & NOZZLE 2
M950 F0 C"fan0" Q500 ; create fan 0 on pin fan0 and set its frequency
M106 P0 S0 H-1 ; set fan 0 value. Thermostatic control is turned off
M950 F1 C"fan1" Q500 ; create fan 1 on pin fan1 and set its frequency
M106 P1 S0 H-1 ; set fan 1 value. Thermostatic control is turned off;WATER COOLER
M950 F2 C"fan2" Q500 ; create fan 1 on pin fan1 and set its frequency
M106 P2 S0 H-1 ; set fan 1 value. Thermostatic control is turned off; Tools as per forum instruction
M563 P0 S"EXTRUDER 0" D0 H1 F0 ;TOOL 0 USES DRIVE 0 AND HEATER 1
G10 P0 S0 R0 X-16.5 Y0 ; set tool 0 axis offsets
M563 P1 S"EXTRUDER 1" D1 H2 F1 ; define tool 1
G10 P1 S0 R0 X16.5 Y0 ; set tool 1 axis offsets; FILAMENT MONITOR LASER WITH MICROSWITCH
; R Values may need setup according to different filaments
;TEMPORARY DEACTIVATED FILAMENT MONOTOR
;M591 D0 P6 C"e0stop" R1:600 E30 S1
;M591 D1 P6 C"e1stop" R1:600 E30 S1; MISCELLANEOUS
M575 P1 S1 B57600 ; enable support for PanelDue
M911 S10 R11 P"M913 X0 Y0 G91 M83 G1 Z3 E-5 F1000" ; set voltage thresholds and actions to run on power lossSimplify 3d program startup script;-
M81 ; AUTO OFF FUNCTION IS SWITCHED OFF AND LATCHING RELAY IS ON (NORMALLY CLOSED)
G28 Z0 X0 Y0
M106 P0 S0 H-1
M106 P1 S0 H-1
M115 U3.1.0
M83
M140 S90 T0 ;BED temp set
M104 S220 T0 ; EXTRUDER 0 TEMP HEAT
M109 S220 ; Wait until temperatures stabilize
M105
G21
G90
M83
G0 Z299
G0 Y0 X0 F3000
G29 S1; APPLY BEDMESH MAPPING
G0 Z10 F1000
G1 Z0.15 F1000
G92 E0
G1 Y100.0 E25 F400.0
G1 Y200.0 E20 F800.0
G1 Y270 E15 F400.0
G1 Y290 E2 F600
G1 Z25 F300
M106 P2 S255 H-1
M572 D0 S1.25 ; PRESSURE ADVANCE
G0 Z5END SCRIPTS
G91 ;relative position set
G1 Z10 F1000
G1 E-20 F150 ; retarct 20mm of filament to avoid burningM140 S0 ; turn off bed
M104 S0 ; turn off extruder
M109 S50 ; wait for extruder temp to reach cooldown
M106 P0 S0 H-1 ;Cooling FAN 0 Switch off
M106 P1 S0 H-1 ;Cooling FAN 1 Switch off
M106 P2 S255 H-1 ; WATER COOLING HEAD SWITCHED OFFG90 ; Absolute position set
G28 Z0
G91 ;realtive mode
G1 Z-5 F500 ; Z axis lowered 5mm from max
G90 ; absolute mode returned
M84 ; disable motors
M80 ; Auto Off or work ready alarm activated -
RE: Powering off Duet wifi via an M codeposted in Duet Hardware and wiring
@mendelevium
Basically, the PS-ON pin supplies a switched negative ground. Taking a positive from the PSU 12v provides a supply of 12vdc. I use simplify 3d so I put M80 in my start script when a print is started and M81 when a print is finished after all cools down and machine returns to idle state. This can be used to trip my contactor and switches everything off. Thanks for the tip DIY-O_Sphere. -
RE: Powering off Duet wifi via an M codeposted in Duet Hardware and wiring
@DIY-O-Sphere
Thanks for this. Basically you have figured out a good way to meet your needs. Can you please confirm what I have understood....I wish to understand this.
from the circuit you have, the center pin (PS-ON) pin will pulse a ground signal. when you send M81 it is switched off and M80 is switched on right? I will figure out how to go round this... Your diode is just a protection right? I think you have explained the method nicely. Well done and thanks for sharing> -
RE: Automatic turn offposted in Duet Hardware and wiring
@mendelevium
My apologies posted twice as I could not find my original post and thought I did not post... sorry... -
Automatic turn offposted in Duet Hardware and wiring
I have a 3d printer in which I wish to turn off power automatically.. There are various posts but they are a minefield and I do not wish to damage anything... My machine has a contactor which is switched on, has a latching coil and switched off by interrupting this coils supply.
I use also simplify 3d in which I can place an M code in its end scripts to effectively activate an electronic relay to interrupt the contactor coil.
I need to know if I can use the P S on terminal and what else? Do I need to place anything in my config?
I appreciate someone guide me in this.
Many thanks in advance, -
Powering off Duet wifi via an M codeposted in Duet Hardware and wiring
I wish my machine to switch off after completing a print. My machine has a built in contactor which I activate by a push switch.. I need a way to power an electronic relay which will interrupt the contactor`s solenoid in turn switching off the machine. I have read various ideas but I am afraid to put my board in jeopardy risking burning something. I use simplify 3D which lets the machine switch off heaters etc and the idea is to add another M code which will activate this relay and switch everything off. Thanks for any ideas.