• Tags
  • Documentation
  • Order
  • Register
  • Login
Duet3D Logo Duet3D
  • Tags
  • Documentation
  • Order
  • Register
  • Login
  1. Home
  2. SlimShader
  • Profile
  • Following 0
  • Followers 0
  • Topics 15
  • Posts 64
  • Best 6
  • Controversial 0
  • Groups 0

SlimShader

@SlimShader

12
Reputation
8
Profile views
64
Posts
0
Followers
0
Following
Joined 6 Mar 2018, 20:41 Last Online 11 Oct 2022, 13:45
Location Marlow, UK

SlimShader Unfollow Follow

Best posts made by SlimShader

  • My Scalable Delta

    Hi all!

    I'd like to present my latest Delta design to you all.

    The aim of this design was to create a scalable platform which uses what I consider to be the best available components. My requirements are:

    • Scalable from large (XXL 400+ XY, 300+Z) size to monstrous (XXXL 650+XY, 1100+Z)
    • Be 'enclosable'
    • Have a choice of removable bed surfaces
    • Quick change tooling
    • Have a simple assembly, manageable by one person alone
    • Be capable of creating very large, accurately sized, high strength parts in reasonable times
    • Be able to print common materials such as PLA, PETG, ASA, ABS
    • Have a low count of overall parts
    • Use 'best of breed' parts where possible
    • Design printed parts so that they can be produced on a 'normal' sized 3D printer
    • Be as 'open source' as possible

    I think for the most part I've managed to achieve the above, and have created a design which stands up to heavy use without breaking a sweat. Between the two machines I've created with this design, I've performed around 2000 hours printing so far.

    The design is heavily influenced by such machines as Johann's excellent Mini Kossel and the T3DP3D version of that machine which I used for several years. During that time I was able to spot some of the weaknesses and wear failure points after a long period of heavy use which didn't quite work for my use case, and make changes accordingly in my version.

    The generic specification for my design is:

    • 4040 V-Slot aluminium frame
    • Meanwell 24v 400W PSU for electronics
    • Duet3d Duet Wifi /PT100 daughterboard
    • Duet3d Smart Effector
    • Duet3d PanelDue 5i/7i
    • Duet3d Magnetic Filament Monitor
    • E3D Supervolcano / 0.8mm nozzle (standard)
    • E3D Super Whopper 1.8 degree motors or E3D High Torque 0.9 degree motors
    • E3D Hermera Bowden Extruder
    • Capricorn Bowden Tubing
    • Mains driven 1.8kw Keenovo bed heater with Celduc SSR
    • 5mm thick aluminium bed base plate with mounting for removable PEI coated steel sheets, Schott Robax Glass plate etc
    • 6mm/8mm Carbon Fibre parallel arms (depending on tool weight) with Haydn's Delrin sleeves for magnetic coupling
    • Gates Powergrip 2GT 9mm belts
    • Solid V Xtreme carriage wheels

    Obviously, some of the components would need to be sized or customised depending on the size of the machine being built. The main differences when scaling the machine would be the length of 4040 extrusion required, along with the bed components, belt lengths and the carbon fibre toolhead arms.

    The two example machines I've assembled have the following specifications:

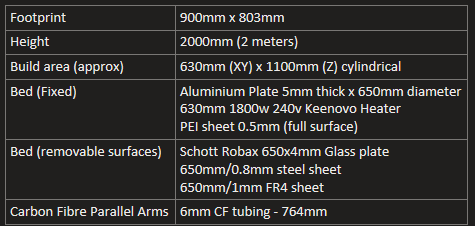
    BigBoy - The size of this machine was constrained by the space I had available to house and develop it, otherwise it likely would have been even bigger! It uses the generic specification with the following differences:

    e4bc2419-74d5-4111-8858-a178733f38b7-image.png
    PXL_20211129_115923661.jpg
    20200106_195606.jpg

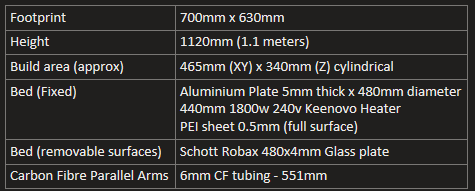
    LittleSis - The baby of the pair was to see how small I could build a machine with the same design. It's turned out to be extremely rigid, and takes up almost exactly half of a dining room table, which means your better half will surely approve of it in the dining room.

    2b34fd38-98cd-4c11-8db7-48c03cf48762-image.png
    PXL_20210324_143607919.jpg
    The LittleSis machine also benefits from an enclosure which has greatly aided with printing larger models in materials such as ABS. The current enclosure design is basic to say the least and is more of a very efficient draft blocker than a proper enclosure, however this is down to me using only 2mm thick Correx sheets in order to prove the design. Now that I know it will work, I will likely replace the panels with a thicker aluminium faced sheets, add proper insulation and actively heat the enclosure as required for the job at hand. Even as it stands though with passive heating, I've noted the chamber temperature getting up to around 55c just being passively heated by a 110c bed!

    PXL_20211113_181523511.jpg

    In terms of print speeds, I've found that the design easily out performs my other consumer machines with stock profiles - on average with the prints being produced in slightly less than half the time when compared with a normal bed slinger printing at 0.3mm with a 0.4mm nozzle. This is of course largely down to the Supervolcano and a 0.8mm nozzle and Hermera extruder combination and is highly dependent on the slicing profile being used, and whether or not Pressure Advance etc is being applied. Profiles definition and tuning is a huge part of getting an machine to perform well, and for me at least seems to be a never ending cycle of testing and experimentation. I have managed to produce several 'stock' profiles for different print requirements such as 0.2mm Detail, 0.4mm Normal and 0.6mm Draft, however these are more starting points in my view and I'm constantly tweaking them depending on the print job. I have to say, it's very satisfying to be able to produce a print which is not only double the size and height of my other machines capabilities, but also have it complete in hours, rather than days!

    PXL_20210429_192227702.jpg PXL_20210429_192215361.jpg PXL_20210429_192206746.jpg

    The machine specification technically allows for far greater than 350mm/s movement speeds in all axis, and frame is rigid enough to support this. Since moving to a magnetically coupled tool head though, I've restricted movement speed to 180mm/s in travel moves, as I didn't fancy finding a toolhead embedded in the wall opposite the machine if the magnets failed. To be fair this was me being what I consider sensible, rather than any bad experiences driving this decision! Indeed on one toolhead, which used ball joints and M4 hardware to secure it, I was able to run the larger machine at 300mm/s during print moves without any issues other than intolerable ringing in the resulting printed model. This could be something I return to later once I nail the intricacies of Input Shaping on Duet machines. For now though, having the clear print time reductions with the extruder and hot end choices have made this a lower priority other than curiosity.

    During my design and assembly processes I've used several different sized nozzles with the SuperVolcano, including 0.6, 0.8, 1.0,1.2 & 1.4mm. I've landed on the 0.8mm as being the best balance between speed and quality, so this is my default on this specification.

    In terms of cost per machine…I can say that the two I've built are considerably more expensive than what the next person could expect, as I've gone through a lot of product testing - meaning I bought & discarded components as I made my final decisions. However, one of my considerations was that these machines should be affordable and accessible to those with the inclination to build one, so I haven't gone too crazy. If one was printing all the parts themselves, and sourcing all the parts from the usual suspects online, I'd expect an average build for a smaller machine to be around £1200 GBP, which for machines of this size and capability I'd say is pretty reasonable. Of course, the cost mentioned doesn't include filament to print the parts (you'd need around 6kg of PETG, and 1kg of ABS), fasteners, wiring, switches or interconnects. Depending on your choices there, it could add between £150-£500 GBP to the overall cost.

    Additionally, aside of the basic machine, there are companion designs for custom electronics mounting, lighting, machine enclosures, filament spool holders, magnetic tool hangers etc.

    If there is any interest in the design, I will include a full BOM for both of my example machines on an upcoming website, along with a library of printed parts, design files and assembly instructions. This would also cover all of the safety features I've included such as thermal cut-outs, emergency stop switches and safety settings to be made in the firmware, along with nice-to-have's like Bowden Pop-Out monitoring.

    Again, if there is interest in the design from the community I might be willing to put together kits of pre-printed parts and/or other 'stock' components for the build - let me know if you're interested!

    posted in My Duet controlled machine
    undefined
    SlimShader
    29 Nov 2021, 12:11
  • My Scalable Delta - release

    Re: My Scalable Delta

    Hi all,

    I have finalised all of the design elements including parts, BOM and assembly instructions for the Scalable Delta - I intend to release it on the usual repositories over the next day or so, including Github, but for now it can all be found here.

    Please do let me know if you decide to build one - I'd love to hear your feedback!

    I intend the design to be completely open source but haven't yet sorted the OSH license yet as I'm not very familiar with how it works or if its even applicable for this. I will state here though, that you are free to use, modify etc any or all elements of the assembly specifics that I have designed including for any potential commercial use. All I ask in return is a name credit and links back to the original files.

    Finally, I will also be releasing kits, likely two styles - one with printed parts only and another which would be a complete BOM for the two standard sizes I used as examples. Again, let me know if this is of interest to you!

    Colin

    posted in My Duet controlled machine
    undefined
    SlimShader
    4 Feb 2022, 11:42
  • RE: E3D Super Whopper stepper motor behaving strange on DUET 2

    I had issues with one of these, and it turned out my belt was too heavily tensioned. These motors have very long shafts, so require support at the end if you are going to tension them to more than a loose fit. I got around it by redesigning the mounts to include an enclosed 608 bearing which the end of the motor shaft slides into - since doing that no issues with grinding or over heating. Hope this helps!

    posted in Tuning and tweaking
    undefined
    SlimShader
    2 Jan 2021, 00:06
  • Stored values for multiple bed surfaces

    Evening all! I had a quick search but unless I'm using the wrong key words I don't see anything relating to this - feel free to shoot me down and prove me wrong!

    My use case is my various Delta's use a variety of build surfaces and tools depending on the job at hand - for example, I may need to print PLA on a PEI surface, then swap to glass for a PETG job because I need a perfectly flat bottom etc, or Tufnol for nylon etc.

    Obviously I need to calibrate when changing tools/surfaces (I only use a G32 auto-cal before each print, and don't use G29 mesh levelling), and generally I need to adjust the IR probe G31 trigger height - especially if I move tools from say a standard 0.4mm to a 1.2mm nozzle.

    The only thing I came across which might allow me to define on-the-fly changes of tools/trigger height etc is the Filaments section in DWC - am I on the right lines here in that I could for example place a G31 statement in there which would override the config.g? Also being able to place a custom M665 there might be useful too, but I'm not sure this would override the config.g statements. I am aware that I could write it directly into the gcode, but this isn't always ideal.

    I do recall somebody asked something similar recently, but I couldn't find it - perhaps my question was already answered in which case I apologise for my lack of search-fu.

    Just for reference, my machines are running 0.85 gen 1 Duets with the 1.26.1 firmware, and the Duet Wifi's are running 2.04.

    Just musing here...let me know what I've missed (as I'm sure I have)!

    posted in General Discussion
    undefined
    SlimShader
    22 May 2020, 21:54
  • InputShaping-Plugin-0.2.0-pre8 initial thoughts and questions

    Re: InputShaping-Plugin-0.2.0-pre8 released

    Hi @mfs12! I just wanted to give some initial feedback on the plugin, based on my playing around with it for a week or so.

    Firstly, wow...you're definitely on the right track here with functionality. It's awesome to be able to try out different algorithms and settings in a batch format and be able to compare the results - fascinating stuff!

    In terms of usage, some more explanation of what we are looking at, suggestions on logical starting points and how to interpret & implement the results and recommendations would be great for people like myself who are not very familiar with the process would be fantastic. Whilst I appreciate that this is all pre-release/under development etc, in order to be able to give proper feedback I need at least a cheat sheet on usage and how to measure success. Saying that though, I'm personally equally happy just playing around to see what happens - I'd just like to do that a bit more efficiently!

    So I'd like some feedback on my current process for using the plugin - I suspect I'm making some mistakes or most likely missing tricks.

    I pretty much follow the release notes 'howto' section:

    • Create a new session, and select it

    • Move to Configure and select axis, start/stop motion constraints

      • Question - Do I base all of my measurements on one axis only? Or should I be performing measurements on one axis, then running additional sessions for the other two axis? If so, how does one combine separate sessions to evaluate the 'overall' changes?
    • Add all available types of input shaping, using defaults
      Untitled.jpg
      Question - I can see that Frequency/Damping/Min' Accel' can be configured - how do I ascertain which values to use if not the defaults? My assumption is that you run a baseline measure measurement with no input shaping, and change the values based on observed vibrations?

    • Move to record and hit run

    • Switch to Frequency analysis and try to look like I know what I'm talking about until the wife leaves the room.
      Untitled2.jpg

    • Move to Recommend, and select the 'none' record with no shaping and hit Run Recommendation

    • Question - The resulting table gives me a bunch of results which I can kind of make sense of. I know I'm supposed to sort by integral, and look at the smaller ones - so far so good. Why is the recommended frequency changed to 11.02hz though? I thought the biggest low end spikes were observed between 38 and 53hz???

    Anyway, at this point I start to get very confused. I can swap between the different recommended records and see on the FFT which ones look like they have the lowest amount of vibration recorded.
    Untitled3.jpg

    Looking at this, I can see that record 5-ei3-7ea0cadf+mzv X is giving great results.
    Untitled4.jpg
    So how do I implement that? Looking at the record, its recommending 11.03hz in this instance, so I use M593 P"mzv" F11.03 in the console.

    Now this I think makes sense - however it's just the X axis calibration right? Should I now be taking further measurements of Y/Z and somehow combining the results?

    Incidentally, by using the MZV shaper as described above, I did see a good improvement in print quality, reducing X axis ringing significantly. However, it's still showing on the Y axis at the same degree as without any shaping at all.

    Overall, I'm really happy so far - this is interesting and has a positive impact on print quality - but obviously there is still a ways to go.

    I'm happy to continue feeding back and asking dumb questions if it helps with the development too!

    Colin

    posted in Plugins for DWC and DSF
    undefined
    SlimShader
    15 Dec 2021, 12:11
  • Yes...0.85 boards are still alive! And needing some love...

    Hi all,

    In building up my farm to produce PPE face shields at a more rapid rate, I decided to take my old Kossel XL out of mothballs. The platform is solid and it's printing pretty well straight off the bat, but I wanted to get the thing fully up to date before putting it into production.

    The Kossel uses a generation 1 Duet 0.85 and is running a very old firmware, namely 1.09r-dc42, and web interface HTML 1.09, JS 1.09 from 2016!

    I've looked around in here and on the Duet site but all I can find if gen 2 instructions, and I've got to admit I got lost trying to follow the different pages.

    Does anybody have a link to some clear instructions for updating this old beast? I know there are specific instructions and things to watch out for between versions, and I really don't want to brick a working system...so any advice would be appreciated!

    Many thanks

    Colin

    posted in Firmware installation
    undefined
    SlimShader
    26 Apr 2020, 17:57

Latest posts made by SlimShader

  • RE: My Scalable Delta

    @eddygara said in My Scalable Delta:

    Where can I find the info to this build diagram and parts lsit??

    Hi @eddygara ! You can find all the resources here.

    Let me know if you end up building it!

    Colin

    posted in My Duet controlled machine
    undefined
    SlimShader
    11 Oct 2022, 13:45
  • RE: Duet Wifi Stepper Driver Chips

    @dc42 Thanks! I got a few ordered today.

    posted in Duet Hardware and wiring
    undefined
    SlimShader
    23 Aug 2022, 21:24
  • RE: Duet Wifi Stepper Driver Chips

    @droftarts Thanks!

    posted in Duet Hardware and wiring
    undefined
    SlimShader
    23 Aug 2022, 21:23
  • Duet Wifi Stepper Driver Chips

    Hi all,

    I managed to blow my E0 stepper chip today by miswiring a new motor. It's done a pretty good job of blowing the chip out.

    I had a quick look around and the only ones which seem to be available are the TMC2660C-PA in a 44PQFP package - would these do the job? Looking at the data sheet, the only difference from the original TMC2660-PA seem to be some added low side short protection and quieter motor driving.

    The part I'm looking at is 1460-1059-ND on Digi-key UK. Can anybody please comment if this would work with a Duet Wifi?

    Thanks!

    Colin

    cb0086a6-eb4d-4879-ab11-7321dc78e44a-image.png

    posted in Duet Hardware and wiring
    undefined
    SlimShader
    22 Aug 2022, 22:36
  • RE: My Scalable Delta - release

    @droftarts said in My Scalable Delta - release:

    @slimshader Lovely looking documentation!

    Ian

    Thanks Ian - took me ages, but hopefully it will be good enough to help somebody out!

    posted in My Duet controlled machine
    undefined
    SlimShader
    4 Feb 2022, 12:52
  • My Scalable Delta - release

    Re: My Scalable Delta

    Hi all,

    I have finalised all of the design elements including parts, BOM and assembly instructions for the Scalable Delta - I intend to release it on the usual repositories over the next day or so, including Github, but for now it can all be found here.

    Please do let me know if you decide to build one - I'd love to hear your feedback!

    I intend the design to be completely open source but haven't yet sorted the OSH license yet as I'm not very familiar with how it works or if its even applicable for this. I will state here though, that you are free to use, modify etc any or all elements of the assembly specifics that I have designed including for any potential commercial use. All I ask in return is a name credit and links back to the original files.

    Finally, I will also be releasing kits, likely two styles - one with printed parts only and another which would be a complete BOM for the two standard sizes I used as examples. Again, let me know if this is of interest to you!

    Colin

    posted in My Duet controlled machine
    undefined
    SlimShader
    4 Feb 2022, 11:42
  • RE: InputShaping-Plugin-0.2.0-pre8 initial thoughts and questions

    @dc42 Excellent news!

    posted in Plugins for DWC and DSF
    undefined
    SlimShader
    16 Dec 2021, 11:51
  • RE: InputShaping-Plugin-0.2.0-pre8 initial thoughts and questions

    @mfs12 OK understood!

    For the rest of my interpretation of how to actually use the plugin - does my description make sense?

    Looking forward to updates when they come!

    posted in Plugins for DWC and DSF
    undefined
    SlimShader
    16 Dec 2021, 11:47
  • RE: My Scalable Delta

    @dken21 I just uploaded both the top and bottom vertices.

    posted in My Duet controlled machine
    undefined
    SlimShader
    16 Dec 2021, 11:29
  • RE: My Scalable Delta

    @dken21 Sure! Not a problem, I intend to share all designs publicly anyway - for now I'm compiling the correct versions so it's all in draft via this link (different from above) and once it's all complete I'll put it on the usual repositories.

    Yeah that is a cork sheet between the glass and bed plate - getting a perfectly flat aluminium plate of that scale when it's going to warp on heat/cooling cycles is something of a nightmare, and my top surfaces were being unevenly heated as a result - I found a 1mm cork spacer/buffer made it a whole lot more even during heating and also protects the glass from me not tightening the bed plate bolts down enough.

    Mostly I only use the cork spacer in the middle, and over the three bolt holes of the bed on the smaller of my two Deltas, when using Schott Robax Glass as the build surface. If I'm using a flex sheet I cover the entire bed with a larger cork disk.
    The larger machine predominantly only uses a Robax glass bed, and I haven't needed to add cork.

    I'm always lurking around here and am happy to share my experiences with you - feel free to ping me here anytime!

    posted in My Duet controlled machine
    undefined
    SlimShader
    16 Dec 2021, 10:59
Unless otherwise noted, all forum content is licensed under CC-BY-SA