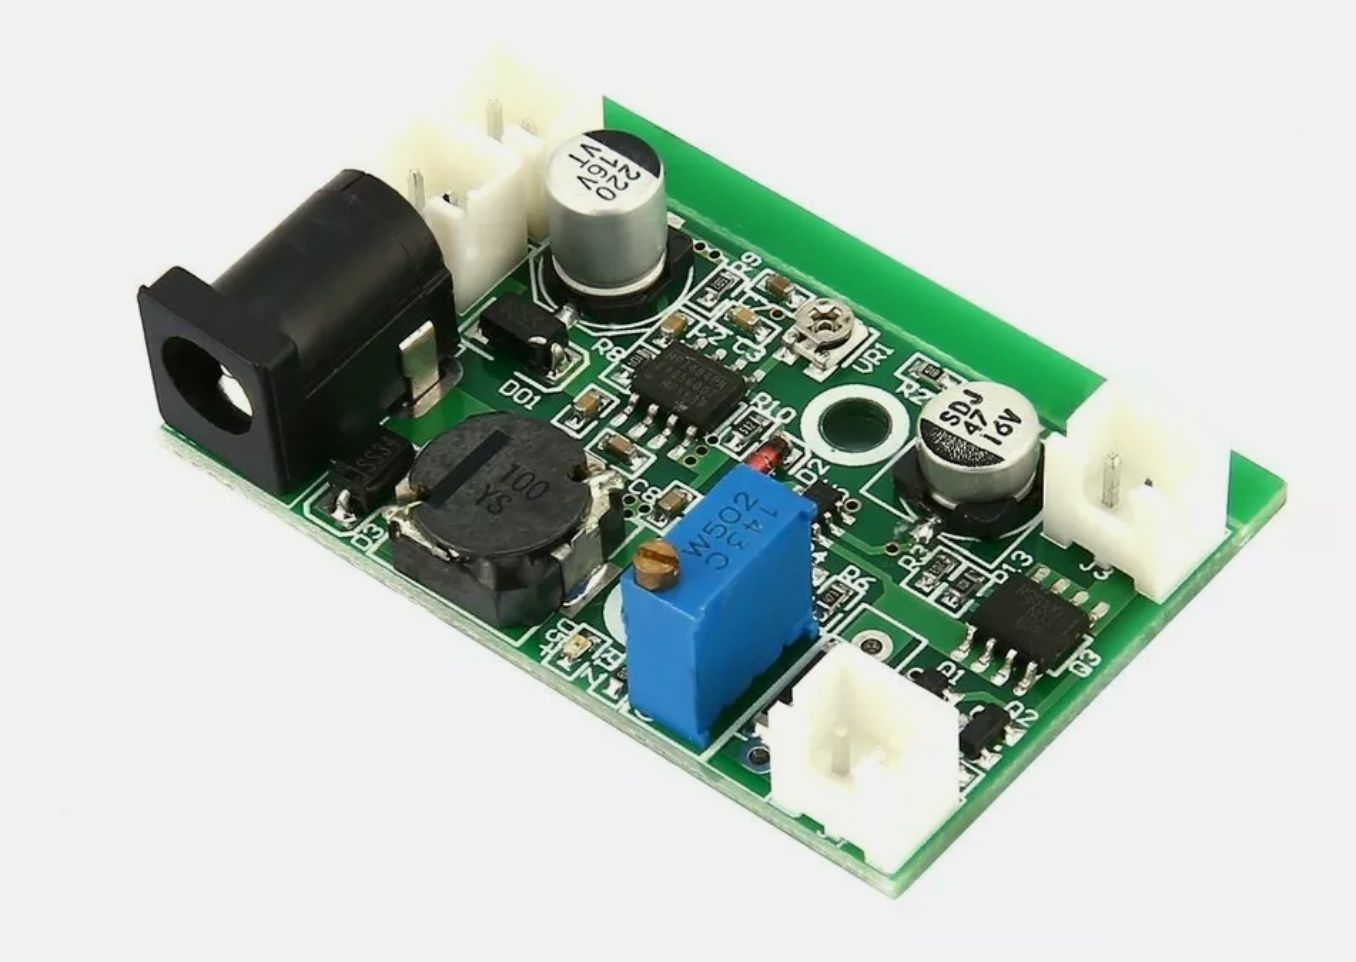
I finished my prototype
It has a 5V 3A regulator on it for the raspberry
I finished my prototype
It has a 5V 3A regulator on it for the raspberry
Hi together,
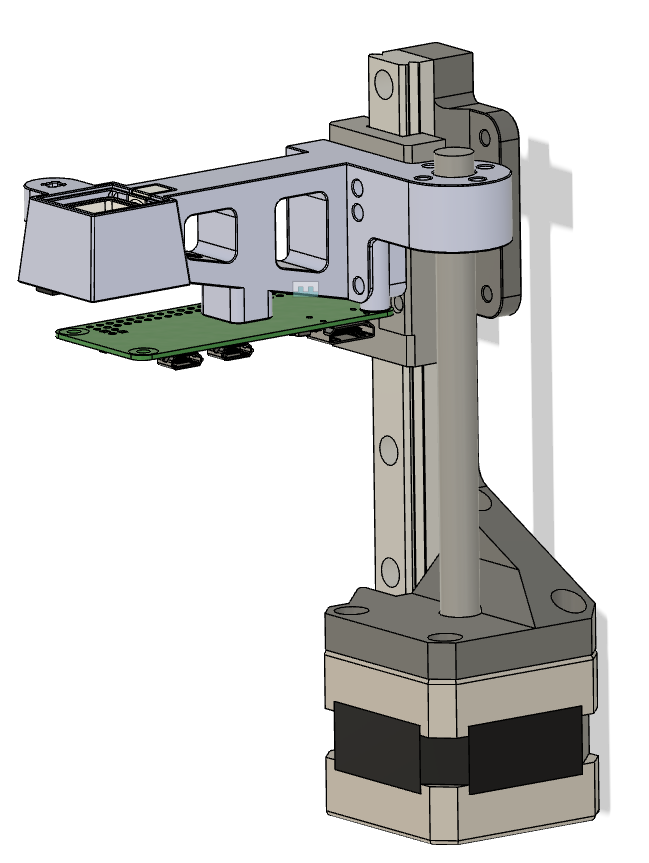
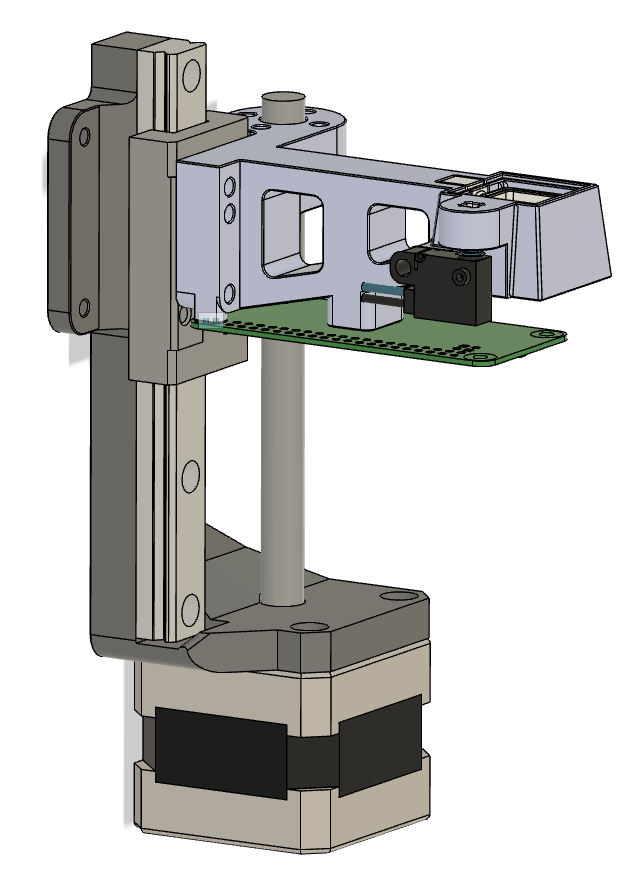
I have designed a tool calibration station for the E3D tool changer. It is equiped with a raspberry pi zero/camera and a hight sensor (guided platform which press a micro switch). The whole station is guided by a linear rail and driven by a stepper motor (equal to Greg's adjustable brush)
I already switched over to rrf 3.01 with conditional gcode.
I know want to set the tool offset by running a macro.
First point I need to know is how I can use the micro switch to probe the tool hight.
Let's call my tool calibration axis W axis. Then I have to move the W axis until the endstop is pressed. But I don't know how to do this? May @dc42 can help me?
Later I can do some mathematics to calculate the tool offset with the actual W axis position. This should be easily possible with the conditional gcodes.
The second point I want the realize is that I put the nozzle above the camera, center it and press a macro button then the XY offset of the tool is set. But this I think is more easily and could be realized also with the new gcodes.
Is there a object model for the tool offset?
I miss a few things in your config:
Also the bedheat, e0heat and e1heat do not have to be inverted on duet2. If you do, then the heaters are always on.
The two heaters on duex5 a correctly that they have to be inverted.
According to you config there is no E6. You just have defined four extruders.
I also noticed you have defined
M950 H0 (Bed)
M950 H1 (Tool0)
M950 H2 (Tool1)
M950 H3 (Tool2)
M950 H4 (Tool3)
but you create tools with:
M563 P0 H2
M563 P1 H3
M563 P2 H4
M563 P3 H5
So the heater mapping does not match. That means if you gcode tries to heat up tool 1 it will heat up tool 2.
So your config is really confusing and I think this is the main reason why something is melted. The looks like you have done some mistakes while conversion to RRF3.
You can look at my config how to define 4 tools (I just picked the lines which are related for the tools):
; Drives
M584 X0 Y1 Z2 E3:4:5:6 U7                          		; Map Drives to Axis
M669 K1                                            		; Select CoreXY mode
M569 P0 S0                                         		; Drive 0 goes forwards
M569 P1 S0                                         		; Drive 1 goes forwards
M569 P2 S1                                         		; Drive 2 goes forwards
M569 P3 S0                                         		; Drive 3 goes forwards
M569 P4 S0                                         		; Drive 4 goes forwards
M569 P5 S0                                         		; Drive 5 goes forwards
M569 P6 S0                                         		; Drive 6 goes forwards
M569 P7 S0                                        		; Drive 7 goes forwards
M350 X16 Y16 Z16 E16:16:16:16 I1                   		; Configure microstepping with interpolation
M350 U8 I0					   		; Configure microstepping without interpolation
M92 X100 Y100 Z1600 U100 E460:460:460:460          		; Set steps per mm
M566 X600 Y600 Z18 U2 E100:100:100:100         		   		; Set maximum instantaneous speed changes (mm/min)
M203 X35000 Y35000 Z1200 U25000 E5000:5000:5000:5000    	; Set maximum speeds (mm/min)
M201 X6000 Y6000 Z400 U500 E2500:2500:2500:2500         	; Set accelerations (mm/s^2)
M906 X1650 Y1650 Z1100 U200 E1450:1450:1450:1450 I30    	; Set motor currents (mA) and motor idle factor in per cent
M84 S120                                           		; Set idle timeout

; Thermal Sensors
M308 S0 P"bedtemp" Y"thermistor" T100000 B3950                   	; Set thermistor + ADC parameters for heater 0
M308 S1 P"e0temp" Y"thermistor" T100000 B4725 C7.060000e-8       	; Set thermistor + ADC parameters for heater 1
M308 S2 P"e1temp" Y"thermistor" T100000 B4725 C7.060000e-8       	; Set thermistor + ADC parameters for heater 2
M308 S3 P"e2temp" Y"thermistor" T100000 B4725 C7.060000e-8      	; Set thermistor + ADC parameters for heater 3
M308 S4 P"e3temp" Y"thermistor" T100000 B4725 C7.060000e-8      	; Set thermistor + ADC parameters for heater 4

; Hardware
M950 H0 C"bedheat" T0
M950 H1 C"e0heat" T1
M950 H2 C"e1heat" T2
M950 H3 C"!exp.heater3" T3
M950 H4 C"!exp.heater4" T4

; Max Temp Protection
M143 H0 S140                                   ; Set temperature limit for heater 0 to 140C
M143 H1 S270                                   ; Set temperature limit for heater 1 to 270C
M143 H2 S270                                   ; Set temperature limit for heater 2 to 270C
M143 H3 S270                                   ; Set temperature limit for heater 3 to 270C
M143 H4 S270                                   ; Set temperature limit for heater 4 to 270C

; Tools
M563 P0 D0 H1 F0                               ; Define tool 0, Fan 0
M563 P1 D1 H2 F3                               ; Define tool 1, Fan 3
M563 P2 D2 H3 F7                               ; Define tool 2, Fan 7
M563 P3 D3 H4 F5                               ; Define tool 3, Fan 5

; PID Settings Tools
M307 H1 A595.9 C199.5 D4.5 S1.00 V24.1 B0      ; Set PID settings tool 0
M307 H2 A775.0 C252.4 D8.2 S1.00 V24.1 B0      ; Set PID settings tool 1
M307 H3 A716.5 C237.1 D8.7 S1.00 V24.1 B0      ; Set PID settings tool 2
M307 H4 A567.7 C241.0 D6.7 S0.80 V24.1 B0      ; Set PID settings tool 3
M307 H0 A181.4 C631.5 D4.9 S1.00 V24.1 B0      ; Bed PID Settings

; Tooloffset
G10 P0 X0.00 Y34.50 Z-15.84                    ; Set tool 0 axis offsets
G10 P1 X0.55 Y34.50 Z-15.83                    ; Set tool 1 axis offsets
G10 P2 X0.16 Y34.50 Z-15.85                    ; Set tool 2 axis offsets
G10 P3 X0.25 Y34.50 Z-15.70                    ; Set tool 3 axis offsets

; Tools Temperatures
G10 P0 R0 S0                                   ; Set initial tool 0 active and standby temperatures to 0C
G10 P1 R0 S0                                   ; Set initial tool 1 active and standby temperatures to 0C
G10 P2 R0 S0                                   ; Set initial tool 2 active and standby temperatures to 0C
G10 P3 R0 S0                                   ; Set initial tool 3 active and standby temperatures to 0C
After a few releases today I tried 3.2beta4 on my tool changer again because I saw a lot of commits regarding the SBC. It seems to work now. I will now wire everything a do a test print.
UPDATE: Test print was fine
@Danal said in Tool Calibration Station E3D Toolchanger:
Having a separate station is a great idea.
Regarding all the commands required to make it work: See the commands in the "tool align" and/or "zonly" script here:
Ignore the python... just look a the gcode and read here about the commands and options, such as G1 H2, and work those into conditional Gcode. More doc on the Gcode here:
*****************************
Regarding your camera... do you intend to use machine vision? Or human alignment to an overlay on the image, such as a crosshair or a circle? For either one of those, you will probably want 'openCV' on your Pi. Almost every install instruction on the internet has you put openCV in a virtual environment, so that you can run multiple releases of opencv. This is a huge hassle. And we really only want one release.
Therefore, there is a 'direct install' script called "installOpenCV.sh" here:
https://github.com/DanalEstes/DuetPython
There are also several sample scripts showing different levels of Machine Vision, or Human Alignment, or ...
*****************************
None of the above is EXACTLY what you seek. At the same time, all the pieces you need to create what you seek are in the above. Please be sure and read the 'readme' in both repositories.
So with the G1 Hx commands I just can Home the axis and set it to the axis limits. H2 mean it does ignore the Endstop, H1 set to M208 axis limit and H3 overrides the M208 limit.
This is the Station:
I also planed a place a LED inside to illuminate the Nozzle. The camera itself is protected by a small piece of glass, which can be purchased from laboratory equipment
@dc42 I switched now back to 2.02.
Here is everything fine. Also 2.04 and 2.03 has this issue. I tried also the old v3 build from the dropbox. Here also everthing is fine.
I assume that it has something to do with the commits from May 25th.
I will later do a build an try it out
@wilriker I also tried to disable the internal 5V converter by removing the the jumper. But I also does not help
Already tried to do this. Already tried to erase everything but this also doesn't work
I renamed the C axis to U axis.
Now it seems to work. PanelDue only supports U axis as third axis
Just copying the homec to homeu have not worked.
@Phaedrux
No I use it for almost 2 years.
I am pretty sure that the CPU is gone
This is my controller:
I use RRF3 and no special config applied. You control the GPIO pins
Hi,
I have problems to controll my laser.
Ich tried to connected the laser VIN to my e4 heater pin on the duex5 and the pwm pin to the e6 pin.
No matter what I do the laser is always full power.
As far I understand this is due to the switched ground instead of switch VIN.
I now read that the pwm pins on the duet5x have a switched positive pin. But my laser also consume some current from the ttl pin. So I think the pwm pins on the duex5 are not tolerant to this.
So how can I handle this?
So I managed to get the broken duex5 working again.
I desoldered the 74HCT02PW from the broken duet and placed it on the duex5. Now this is working again.
But I thing the duet2 is ready for the garbage.
@bearer said in Bricked Duet2 SBC Ethernet:
@smoki3 said in Bricked Duet2 SBC Ethernet:
I did some research that on the duex5 maybe the 74HCT02PW are broken. So I will replace this.
i'd test the mosfets first
if the 3.3v rail on the duet is good and the erase jumper doesn't help then make sure the issue isn't usb (port, cable, socket) related before replacing the cpu.
the usb port goes directly to the cpu and the bootloader is in rom so bricking usually requires damaging the cpu or usb connection.
The to the fact that the two heater (heater 5 and 6) which are connected to U9 74HCT02PW both are powered on permanently I think the is not a mosfet failure. Unlikely that both fail at a time. I am pretty sure that the 74HCT02PW is broken.
So my usb equipment is fine tested with my other duet2 wifi.
Is it there a possiblity to flash the cpu via a serial connection to rewrite the bootloader?
I looked for the cpu, this costs around 30 euros to get it in germany. I think this is not economically
So I disassembled my other duet from another machine and changed it on my broken tool changer.
It looks like my duex5 is also brocken still the same Heater 5 and 6 not Controllable anymore.
I did some research that on the duex5 maybe the 74HCT02PW are broken. So I will replace this.
But how can I fix my Duet2? Or what can be broken?
The fuses are okay. Already checked them. But as far I know the fuses are only for the power unit not for the programming interface.
Have to check if chip is gone. I also disconnected everything from the board but this doesn't make any difference.
Already tried to do this. Already tried to erase everything but this also doesn't work
Hi,
I have a problem with my Duet2. Everything started with that the E5 and E6 Heater on my Duex5 was always on. Then I turned off the printer completely and unplugged the Duex5. But the printer is still not starting.
Then I tried to flash the firmware again. But this also doesn't work. My PC is not detecting the Duet. The VIN, 5V and 3.3V and Diag LED is on as soon I turn on VIN.
Looks like it is broken completely


