Pressure Advance: Discussion for Future Development
-
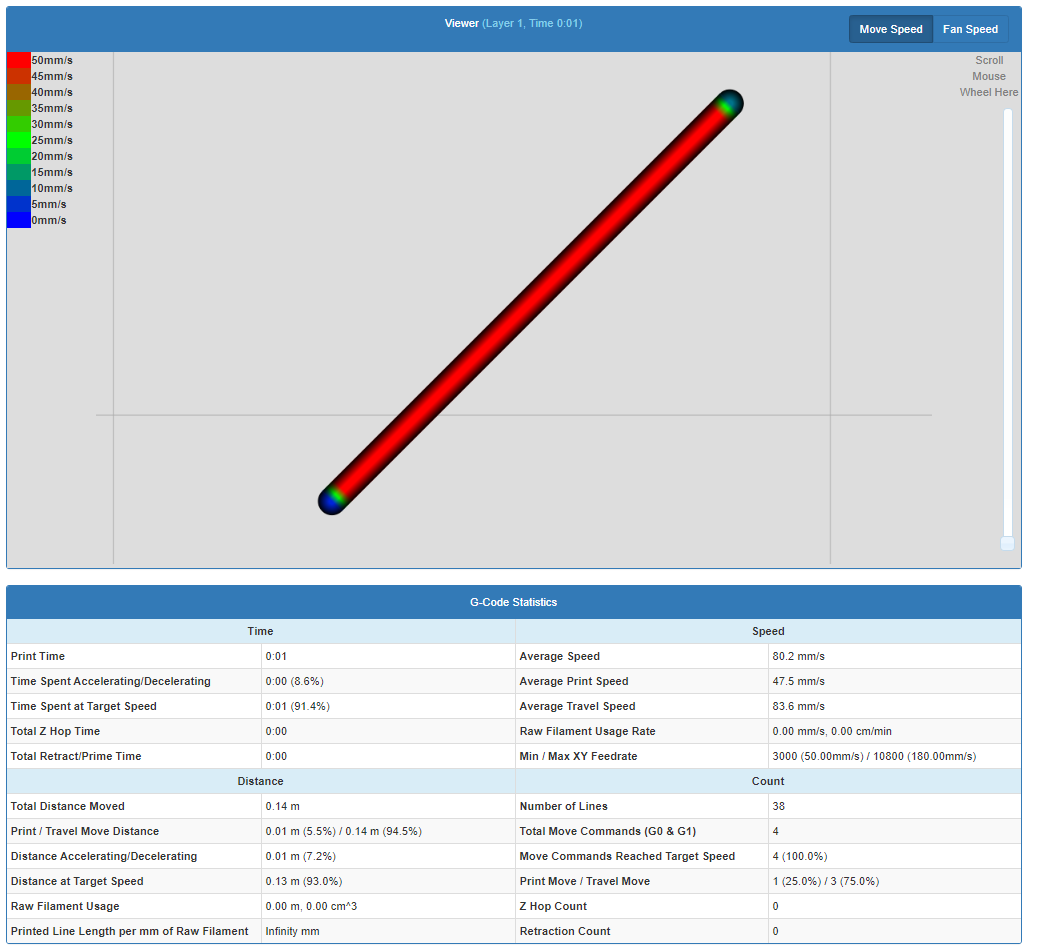
Here is a gcodeanalyzer view of a single infill line. Obviously % time spent accel/decel depends on the length of the line. But, you can see the distance is pretty tiny:
-
(not trying to be Smart Aleck)
Have you considered switching to a direct extruder? I went through a similar struggle with a bowden configuration and pretty much all the problems went away when Is switch to a direct extruder.
As for the topic here, are there mechanical/physical simulations software that can simulate the behavior of the bowden + hotend? This could save a lot of trial and error.
-
What slicer are you using? Cura? Or is that just for visualiation? Those infills remind me of the glorious infill segments from IceSL.
")
*not actually a robot
-
@zapta said in Pressure Advance: Discussion for Improvement in Bowden Printers:
(not trying to be Smart Aleck)
Have you considered switching to a direct extruder? I went through a similar struggle with a bowden configuration and pretty much all the problems went away when Is switch to a direct extruder.
As for the topic here, are there mechanical/physical simulations software that can simulate the behavior of the bowden + hotend? This could save a lot of trial and error.
I don't know what problems you had with your bowden setup, but I don't have any real problems. Even without pressure advance, I have generally good extrusion rate control. Pressure advance should be an "icing on the cake" feature. But it ends up worsening print quality for me.
-
@bot said in Pressure Advance: Discussion for Improvement in Bowden Printers:
What slicer are you using? Cura? Or is that just for visualiation? Those infills remind me of the glorious infill segments from IceSL.
I tend to use Cura (first screenshot)
The second screenshot is: http://gcodeanalyser.com/ for visualizing actual print head speed using your motion control settings.
-
@CCS86 said in Pressure Advance: Discussion for Improvement in Bowden Printers:
But it ends up worsening print quality for me.
Post your config and slicer settings?
-
@Phaedrux said in Pressure Advance: Discussion for Improvement in Bowden Printers:
@CCS86 said in Pressure Advance: Discussion for Improvement in Bowden Printers:
But it ends up worsening print quality for me.
Post your config and slicer settings?
Which slicer settings are you interested in? There are a ton. Basic stuff: line width=0.4mm, layer height=0.15mm, outer wall=30mm/s, infill=60mm/s. I have tried with and without coasting.
; Configuration file for Duet Maestro (firmware version 3) ; General preferences G90 ; absolute coordinates M83 ; relative extruder M550 P"Maestro86" ; set printer name ; Network M552 P0.0.0.0 S1 ; enable network and acquire dynamic address via DHCP M586 P0 S1 ; enable HTTP M586 P1 S0 ; disable FTP M586 P2 S0 ; disable Telnet ; Drives M569 P0 S0 ; physical drive 0 goes forwards / bw M569 P1 S1 ; physical drive 1 goes backwards / fw M569 P2 S0 ; physical drive 2 goes backwards M569 P3 S0 ; physical drive 3 goes backwards M569 P0 D2 ;V150 ; Stealthchop2 till about 31.3 mm/sec / spreadcycle now D2 M569 P1 D2 ;V150 ; Stealthchop2 till about 31.3 mm/sec / spreadcycle now D2 M569 P2 V40 ; Stealthchop2 till about 46.9 mm/sec M569 P3 D2 ; Extruder in Spreadcyle M584 X1 Y0 Z2 E3 ; set drive mapping M92 X159.93 Y159.75 Z400.00 E510 ; set steps per mm M350 X16 Y16 Z16 E16 I1 ; configure microstepping with interpolation M201 X4000.00 Y4000.00 Z400.00 E10000.00 ; set max accelerations (mm/s^2) M203 X10200.00 Y10200.00 Z1800.00 E2400.00 ; set maximum speeds (mm/min) M204 P2200 T3500 ; set accelerations (mm/s^2) M205 X8 Y8 Z4 E4.5 ; set maximum instantaneous speed changes (mm/s) M593 F00 ; dynamic accel cancel 0 hz M572 D0 S0.20 ; Pressure Advance M906 X1200 Y1200 Z1200 E1200 I40 ; set motor currents (mA) and motor idle factor in per cent M84 S30 ; Set idle timeout ; Axis Limits M208 X0 Y0 Z0 S1 ; set axis minima M208 X205 Y195 Z220 S0 ; set axis maxima ; Endstops M574 X1 S1 P"!xstop" ; configure active-high endstop for low end on X via pin !xstop M574 Y1 S1 P"!ystop" ; configure active-high endstop for low end on Y via pin !ystop ; Z-Probe M574 Z1 S2 ; Set endstops controlled by probe ;M558 P9 C"^zprobe.in" H5 F300 T6000 ; set Z probe type to bltouch and the dive height + speeds M558 P5 C"^zprobe.in" H5 F500 T6000 M950 S0 C"zprobe.mod" ; create servo pin 0 for BLTouch G31 P25 X12 Y-18 Z2.37 ; set Z probe trigger value, offset and trigger height M557 X12:200 Y0:169.2 S18.8 ; define mesh grid M376 H2 ; mesh taper ; Heaters M308 S0 P"spi.cs1" Y"rtd-max31865" ; configure sensor 0 as a PT100 sensor in the first position on the Duet 2 daughter board connector M950 H0 C"bedheat" T0 ; create bed heater output on bedheat and map it to sensor 0 M307 H0 B0 S1.00 ; disable bang-bang mode for the bed heater and set PWM limit M140 H0 ; map heated bed to heater 0 M143 H0 S120 ; set temperature limit for heater 0 to 120C M308 S1 P"e0temp" Y"pt1000" ;T100000 B4725 C7.06e-8 ; configure sensor 1 as PT1000 on pin e0temp M950 H1 C"e0heat" T1 ; create nozzle heater output on e0heat and map it to sensor 1 M143 H1 S260 ; set temperature limit for heater 1 to 250C M307 H1 B0 S1.00 ; disable bang-bang mode for heater and set PWM limit M308 S2 Y"drivers" A"DRIVERS" ; configure sensor 2 as temperature warning and overheat flags on the TMC2660 on Duet M308 S3 Y"mcu-temp" A"MCU" ; configure sensor 3 as thermistor on pin e1temp for left stepper ; Heater model parameters M307 H0 A126.9 C671.6 D1.2 S1.00 V23.0 B0 M307 H1 A374.7 C132.0 D4.4 S1.00 V24.3 B0 ; Fans M950 F0 C"fan0" Q500 ; create fan 0 on pin fan0 and set its frequency M106 P0 S0 H-1 ; set fan 0 value. Thermostatic control is turned off M950 F1 C"fan1" Q500 ; create fan 1 on pin fan1 and set its frequency M106 P1 S1 H1 T40 B1.5 ; set fan 1 value. Thermostatic control is turned on M950 F2 C"fan2" ;Q800 ; create fan 2 on pin fan2 and set its frequency M106 P2 H1:2:3 L1 X1 T53 ; set fan 2 value ; Tools M563 P0 S"E0" D0 H1 F0 ; define tool 0 G10 P0 X0 Y0 Z0 ; set tool 0 axis offsets G10 P0 R0 S0 ; set initial tool 0 active and standby temperatures to 0C ; Custom settings are not defined ; Miscellaneous T0 ; select first tool ;M501 ; Load config-override.g -
Can you post a gcode file you’ve printed and had bad experiences with in regards to PA?
-
I can't remember with confidence which files I tried and failed to get a good result. The next time I have that issue, I will set the code aside.
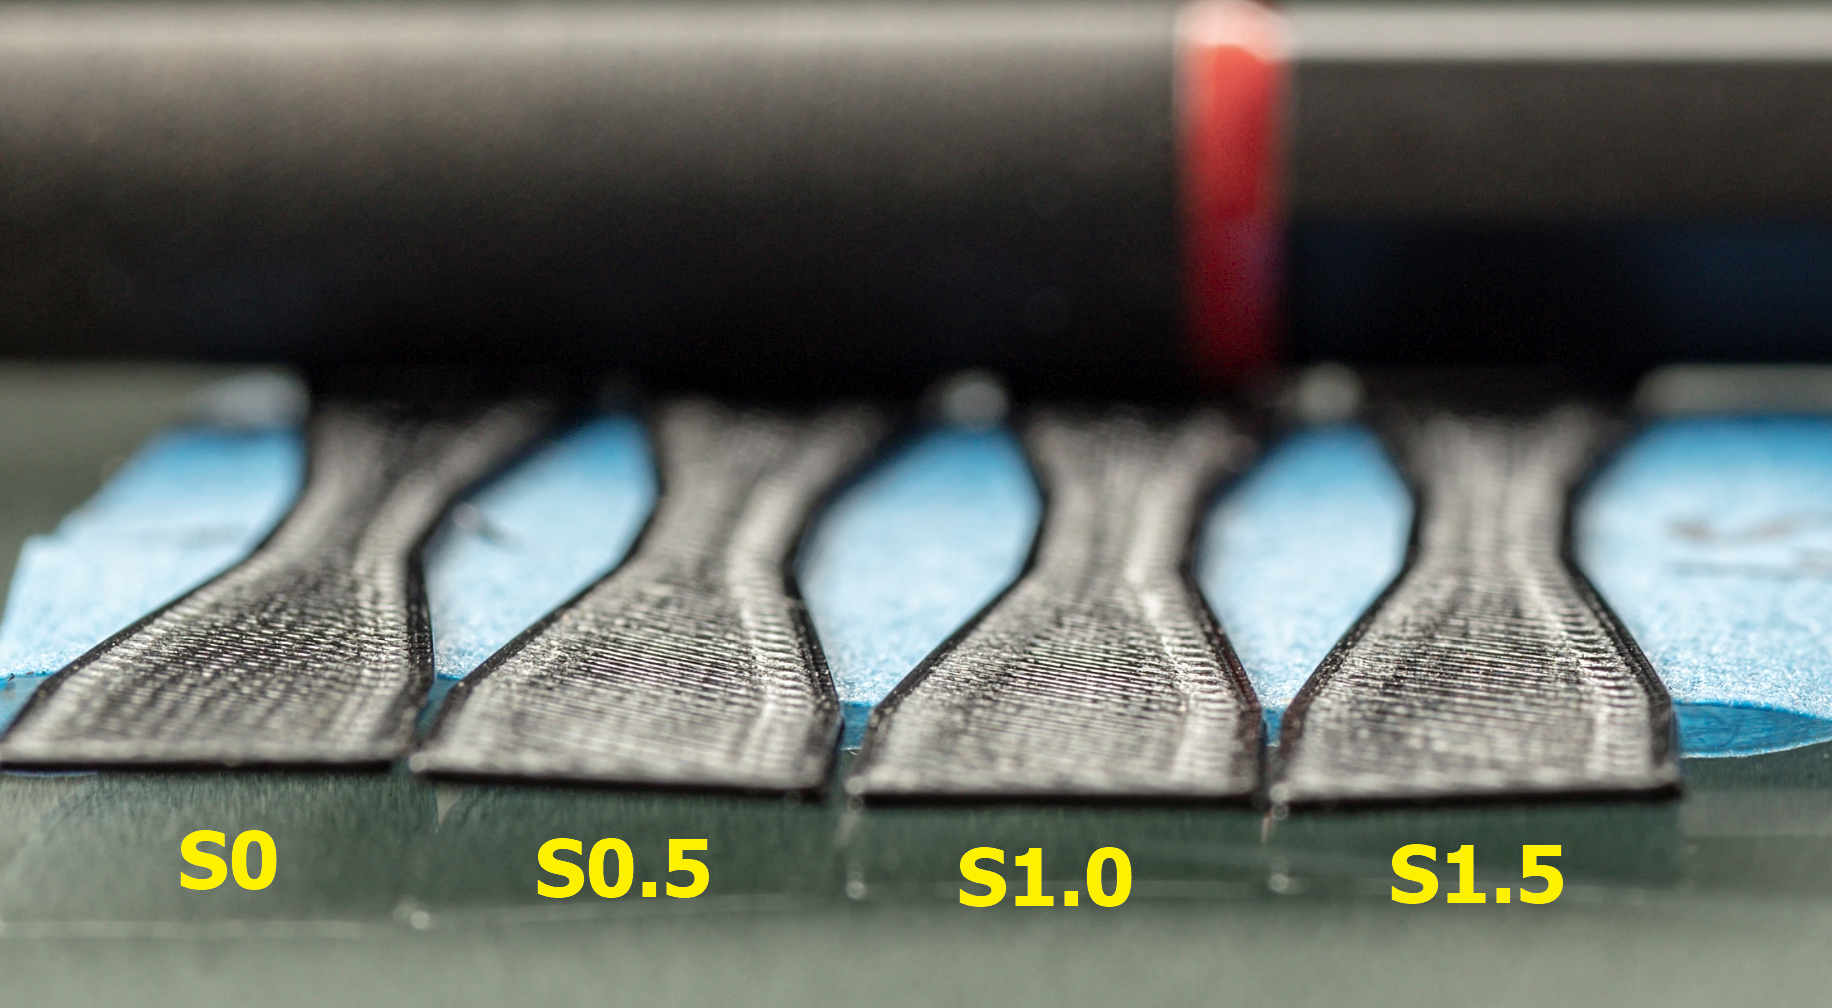
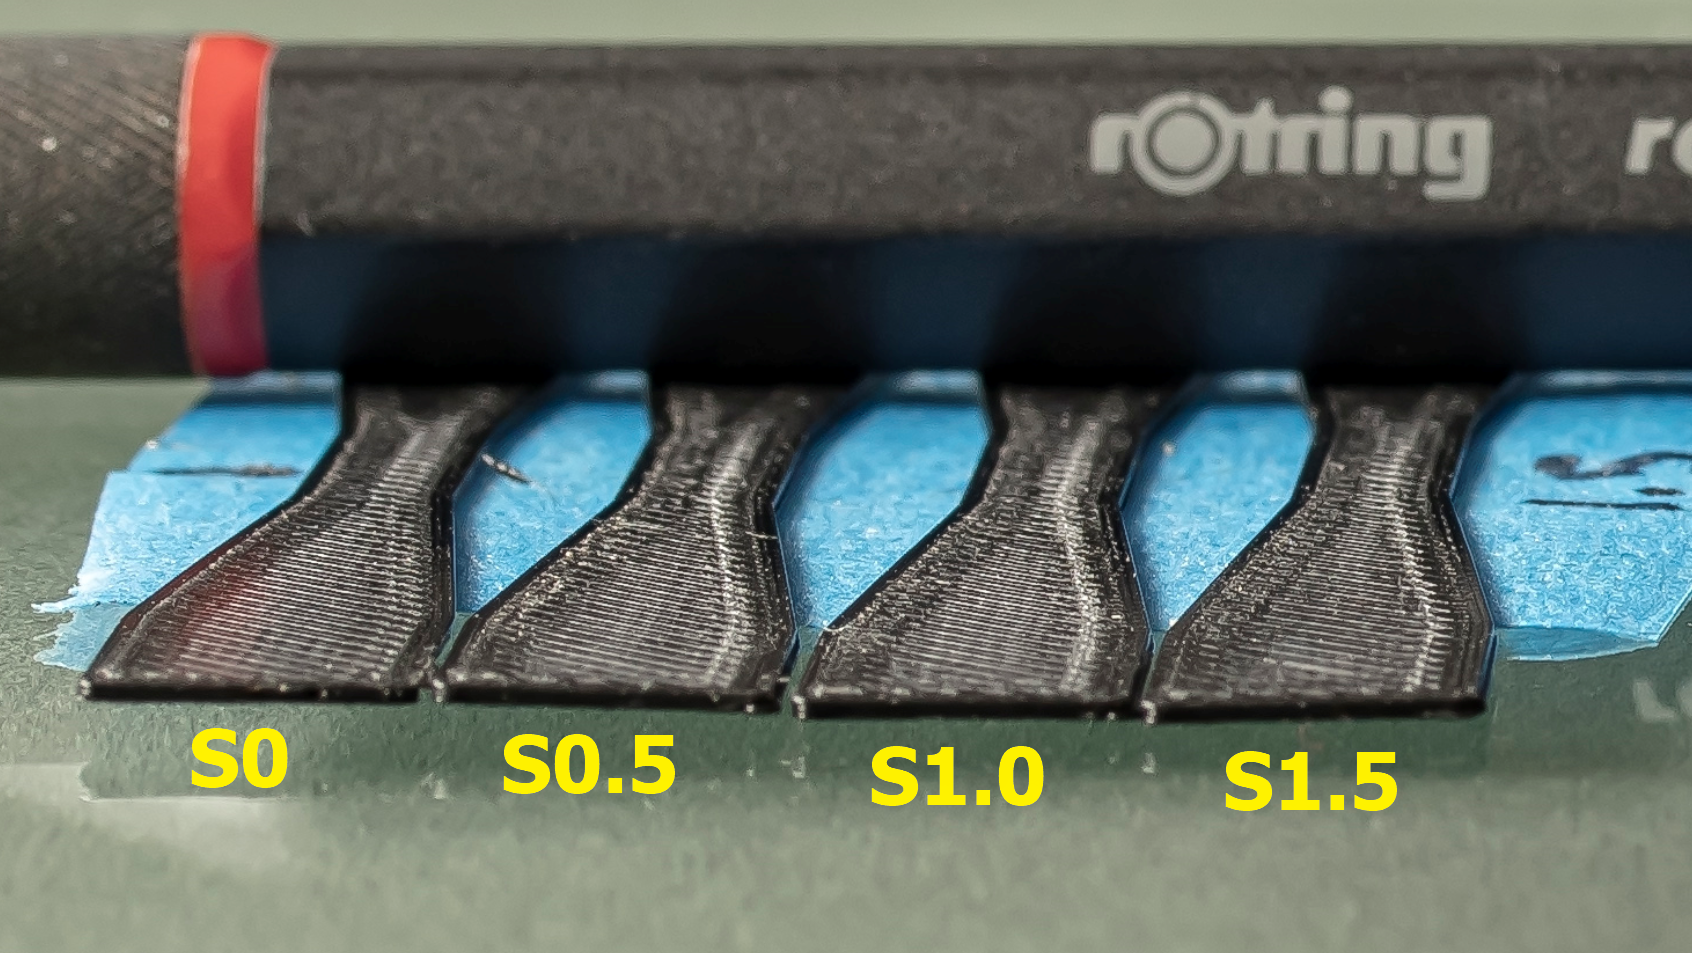
I decided to try to make a test print that I hoped would replicate my PA issues for demonstration. Just a short, narrow print, which necks down from an 8mm width, to 2mm width. This object is copied 4 times, printed one at a time, with M572 D0 S0, S0.5, S1.0, S1.5.
I photographed the results with my macro lens, but it's really hard to make judgement from the photos. In hand, they all look similar. If anything the S0 print looks best. With PA enabled, you certainly lose a bunch of time.
-
I relate to your ideas and findings. I have a nimble though, so bit different situation. A nimble has trouble to keep up wit PA due to its high gear ratio (as noted on duet website). So although direct drive it has some "bowden like" behavior in PA. My findings:
- using Marlin routine I need S0.54
- using the Python script approach I need S0.6
- in real printing I find better results with S0.4
So lower than in the tests with I think relate to your observation on for the under extrusion on very short lines.
I have no need anymore for coasting in cura, and overall I have better quality. I hope and think you do too right? It's about improving it even more.
So I think your idea on the minimum amount of time could work well. I'm wondering if it should be time or travel length though? That would take out the need to tune each time when you print with different speeds for different prints, or even when using different speeds while printing different features.
I think having both options would be best to tinker with.
Also I would think it would be even nicer if one can give two parameters:
- length/time No PA
- length/time Full PA.
And an interpolation in between to give a sliding PA value?
No idea how hard to implement, but I bet it would be a selling point when this works well (I'd be happy to test
when indeed working well.While think about it: anybody know how to modify a gcode file to search for short line length and putting an M572 in front (and after) to change the settings with some existing scripts or something to prototype test?
Cheers Q
-
Seems little interest CCS...

-
I ended up just using 0.5 for my PA on my long bowden setup despite all tests indicating more or less no change until 1.5-2 range.
I'm actually getting quite nice results but I was simply limited by what didn't cause the extruder to sound like a machine gun
-
That's exactly what i ended up doing to (well i setteled on 0.4), even though i would get the most consistent pressure somewhere close to 2, but it sounded like my BMG was one nudge away from exploding at that point

Designed new extruder mounts so i could move the extruders over the build area (corexy machine) and shorten the bowdens down to 300mm ish, so 0.4 isn't that much off.
-
@QuintBrand said in Pressure Advance: Discussion for Improvement in Bowden Printers:
Seems little interest CCS...
Were you waiting on my feedback? It sounded like you were generally agreeing with me and not asking questions.
I don't think "length" is a better parameter to use for filtering over "time". We are dealing with time based phenomenon, ie lag between extruder drive motion > nozzle pressure > nozzle flow rate. How fast the print head is traveling doesn't impact these things.
-
I have resorted to printing without PA now. In my case I observed that the extruder reverse motion gets skipped on consecutive small segments, thus all my over-extrusion issues ensued.
I also dug in the Firmware and at some point it just stopped being fun as there are multiple approximations related to step generation which smell bad. Having no handy HW simulation tools it just took too long to debug with all the variables.
I saw Klipper implements "smoothing" for PA, so I started moving to it to test it out. While there are pros and cons between Duet and Klipper (I still like the Duet), but at least in Klipper the CPU basically only runs the step pulses, so no need to deal with interrupts being late or whatnot.
Not finished yet, tho.
-
Hey, no I was not trying to push you in any way, but actually trying to support this tread from sliding away as I think it is an excellent idea to get the "gun" effect out of the printing with PA
 .
.I think bit time and length would be nice. I agree that if we'd "need to choose" time is probably better, but when printing at (quite) different speeds for infill, walls etc I think length is also nice.
I also went from 0.4-0.5 found from testing to 0.2 to ease the printing somewhat and get good results anyways too.
-
@Exerqtor said in Pressure Advance: Discussion for Improvement in Bowden Printers:
That's exactly what i ended up doing to (well i setteled on 0.4), even though i would get the most consistent pressure somewhere close to 2, but it sounded like my BMG was one nudge away from exploding at that point
Designed new extruder mounts so i could move the extruders over the build area (corexy machine) and shorten the bowdens down to 300mm ish, so 0.4 isn't that much off.
Answers like this make me not feel alone in the world.
CR10S, August 2018
Anycubic Photon S December 2019
Ender 5 Feb 2020
Ender 5 Plus May 2020
Anycubic Photon Mono X Nov 2020
~
https://3dimensiongames.com/ -
@RyanP said in Pressure Advance: Discussion for Improvement in Bowden Printers:
@Exerqtor said in Pressure Advance: Discussion for Improvement in Bowden Printers:
That's exactly what i ended up doing to (well i setteled on 0.4), even though i would get the most consistent pressure somewhere close to 2, but it sounded like my BMG was one nudge away from exploding at that point
Designed new extruder mounts so i could move the extruders over the build area (corexy machine) and shorten the bowdens down to 300mm ish, so 0.4 isn't that much off.
Answers like this make me not feel alone in the world.
Aye me too... Most calibration things I can see the difference and select a good balance (although often having to run multiple parameter ranges to get a matrix of options - stringing control being a good example here, move speed, retraction length, retraction rate wipe etc.) but this one feels like black magic hah
-
Just saw this tutorial pop up, note that it is for klipper-fw, but it should be translateable for RRF to i think. Gonna try it tomorrow and see what numbee i end up with this time

https://www.lpomykal.cz/anycubic-kossel-klipper-pressure-advance/
-
@dc42, any thoughts on this?