IDEX CoreXY, With Only 2 Motors.
-
Just to chime in on the alleged h-bot racking -- that all seems to go back to an old Hackaday posting where the author later admitted to using low quality belts and self-made cantilevered pulleys. I am poised to assume the claims about h-bot being terrible are a bit overblown in practice.
-
@oliof of course it is .
many industrial motion systems use h bot . startasys used hbot in their printers . it all depends how rigid your design is . -
In this special case it's the equal belt tension that keeps the crossbar in line. Also the tension shouldn't be too low.
-
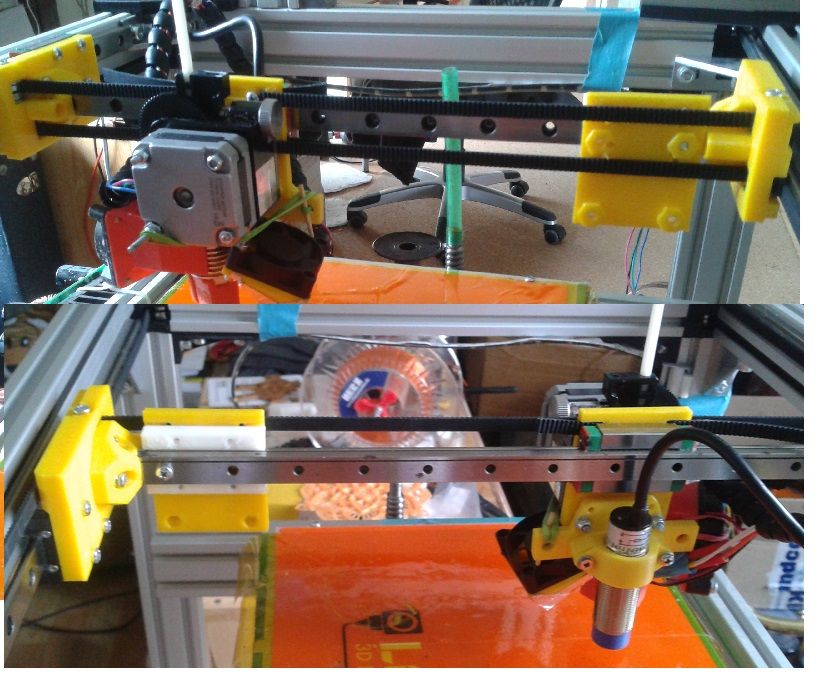
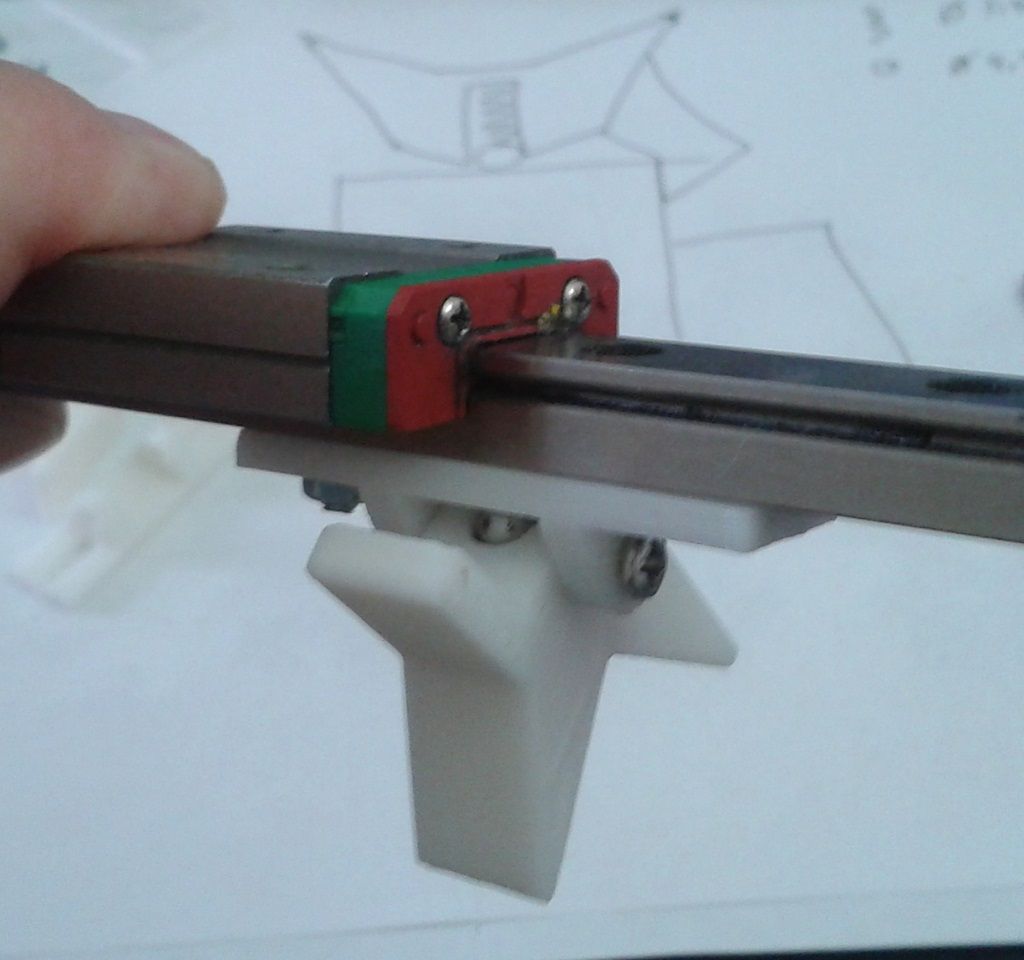
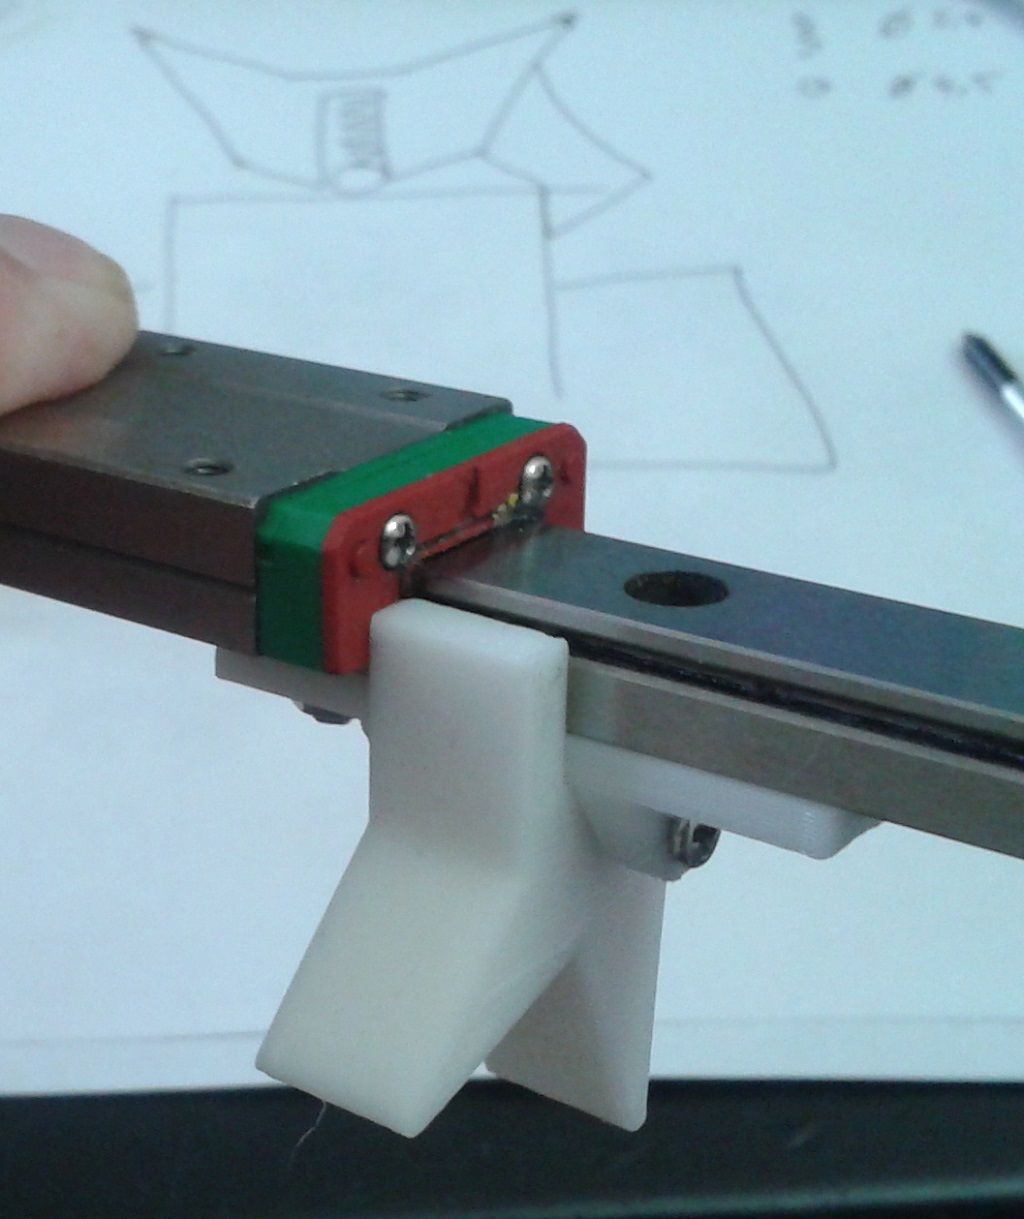
Here's a little teaser of the dummy U-carrier waiting to be connected and mapped.
It's an IDEY CoreXY BTW...just in case someone has a clue how to run this.
-
I found this in the wiki, but there is also a K11=MarkForge type of kinematics, but no further explanation. I guess it's trial&error time , as usual...
CoreXY with extra Markforge U axis (see https://forum.duet3d.com/post/136554 ) M669 K1 X1:1:0:0 Y1:-1:0:-1 Z0:0:1:0 U0:0:0:1 -
@RichardDuke
It's alive
The kinematic is the same as MarkForge (M669 K11) but I had to modify it, because my crossbeam is the Y-axis.
I've called it simple-IDEX or s-idex and linked the video to this thread.
Here's a short video with a fixed dummy U-axis.
Next I'll fix the Y-axis and work on the reversed kinematic. -
@o_lampe said in IDEX CoreXY, With Only 2 Motors.:
@RichardDuke said in IDEX CoreXY, With Only 2 Motors.:
The kinematics of this directly correspond to that of Markforged, except at every toolchange, both X and Y motor logic is swapped and reversed.
Is it possible to do the swap during a tool change? What does the firmware do in that case? There are some restrictions to the stepper parameters, IMHO some require a reboot? @Phaedrux ??
Nothing requires a reboot to configure. Everything can be done on the fly. The only reason DWC suggests a reboot after changing config.g is so that your changes can be applied. Could also be accomplished by sending M98 P"config.g" to execute the file as a macro.
Some changes may have a quality impact if executed during a print, but if done stationary no problems should arise.
-
@o_lampe said in IDEX CoreXY, With Only 2 Motors.:
@RichardDuke
It's alive
The kinematic is the same as MarkForge (M669 K11) but I had to modify it, because my crossbeam is the Y-axis.
I've called it simple-IDEX or s-idex and linked the video to this thread.
Here's a short video with a fixed dummy U-axis.
Next I'll fix the Y-axis and work on the reversed kinematic.Soooooo..... that is awesome! You're a superstar for testing this out! What an wicked post to wake up too.
I guess I am going to have to start ordering some parts and join in on the SIDEX action!
-
@RichardDuke
Goooooood MORNING!
I thought about the name of the new born baby, maybe locked IDEX describes it better?
I also have found a way to include the lock and a small servo to my X-carriers. Will photoshop the idea for all of us to discuss.I printed two things yesterday, expecting to see more overshooting at the corners, where the single belt has to catch all the moving mass, but a test cube was practically identical to a formerly printed one.
The second doesn't show any signs of difference, but I'll inspect it again in bright sunlight today. Still unsure how racking would show? Lost steps and screeching carriers?The only downside is, I was so proud about the small frame with regards to the print area, but now the second carrier eats up a lot of space. Maybe I have to order a few longer 2040 extrusions and reassemble the whole frame.
-
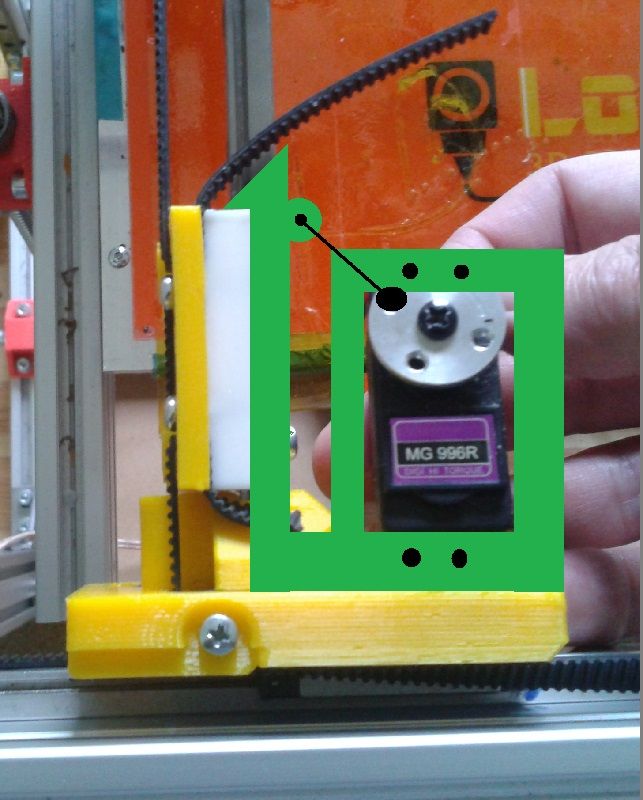
Here's the basic idea of a servo-locked carrier. The servo arm should be at top_dead_center when the carrier is locked. This way we can switch it off when not needed.
I'm not sure if the small 9gram servo can pull the PETG-hook away from the carrier, but the other servos I have are 60gram standard servos ready to rip the hook off if necessary")
PS: @Phaedrux why are my pictures always rotated 90° CCW, when I upload them the first time?

The 60gram Servo looks more like it.
-
@o_lampe said in IDEX CoreXY, With Only 2 Motors.:
why are my pictures always rotated 90° CCW, when I upload them the first time?
possibly because they are saved rotated, but your phone "unrotates" them for display?
-
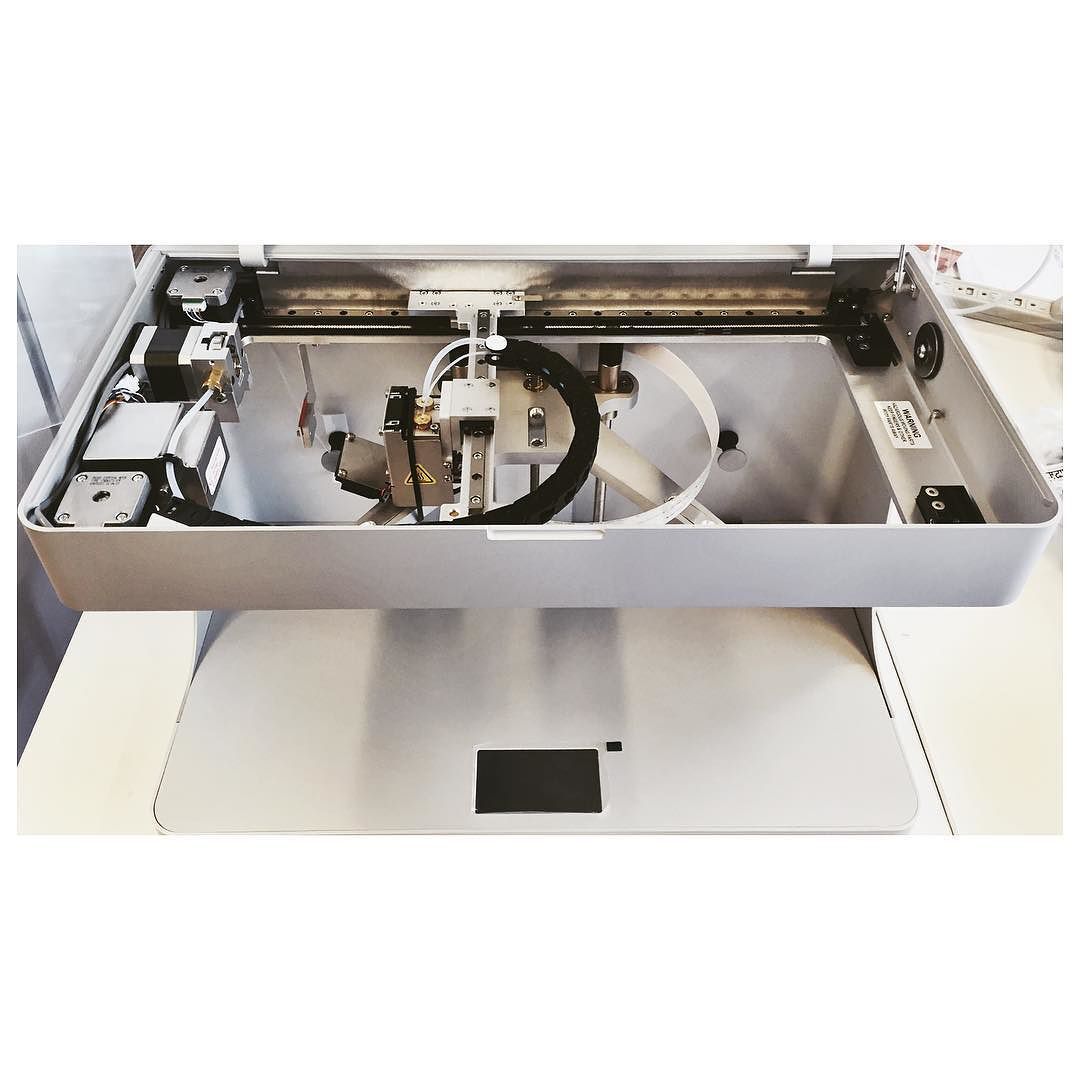
I also have a (dual) Markforged printer and to weigh in a little on the racking issue. I agree with @fcwilt, two Y-axis belts is a good idea or you have to have a very ridged bearing setup like on the Mark one.
Notice the solid one piece gantry with two bearing on each end spaced apart to keep it from skewing. This allows them to get away with just one Y-axis drive. Personally I think its better to add another belt to keep it square considering it does not add any moving weight like additional bearings and a heavy gantry. If you want a IDEX though, it makes more sense to double up on the markforged, which will also equal out the racking forces.
I think its a good thought, but I'm not sure I understand the purpose of locking the carriages to save a stepper. You would just be adding more moving weight, as the second motor on a dual markforged is parked on the frame.
You are welcome to check out my project, it might give you some ideas at the very least. https://github.com/3dprintingworld/MULDEX
-
I think its a good thought, but I'm not sure I understand the purpose of locking the carriages to save a stepper. You would just be adding more moving weight, as the second motor on a dual markforged is parked on the frame.
You are welcome to check out my project, it might give you some ideas at the very least. https://github.com/3dprintingworld/MULDEX
I think the purpose of this would mostly be an effective way to add independent dual extrusion to an existing CoreXY printer, without the need to redesign a lot of key components.
Nice work on Muldex btw, it was the only DIY build IDEX printer I could find, and I do like it, but I thought it would be interesting to see what other options could potentially be possible.
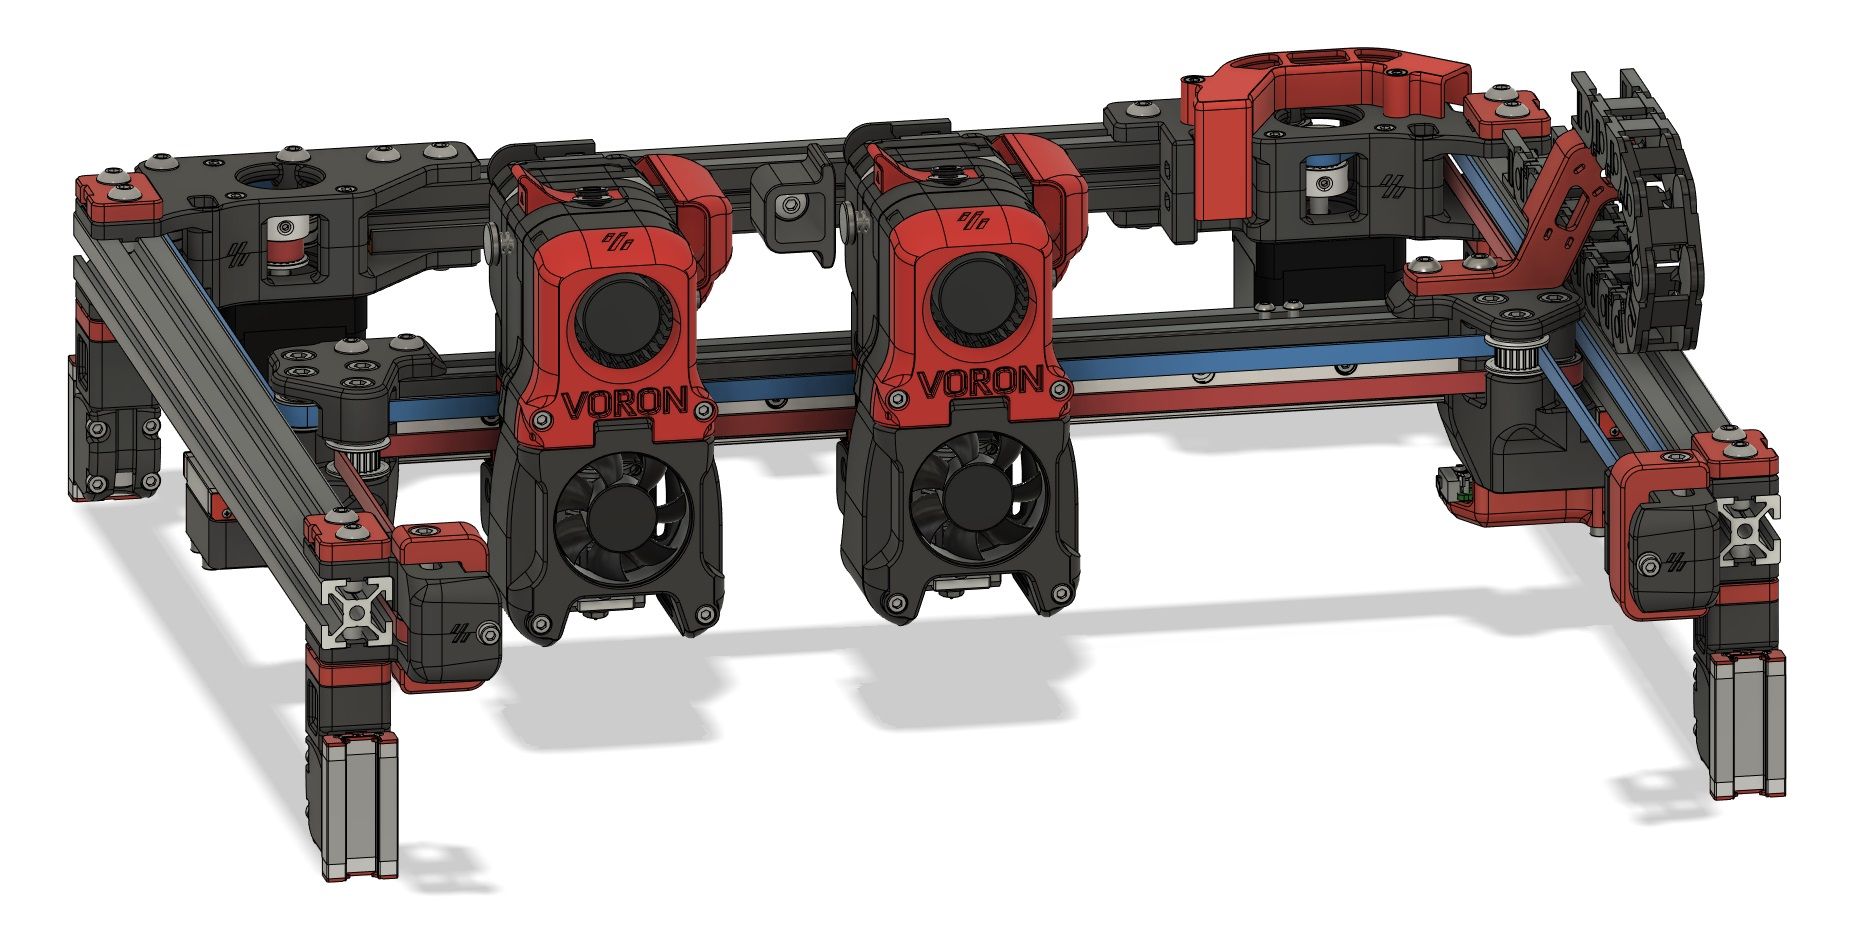
Quite partial to the fixed bed, gantry z movement, and well designed form factor with no wasted space of the Voron, When I started looking over the design, I noticed there was no easy method to add additional belts and motors, not without redesigning all of the major components. That’s when I had the idea for a servo lock. It’s not flash, it’s relatively simple, but I think the concept of having only two motors responsible for the xy movement of two separate carriages, and how the firmware must interact to make it so is very intriguing, and perhaps this will spark other ideas.
Still unsure how racking would show? Lost steps and screeching carriers?
I think racking will boil down to how tightly build a gantry design is. Its hard to say without testing, and I dont know how racking would present itself in a print, possibly out of square corners, or misaligned layers. I think the best gauge would just be to see if you can feel for any play when trying to rock the gantry.
-
@RichardDuke Got it, I love the thought. I would love to see what you come up with.
BTW... Have you thought about swamping carriages, maybe it would fit your application better? You park a carriage at each end of X axis gantry. Then your tool can pick up either carriage. This might be easier to incorporate into an existing corexy design.
-
It has crossed my mind, but it would require a coupler that was fairly acurate. I think I would probably end up with a result much like the toolchanger and park the tools off the carriage instead.
It just seemed so easy to throw on another carriage without much modification!

Richard
-
@RichardDuke Seems simple enough, I guess you never know for sure unless you try!
-
@RichardDuke
In case of the Voron it seems, you'd fit the whole extruder with only two screws to the carrier? You would loose the screws, that otherwise hold the belt-clamp.
Is there a way to use countersunk screws, like I did?I'm trying to find a way to switch the locks without servos.
Just by moving against the far end of the printer, both carriers would simultanously push a springloaded switch, that toggles their lock/unlock hooks. Not sure yet, how to do this but it's there -
@o_lampe I have redesigned it so there are two cap screws and 2 c/sunk screws. The c/sunk ones are just hiding behind the belts. There is also an additional linear rail on the underside of the 2020 extrusion so in total, 8 bolts per carriage, a bit extreme. Edited* the belt clamps are secured with seperate bolts that run parallel to the gantry. They are not shown in the image, but it all still fits.
I too have been thinking about alternative locking mechanisms. I think the most ideal solution will be some kind of bushing in the carriage, that a machined shaft is inserted into to pin it in place. Its going to be crucial that the parked carriage has no movement otherwise this will translate into the print quality.
I have been scouring AliExpress for various bits of hardware that could be potential candidates but struggling to find something suitable. I did come across some small form 12v door latch solenoids that I liked the idea of, but I would be positive the solenoid pin will have some amount of play.
I figure if you can have 2 servos, latch/unlatch the carriages, you should be able to rig both latches to a single central servo with some actuator rods ect. But your idea of a full mechanical solution is a neat idea, I will have to give it some more thought, I’m not sure if it’s possible though as there will likely be a moment where both carriages must simultaneously move together which would likely loose the Y position, although this could be rectified with a home between tool change.
-
@o_lampe said in IDEX CoreXY, With Only 2 Motors.:
I'm trying to find a way to switch the locks without servos.
Just by moving against the far end of the printer, both carriers would simultanously push a springloaded switch, that toggles their lock/unlock hooks. Not sure yet, how to do this but it's thereYou know what, I have done some finger paintings on my phone in bed, which I am not quite prepared to publish haha, but I think this may actually be possible. I will sketch something better in the morning
-
@RichardDuke said in IDEX CoreXY, With Only 2 Motors.:
@o_lampe said in IDEX CoreXY, With Only 2 Motors.:
I'm trying to find a way to switch the locks without servos.
Just by moving against the far end of the printer, both carriers would simultanously push a springloaded switch, that toggles their lock/unlock hooks. Not sure yet, how to do this but it's thereYou know what, I have done some finger paintings on my phone in bed, which I am not quite prepared to publish haha, but I think this may actually be possible. I will sketch something better in the morning
Keep your hands over the blanket they say
Here's a first design to play with. Needs some beefing up, but the springloaded steelball snaps the switch nicely from one side to the other. And the springload is not important for the lock, just to make sure it stays in place.
I agree with the need for absolute locking. My idea is to add another (strong) spring that pushes the carrier against the hook. I already found the place for the spring in my design, but have no spring that fits.
The parking procedure is:- move the carrier against the limit and a bit beyond
- move the whole beam towards the far end of the printer
- toggle the lock(s) by pushing the switch into the toggler (not designed yet)
- change the kinematics and continue printing