[solved] strong vibration with pressure advance
-
@giostark said in strong vibration with pressure advance:
I tried M572 D0 S0.5 till M572 D0 S01.2 (code placed at the end of the drivers section of the config.g)
The right place to add this line is after the tool definition. Don't know if that makes a difference, just thought it was worth mentioning.
-
Thanks both of you! Yep is a BGM. When i touch the filament i can feel the small retracted part. But i suspect you are pointing well.
I also will move the code in the right place. In few hours i'll upload the config.g, now i'm in office with just the mobile phone... -
Here we are , this is how the config.g is right now. (I'll move the M572 bottom)
Config.g ; General preferences G21 ; Work in millimetres G90 ; Send absolute coordinates... M83 ; ...but relative extruder moves ;M555 P2 ; Set firmware compatibility to look like Marlin ;*** The homed height is deliberately set too high in the following - you will adjust it during calibration. M575 P1 S1 B57600; enable panel due to connect properly M665 L400.310:400.320:400.310 R164.474 H510.20 B165.0 X0 Y0 Z0.000; Set diagonal rod length, delta radius, printable radius and homed - L400.310:400.320:400.310 - Diagonals 400.310:400.320:400.310, delta radius 164.474, homed height 510.200, bed radius 165.0, X -0.071°, Y 0.090°, Z 0.000° con cinghie nere e carrelli liberi M666 X0.00 Y0.0 Z0.0 A0.00 B0.00; Put your endstop adjustments here, or let auto calibration find them ; old setting M666 X0.45 Y0.40 Z-0.25 A0.00 B0.00; ; Network M550 PTEVO Little Monster ; Set machine name M552 S1 G4 P1000 M587 S"Vodafone-casa24" P"rocco55=rocco55" M586 P0 S1 ; Enable HTTP M586 P1 S0 ; Disable FTP M586 P2 S0 ; Disable Telnet ; Motors 0.9 degree M569 P0 S1 ; Drive 0 goes forwards M569 P1 S1 ; Drive 1 goes forwards M569 P2 S1 ; Drive 2 goes forwards M569 P3 S0 ; Drive 3 goes forwards M350 X16 Y16 Z16 E16 I1 ; Configure microstepping with interpolation M92 X160 Y160 Z160 E920 ; Set steps per mm M566 X1200 Y1200 Z1200 E1200 ; Set maximum instantaneous speed changes (mm/min) M203 X18000 Y18000 Z18000 E1200 ; Set maximum speeds (mm/min) M201 X1000 Y1000 Z1000 E1000 ; Set accelerations (mm/s^2) M906 X1445 Y1445 Z1445 E1445 I60 ; Set motor currents (mA) and motor idle factor in per cent.I100 is idle 100% power motor. By def 1700 for axis and 1500 for Extruder for standard motors. For 0.9 motors use 1700 for 3 axis and 1700 for extruder (the motors are the same). ;M84 S30 ; Set idle timeout M572 D0 S1.2; pressure advance - D0 - extruder name and SX.X the amount of the pressure advance ; Axis Limits M208 Z-0.3 S1 ; Set minimum Z for use negative baby steps ; Endstops M574 X2 S1 P"xstop" ; Set active high endstops M574 Y2 S1 P"ystop" M574 Z2 S1 P"zstop" ; Z-Probe M307 H3 A-1 C-1 D-1 ; Disable heater on PWM channel for BLTouch M558 P8 C"^zprobe.in+zprobe.mod" H4 F1000 T5000 A5 R0.4 ; P9 for BLTouch, dive height 5mm=H5 , probe at 100mm/min, travel 6000mm/min, up to 5 probes, pause 0.1s ; M558 P8 R0.4 F1200 for smart effector G31 P100 X0 Y0 Z-0.1 ; offset and trigger height. The higher the Z value, the closer the bed will get to the nozzle. G31 X0 Y20 Z1.150 P25 for BLT. - G31 P100 X0 Y0 Z-0.1 for SMART. M557 R140 S50 ; Define mesh grid ; HEATERS : M308 S0 P"bedtemp" Y"thermistor" A"Bed" T100000 B3950 ; define bed temperature sensor M950 H0 C"bedheat" T0 ; heater 0 uses the bed_heat pin, sensor 0 M308 S1 P"e0temp" Y"thermistor" A"Nozzle" T100000 B4725 C7.060000e-8 R4700; define E0 temperature sensor for nozzle M950 H1 C"e0heat" T1 ; heater 1 uses the e0_heat pin and sensor 1 M308 S2 P"e1temp" Y"thermistor" A"H_C_Resistor" T100000 B4725 C7.06e-8 R4700 ; configure sensor 2 as thermistor on pin e1_temp for hot chamber M950 H2 C"e1heat" T2 ; heater 2 uses the e1_heat pin and sensor 2resistence M308 S3 P"e2temp" Y"thermistor" A"Enclosure" T10000 ; configure sensor 3 as thermistor on pin exp.35 for enclosure M950 P3 P"exp.heater3" T3; sensor 3 uses the exp.35 pin and sensor 3 M140 H0 ; the bed heater is heater 0 M141 H2 ; heater 2 is the chamber heater M143 H1 S280 M570 H1 P1200 S1200 ; Tools M563 P0 D0 H1 S"Nozzle"; F1 - Define tool 0 L'F1 inverte la ventola del tool e le ventole di raffreddamento. cosi' quando sposto il cursore del tool varia correttamente l'intensita' della ventola del nozzle. (prima invece cambiavano le ventole di raffreddamento) Con la nuova mappatura dei pin questo non e' piu' necessario. G10 P0 X0 Y0 Z0 ; Set tool 0 axis offsets G10 P0 R0 S0 ; Set initial tool 0 active and standby temperatures to 0C ; Fans M950 F0 C"fan1" ; part fan M106 P0 S0 C"Printend Part" H-1 ; M106 P1 S0 I0 F500 H-1 ; Set fan 1 value, PWM signal inversion and frequency. Thermostatic control is turned off M950 F1 C"fan0" ; tool fan M106 P1 S1 X1 C"Nozzle Head" H1 T45 ; Set fan 0 value, PWM signal inversion and frequency. Thermostatic control is turned on at 45degree - 0.3 is 30% M950 F2 C"fan2" M106 P2 S0 H-1 C"Chamber"; Set fan 0 value, PWM signal inversion and frequency. Thermostatic control is turned off - 0.3 is 30% ; Automatic power saving M911 S10 R11 P"M913 X0 Y0 G91 M83 G1 Z3 E-5 F1000" ; Set voltage thresholds and actions to run on power loss ; Custom settings ;M591 D0 C3 P2 E6.0 ;old extruder settings ; Filament Sensor - Add the following to config file anywhere before the M501 command M591 D0 P1 C"e0_stop" R20 S1; configure extruder drive 0 to use E1 endstop (C4) with 20% tolerance , new extruder settings for filament sensor ;M591 D0 ; display filament sensor parameters for extruder drive 0 ; Miscellaneous M501 ; Load saved parameters from non-volatile memory M280 P3 S10 I1 M280 P3 S90 I1 -
I tried with those settings gathered from this post:
https://forum.duet3d.com/topic/9092/bondtech-bmg-owners-what-are-your-accel-and-jerk-settings
The guy with the kossel use pretty the same despite the current.
My motor are rated to 1700 so the 90% is 1530.
The vibration of the very small retraction is really strong because is too fast?M350 X16 Y16 Z16 E16 I1 ; Configure microstepping with interpolation M92 X160 Y160 Z160 E920 ; Set steps per mm M566 X1200 Y1200 Z1200 E1200 ; Set maximum instantaneous speed changes (mm/min) Jerk M203 X18000 Y18000 Z18000 E1200 ; Set maximum speeds (mm/min) M201 X3000 Y3000 Z3000 E3000 ; Set accelerations (mm/s^2) M906 X1530 Y1530 Z1530 E1530 I60 ;With 0.5 PA the tiny blobs still remain. Retraction speed is set to 30mm/s for a 3mm length.

-
@giostark said in strong vibration with pressure advance:
With 0.5 PA the tiny blobs still remain. Retraction speed is set to 30mm/s for a 3mm length.
Actually your retraction speed is limited by your M203 command.
@giostark said in strong vibration with pressure advance:
M203 X18000 Y18000 Z18000 E1200 ; Set maximum speeds (mm/min)
Try increasing your max speed inM203 so that you have better control over the actual retraction speed. And then try different jerk and acceleration values.
If you use firmware retraction you can actually make adjustments during the actual print. Same for acceleration and jerk. This lets you do the tuning more quickly. Just send the commands in the console during the print. M201 E1000, etc.
There's also a set of macros that can help.
https://forum.duet3d.com/topic/6181/tuning-macros-menus-accel-jerk-retraction-pressure-advance?_=1622058401633 -
@phaedrux
You are right ... I'm sleeping
-
@phaedrux
I tried to rise the retraction speed till 35mm/s (after changing the E in M203) . But this doesn't changed much.
With PA at 0.8 there are still no differences in blobs and the vibration is still really strong during the performing of PA.
Still before at 20mm/s the retraction was good. With the extra prime amount at restart I'm able to reduce the pressure at the start.
What seems I can't avoid is the very small blob at the end.
Is normal that the retraction is so fast and produce this vibration? Probably is the part too small ? 3cm X 3cm (wall 3mm thick) So the retraction must happen really fast ... The only solution for avoid this to happen is to slow down really much the print speed , right? But 35mm/s is already slow.
Now I try again with the coasting option and without the PA. That retraction produce a too noise sound and I cant leave the printer on during night. or stay in the same room during the day either.
Other advice are welcome !
I saved in the bookmark the macro post") tnx
tnx -
You're running into a downside of bowden extruder setups.
-
@phaedrux
Ok, I have to finish this printer and then I'll start to mount the CoreXY full metal . Now it is in pieces in boxes.
If I found solutions I'll update this post. Thx as always for your time !
-
@giostark said in strong vibration with pressure advance:
If I found solutions I'll update this post.
Hours of rigorous testing and tuning with those macros. Maybe changing to more exotic capricorn tubing. Maybe a different extruder motor. Mounting a flying extruder to reduce distance to the print head.
-
@phaedrux
The tube is already an original capricorn , the 0.9 motor should be fine (german provenience) . In origin I had the fly system but I changed it for the enclosure system , for light the head and avoid to leave the extruder inside the hot chamber. The direct drive on the Smart effector seems not an option right? I'm already spending so much time back this damn trap but seems that I have to put still some effort on it.
I'm proceeding with other test... -
@giostark said in strong vibration with pressure advance:
The direct drive on the Smart effector seems not an option right?
With the right motivation anything is possible.
-
@phaedrux
Eh , I posted there ... this should be an interesting solution to adapt: -
I have one other thought. Measure your filament diameter and ensure there is not interference with the Capricorn tubing. I ended up getting rid of the Capricorn on all of my setups because it caused too much drag on the filament and I was unable to retract without losing steps in the extruder. Or that you are not changing the shape of the filament too much by squeezing it so hard with the BMG.
-
@giostark
There were guys adapting the Orbiter to a SmartEffector, needs a bit more work, though. -
Hi all the mate that try to help me !
News... As suggested by Phaedrux I reverted to a fly system the extruder , I had no choice. In origin I wanted to put it out the chamber for avoid the heat. But seems that a long tube can affect the pressure quite a lot.
I suspended the extruder and used a near 10cm of Capricorn.
The earlier horrible rumor was because the stiffness of the structure . Too rigid , the quick and strong extruder reversing generate a reverberation long the aluminium bars of the structure increasing the final rumor.
Now , the plastic belt with spring that suspend the extruder work as dampeners and also because inside the double plexiglass chamber all the rumors are gone !!!
I tried the pressure advance again at 0.2 disabling "extra prime amount" and leaving a 5mm retraction (70mm/s) + a 0.2 of coasting. (0.3mmlayer height)
This is the result , I need MORE testing but for today I'm fine , is late and I'm exhausted. Also cables and roll need new arrangement.
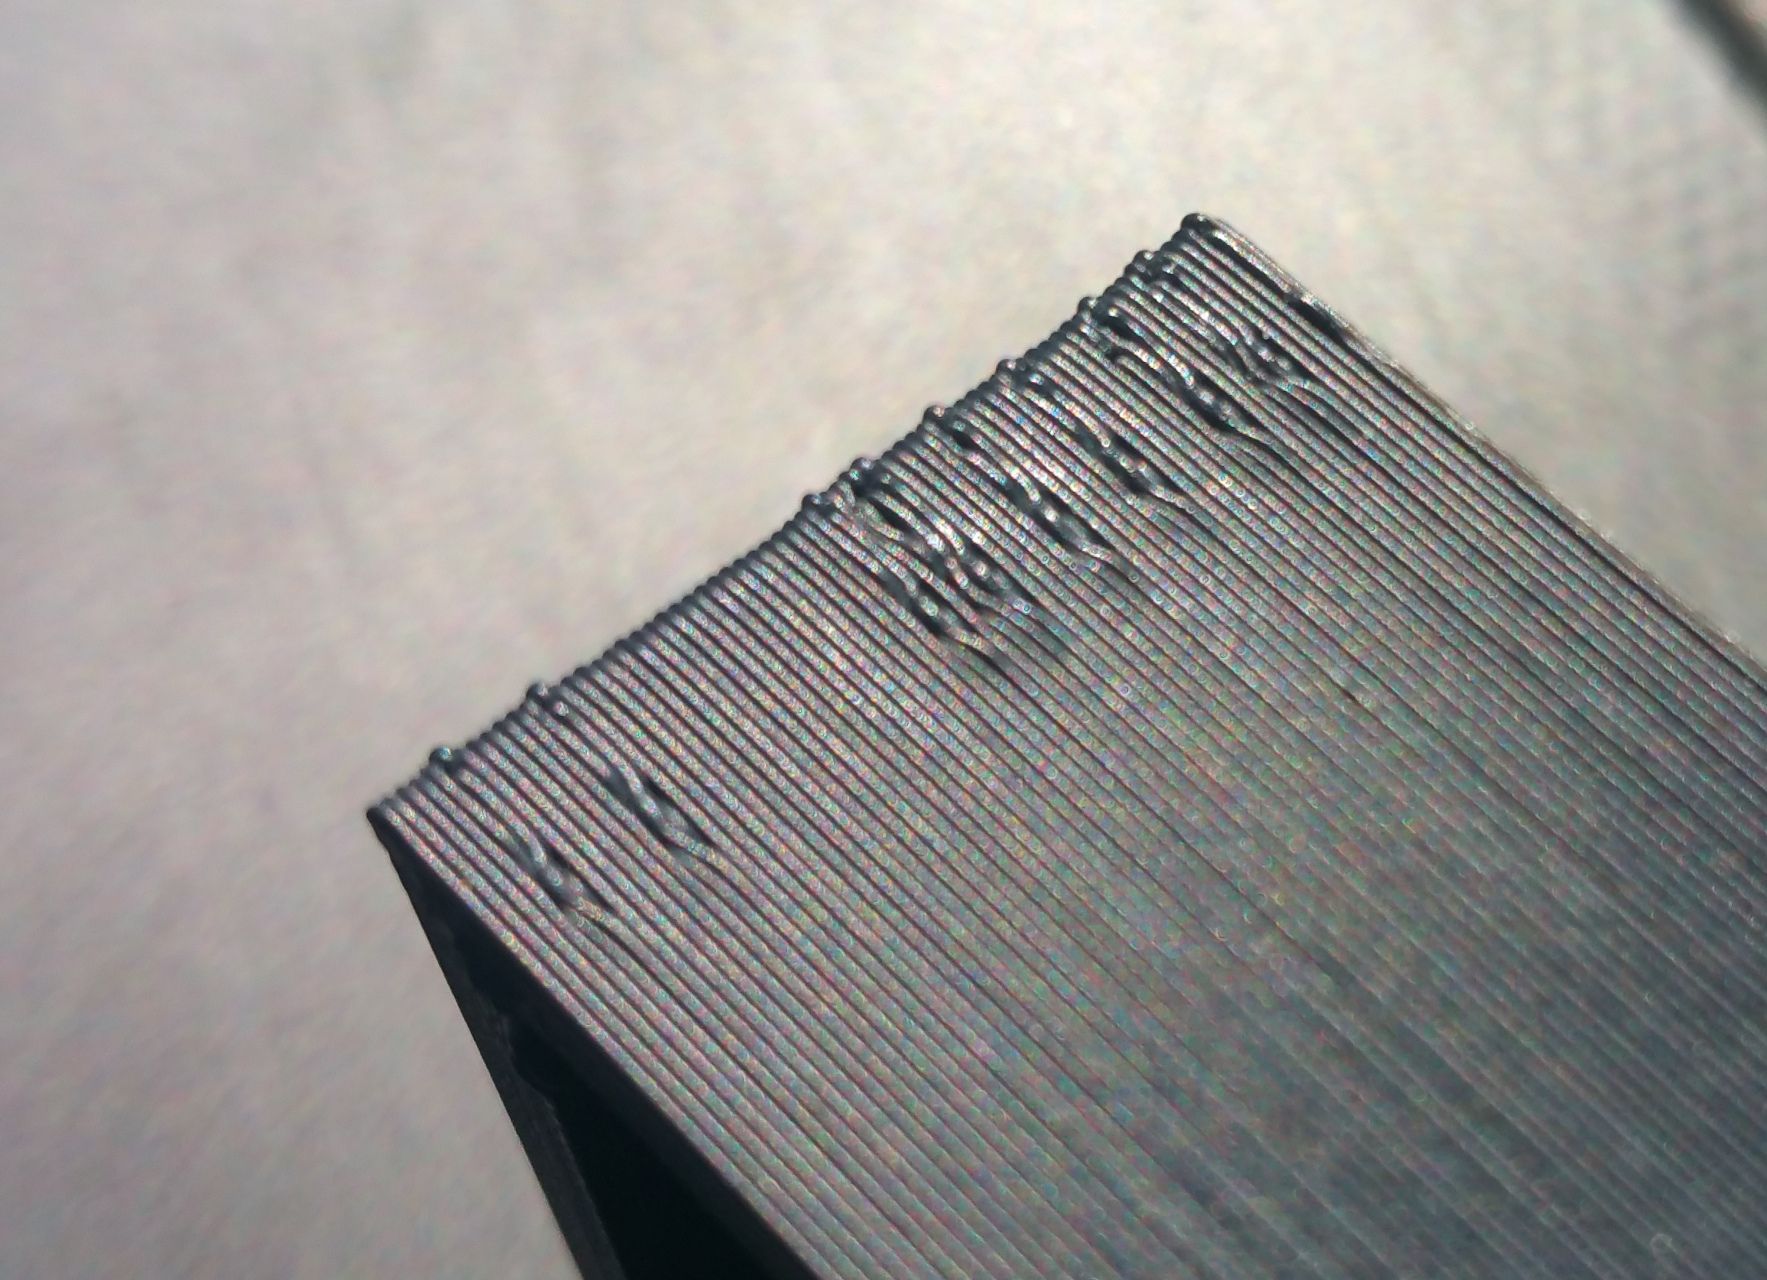
Attached the video with no rumors anymore and a part now printed... I noticed that on the left a small vibration is because some extruder settings. If I disable pressure advance and some Cura option the wave go away but start the blobs . On the right corner the prominent edges correspond to the old blob that now are more flat.
So , no more rumors and room for get a better printed part...good to go!
The direct driver is really intriguing. Is not excluded a future upgrade...
no-rumors.mp4

-
@giostark
Looks good, but the errors on the left and right edge seem to have a regular distance, like you have Z-banding or wobble? -
@o_lampe
At first I suspected it but reverting to neutral setting in Cura and disabling the pressure advance they were gone. Seems different amount of material.
This wave artifact appear ONLY after that the nozzle turn the corner. (in this case the printer nozzle go form left to right).
On the right the small white sign are excess of material (the light reflected them resulting in small white).
An other strange behavior of the coasting (with the long tube and a big value of it) was that when the printer stop to extruder before applying the coasting , it leave a small blob (seems a hole but from the top view is an excess of material). This let me thing that is difficult to control the pressure so I shortened the tube.
Now I have to play between "pressure advance", "coasting", "wall inserting" , "retraction" .
Any your consideration is welcome!
-
@giostark How about the belt tension ? It seems the head goes too much due to the belt loosness.
-
@hiroaki
I can try to pull them , I'll report it in the evening... now is time for prepare the climbing afternoon
tnx all of you !
