Duet3D Logo Duet3D
    • Tags
    • Documentation
    • Order
    • Register
    • Login
    1. Home
    2. Sphyloid
    • Profile
    • Following 0
    • Followers 0
    • Topics 19
    • Posts 52
    • Best 8
    • Controversial 0
    • Groups 0

    Sphyloid

    @Sphyloid

    9
    Reputation
    12
    Profile views
    52
    Posts
    0
    Followers
    0
    Following
    Joined Last Online

    Sphyloid Unfollow Follow

    Best posts made by Sphyloid

    • Anyone notice the Duet website is written on the back in solder?

      Seriously doubt many people noticed this, but I find it beyond cool. The duet website is written the the back copper and in the back solder mask so when it is wave soldered the website gets written in solder! Totally showing off, but its super cool.

      Back Copper:

      backCopper.PNG

      Back Solder Mask:

      backMask.PNG

      IRL:

      solderWebsite.jpg

      posted in General Discussion
      Sphyloidundefined
      Sphyloid
    • RE: X Axis jumps randomly during printing

      @Phaedrux The Duet still turns on and runs fine until it skips X around. I found where the short was and all it had access to short was the X endstop and X stepper.

      Ended up ordering a replacement, had to go with a cloned version since I could not find a real duet anywhere. The printer works fine now. Though I found there was no cooling for the duet, the rear of the board had little to no clearance and the board cooling fan was choked with the air flowing away from the board instead of under.

      I added hotglue to the main ribbon solder joints and the rear of the connectors and removed the grounding wire that may have shorted them. Also I wired the X stepper directly to the board so that the breakout only has the 5V endstop.

      Thank you for the help guys, looking forward to having my duet running on another of my machines.

      X_Board_A_1024x1024.jpg

      posted in Duet Hardware and wiring
      Sphyloidundefined
      Sphyloid
    • IDEX H-Bot

      Yes, this is a terrible idea for many reasons. I simply want to know if this is possible to configure with the stock rep-rap firmware.

      As the title suggests, the independent dual extruder machine would have two layers of the H-Bot motion system. Each extruder would have it's own X and Y motor, but the firmware would need to keep both extruders at the same Y value.

      Thank you,
      Will

      posted in Firmware installation
      Sphyloidundefined
      Sphyloid
    • RE: Duet 2 Wifi Expansion board IO usage

      @phaedrux Perhaps this is worth promoting to its own thread. Ill make one real quick.

      posted in Duet Hardware and wiring
      Sphyloidundefined
      Sphyloid
    • RE: IDEX H-Bot

      @bot The reason I say it is terrible is complicated. While functional and useful, I am unsure of the marketability of the product. Other similar designs offer different advantages that may be preferable to most other people.

      Honestly it is quite alarming how little I know about getting this to work at a firmware level. Any tips on where I could get better guidance?

      If you are interested I wrote a little about it in response to a strictly theoretical build. While I have not received all the pieces to my machine from the machine shops, I regard my design as functional given that myself and two senior level engineers, one with a doctorates in mechanical engineering, have reviewed the design. Furthermore I have done extensive FEA on the assembly with a safety factor of 5 for a total deflection of 0.2mm on the Z, and 0.02mm on the X/Y axis. The critiques on my final design were in fine alignment and assembly, not mechanical functionality. It has been completely re-engineered 5 times.

      "I have engineered an H-bot motion system. The reason my design works and this design will not is due to FEA. If you ran FEA on this design it would not be stiff at all.

      Not to mention you would never actually be able to assemble this due to all of the excess rails. Getting them all aligned would be a nightmare. Not to mention you have all your pulleys and motors cantilevered outside the frame. You have all of the extrusions running the thin way where all of the twisting moment is applied to the y carriages.

      Look at how the makerbot replicator H bot is designed. These are engineers from stratasys if I am not mistaken.

      My H-Bot design is infinitely more stiff and requires no more space than a coreXY because of the type of pre-loaded linear rails I used and in what orientation I used them. Christ, I have them bolted to a half inch of blanchard ground steel almost a foot wide stretching the length of the machine reinforced by two 50x100mm aluminum extrusions and the rest of the machine is built with 40x120mm. Bear in mind, this is a large machine.

      Having an IDEX H-bot is a mistake from a complexity standpoint, this did not stop me from trying. I mounted the pullies with roller bearings on 12mm steel rod with polymer bushings in between. Yes you can get it to work, but to what end? Two printers for the price of 1 but at 4x the cost of a simpler design? There would need to be strong motivation, like high precision and speed milling operations to warrant such a design.

      CoreXY is not as accurate as H-bot simply because when you have the rigidity required for high accuracy, H-bot is simpler to design. Unfortunately, for using H-bot in 3d printing specifically, 3D printers are not required to be high accuracy. It is a very messy process, there is no benefit from having high precision.

      As for speed, H-bot wins again. When you have enough stiffness, you can use huge motors. To re-iterate, H-bot is easier to engineer when you have enough stiffness. You need to take advantage of that stiffness if you do not want to lose speed.

      Speaking of cost the original makerbot cartesean system is far superior to all the other 3d printing specific designs. You can make 10 adequate sheet metal cartesean machines for the price of one high-precision H-bot machine not including the labor intensive process of FEA engineering the H-bot. It took me a full year to design a great H-bot when I could have designed an adequate sheet metal machine of the same size in a few months. Granted it would need to have the Z axis bolted to a cement wall, or have multiple lead-screws ( eww ).

      The motivation for my exercise in futility, encase you had not guessed, was space and time. I have space and electricity for one painfully large 500kg, 35A of 220V machine, not two. Furthermore, I want highly dimensionally accurate parts fast in PEEK, PEI, and PC. I cannot waste time and money playing with taking a part off the printer onto a $30,000 CNC I dont have. Ontop of that, I want to be able to have the option of having two half sized machines when I do not need the full build envelope. Hell, maybe other people feel the same way. Maybe they will pay top dollar for my work."
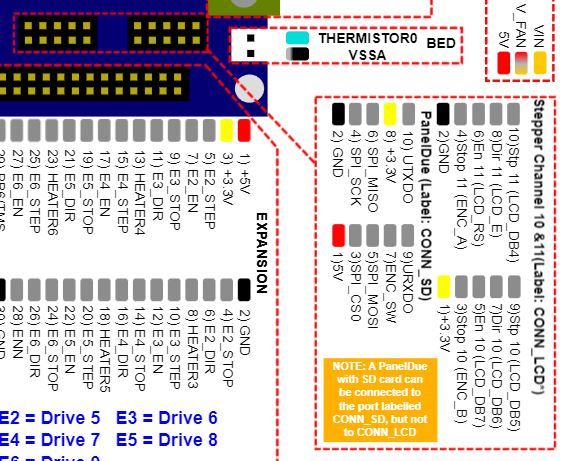
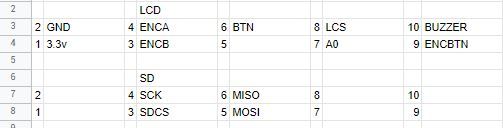
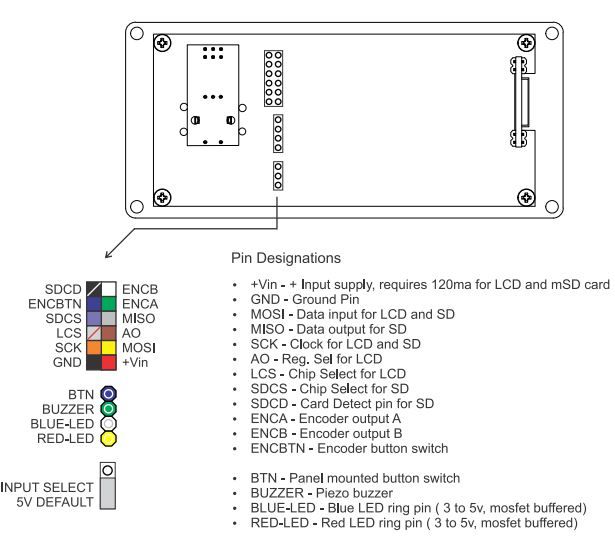
      posted in Firmware installation
      Sphyloidundefined
      Sphyloid
    • Duex0 Still on the way?

      Im putting a significant amount of effort into making my own version of this. Admittedly the drives will have no SPI option as that is irrelevant to my specific machine, adds significant complexity, and the project has low marketability.

      If there is something in the works, I would obviously want to use that instead of spending time engineering something that will likely be inferior, even if it has a nice BLTouch port.

      posted in Duet Hardware and wiring
      Sphyloidundefined
      Sphyloid
    • RE: IDEX H-Bot

      @dc42 Thank you so much! My next question, has anyone actually used this configuration? If so, how difficult was it to configure?

      I did not get much after looking up "CoreXYUV kinematics" any links you know off hand?

      posted in Firmware installation
      Sphyloidundefined
      Sphyloid
    • RE: E3.STOP Endstop not working as expected

      Edit: I read up on pullup resistors and I understand now. Thanks!

      posted in Firmware installation
      Sphyloidundefined
      Sphyloid

    Latest posts made by Sphyloid

    • RE: Tool Specific M675 For Automatic XY tool offsets

      @dc42 The whole point of what I am asking is that the tool offsets are found automatically without the need for the user to print a veneer or any other shenanigans. The cavity is only available on the first layer.

      775eb304-498a-4b44-ac44-cf6c443f9483-image.png

      This is a machine that has an identical feature. They allow the user to run probing on that cavity when the machine falls out of calibration instead of having to waste tons of time finding offsets. The machine then stores these values.

      My idea behind running this homing at the start of each print is simply so that the user never has to worry about the machine falling out of calibration, making the alignment completely hands-free, completely automatically. The user simply has effortless dual material printing experience.

      The next step is enabling servo lifting on the two nozzles so that they automatically maintain themselves in that axis.

      In my case I have 10 idex machines. I have not ever considered using dual material mode as maintaining an accurate calibration on 10 machines is completely unsustainable without it being automatic or wasting tons and tons of time. Adding a cavity to probe? Now that is a cakewalk.

      posted in Gcode meta commands
      Sphyloidundefined
      Sphyloid
    • RE: Tool Specific M675 For Automatic XY tool offsets

      @rjenkinsgb It seems you missed the "automatic" part of what I was saying. The user should never have to manually set offsets, they change over time and it is a giant pain. Sure you can design a sufficiently precise printer that does not change, but that is too expensive which is why it has not been done.

      I have a circle with a center point at a known location cut into my build plate. I want to drop the nozzle in the hole and capacitive home all the tools at the start of each print. If I home them consecutively in the hole with M675 as the command works now only the last tool homed will print in the "right" place relative to the hole.

      Maybe I do not want to home in this way before every print, it would be nice to additionally save the offsets generated by this.

      posted in Gcode meta commands
      Sphyloidundefined
      Sphyloid
    • Tool Specific M675 For Automatic XY tool offsets

      Title says it all, I want a version of M675 that stores tool specific offsets. As you are printing you cannot keep re-homing each time you change a tool, you would collide with the part.

      One way this could work is the first tool is homed using "M675 Y T0 R2 F1200" which acts like a normal homing. If a tool other than 0 is used for initial homing, then it becomes the arbitrary 'true home' the tool from which all the rest are relative too. Then say tool 2 is homed with: "M675 Y T1 R2 F1200" next T2, T3 etc. Instead of homing the next tools, their offset from the original homing would be recorded.

      Please add this functionality or give me a brief high level description of how I would implement something like this in my own fork.

      posted in Gcode meta commands
      Sphyloidundefined
      Sphyloid
    • RE: IDEX/multi extruder auto calibration

      @droftarts Actually, that does exactly what I am looking for. A while ago I read the entire gcode dictionary for the duet, and since I did not see any similar posts on the forums I assumed it was not added yet. This makes things easier for me!

      posted in Firmware installation
      Sphyloidundefined
      Sphyloid
    • IDEX/multi extruder auto calibration

      Hi I want to cut a circular feature into my build plate. The center point will be a known location. The build plate will be connected to 3.3v and both nozzles will be connected to an endstop signals. Using really slow movements I want to use each nozzle to probe the sides of the circular feature to find their offsets.

      I need a way of recording the distance between the endstop being triggered the first and second time on X, then the distance between the first and second time on Y. Then I need to do maths on these values to find the offsets, then I need to use these offsets and apply them in the firmware.

      Both E0 and E1 will need offsets stored since they will be relative to this feature.

      This feature will usher in a next level in multi extruder print quality and ease of use on the duet. It's importance cannot be understated given the incoming era of multi extruder machines prusa is kickstarting.

      alt text

      The next step is enabling nozzle lifting on the second nozzle, but that is for later.

      posted in Firmware installation
      Sphyloidundefined
      Sphyloid
    • RE: Duet Wifi 2 Panucatt Viki 2 / VIKI2 setup

      @dc42 Thanks for the help, I just created a guide incase anyone else tries to do this: https://duet3d.dozuki.com/Guide/Panucatt+Viki+2+-+VIKI2+setup/111

      posted in Duet Hardware and wiring
      Sphyloidundefined
      Sphyloid
    • RE: Duet Wifi 2 Panucatt Viki 2 / VIKI2 setup

      @sphyloid VIKI2 is 100% compatible. 🙂 just need to wire it properly, call it in config.g and create the menus.

      Duet 2 SD and LCD port Pinouts ( For Reference )

      DuetDisplay.JPG

      Correct Pin Placements

      VIKI2toDuet2.JPG

      VIKI2 Pinout ( For Reference )

      VIKI2pinout.JPG

      Never found a place for the red and blue LEDs from what I read I do not think P5 the neopix pin will work for one of them. Maybe ill connect them to fans or something if they work not sure. If they are logic only I could run them through the expansion but I strongly suspect they need to be powered.

      #define DEFAULT_LCD_CONTRAST 40
      #endif
      
      #define ENCODER_PULSES_PER_STEP 4
      #define ENCODER_STEPS_PER_MENU_ITEM 1
      

      Grabbed this from the default marlin firmware from the AW3D Axiome. From this I believe the following would be the correct:

      M918 P2 E4 C40

      Great, it is working now! Just need to setup the menu
      https://duet3d.dozuki.com/Wiki/Duet_2_Maestro_12864_display_menu_system

      The Ultimate Duet Menu by Jadon Miller comes HIGHLY recommended by me.
      https://github.com/jadonmmiller/UltimateDuetMenuSystem

      posted in Duet Hardware and wiring
      Sphyloidundefined
      Sphyloid
    • RE: Duet Wifi 2 Panucatt Viki 2 / VIKI2 setup

      @dc42 When looking at the marlin firmware originally compiled for the AW3D Axiome I saw that calling VIKI2 calls Ultralcd which is the backbone for ST7920. However when double checking it also calls DOGLCD, the backbone for ST7567. So I have no idea honestly

      posted in Duet Hardware and wiring
      Sphyloidundefined
      Sphyloid
    • RE: Duet Wifi 2 Panucatt Viki 2 / VIKI2 setup

      @sphyloid I could not get the Viki 2 working with the duet wifi 2. However I did have the paneldue enabled in firmware.

      After switching to 3.3v, the backlight did turn on despite only being powered with 3.3v, but nothing showed on the display. Paneldue was enabled upstream of where I enabled the encoder display, so it should have been overridden.

      I tried 2Mhz, 0.5Mhz, and 60hz. Nothing showed on any of them.

      Your mileage may vary, Im not exactly a pro.

      As of right now I prefer paneldue and had one lying around so Im just using that. Too fustrated with re-setting up the wiring loom to bother trying again with paneldue disabled. It likely will not work anyway.

      posted in Duet Hardware and wiring
      Sphyloidundefined
      Sphyloid
    • Duet Wifi 2 Panucatt Viki 2 / VIKI2 setup

      EDIT: I got it working, you can too. All the info you need is in one of my replies.

      https://www.panucatt.com/product_p/vikilcd2.htm

      This seems to be a special case ST7920 that is set up to accept 3.3v input. It has a jumper input voltage select with an option for 3.3v and 5v with the default set to 5v.

      Any words of caution before I follow the guide here?: https://duet3d.dozuki.com/Wiki/Connecting_an_LCD_control_panel#Section_Connecting_a_12864_mono_graphics_LCD_display_with_rotary_encoder

      posted in Duet Hardware and wiring
      Sphyloidundefined
      Sphyloid