Duet3D Logo Duet3D
    • Tags
    • Documentation
    • Order
    • Register
    • Login
    1. Home
    2. dhusolo
    3. Posts
    • Profile
    • Following 0
    • Followers 0
    • Topics 46
    • Posts 259
    • Best 19
    • Controversial 1
    • Groups 0

    Posts made by dhusolo

    • Incorrect RPM on VFD then what's selected in DWC

      I was able to get the PWM convertor working from this thread. Since then I've upgraded to a Duet 3 MB6HC, now I can now control my VFD through DWC. However the RPMs shown on the VFD are different than what is selected in DWC.

      M950 R0 C"vfd+out7" Q3000 L5999:24001                   ; create spindle #0 connected to vfd pin and 24k rpm at full PWM
      M563 P1 S"Spindle" R0                                ; create tool #1 with spindle 0
      M568 P1 F0                                  ; set initial tool #0 active and standby temperatures to 0C
      T1                                          ; select tool 1
      M3 T1 S0
      M5
      

      RPM set in DWC on the left and RPM shown on the VFD on the right.
      7000 = 6000
      8000 = 6384
      9000 = 7752
      10000 = 9100
      11000 = 10465
      12000 = 11830
      13000 = 13200
      14000 = 14550
      15000 = 15930
      16000 = 17300
      17000 = 18650
      18000 = 19990
      19000 = 21310
      20000 = 22465
      21000 = 23570
      22000 = 24000

      posted in CNC
      dhusoloundefined
      dhusolo
    • RE: HY VFD controlled by Duet 3 Mini

      @dc42 damn I'm an idiot. I see that now. I had some of those laying around and didn't realize those were the ones not to use. I'll have to order more green converter boards and see if I can get those to work.

      I do have 1 of these 3.3v boards. https://www.amazon.com/dp/B08CRKRBX4?ref=ppx_yo2ov_dt_b_fed_asin_title
      But would that work with a duet 3 mini?

      posted in CNC
      dhusoloundefined
      dhusolo
    • RE: HY VFD controlled by Duet 3 Mini

      @dc42 I confirmed the wiring is correct. I tested the voltage output at the PWM+/- pins and I can see the voltage changing when I adjust the speed in DWC.

      This is the wiring
      1417ad16-e1f0-41b2-9e67-fba77f6703c4-image.png

      I have a relay connected to io4.out that shorts DCM to FOR when the spindle is turned on.

      M950 R0 C"0.vfd+0.io4.out" Q3000 L24000                   ; create spindle #0 connected to vfd pin and 24k rpm at full PWM
      M563 P1 S"Spindle" R0                                ; create tool #1 with spindle 0
      M453                                        ; set cnc mode
      M568 P1 F0                                  ; set initial tool #0 active and standby temperatures to 0C
      T1                                          ; select tool 1
      M3 T1 S0
      M5
      

      I know this is working because when I turn the spindle I can hear the relay clicking and the numbers and the FOR LED on the VFD LCD go solid.

      The jumper was moved from J2 to J1. I have the VFD configured for:
      PD001 = 1
      PD002 = 2
      PD070 = 0

      posted in CNC
      dhusoloundefined
      dhusolo
    • RE: HY VFD controlled by Duet 3 Mini

      @dc42 12v power is coming from the 12v pins next to the VFD header.

      94e1b53c-9990-42e7-84e6-e39353fc712c-image.png

      posted in CNC
      dhusoloundefined
      dhusolo
    • RE: HY VFD controlled by Duet 3 Mini

      @dc42 Yes I have. The connections are

      PWM Input - > VFD GND Pin
      PWM Input + > VFD(out6_buff) pin
      Power Supply + > 12v+ next to VFD pins
      Power Supply - > 12v- next to VFD pins
      Voltage output - (GND) goes to ACM
      Voltage output + (AO) goes to VI(I've also tried AI)

      My config is

      M950 R0 C"0.vfd+0.io4.out" Q3000 L24000                   ; create spindle #0 connected to vfd pin and 24k rpm at full PWM
      M563 P1 S"Spindle" R0                                                      ; create tool #1 with spindle 0
      M453                                                                                     ; set cnc mode
      M568 P1 F0
      T1
      M3 T1 S0
      M5
      posted in CNC
      dhusoloundefined
      dhusolo
    • RE: HY VFD controlled by Duet 3 Mini

      @dc42 You sir are correct. I did get the wrong board. I installed an actual PWM to Voltage converter and wired it up. This is the one I'm using now
      35c29473-9de7-4623-b72c-e84d3541f26e-image.png

      Voltage output - (GND) goes to ACM
      Voltage output + (AO) goes to VI(I've also tried AI)

      I have a relay connected
      NO > DCM
      COM > FOR
      Right now I'm switching it with a macro but eventually I'll get it configured to automatically switch when the drive is working correctly. I know the relay is working because when I switch it on the FOR LED on the VFD goes to solid.

      e1f676ff-614c-4b70-81bd-0c9b07e0111e-image.png

      I set:
      PD001 = 1
      PD002 = 1
      PD070 = 0
      I've moved the jumper to J1 enabling external potentiometer. I've tested the AO and GND and I am getting about 4.8v at 12k RPMs. But the VFD isn't recognizing the signal from the PWM converter

      posted in CNC
      dhusoloundefined
      dhusolo
    • RE: HY VFD controlled by Duet 3 Mini

      Any help would be greatly appreciated

      posted in CNC
      dhusoloundefined
      dhusolo
    • RE: HY VFD controlled by Duet 3 Mini

      @dc42 From what I can see it's the HY02D211B VFD. I've got it kind of working. I can control the speed from S6000 to S7000 but it'll max out at 7000, even if I enter s24000.

      RRF version 3.5.4
      Wifi Server 2.2.0
      DWC 3.5.4

      I've got a jumper wire in between DCM and FOR on the VFD
      Out6_buff/VFD goes to pulse input +
      and VFD GND goes to pulse input -
      This is the one I'm using link text

      ; Configuration file for Duet WiFi (firmware version 3.4.6)
      ; executed by the firmware on start-up
      ;
      ; generated by RepRapFirmware Configuration Tool v3.4.6 on Wed Oct 10 2023 (Central Standard Time)
      
      ; General preferences
      M552 S1                                     ; enable wifi
      G90                                         ; send absolute coordinates...
      M83                                         ; ...but relative extruder moves
      M550 P"CNC"                                 ; set printer name
      M453                                        ; configure CNC mode
      
      ; Kinematics
      M669 K0                                     ; configure Cartesian kinematics
      
      ; Drives
      M569 P0.0 S0                          		; physical drive 0.0 goes forwards
      M569 P0.1 S1                          		; physical drive 0.1 goes backwards
      M569 P0.2 S0                          		; physical drive 0.2 goes backwards
      M584 X0 Y1 Z2                               ; set drive mapping
      
      M350 X16 Y16 Z16 I1               	    	; configure microstepping with interpolation
      M92 X800.00 Y800.00 Z400.00         	    ; set steps per mm
      M566 X500.00 Y500.00 Z200.00                ; set maximum instantaneous speed changes (mm/min)
      M203 X1500.00 Y1500.00 Z2000.00             ; set maximum speeds (mm/min)
      M201 X1000.00 Y1000.00 Z1500.00                ; set accelerations (mm/s^2)
      M906 X1800 Y1800 Z1700 I10                  ; set motor currents (mA) and motor idle factor in per cent
      M84 S100                               	    ; Set idle timeout
      M204 P1500 T3000
      
      ; Axis Limits
      M208 X0 Y0 Z0 S1                        	; set axis minima
      M208 X316 Y200 Z130 S0                       ; set axis maxima
      
      ; Endstops
      M574 X1 S1 P"!0.io3.in"                       ; configure active-high endstop for low end on X via pin
      M574 Y1 S1 P"0.io5.in"                       ; configure active-high endstop for low end on Y via pin
      M574 Z2 S1 P"!0.io6.in"                     ; configure active-high endstop for high end on Z via pin
      
      ; Fans
      M950 F0 C"0.out5" Q200      	                          	; create fan 0 on pin out9 and set its frequency
      M106 P0 C"Board Fan1"                      ; set fan 0 value. Thermostatic control is turned off
      
      ; Spindle Control
      M950 R0 C"0.out6" Q70 L6000:24000                   ; configure spindle #0
      M950 P1 C"0.out3" Q500 
      M42 P1 S0
      M950 P2 C"0.out4" Q500 
      M42 P2 S0
      
      ; Tools
      M563 R0 P0 S"Spindle"                                 ; create tool #0
      M453
      M568 P0 F0                                  ; set initial tool #0 active and standby temperatures to 0C
      G10 P0 X0 Y0 U0 Z0                          ; set tool 0 axis offsets
      G10 P0 R0 S0                                ; set initial tool 0 active and standby temperatures to 0C
      
      ; Mist Control
      ;M950 F0 C"0.out6" Q20000      	                          	; create fan 0 on pin out9 and set its frequency
      ;M106 P0 C"Mist Control" S0 L0.15 X0.85 H-1                     ; set fan 0 value. Thermostatic control is turned off
      
      ; Miscellaneous
      M564 S0 H0								;Allow movement without homing (without axis maxima)
      ;T0                                          ; select first tool
      M575 P1 S1 B57600
      
      ; Custom settings are not defined


      posted in CNC
      dhusoloundefined
      dhusolo
    • RE: HY VFD controlled by Duet 3 Mini

      @dc42
      My VFD is the 110v 2.2kw 80mm spindle purchased from Amazon and is supposedly a clone of this one.

      Closest thing I could find from HY is this one

      Otherwise the only thing I have from the seller is a paper manual.

      posted in CNC
      dhusoloundefined
      dhusolo
    • HY VFD controlled by Duet 3 Mini

      I have my 110v 2.2kw liquid cooled spindle working. I've got the pump wired to the VFD so when the spindle is running the pump is running. I've been searching the forums for a few days and I can't seem to find anything clear that I need to do for my setup.

      I can control the RPM through the dial on the front of the VFD. However I'd like full control through DWC as in being able to use start, stop and change RPMs.

      I've seen posts that say since I have a duet 3 mini, using the VFD pins all I have to do is connect:
      DCM to GND to ground the VFD and the Duet 3 mini
      FOR to out6 on the Duet 3 mini to control RPM

      4754f7e6-bfa6-43a3-bddd-77ab1696b667-image.png

      I also have a frequency to voltage converter like this one.

      e3ac8840-71af-4bd7-bc5c-5b93af8582d5-image.png

      So my question is, what's the correct way to do this so I have full control over the spindle through DWC?

      posted in CNC
      dhusoloundefined
      dhusolo
    • Switch to limit move increments

      I have a duet 3 mini running my cnc controlling DWC with my tablet. I use a digital edge finder to find 0,0 of my workspace. Occasionally while dialing in 0,0 instead of hitting .05, .5 gets hit moving the axis too far.

      I'm wondering if there's a way to use a toggle switch connected to one of the open input pins as a trigger that could override the axis movements to make sure it doesn't move over .05mm each time a move button is pressed.

      posted in CNC
      dhusoloundefined
      dhusolo
    • RE: Errors with new CNC setup

      @droftarts Genius. That fixed the problem. Thanks!

      posted in CNC
      dhusoloundefined
      dhusolo
    • Errors with new CNC setup

      Setting up my Duet 3 Mini 5+ with RRF 3.5.4, DWC 3.5.4 and Wi-Fi server 2.2.0, no SBC. I'm sure something is wrong with the config but I'm not sure what.

      I receive the following error:

      M98 P"config.g"
      Error: exactly one of EFHJPSR must be given
      Error: unconfigured spindle
      Error: in file macro line 52: M568: Invalid tool number
      

      I used the configurator to build the config file.

      ; Configuration file for Duet WiFi (firmware version 3.4.6)
      ; executed by the firmware on start-up
      ;
      ; generated by RepRapFirmware Configuration Tool v3.4.6 on Wed Oct 10 2023 (Central Standard Time)
      
      ; General preferences
      M552 S1                                     ; enable wifi
      G90                                         ; send absolute coordinates...
      M83                                         ; ...but relative extruder moves
      M550 P"CNC"                                 ; set printer name
      
      ; Kinematics
      M669 K0                                     ; configure Cartesian kinematics
      
      ; Drives
      M569 P0.0 S0                          		; physical drive 0.0 goes forwards
      M569 P0.1 S0                          		; physical drive 0.1 goes forwards
      M569 P0.2 S0                          		; physical drive 0.2 goes forwards
      M584 X0 Y1 Z2                               ; set drive mapping
      
      M350 X16 Y16 Z16 I1               	    	; configure microstepping with interpolation
      M92 X800.00 Y800.00 Z800.00         	    ; set steps per mm
      M566 X300.00 Y300.00 Z300.00                ; set maximum instantaneous speed changes (mm/min)
      M203 X3000.00 Y3000.00 Z3000.00             ; set maximum speeds (mm/min)
      M201 X150.00 Y150.00 Z150.00                ; set accelerations (mm/s^2)
      M906 X1200 Y1200 Z1200 I30                  ; set motor currents (mA) and motor idle factor in per cent
      M84 S30                               	    ; Set idle timeout
      
      ; Axis Limits
      M208 X0 Y0 Z0 S1                        	; set axis minima
      M208 X289 Y183 Z56 S0                       ; set axis maxima
      
      ; Endstops
      M574 X2 S1 P"0.io5.in"                       ; configure active-high endstop for low end on X via pin
      M574 Y1 S1 P"0.io6.in"                       ; configure active-high endstop for low end on Y via pin
      M574 Z2 S1 P"!0.io4.in"                       ; configure active-high endstop for high end on Z via pin
      
      ; Heated beds
      M140 P0 H0                                  ; configure heated bed #0
      
      ; Spindles
      M950 C"io1.out+io2.out" Q500 L60:12000 ; configure spindle #0
      
      ; Tools
      M563 P0 H1 R0                       ; create tool #0
      M568 P0 R0 S0                          ; set initial tool #0 active and standby temperatures to 0C
      
      ; Miscellaneous
      M453                                        ; configure CNC mode
      T0                                          ; select first tool
      
      ; Custom settings are not defined
      
      posted in CNC
      dhusoloundefined
      dhusolo
    • RE: Bluetooth with Duet Pi

      @Phaedrux Sunday afternoona

      posted in General Discussion
      dhusoloundefined
      dhusolo
    • Bluetooth with Duet Pi

      I've been trying to get a Bluetooth controller connected the my RPI 4 in SBC mode controlling my Duet 3. It occurred to me it might be disabled. When I go to the Bluetooth Manager I receive the error:
      9e1a69f8-a332-407c-9a28-df98d1dc1070-image.png

      I'm not sure what I'm missing but I've already update the pi and the firmware.

      posted in General Discussion
      dhusoloundefined
      dhusolo
    • RE: Simpilfy 3D Send file to printer

      I know there are other slicers that have different features that may or may not be better than S3D. I've tried other slicers and I don't like them. I've used S3D for years and there's no reason for me to switch.

      posted in General Discussion
      dhusoloundefined
      dhusolo
    • RE: Simplify3d v5 duet / reprapfirmware support?

      @dc42 With post processing scripts you can still use G10/G11. I set mine up like this

      {REPLACE "G1 E-0.5000 F4500\n" "G10\n"}
      {REPLACE "G1 E0.0000 F4500\n" "G11\n"}
      
      posted in General Discussion
      dhusoloundefined
      dhusolo
    • RE: Simpilfy 3D Send file to printer

      @chrishamm Wow really? You'd think it would be... Thanks for letting me know.

      posted in General Discussion
      dhusoloundefined
      dhusolo
    • Simpilfy 3D Send file to printer

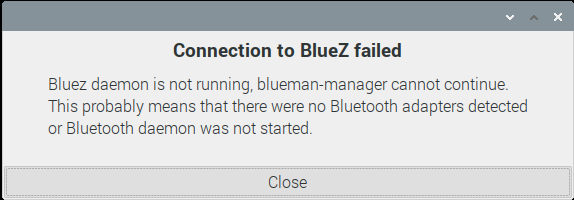
      S3D has a feature where you can send the file and start printing after you slice it but I'm having issues getting it connected.

      This is the instructions on the page:

      Most network-enabled 3D printers support auto-discovery, meaning that the software can automatically detect the printer on the network and determine the appropriate connection details. To test this process, go to Tools > Machine Control Panel within Simplify3D and click “Add New” to launch the New Connection Wizard. Select the “Network Connection” protocol, choose the “Search for Connections” option, and then click “Search for Devices” to begin the auto-discovery process. Note that this process will only work if your firewall and network rules allow UDP traffic back between the printer and your computer. In many cases, you will need to add a firewall exception to allow Simplify3D to detect the 3D printer.
      
      If the software cannot find your 3D printer, you can still enter the connection details manually. Select the “Manual Connection Details” option and then enter the IP address for your 3D printer. This information can typically be found using the LCD screen on the 3D printer to browse to the info or network status page. The software can typically select the correct port automatically based on your printer profile, but you can also enter the port number manually if needed. Common port values used by different manufacturers are listed below:
      
      FlashForge: port 8899
      Ultimaker: port 80
      MakerBot: port 9999
      Dremel: port 80
      Qidi Technology: port 3000
      XYZprinting: port 9100
      Once you have entered the correct details, you can click Next and press “Begin Connection Test” to establish a connection with the printer. If the software fails to connect, it typically means that the firewall or network settings are still blocking the connection. Make sure a firewall exception has been properly configured and consult your network IT manager to make sure traffic between the printer and your computer is permitted. Once a connection is successfully established, Simplify3D will automatically save the correct settings for the future, so you only need to perform this setup process once.
      

      While trying to connect I enter my printers IP and for port number I select automatic but it fails.

      posted in General Discussion
      dhusoloundefined
      dhusolo
    • RE: Configuring RT1000

      @jay_s_uk Go figure I completely forgot to change that. That worked thanks.

      posted in Tuning and tweaking
      dhusoloundefined
      dhusolo