Best posts made by Martin1454
-
RE: Ender 3 nothing working rightposted in My Duet controlled machine
I think it is amazing that you have installed an Duet wifi in a printer that cost almost the same as the duet

Looking foward to see then end result.")

-
RE: Duet Wifi limitations - what are your experiences?posted in General Discussion
Biggest limitation? My imagination and understanding of the Gcode commands -
Other than that:
Missing stealth chop on the duet wifi, but spready cycle is okay -
12V fans on a 24V setup is only possible with external hardware (duex5 or an regulator)For a small retrofit, I would go for the Duet Maestro, unless the print is complex (multiple extruder, multiple motors for auto leveling Z, etc.)
I use the paneldue, but 90% of my work is done through the web interface.
-
RE: Reverse math for 3-point auto leveling?posted in Tuning and tweaking
Finally to the point where im satisfied.
Biggeste change was changing to BL touch - After I got my hands on an thermal/IR camera, I could see that the bed was like a mirror for the camera, so that's why the IR probe didn't work good enough

-
RE: Icarus Delta ... nearly finished!posted in My Duet controlled machine
That is beautiful! looking foward to see print quality if it is as pretty as the printer
-
RE: Duet Wifi limitations - what are your experiences?posted in General Discussion
@plasticmetal said in Duet Wifi limitations - what are your experiences?:
@martin1454 said in Duet Wifi limitations - what are your experiences?:
12V fans on a 24V setup is only possible with external hardware (duex5 or an regulator)
Just to clarify, the external hardware is simply to supply the 12V. It can be a $3 buck regulator from eBay or Amazon. A wiring example is here.
Yup - A small buck converter is enough - or if it is a small low power fan like the 30mm E3D, a linear 7812 is also fine.
-
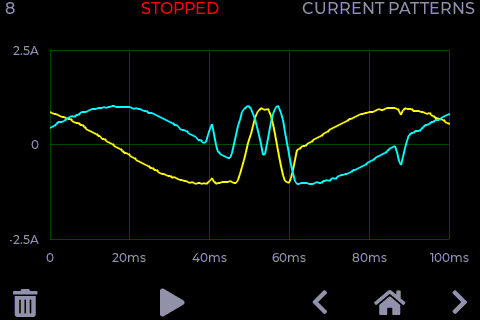
RE: Super Volcano with BMG and 0.9 Motor Wierd behaviourposted in Tuning and tweaking
rectilinear infill? try grid instead
-
Where to buy connectors for Duet 3 (output/stepper connectors)posted in Purchasing
Hi, Im looking to rebuild my 3d printer in the near future, and I will need a few extra connectors for the steppers and the output channels.
I can see the connectors are:
2 way shell VH396-02H
4 way shell VH396-04H
Crimps for the above: VH396T-LBut is there anywhere I can buy them with ok shipping? I only found toby.co.uk where the connectors will be around 8£, but the shipping to denmark is 22£.
-
RE: Question: Home Z with Z-probe before homing X & Yposted in Tuning and tweaking
What about In your home all file to make the printer "believe" it have been homed IN XY first (I think its just to set G92 X0 Y0) and then home Z, and then home X and Y
Latest posts made by Martin1454
-
RE: Can deform 4mm print glassposted in Tuning and tweaking
@peter247 What type of probe do you have? the result looks acceptable, but if anything my guess is on the probe or mechanical issue
-
RE: Question: Home Z with Z-probe before homing X & Yposted in Tuning and tweaking
What about In your home all file to make the printer "believe" it have been homed IN XY first (I think its just to set G92 X0 Y0) and then home Z, and then home X and Y
-
RE: Looking for PCB designer with spare time :)posted in Off Topic
Do you already have a complete schematic?
-
RE: 486MP Adhesive Removalposted in General Discussion
By the way - I recently had to remove some PEI that was stuck with 486MP from my plate - some good 80% IPA was good at removing.
-
RE: run code / trigger relay when heater 0 is active or standby?posted in Gcode meta commands
@Phaedrux That is perfect, I will try to use that!
-
RE: run code / trigger relay when heater 0 is active or standby?posted in Gcode meta commands
@Phaedrux said in run code / trigger relay when heater 0 is active or standby?:
You could set up a monitoring loop in daemon.g to check the heater status perhaps.
That seems like a good way to do it - Do we know what the status variable is called for the bed heater? or is there an overview somewhere where I can find it?
-
RE: Multiple Web Camerasposted in Duet Web Control wishlist
Maybe you can run OBS stream, either on another device - Or if you have a duet 3 with an RPI, then on the RPI it self - That should be able to merge the 2 streams
-
run code / trigger relay when heater 0 is active or standby?posted in Gcode meta commands
Is it possible to setup the firmware to enable an output when you enable the heater 0 (off-> active?)
I have an mechanical relay that is in series with my bed heater, but I'm using PS_ON to enable my 24V supply - So is there a way to make one of the GPIO high or low if im changing the state of the heater?
I know that I can write a gcode to change the state of the GPIO, but I would like to avoid having to write that GCODE each time im trying to heat up the bed.
Thanks for the help!
-
RE: Where to buy connectors for Duet 3 (output/stepper connectors)posted in Purchasing
@Veti That looks like it, thanks!