Drastic improvements with BL Touch disabled
-
Post a picture of your bed mesh. Probe the whole thing with like a 10mm spacing.
You could have the probe offset wrong, so the mesh isn't correctly aligned with the nozzle.
-
@ryanp I guess more to the point is why use mesh compensation if your bed is inherently flat? You've proven to yourself that you don't need it so every time you run it, all you are doing is wasting time trying to fix a problem that doesn't exist.
-
@ryanp
What about the Z-axis leadscrews? Are they worn out? The best Z-probe can't produce true results when the Z-axis corrupts the real height. -
@ryanp you have a large Y offset for the probe. Is it hanging off the front of the hot end? It will be prone to exaggerate any movement of the X carriage around the X axis. It’s usually better to align the probe in line with X so it doesn’t pick up this error. However, this can also cause error if the X carriage can rock side to side, but usually this is more obvious, as it creates a sawtooth pattern on the mesh map. Nozzle probes such as piezos can get around these limitations; any offset probe will error unless there is zero play in the axes.
@deckingman is correct; get the bed plane level, and if the bed is inherently level, you shouldn’t need mesh compensation. I don’t tend to run it on my printers, though mine have quite small bed areas. With larger beds it’s more difficult to have a perfectly flat surface, due to the weight of the bad causing sag, or thermal expansion causing the shape to change.
Ian
Bed-slinger - Mini5+ WiFi/1LC | RRP Fisher v1 - D2 WiFi | Polargraph - D2 WiFi | TronXY X5S - 6HC/Roto | CNC router - 6HC | Tractus3D T1250 - D2 Eth
-
@droftarts @CCS86 @deckingman @o_lampe
I basically went back through and "re-taught" myself bed leveling and mesh bed compensation. It seems silly, but sometimes it is easy to overlook things.
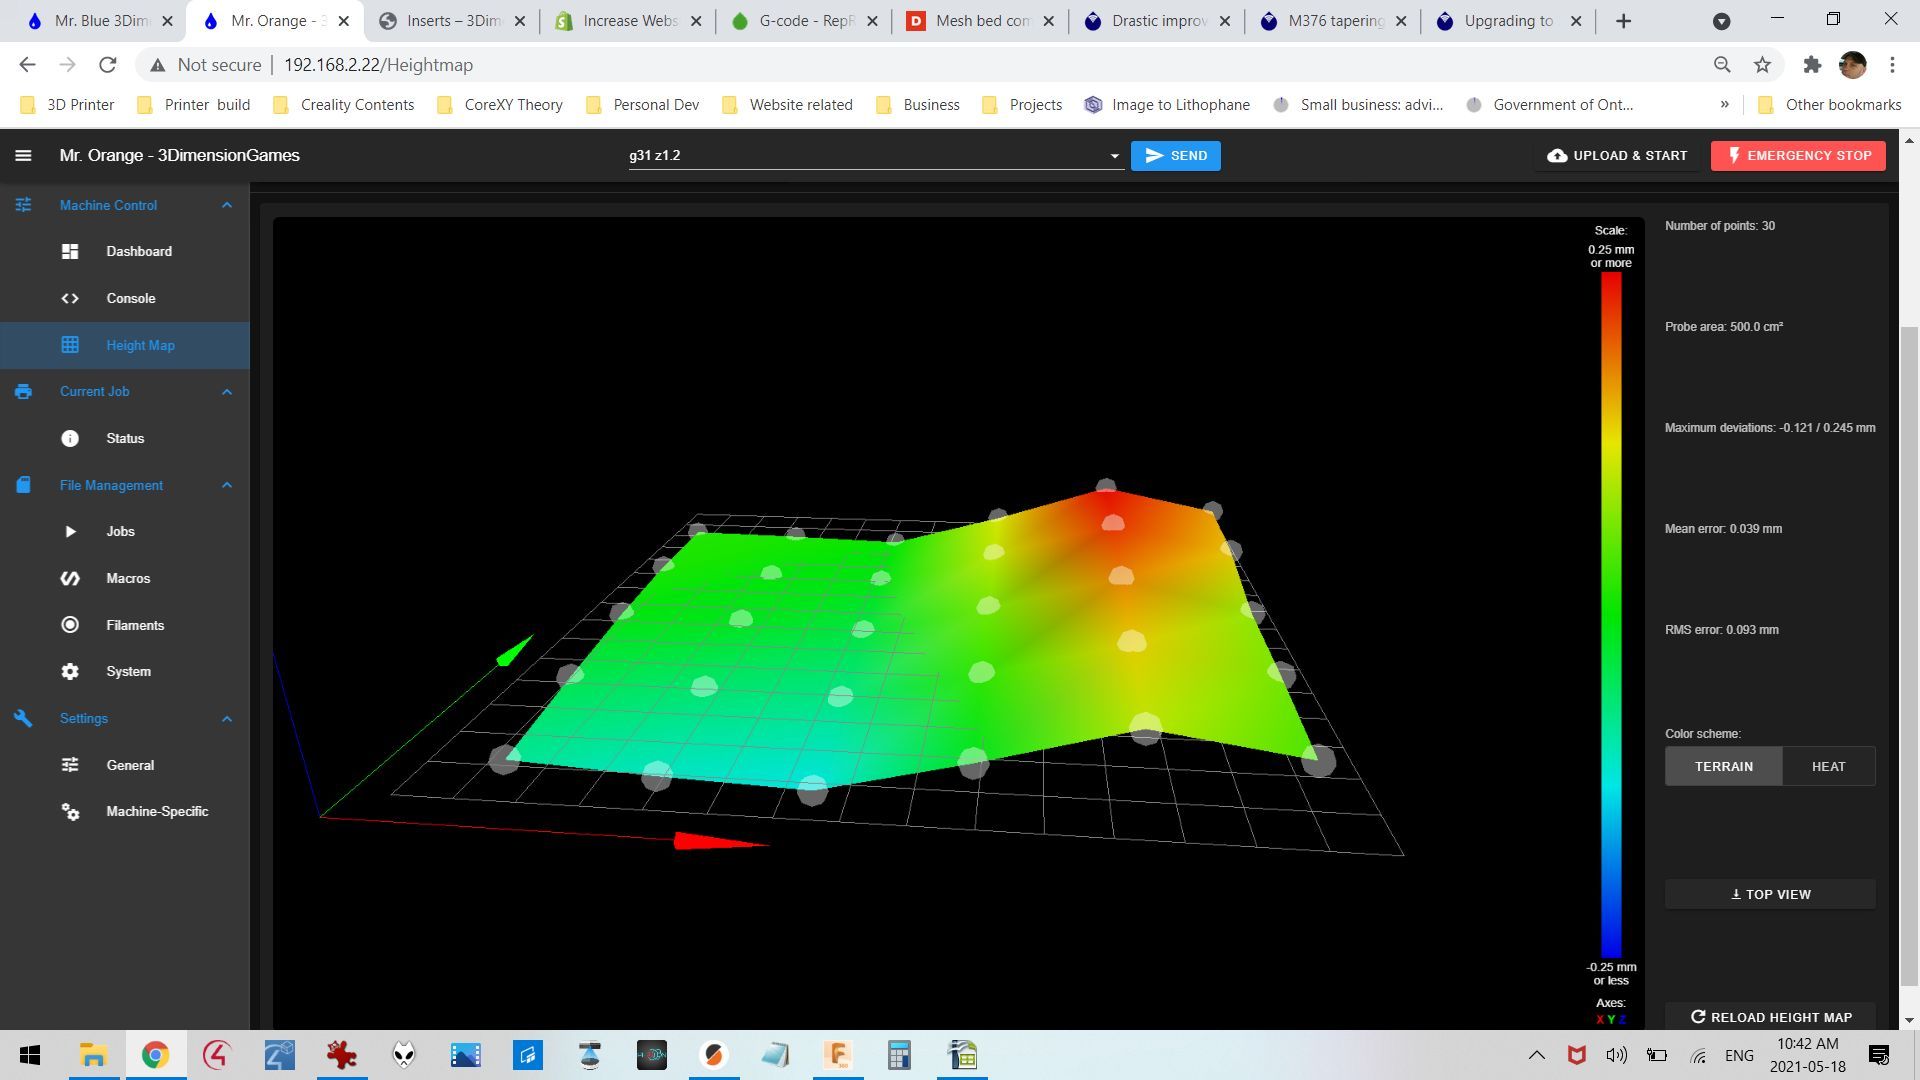
So I homed the printer, run G32 three times to eliminate X axis slope. Leveled the corners. Ran G29 and received the above height map.
Then I looked at my M376 taper command. I had it set to ten.
So 10mm is way to much taper. 20 x 0.245 is 4.9.
But I am still confused as to why the mesh looks like this. It is certainly not what I am expecting based on how the paper feels between the nozzle and the bed.
CR10S, August 2018
Anycubic Photon S December 2019
Ender 5 Feb 2020
Ender 5 Plus May 2020
Anycubic Photon Mono X Nov 2020
~
https://3dimensiongames.com/ -
What are your probe offset values? If the probe is a large distance from the nozzle, it is possible that the probe height changes more than the nozzle height, due to geometric errors in your motion system.
Also, the taper command represents the Z height when mesh leveling correction will have tapered to zero. So, if you have a max deviation of 0.2mm, and a taper height of 10mm, each layer will handle 0.2mm / 10mm of correction; 0.02mm per layer.
-
@ryanp Post a video of your printer as the X axis moves from left to right. I reckon something is twisting the carriage as it goes to the right, causing the probe to
liftdrop on that side. Perhaps cables pulling, or something tightening on that side.Ian
Bed-slinger - Mini5+ WiFi/1LC | RRP Fisher v1 - D2 WiFi | Polargraph - D2 WiFi | TronXY X5S - 6HC/Roto | CNC router - 6HC | Tractus3D T1250 - D2 Eth
-
@droftarts said in Drastic improvements with BL Touch disabled:
... causing the probe to lift on that side.
Isn't it dropping? That is, getting closer to the bed?
The height map suggests something funny with the X axis on the right side. Do you get good first layer on the left side of the bed?
-
working on this now guys.
BTW, this is a creality CR10S. Front Left is home.
CR10S, August 2018
Anycubic Photon S December 2019
Ender 5 Feb 2020
Ender 5 Plus May 2020
Anycubic Photon Mono X Nov 2020
~
https://3dimensiongames.com/ -
@ryanp perhaps try printing a mount like this that reduces the Y offset: https://www.thingiverse.com/thing:3096824
Ian
-
@ryanp said in Drastic improvements with BL Touch disabled:
So I homed the printer, run G32 three times to eliminate X axis slope. Leveled the corners. Ran G29 and received the above height map.
So you leveled the corners AFTER running G32? That means you've essentially changed the results of G32 by changing the bed.
Can you post your homeall.g, bed.g as well so we can see what it's doing?
-
That mesh looks to me like one side of the gantry is binding so you're missing steps. You clearly don't have abed like that.
Also, G32 makes no sense to me if the gantry isn't level as it just tilts it to the bed angle.
I would level the x axis against the top of the gantry ensuring that is square first. Once you are happy that is level, home z.
Then just manually move the nozzle to the bed with the mesh disabled (M561). Use M564 S0 if needs be to allow the nozzle to the bed level. Adjust the bed to have each corner as close to 0 on DWC as possible. This way the bed and x gantry should be relatively parallel. Then you can set Z (G92 Z0) and adjust your ofset for the BLtouch. Do that with the bed and nozzle at temp. Then finally run G29 to generate a mesh. Of course if the z screws are binding or steps missed you will get a false reading. At least this way things should be pretty close to square.
I tend to run a low mesh at the start and adjust based on it before increasing the density. Finally, once you have a decent level mesh I then set Z again as before and run the mesh once again with the new z offset in config.g.
G32 only makes sense to me if I am happy the bed it parallel to my frame or perpendicular however you look at it. Then it works well to set it back to square if a step has been missed etc.
-
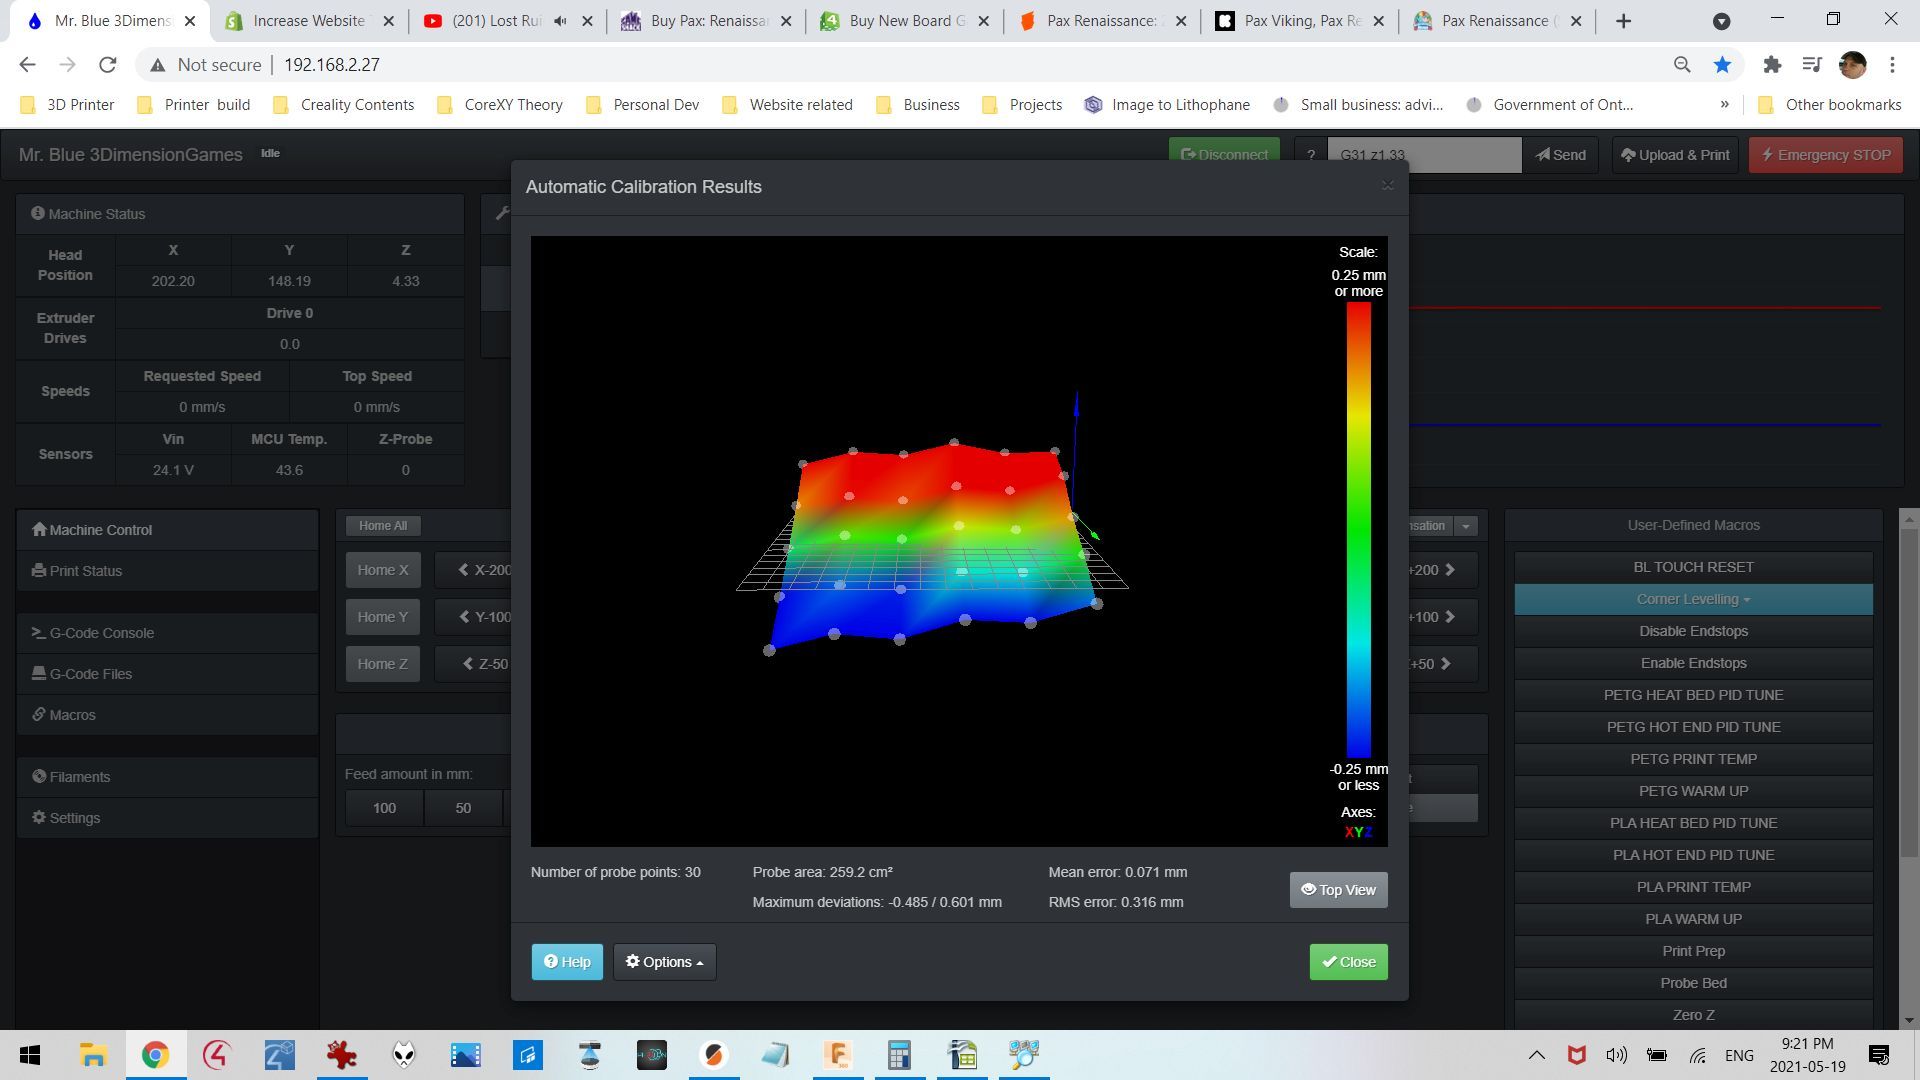
@blacksheep99 @deckingman @Phaedrux @droftarts
Now Im getting pissed off. This was flat yesterday.
I've mainly solved the issue with my CR10S.
But my modded Ender 5, single Z leadscrew....I am completely bewildered.
BTW, before I created this post I went over my printer with a fine tooth comb. Loosened and tightened belts, wheels. Lubed Z-screw. Loosened and tightened corner screws. I am at a loss.
I home to the center of the bed, confirm my Z-offset is accurate with paper to the nozzle. Verify the flatness via viewing nozzle or paper at the four corners. Here are the pictures, it is flat. I actually tend to look closely at the nozzle and watch the sliver of light disappear under it.
Center

Back Right Corner

Back Left Corner

Front Left Corner

Front Right Corner

AND THIS IS THE HEIGHT MAP I FREAKIN GET!!!!!
This is my Zprobe Config.g text
; Z-Probe
M558 P9 H3 F60 T15000 A3 S0.05 B0 R0; set Z probe type to bltouch and the dive height + speeds
G31 X-2.2 Y40.8 Z2.6             ; ***PLA*** set Z probe trigger value, offset and trigger height
;G31 X-2.2 Y40.8 Z2.51		   ; ***PETG***
M557 X20:200 S36 Y45:210 S53                ; define mesh grid
M376 H4			; define compensation taper
Anything jump out in that code?
Is there any possibility that something is stuck in the board electrically. Would a power cycle and unplugging the printer reset anything? Obviously I am utterly baffled.
CR10S, August 2018
Anycubic Photon S December 2019
Ender 5 Feb 2020
Ender 5 Plus May 2020
Anycubic Photon Mono X Nov 2020
~
https://3dimensiongames.com/ -
@ryanp said in Drastic improvements with BL Touch disabled:
S0.05
The default is 0.03. Is there a reason you've loosened the tolerance between consecutive probings?
If you test the trigger height at different spots on the bed is it consistent?
-
@ryanp I doubt it’s this but check the Z motor turns okay by hand with the power off. Check it’s not binding in some way. I’ve had this recently. It was causing missed steps and thus similar issues with my mesh although way more exaggerated
-
@ryanp
I got superstitious with mesh leveling. Before I start a new one, I delete the old heightmap. Even with M561 (reset all bed transforms) I had the feeling, the new heightmap was added on top of the existing. They got worse and worse... -
@phaedrux will amend and try that now.
CR10S, August 2018
Anycubic Photon S December 2019
Ender 5 Feb 2020
Ender 5 Plus May 2020
Anycubic Photon Mono X Nov 2020
~
https://3dimensiongames.com/ -
Guys, I am punch drunk with this. I've been at this all day. Loosened, cleaned everything. Measured everything. Changed out the BL Touch. Replaced the Pom nut on the z axis. Reviewed the Z axis flexible couple, nothing wrong with it. Tightened it up. Used my digital calipers to measured off the x axis 2020 ext to the bed. Flat.
My latest go had me going back and forth between Corner 1- Corner 3 and Corner 2 - Corner 4. To all my measuring they are spot on.
I then just went up and down 5 times on each corner to make sure the grip on the paper didn't change. It didn't. I probed the center of the bed 10 times, certainly well within tolerance.
Leave it as all four corners are repeatable and snug the nozzle well.
But as soon as I do a mesh level:
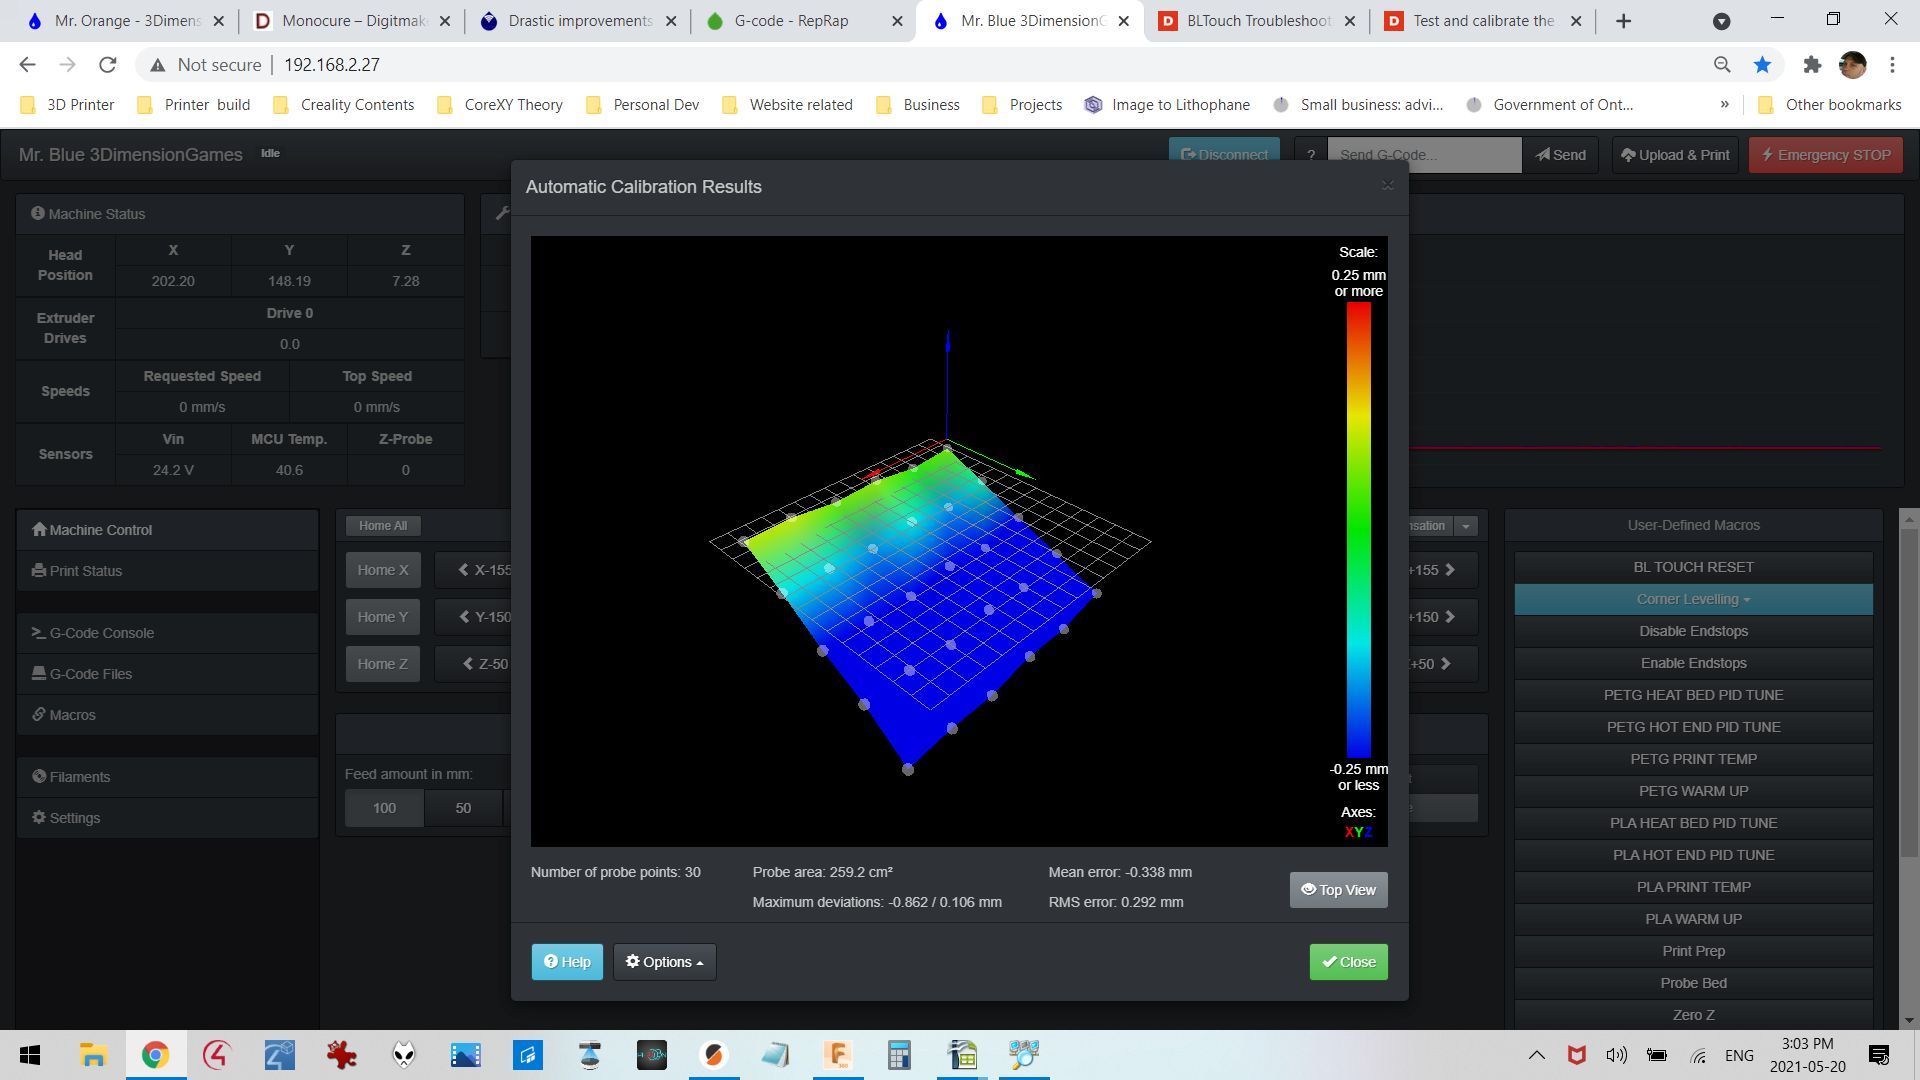
Bewilderment is the only work I can describe it.
CR10S, August 2018
Anycubic Photon S December 2019
Ender 5 Feb 2020
Ender 5 Plus May 2020
Anycubic Photon Mono X Nov 2020
~
https://3dimensiongames.com/ -
@ryanp said in Drastic improvements with BL Touch disabled:
M350 X16 Y16 Z256 E16 I1 ; configure microstepping with interpolation
Are you really using x256 microstepping on Z?
That's a lot of steps per mm. Can you try switching back to x16 and retesting? Maybe it's a case of missing steps? /shrug? -
@ryanp In your OP on 13th May, you started off by saying (quote)
"So I simply disabled all mesh bed compensation. Just home the hot end, level the corners, and print.
And now I have ridiculously smooth first layers, with no movement in the z axis.
"At that time I said why not leave it at that? Why use mesh compensation if you don't need it?
You had a perfectly good printer producing (quote) "ridiculously smooth first layers" but you've spent a week beating yourself up, stripping everything down, measuring everything, replacing parts, etc etc . Clearly something is amiss with mesh compensation but why spend all that time and effort to fix it when you don't need to use it?