Duet3D Logo Duet3D
    • Tags
    • Documentation
    • Order
    • Register
    • Login

    Another Predator

    Scheduled Pinned Locked Moved
    Duet Hardware and wiring
    11
    204
    14.2k
    Loading More Posts
    • Oldest to Newest
    • Newest to Oldest
    • Most Votes
    Reply
    • Reply as topic
    Log in to reply
    This topic has been deleted. Only users with topic management privileges can see it.
    • Carloundefined
      Carlo @Carlo
      last edited by Carlo

      @Carlo

      I put my nimble V2 back on hoping for better luck....nope exactly the same and I've tried well basically all trigger heights with no joy.....I previously asked if it could be sent back the board and effector (refuse to call it smart at this point)to be tested but never received a response ?
      As a few people on these forums have this very setup working but no matter what I try I get the same result even when the kind forum users with this very setup slice files and offer settings that they themselves use successfully on the same machine yet I get no change what so ever....everything on this machine is new and the only part that does change and succeed in printing is removing the Duet2 and slapping in the original board.....what does that say ?

      Cheers
      Cnimble v2.jpg

      droftartsundefined 1 Reply Last reply Reply Quote 0
      • droftartsundefined
        droftarts administrators @Carlo
        last edited by

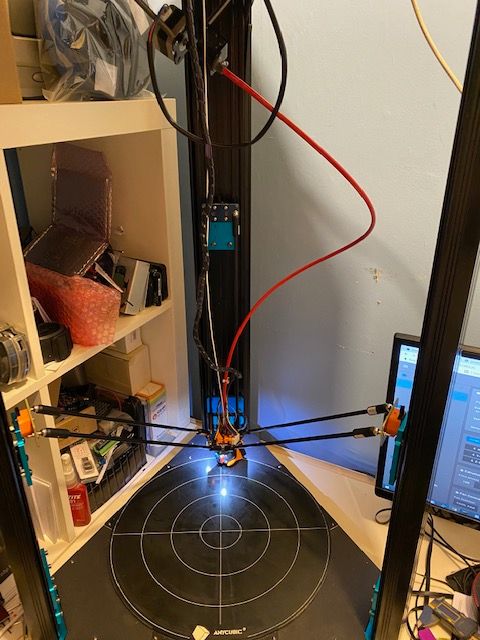
        @Carlo Sorry this has been such a frustrating experience for you. When you swapped the original board back in, did you also put the original effector back on, or did it use the smart effector? If you used the original effector (and presumably original probe), can you try that with the Duet? This would at least narrow down if it's the effector or the Duet.

        If you didn't swap back the effector, the only thing that I can think of is to try a 'manual' probe setup. Replace the probe type in config.g with type 0 (eg M558 P0 H5 F120 T6000), then run through a bed calibration and start a print. It should ask you to manually step the Z down at each probe point, until it touches the bed (use a thin piece of paper, babystep the Z down until it just grabs the paper under the nozzle). You may want to reduce the number of probe points!

        Then proceed to run a print in the normal way. If you home and do G30 to set Z height, it should ask you to manually do that, too.

        Ian

        Bed-slinger - Mini5+ WiFi/1LC | RRP Fisher v1 - D2 WiFi | Polargraph - D2 WiFi | TronXY X5S - 6HC/Roto | CNC router - 6HC | Tractus3D T1250 - D2 Eth

        Carloundefined 1 Reply Last reply Reply Quote 0
        • dc42undefined
          dc42 administrators @Carlo
          last edited by

          @Carlo said in Another Predator:

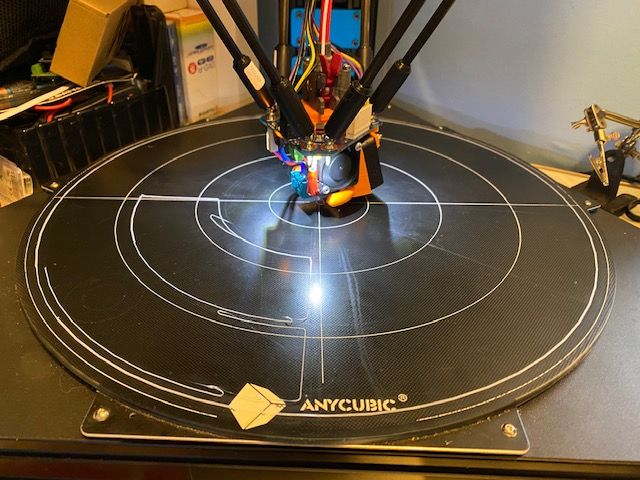
          This is the result I think everyone looks and thinks it's too far from the bed but it's not actually completing the print move it's changing direction before it should in the picture you can see where the print does a U turn on it's self so it never joins the print together it just doesn't complete the move almost like the radius is wrong like the circle is smaller than it is I'm watching it and it does not complete the circles or arcs it never makes it to the end it changes direction and doesn't go back to finish it.

          If you are still having this problem, can you post a video of it printing, to show what you mean?

          What filament are you using, what is the bed surface, and what bed temperature?

          Duet WiFi hardware designer and firmware engineer
          Please do not ask me for Duet support via PM or email, use the forum
          http://www.escher3d.com, https://miscsolutions.wordpress.com

          1 Reply Last reply Reply Quote 0
          • Carloundefined
            Carlo @droftarts
            last edited by

            @droftarts

            Hi Ian,

            Not your fault I appreciate all the help everyone has offered ...still hoping its my fault.
            I did do a manual probe as suggested didn't make any difference.

            Manual probe.jpg

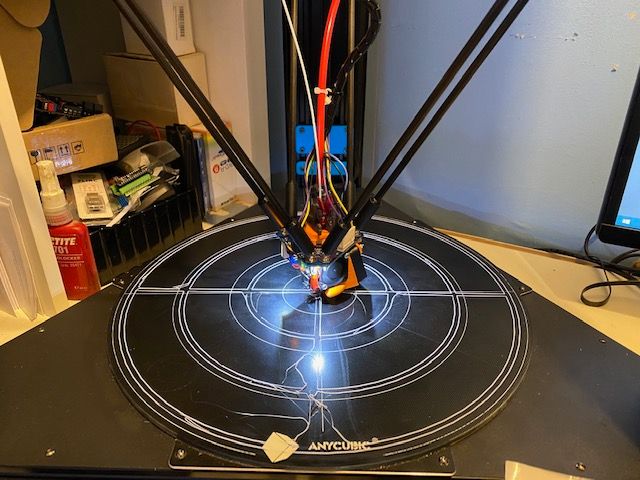
            @dc42 said in Another Predator:

            Hi dc

            If you are still having this problem, can you post a video of it printing, to show what you mean?Yes still having the same problem.

            What filament are you using, what is the bed surface, and what bed temperature?Ultrabase PLA 70c.

            I have shot a video just now but error can't upload due to being over permitted size.

            Cheers
            C

            Phaedruxundefined 1 Reply Last reply Reply Quote 0
            • Phaedruxundefined
              Phaedrux Moderator @Carlo
              last edited by

              @Carlo said in Another Predator:

              can't upload due to being over permitted size.

              Would need to host it on something like dropbox or google drive or even youtube or vimeo.

              Z-Bot CoreXY Build | Thingiverse Profile

              Carloundefined 1 Reply Last reply Reply Quote 0
              • Carloundefined
                Carlo @Phaedrux
                last edited by Carlo

                @Phaedrux

                No worries thanks

                Link below

                https://drive.google.com/open?id=1rd_xZ5KSlHqUiM8DExCabhpIQD18Y5gk

                Cheers
                C

                1 Reply Last reply Reply Quote 0
                • Phaedruxundefined
                  Phaedrux Moderator
                  last edited by

                  It doesn't look like you're doing a single G30 before the start of the print. I'm not really familiar with the delta calibration to know if that's still required or not.

                  Z-Bot CoreXY Build | Thingiverse Profile

                  1 Reply Last reply Reply Quote 0
                  • Danalundefined
                    Danal
                    last edited by Danal

                    It is not absolutely required; however, a G32 with a bed.g that does 6 or 8 factor calibration is a best practice.

                    My bed.g

                    ; bed.g file for RepRapFirmware, generated by Escher3D calculator
                    ; 16 points, 8 factors, probing radius: 280, probe offset (0, 0)
                    G28
                    M106 P1 S0
                    G30 P0 X0.00 Y280.00 Z-99999 H0
                    G30 P1 X140.00 Y242.49 Z-99999 H0
                    G30 P2 X242.49 Y140.00 Z-99999 H0
                    G30 P3 X280.00 Y0.00 Z-99999 H0
                    G30 P4 X242.49 Y-140.00 Z-99999 H0
                    G30 P5 X140.00 Y-242.49 Z-99999 H0
                    G30 P6 X0.00 Y-280.00 Z-99999 H0
                    G30 P7 X-140.00 Y-242.49 Z-99999 H0
                    G30 P8 X-242.49 Y-140.00 Z-99999 H0
                    G30 P9 X-280.00 Y-0.00 Z-99999 H0
                    G30 P10 X-242.49 Y140.00 Z-99999 H0
                    G30 P11 X-140.00 Y242.49 Z-99999 H0
                    G30 P12 X0.00 Y140.00 Z-99999 H0
                    G30 P13 X121.24 Y-70.00 Z-99999 H0
                    G30 P14 X-121.24 Y-70.00 Z-99999 H0
                    G30 P15 X0 Y0 Z-99999 S8
                    G29 S1
                    M106 P1 S1 I0 F500 H1 T40 
                    

                    The M106 turn the hot end fan off and back on. It shakes too much and false triggers the smart effector, if it runs during probing.

                    My start Gcode (in the slicer)

                    G28 ;Home
                    G32
                    G1 Z15.0 F6000 ;Move the platform down 15mm
                    ;Prime the extruder
                    G92 E0
                    G1 F200 E3
                    G92 E0
                    

                    Delta / Kossel printer fanatic

                    1 Reply Last reply Reply Quote 0
                    • boldnutsundefined
                      boldnuts
                      last edited by

                      Based on the video it looks to me that your nozzle is still slightly to high and your printing your first layer to fast, your print moves also seem quite jerky. Have you lubricated the haydn magball ends as he recommends ? https://www.magballarms.com/

                      Carloundefined 1 Reply Last reply Reply Quote 0
                      • Carloundefined
                        Carlo @boldnuts
                        last edited by Carlo

                        Hi,

                        Yes they are well lubricated with a similar dry product which is Teflon based, The trigger height during the video was/is currently
                        0.05.
                        I will add slicer settings later once it completes a layer out of interest what trigger height do you suggest ?...as I've tried a few in 0.01 increments
                        I don't seem to get any false triggers during travel when probing but i'll disconnect the fan during a probe and post again.
                        I did a G29 S2, G28 then G32 prior to the print.
                        My bed has G29 S2 added to it and is currently Factor 6 I've tried Factor 8 no benefit/visible effect.

                        ; bed.g file for RepRapFirmware, generated by Escher3D calculator
                        ; 10 points, 6 factors, probing radius: 170, probe offset (0, 0)
                        G30 P0 X0.00 Y170.00 Z-99999 H0
                        G30 P1 X147.22 Y85.00 Z-99999 H0
                        G30 P2 X147.22 Y-85.00 Z-99999 H0
                        G30 P3 X0.00 Y-170.00 Z-99999 H0
                        G30 P4 X-147.22 Y-85.00 Z-99999 H0
                        G30 P5 X-147.22 Y85.00 Z-99999 H0
                        G30 P6 X0.00 Y85.00 Z-99999 H0
                        G30 P7 X73.61 Y-42.50 Z-99999 H0
                        G30 P8 X-73.61 Y-42.50 Z-99999 H0
                        G30 P9 X0 Y0 Z-99999 S6

                        G29 S2

                        I'll go and move the fan to another socket so I can control it add the M106 and try some more settings again.
                        So the height will make it complete the arcs which it doesn't at the moment.
                        So it's just 2 settings move the fan and find a new height .Oh and use the file sliced by another forum user cool...that second one may be a bit trickier now I'm thinking about it ! but hey once more in to the breach

                        As always big THANKS for the help it really is appreciated I know you don't have to help yet you do.

                        NexxCatundefined 1 Reply Last reply Reply Quote 0
                        • NexxCatundefined
                          NexxCat @Carlo
                          last edited by

                          @Carlo
                          Try using this macro to configure your Z-probe offset. I wrote it and use it across multiple machines. Make sure to heat both the bed and nozzle. I use 60C on the bed and 130C on the nozzle:

                          ;calibrate_z_probe_offset.g
                          G31 P100 X0 Y0 Z0			; Reset Z trigger height to 0mm
                          M290 R0 S0				; Reset babystepping
                          G29 S2					; Clear bed mesh
                          G28					; Home the effector
                          G1 X0 Y0 Z20 F6000			; Move close to the bed
                          G30					; Probe to find a rough Z 0mm
                          
                          G1 X0 Y0 Z1 F3000			; Move the nozzle to Z 1mm slowly
                          G92 Z3.0				; Set the Z height to 3mm, allowing moves below 0
                          M291 P"Lower the nozzle to until it grips a piece of paper. Click to continue." S2 Z1
                          G92 Z0					; Define this point as 0mm
                          G1 X0 Y0 Z20				; Move the probe to Z 20mm
                          G30 S-3					; Probe and set the trigger height
                          G1 Z20					; Raise Z to 20mm
                          

                          It will report your trigger height back, which you can then put into config.g

                          Carloundefined bbergerundefined 3 Replies Last reply Reply Quote 0
                          • Carloundefined
                            Carlo @NexxCat
                            last edited by

                            @NexxCat

                            Thanks I'll try that right now.
                            Really appreciated.

                            Thanks C

                            1 Reply Last reply Reply Quote 0
                            • Carloundefined
                              Carlo @NexxCat
                              last edited by Carlo

                              @NexxCat

                              Hi,

                              I ran the macro thanks for that results are:

                              1st
                              M98 P"0:/macros/Z probe report"
                              Z probe trigger height set to -0.084 mm

                              2nd
                              M98 P"0:/macros/Z probe report"
                              Z probe trigger height set to -0.146 mm

                              3rd
                              M98 P"0:/macros/Z probe report"
                              Z probe trigger height set to -0.159 mm

                              4th
                              M98 P"0:/macros/Z probe report"
                              Z probe trigger height set to -0.146 mm

                              5th
                              M98 P"0:/macros/Z probe report"
                              Z probe trigger height set to -0.159 mm

                              6th
                              M98 P"0:/macros/Z probe report"
                              Z probe trigger height set to -0.159 mm

                              So not sure what to set it to ... I know -0.159 I thought 3 out of 6 gotta be the one ....Its not the one.

                              after macro ztest.jpg

                              Thanks for the help oops guys or Ladies really appreciated PC correction

                              NexxCatundefined 1 Reply Last reply Reply Quote 0
                              • Phaedruxundefined
                                Phaedrux Moderator
                                last edited by

                                I can't remember if this has been asked already, but has the bed been PID tuned?

                                Z-Bot CoreXY Build | Thingiverse Profile

                                Carloundefined 1 Reply Last reply Reply Quote 0
                                • Carloundefined
                                  Carlo @Phaedrux
                                  last edited by

                                  @Phaedrux

                                  Hiya,

                                  Yeah both H0/H1 have and they are in the config.
                                  I'm calling it now..... I'm done off to research a replacement.

                                  Really appreciate all the help from everyone big THANK YOU!

                                  droftartsundefined 1 Reply Last reply Reply Quote 0
                                  • NexxCatundefined
                                    NexxCat @Carlo
                                    last edited by

                                    @Carlo
                                    Did you use a single sheet of paper when it asked, just regular printer paper? Alternatively, if you have some feeler gauges, you can use a 0.10mm gauge.

                                    Carloundefined 2 Replies Last reply Reply Quote 0
                                    • droftartsundefined
                                      droftarts administrators @Carlo
                                      last edited by

                                      @Carlo From my earlier post: When you swapped the original board back in, did you also put the original effector back on, or did it use the smart effector? If you used the original effector (and presumably original probe), can you try that with the Duet? This would at least narrow down if it's the effector or the Duet.

                                      Ian

                                      Bed-slinger - Mini5+ WiFi/1LC | RRP Fisher v1 - D2 WiFi | Polargraph - D2 WiFi | TronXY X5S - 6HC/Roto | CNC router - 6HC | Tractus3D T1250 - D2 Eth

                                      Carloundefined 1 Reply Last reply Reply Quote 0
                                      • Carloundefined
                                        Carlo @NexxCat
                                        last edited by Carlo

                                        @NexxCat

                                        Hi NexxCat

                                        I used the back off a sticker which is 0.1mm on my calipers.
                                        Just found my gauges !

                                        Thanks

                                        1 Reply Last reply Reply Quote 0
                                        • Carloundefined
                                          Carlo @NexxCat
                                          last edited by

                                          @NexxCat

                                          Hi,

                                          So I used the well 0.102 feeler gauge though it is .10 with my calipers and 3 times got 3 heights.
                                          I did video the whole process but that won't help me
                                          The numbers don't actually help because they are not accurate though one of them is:

                                          M98 P"0:/macros/Z probe report"
                                          Z probe trigger height set to -0.159 mm

                                          I don't think it's the effector because it does what it is supposed to do and no matter what trigger height I put in G31 line its the same outcome and the effector does return the same probe heights all be it not one after the other 🙂
                                          maybe the drivers are not calculating correctly I don't know but it is what it is and that is not usable.

                                          Cheers for your help.

                                          C

                                          NexxCatundefined 1 Reply Last reply Reply Quote 0
                                          • NexxCatundefined
                                            NexxCat @Carlo
                                            last edited by

                                            @Carlo
                                            Ok, last thing I can think of, just to double check if the actual positioning is being repeatable. Run these commands one at a time, or save it as a macro:

                                            ; Disable any baby-stepping and the bed mesh
                                            M290 R0 S0
                                            G29 S2
                                            
                                            ; Home the effector
                                            G28
                                            
                                            ; Heat bed to 60C & nozzle to 130C
                                            M104 S130 T0
                                            M190 S60 T0
                                            M109 S130 T0
                                            
                                            ; Run delta calibration
                                            G32
                                            
                                            ; Move the effector to 0,0,Max height
                                            G1 X0 Y0 F4500
                                            G1 Z500 F4500
                                            
                                            ; Move the effector back to 10mm off the bed
                                            G1 Z10 F4500
                                            
                                            ; Slowly move down to 0.1mm
                                            G1 Z0.1 F600
                                            

                                            When the macro is finished, the nozzle is at 0.1 on the Z axis. Use the paper or a 0.1mm feeler gauge and see if the nozzle truly is at 0.1mm

                                            Carloundefined 2 Replies Last reply Reply Quote 1
                                            • First post
                                              Last post
                                            Unless otherwise noted, all forum content is licensed under CC-BY-SA