@jay_s_uk Wa hoo. got it. Because I initially had the Y flag set at max, the configurator set the homing files to have +420 for Y when it should have been -420
Next item checked off the list.
Thanks.
@jay_s_uk Wa hoo. got it. Because I initially had the Y flag set at max, the configurator set the homing files to have +420 for Y when it should have been -420
Next item checked off the list.
Thanks.
@phaedrux friend, you just gave me exactly what I needed. It's the M558 command. I can totally sort it out from there.
Thanks.
Michael
@alankilian I got is all sorted. Thanks.
I'm really sorry, but I'm just trying to make sure I order all of the right stuff. I have a Duet 3 on order, and already have an RPi 4.
So which device do I get the touch screen display for, the Duet or RPi? Do I get the Duet 3 touch screen, or use the RPi 7" touch screen? (If you can use either, which is preferred?)
Also, it is my understanding that the Raspberry Pi gets powered via the ribbon cable to the Duet 3. Is this the case? I don't need a separate 3A 5V supply for the RPi?
Is there someplace I can get the ribbon cable, as I don't see it anyplace?
Thanks a bunch. (Building a HevORT)
@Exerqtor Thanks. I'll read through the change log.
@fcwilt OK, I will give it a try tomorrow.
My Z home is X=0 Y=20
So I will do a home all
Then the auto-bed level
Then do a G30 P0 X0 Y20 (do I include the Z-99999?) Or just do a G30 X0 Y20?
Then run the mesh analysis?
@fcwilt Hi,
Yes, I have simple contact leaf switches for homing X & Y, and then it uses the BLTouch to home the Z.
And yes, I have triple Z=Screws and steppers for my bed (I'm running a HevORT printer).
My Z Offset in the my system config.g is G31 P500 X36 Y-9 Z4.55 (I'm running a Phaetus Rapido hotend)
This is my home all code.
True Bed leveling code follows
; homeall.g
; replacing all old code, that didn't work
; HOME ALL New 20240515
;home X code
; called to home the X axis
;
G91 ; relative positioning
G1 H2 Z5 F500 ; lift Z relative to current position was F500 is Z speed was 9000
G1 H1 X-420 F3000 ; move quickly to X axis endstop and stop there (first pass)
G1 X5 F3000 ; go back a few mm
G1 H1 X-420 F360 ; move slowly to X axis endstop once more (second pass)
;G1 H2 Z-5 F500 ; lower Z again was 9000
G90 ; absolute positioning
; home Y code
; called to home the Y axis
;
G91 ; relative positioning
;G1 H2 Z5 F500 ; lift Z relative to current position was 9000
G1 H1 Y-420 F3000 ; move quickly to Y axis endstop and stop there (first pass) said 420
G1 Y5 F3000 ; go back a few mm
G1 H1 Y-420 F360 ; move slowly to Y axis endstop once more (second pass) said 420
;G1 H2 Z-5 F500 ; lower Z again was 9000
G90 ; absolute positioning
; home Z code
; called to home the Z axis
;
G91 ; relative positioning
;G1 H2 Z5 F500 ; lift Z relative to current position was F9000
G90 ; absolute positioning
;G1 X0 Y20 F3000 ; go to first probe point was X30 and Y55
G30 ; home Z by probing the bed
G90 ; Me adding to see if this fixes some of my problems
Code for the true bed leveling. It tests 4 points on the bed.
;Changed this to a triple set up, so I don't have to do it manually
G30 P0 X36 Y11 Z-99999 ; probe near a leadscrew - new from Oliver X was setto 29, but banged
G30 P1 X36 Y376 Z-99999 ; probe near a leadscrew
G30 P2 X396 Y376 Z-99999 ; probe near a leadscrew
G30 P3 X396 Y11 Z-99999 S3; probe near a leadscrew
@fcwilt Oh, and my z homing uses my BLTouch, so that should deal with this? Yes?
But that homing point is also in the front left corner.
EDIT: OK, I found it in the manual.
Am I still doing something procedurally wrong? I heat up the nozzle and bed for a good while. Extrude some filament, and then retract a bit, so it doesn't ooze.
I initially do a home all. Then I will run a True Bed Leveling (G32). After that I ran the mesh compensation.
I'm thinking I should probably do another home of Z, as my bed leveling's last measurement is in the front right hand corner of the bed. Where the 1st measurement of the Mesh is in the front left.
Am I on the right track?
Thanks.
Michael
Well, there ya go, I need to do Z=0 Datum. Where should I do it?
This is the Stats on the mesh reading.
Number of points: 506
Probe area: 1039.5 cm²
Maximum deviations: -0.303 / 0.109 mm
Mean error: -0.189 mm
RMS error: 0.078 mm
Is that what you are looking for.
And would you mind pointing me to where to look in the RTFM for setting the Z=0 datum.
Thanks.
Michael
Hi,
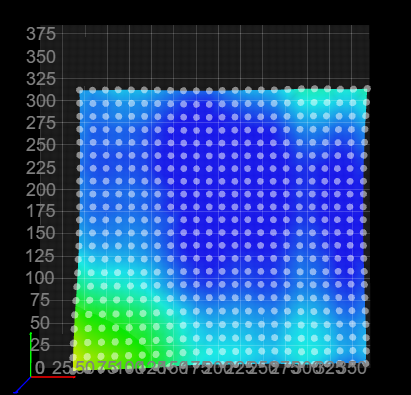
I did a big multi-point height map. As you can see my bed's in pretty good shape, except for the front left corner. I've been lucky, as most of the time, I've not needed the entire bed to print, but need it this time, and was planning on printing with Mesh Compensation for the 1st time.
When loading the saved height map, it seems to get worse, where the left front, the nozzle is mashed to the plate, and can't extrude worth a lick.
The rest looks fine. Am I doing something wrong?
I'm assuming that most of the bed is blue due to the Z offset? Do I need to change a different Z-Offset for mesh?
@droftarts Hi,
I'm just an idiot. I didn't realize that while the printer is paused, I could manually extrude filament.
I thought since it was paused, I wouldn't have access to any of the normal controls.
I'm good for now. The pause and resume are working as I would like them to.
But I will still look into the Filament Error to see what it's capable of doing.
Thanks.
Michael
Hi,
I finally added a filament sensor, which seems to be working fine.
When the out of filament sensor trips, the pause.g seems to work fine. And it looks like it retracts 10mm of filament with the pause.
pause.g (made no changes)
M83
G1 E-10 F3600
G91
G1 Z5 F360
G90
G1 X0 Y0 F6000
But the resume.g moved the head back to position, and then does a 10mm filament push before restarting the print.
G1 R1 X0 Y0 Z5 F6000
G1 R1 X0 Y0
M83
G1 E10 F3600
What I'd like to do is 1st push some filament through the nozzle, and have it wait, so I can clean it with my toothbrush, and then resume the print. But the following doesn't work.
G1 E10 F3600
G4 S010
G1 R1 X0 Y0 Z5 F6000
G1 R1 X0 Y0
M83
What am I doing wrong?
Thanks.
Just a word of warning.
I'm used to the red stripe on a ribbon connector annotating pin 1.
Whelp, I got my DUET3D Accelerometer in the mail, and went to hook it up, and came to find the ribbon is installed on the connectors flipped.
Since you can only plug the cable into the Accelerometer one way, you need to be careful, and install the connector on the Duet3D M/B with pin 1 flipped to pin 10.
@dc42 Thank you very much. That's exactly what I was looking for.
@dc42 Hi, thanks for the feedback. Yes, the bed goes down, which I would agree would be the same as the head going up.
But what 2 digit code would I use in the M955 command.