Duet3D Logo Duet3D
    • Tags
    • Documentation
    • Order
    • Register
    • Login
    1. Home
    2. Notepad
    3. Best
    • Profile
    • Following 0
    • Followers 1
    • Topics 21
    • Posts 204
    • Best 42
    • Controversial 1
    • Groups 0

    Best posts made by Notepad

    • RE: RepRapFirmware 3.6.0-alpha.2 for Duet main boards available

      After a quick investigation on PA, it does appear to be much more effective. Key word is 'appears'. Due to the new input shaper causing cornering artefacts (which from now on I will reference as smoothing) this aids in reducing the amount of pressure advance required. More on this later.

      The main thing I have tested in this batch is the behaviour of the different input shapers available. I did so by cutting down the original print file into a smaller 10mm slice so the parts can be printed quicker. The slice was chosen to be at the bottom of the original file as this is where most print errors occurred, which coincides with the most amount of long arcing movements. Print speeds and aggression stayed the same.

      Duet 2 3.6.a2+3 16xmicro 10kA 14J MZV 51hz.txt
      Duet 2 3.6.a2+3 16xmicro 10kA 14J EI3 51hz.txt
      Duet 2 3.6.a2+3 16xmicro 10kA 14J EI2 51hz.txt
      Duet 2 3.6.a2+3 16xmicro 10kA 14J zvddd 51hz.txt
      Duet 2 3.6.a2+3 16xmicro 10kA 14J zvd 51hz.txt

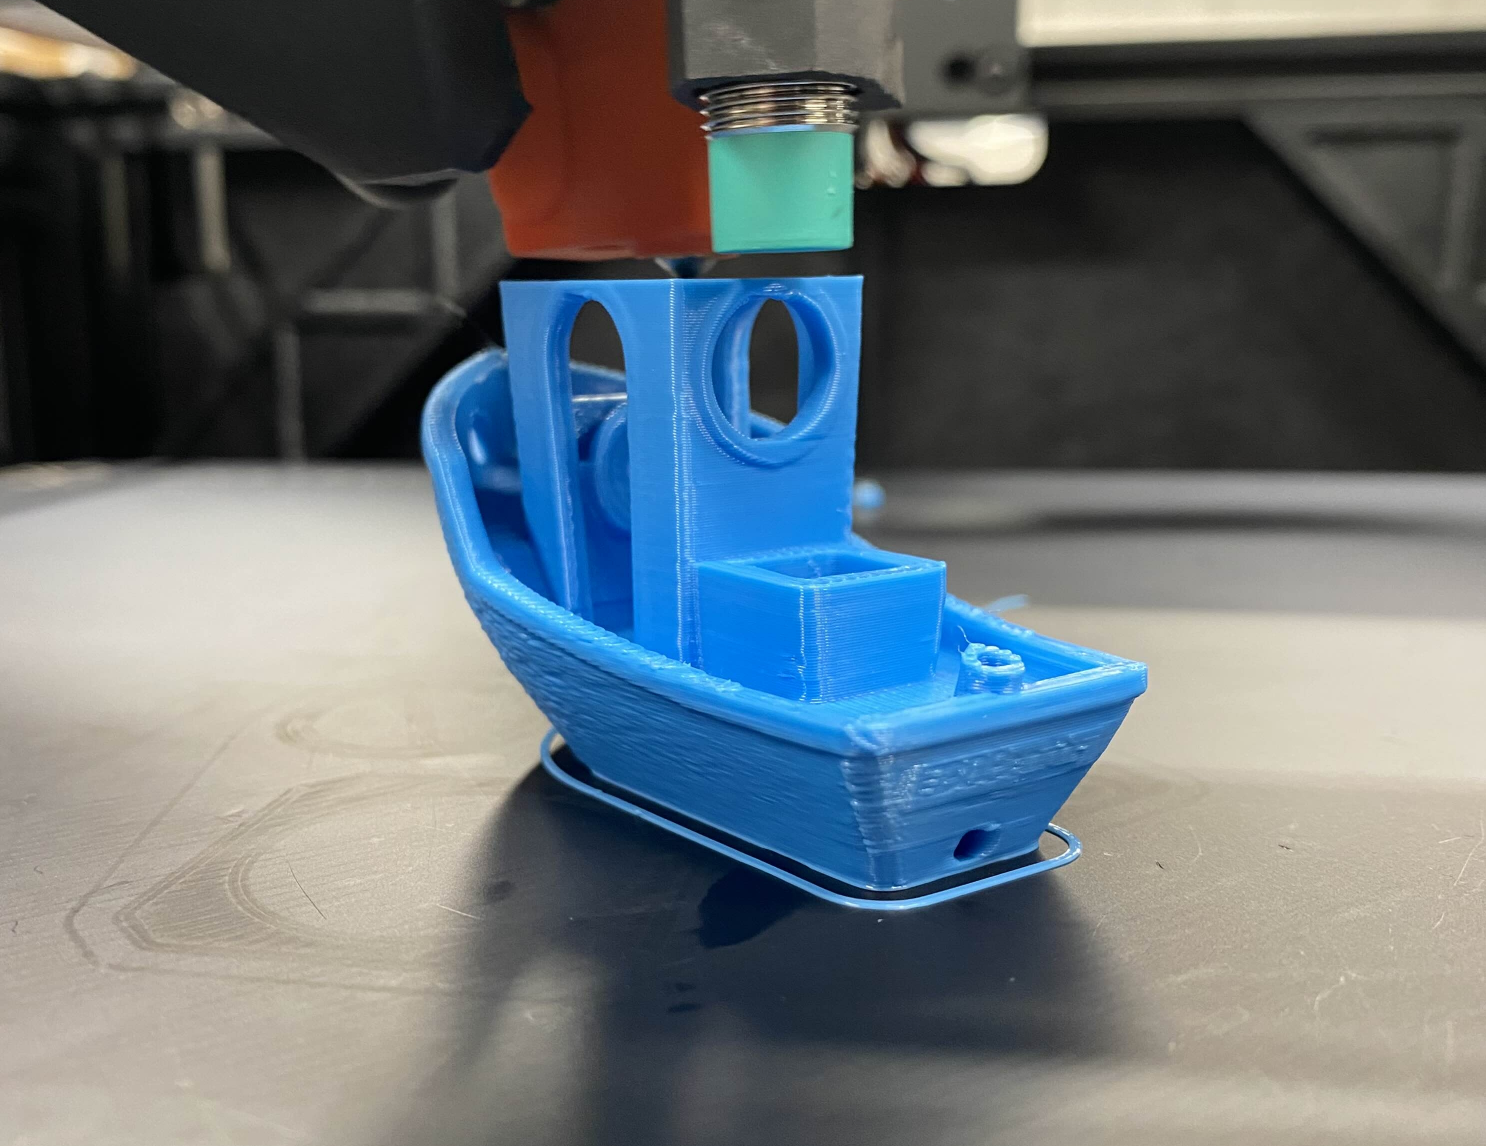
      Over all, the prints performed exactly as expected, and all passed without any issues.
      There was one print which did get a Code 3 error, and the main difference was I changed the input shaper type mid printer (after the first layer). This might be an edge case senario but it is interesting that the only time I manually change the input shaper type mid print via inserting custom gcode in the slicer, is the one time it fails. It is also interesting that it didnt fail instantly, it was able to process about 5 seconds more of the print job before the print failed on one of the curved sections.
      Duet 2 3.6.a2+3 16xmicro 10kA 14J MZV 51hz fail.txt

      After this initial fail, I decided on updating the config.g itself and restarting the mainboard to be the best course of action.


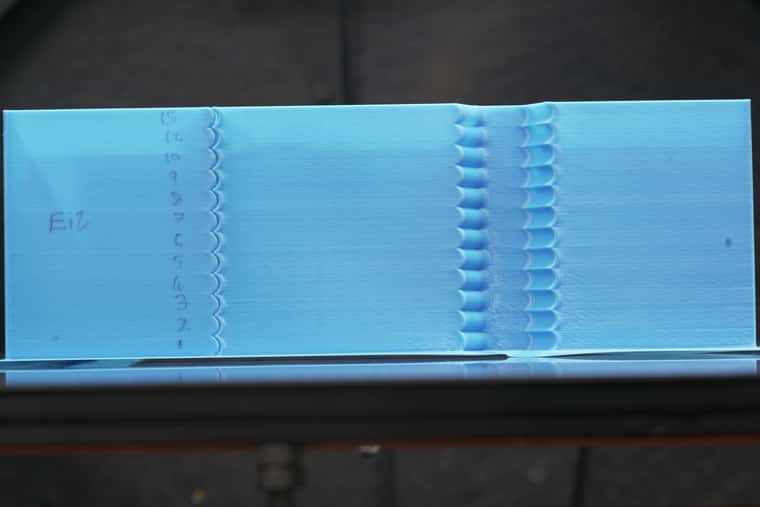
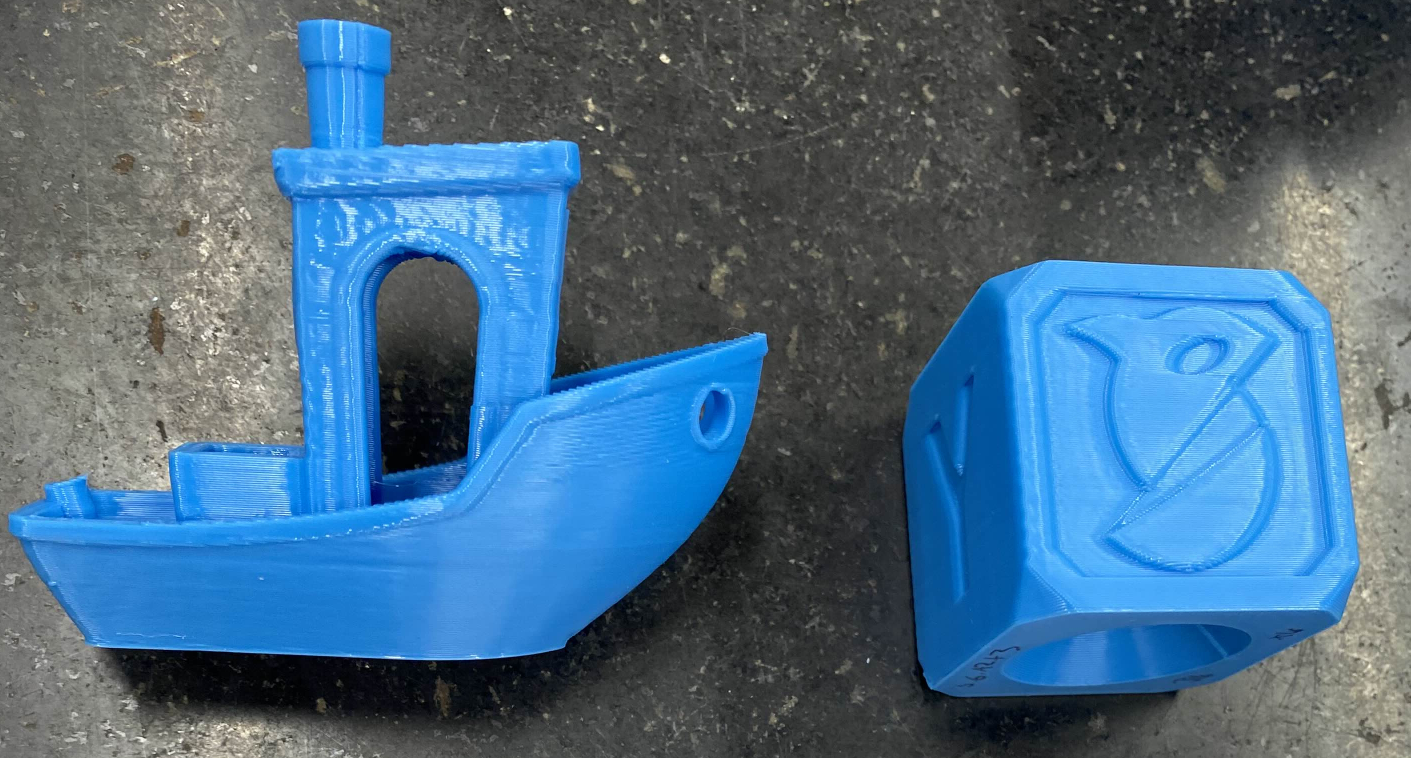
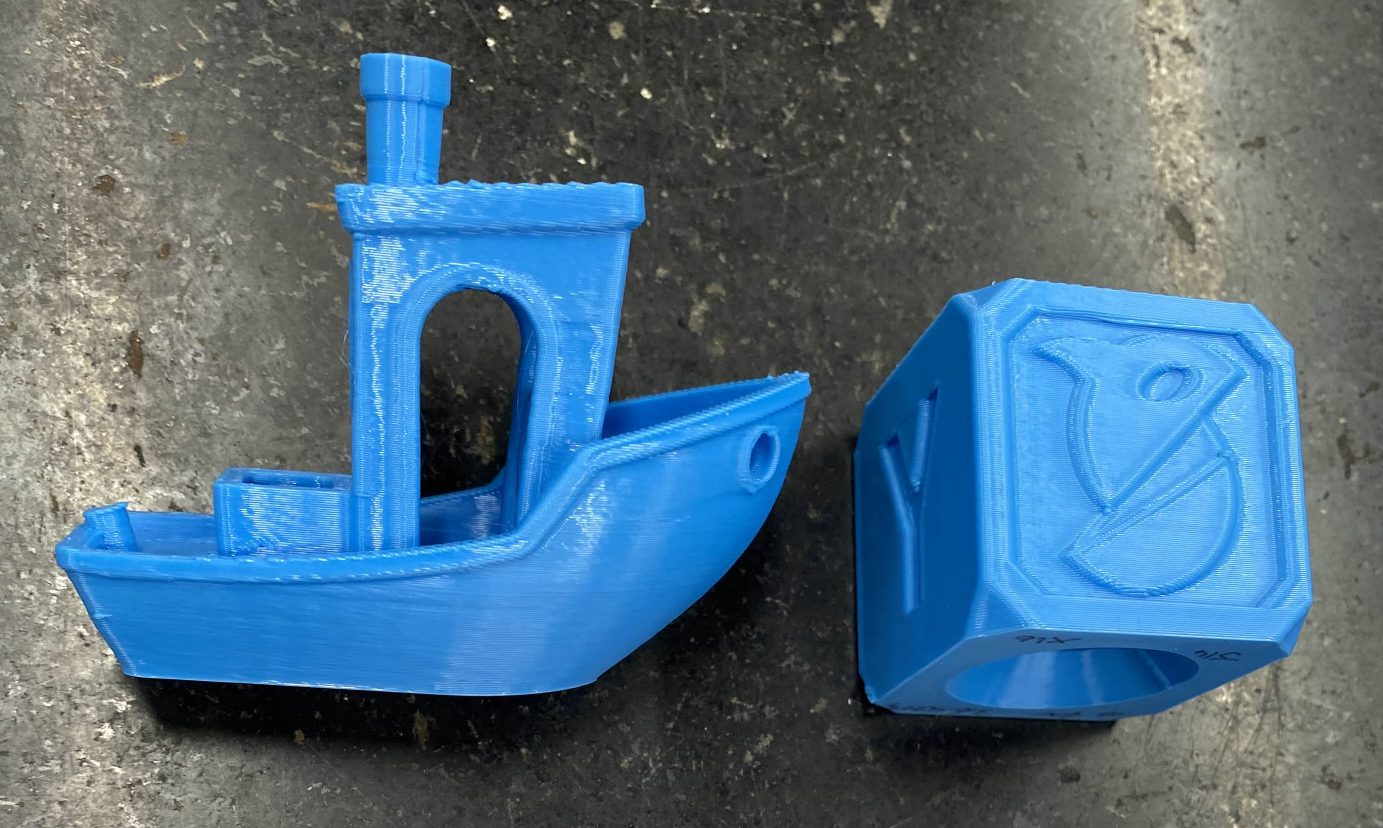
      Stacking the print jobs from previous, gives a great example of the input shaper aggression against the amount of smoothing which the input shaper applies.
      In order from top to bottom:
      MZV, ZVD, ZVDDD, EI2, EI3
      P1086725.JPG P1086723.JPG P1086721.JPG P1086719.JPG P1086717.JPG P1086715.JPG

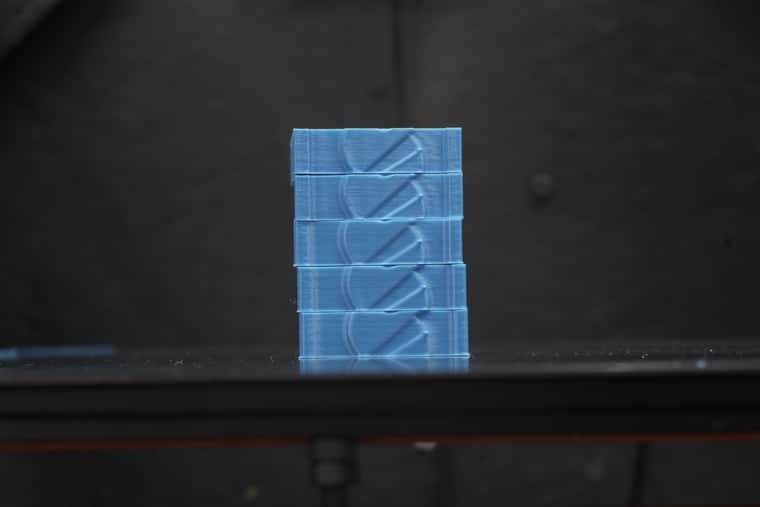
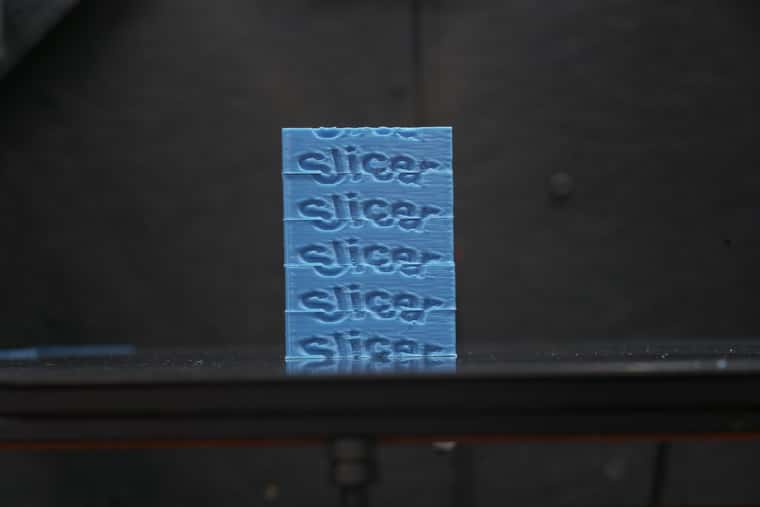
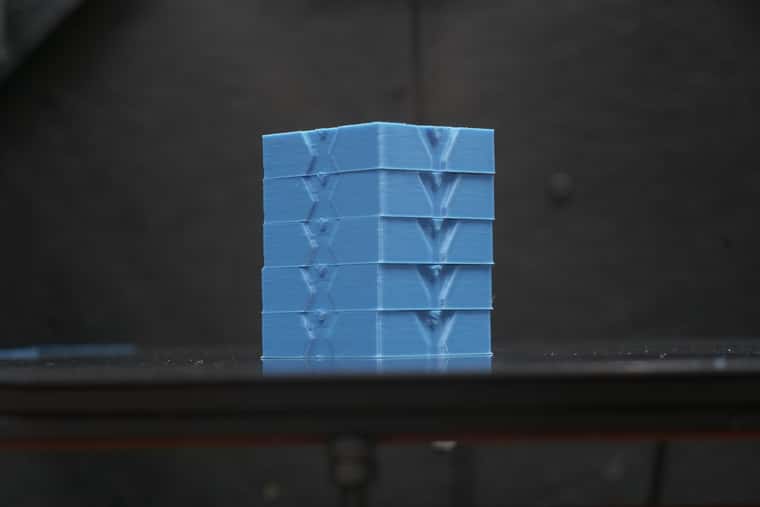
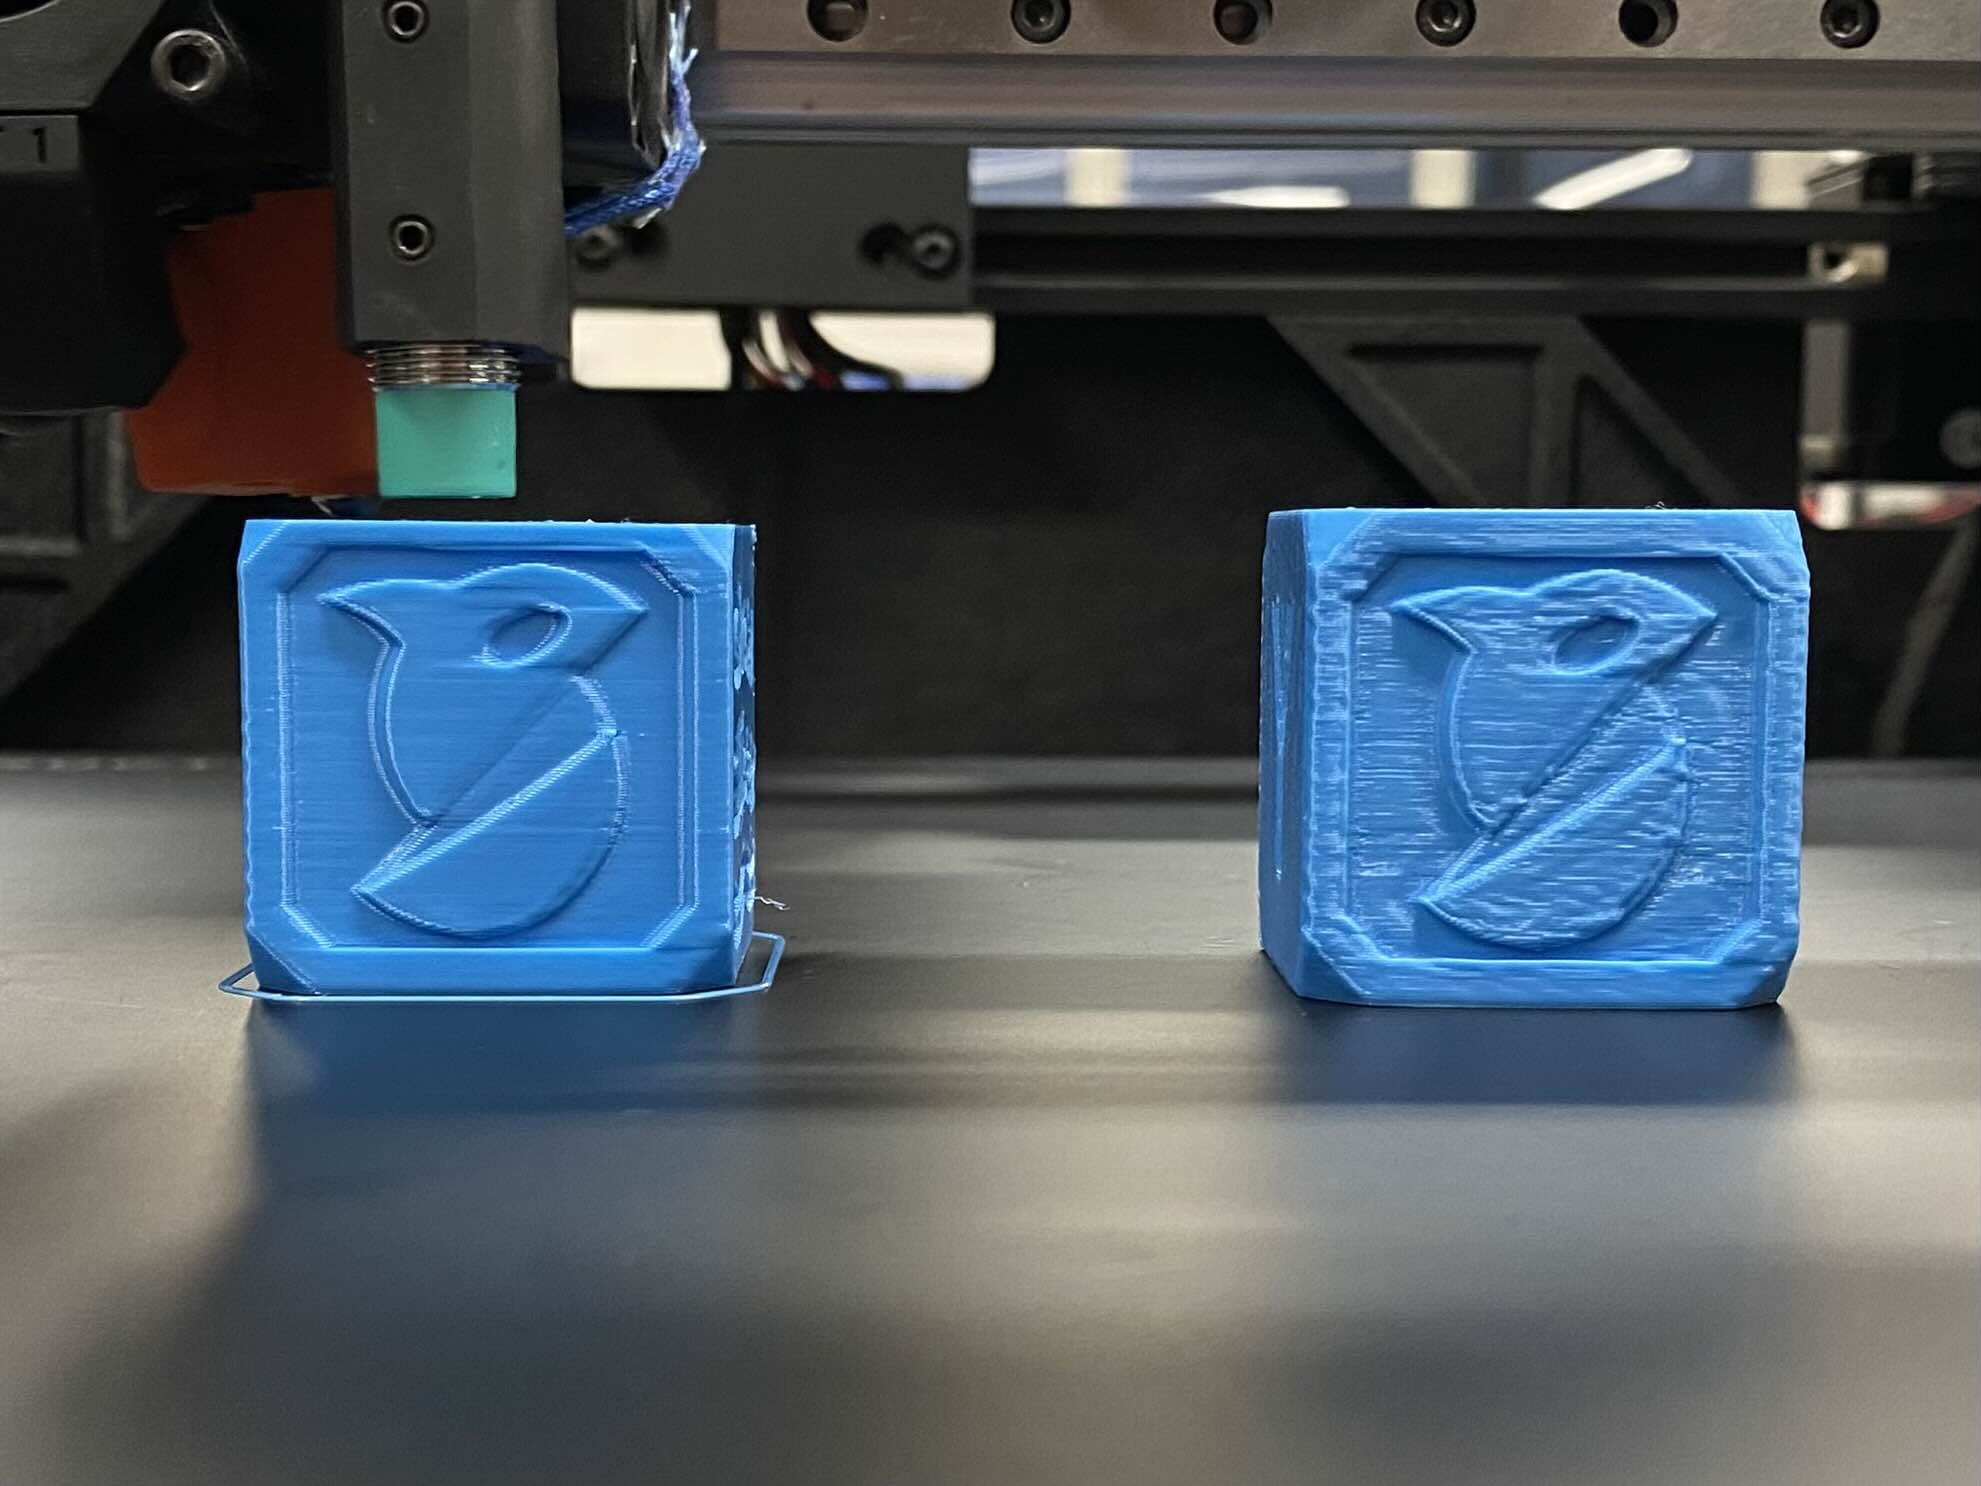
      The effect of the smoothing is very noticableon the benchy's rear text and the orca slicer logo.
      This also leads me to the conclusion that pressure advance should be calibrated to the type of input shaper used, as more aggressive input shapers require lower values of PA for the same clarity.

      I personally use EI2 as my go to shaper of choice. and at 51hz I was able to lower my PA value from 0.0225 to 0.0085, which in-turn also sped up my overall print speeds without sacrificing any quality.

      One final test I completed (no pictures sadly) is using MZV on an extremely low frequency which would normally never be used in actual machines, in hopes to overload the MSU.
      The output print quality was decent, however showed massive amount of smoothing almost 10x worse than EI3 in the previous tests.
      This leads me to the conclusion that the input shaper should only be used on frequencies above 40hz, and the lower the frequency you go, the simpler the input shaper should be used. I.E dont use EI3 over MZV at 30Hz.
      Duet 2 3.6.a2+3 16xmicro 10kA 14J MZV 20hz.txt


      I am starting to run out of things to test on my dedicated test machine, so I have selected a handful(8) of print farm machines which i have deployed 3.6.A2+3 on to. So far the output has been a marked improvement in print quality. No known errors or issues has appeared yet.

      Any advice on specific areas I should focus my testing onto would be much appreciated. if not my next batch will be all the input shaper types at very low and very high frequencies.
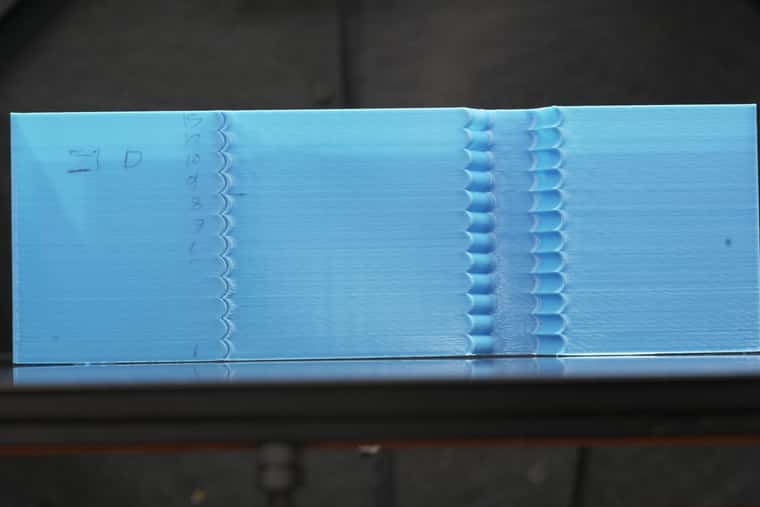
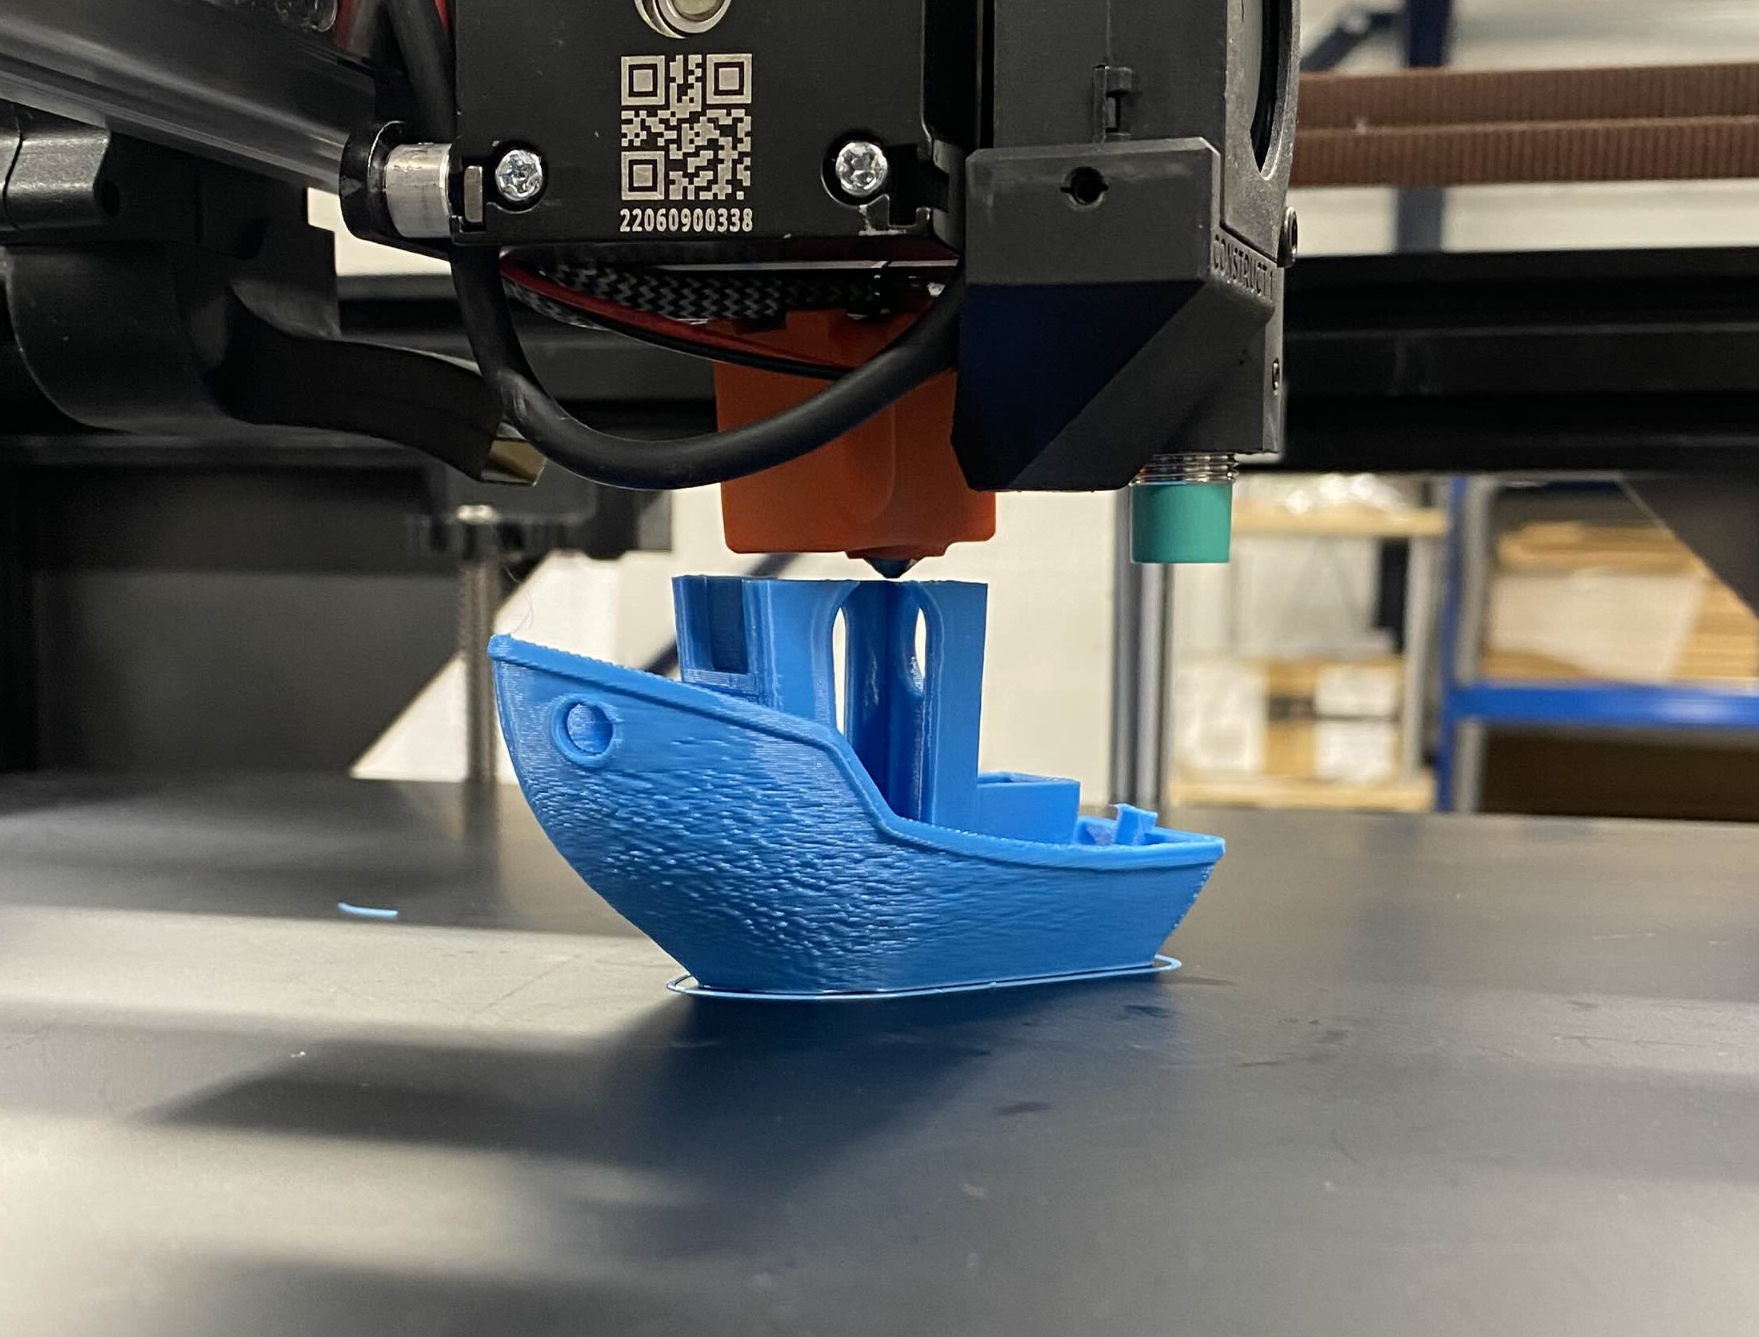
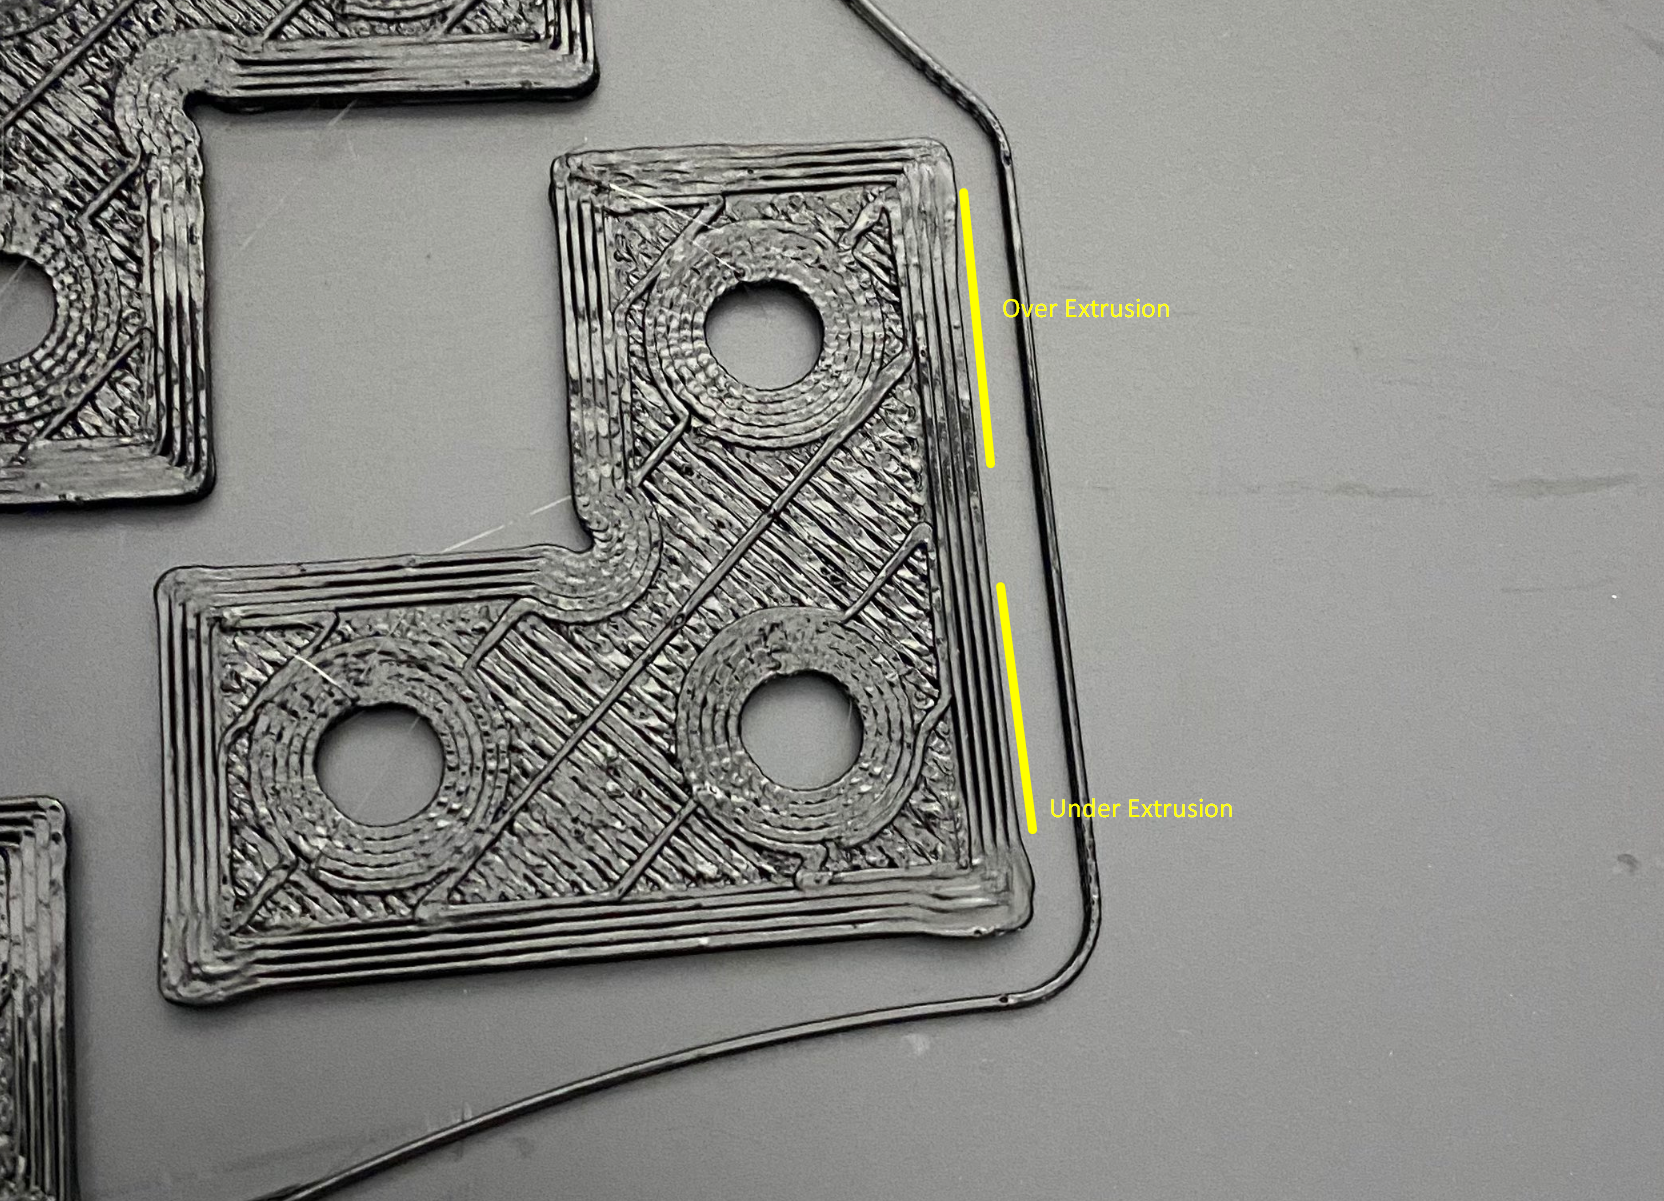
      posted in Beta Firmware
      Notepadundefined
      Notepad
    • RE: RepRapFirmware 3.6.0-alpha.2 for Duet main boards available
      Small behaviour test. Acceleration vs smoothing amount.

      As a follow on from the PA test, PA should be dialed in once a set aggressiveness is chosen. A printer that is more aggressive with higher jerk and acceleration will require less PA as there is less of an impulse of pressure inside the nozzle as the printer changes directions and speeds.

      One of the risks of higher aggression accelerations and jerk values is the amount of smoothing the input shaper applies can lead to lower tolerances, which is especially noticeable in corners intending to be sharp.

      Using an IS profile like MZV and ZVD, these appear to have the least amount of aggression based smoothing.
      P1086727.JPG
      Im not sure how the forum will handle the compression of these pictures (originally 9k photos). The test prints increase in acceleration in the thousands based on the number for that section. 1->10, 12, and 15. In ZVD the printer started to show some ringing artefacts at 8k acceleration mark, but even up to the 15k mark, there didnt appear to be any gap forming in the half moon segments. The over extrusion caused by no PA being enabled did show that at higher accelerations that less PA will be required.

      P1086729.JPG
      For the EI2 test, it is immediately obvious that the amount of over extrusion due to the lack of PA is greatly reduced, this is probably due to the printer being more aggressive with the smoothing of the geometry causing the over extrusion amount to be mitigated and thus hidden.
      While the printed part shows no sign of ringing, what does become visible after the 8k acceleration point is the half moon segments do start to separate and thus the tolerance quality of the part does deviate from the intended shape.


      ( I have rewritten this section 4 times already as it just reads like word soup, so bear with me)

      This does open up a new choice for printer setting optimisations in terms of optimisation methodology.
      I personally require very accurate tolerancing, so my current print profiles were optimised to produce accurate parts with FW3.5.2.
      With 3.6.A2+3 and the improvement of the input shaper, I am able to increase my accelerations and jerk values whilst maintaining the same tolerance level.
      Accel 3400 -> 6800
      Jerk 8 ->12
      PA 0.0225 -> 0.0085

      It is important to note that the previous settings on 3.5.2 was also the hard maximum as any more and the printer risks layer shifting. This risk seems completely bypassed in 3.6.A2+3 as the printer can handle the higher aggression with ease.

      I can also push the printer even faster if I throw perfect tolerances out of the window. I have been able to test accelerations up to 16,000 and Jerk values up to 16mm/s.
      This means for prints of a more artistic nature that do not require high engineering level tolerancing even higher speeds are available.


      Of the 8 machines currently deployed with 3.6.A2+3 none have had any failures or show any signs of input shaping oddities. One printers extruder behaviour does sound weird when pausing however it almost appears like the bug with 3.5.2 (where insertion of filament after retracting in a pause being doubled) might be the cause. This bug behaviour has not been tested in this version specifically so take it with a grain of salt.


      Edit, Tested the same with jerk values from 5->30, Same behaviour of smoothing when the print gets more agressive, and less PA is required. a good value for me at 8000accel seems to be 10jerk to maintain detail

      posted in Beta Firmware
      Notepadundefined
      Notepad
    • RE: Issues with pressure advance since RRF 3.4

      @oliof I have been looking at the code, and it looks like the PA only uses a linear relationship of pressure to movement speed. Over Christmas I will be looking at ways to add different algorithms to the PA to change it from a linear relationship to maybe accepting a quadratic based algorithm instead

      posted in General Discussion
      Notepadundefined
      Notepad
    • RE: RepRapFirmware 3.6.0-alpha.2 for Duet main boards available

      @dc42 This is probably the most excited I have been all year. I have been able to spend a good 5 hours with 3.6.A2 and it makes me so giddy.

      The most important thing ignoring the quirks of alpha-2 is the input shaper is a huge quality improvement. The following image shows 3.6.A2 (Left) and 3.5.2 (Right) printed using identical print settings.
      1872798b-9486-44c1-beb7-66e11c45f874-image.png

      This is an absolutely phenomenal improvement to the input shaper efficacy, and I dare say I even think the pressure advance seems to be more effective.


      Now onto the debugging as there is a few issues I have tried to get some logs for.

      The machine used to do all this testing is a heavy version of the Construct 1 XL, and will not see any hardware changes for any tests to isolate only firmware quality improvements.
      The main hardware is as follows:

      • Duet 2 (Wifi), Hemera XS, CHT Volcano (brass), CoreXY kinematics.
      • All print jobs are done with the same gcode file which includes a 3D benchy, Orca cube, and Orca cube threaded cap. All models are scaled to 125%.
      • All accelerations are set to 5000mm/s^2 and jerk values are set to 10mm/s. These settings are specifically chosen as these create the worst quality prints possible with 3.5.2 (higher jerk or accelerations surprisingly improves print quality) and any slicer tweaks that could improve print quality has been disabled in favour of making the worst quality prints possible.
      • ArcWelder is disabled
      • print file: 3DBenchy36alpha2noarc_PLA_58m24s.gcode
      • Config.G: config (2).g

      The first thing noticeable when printing with 3.6.A2 is at high speeds the motors audibly 'chirp'. https://youtu.be/7ICvUHX-By8?si=9LWsEbJRurqIOF06
      At the 14 second mark is when the chirping is most obvious. This tends to be only in arcing movements.
      For the first print only, Arcwelder was enabled and this did make the issue worse, however I do not believe its the actual G2 or G3 commands causing the issue, but probably the dense segmentation/step instructions of arc commands causing the IS to freak out slightly. This also seems coupled with print speed, as the first layer which is printed at a respectable 60mm/s prints fine, however print moves above 140mm/s start to excite the chirping greatly and past 220mm/s tend to be the hard limit before the machine encounters a fault.
      It is surprisingly hard to determine if the chirping noise is being generated by the XY motors, or by the vibration in the print head. I know the IS doesn't affect the extruder motor itself however I am very much struggling to isolate the noise location, even when putting my ear to the XY motors.

      After a few layers, the printer will throw a Code 3 error;

      Error: Movement halted because a step timing error occurred (code 3). Please reset the controller

      I have been able to get quite a nice diagnostic log with the following process.

      1. Power cycle the printer
      2. YAT USB connection
      3. M122 as a baseline diagnostic
      4. m111 p4 d1 b2048
      5. Print till failiure
      6. M122 as a final diagnostic log
      7. Estop
      8. Save diaglog
        Diagnostic log: Duet 2 3.6.alpha2 benchy test run no arcweld debuglog alternate 2.txt

      With further testing I have identified:

      • Pressure Advance does not affect the behaviour. tested 3 times with values 0.00(off), 0.15, 0.30
      • Input shaper type does not affect the audible chirping intensity, frequency or what moves it occurs on. Tested with Ei2, MZV and ZVD
      • Input shaper dampening value does not affect the chirping. Tested with S0.0 and S0.05, S0.1
      • Jerk does affect the chirping considerably. Reducing the jerk from 10 to 6 actually lets prints finish instead of failing within a few dozen layers. Though the chirping is still present, the magnitude tends to be less. I have been able to print an orca cube (previously pictured) and a 3Dbenchy, which shows on curved surfaces the chirping artefacts, but elsewhere on flatter surfaces it looks beautiful.
        92c020a8-6f77-4ace-bb9a-21a2e6f5172d-image.png
        e4bc2979-6f54-438a-8606-cf0fca95fccf-image.png
      • Z-Jerk and Z-Acceleration does not appear to affect the chirping. leading me to believe there is no interaction between the bed mesh auto leveling and the XY movement being a factor.

      Additional diagnostic logs:
      Duet 2 3.6.alpha2 benchy test run no arcweld debuglog.txt
      Duet 2 3.6.alpha2 benchy test run no arcweld debuglog alternate.txt
      Slightly less helpful longer form (2min) YouTube vid of failure: https://youtu.be/N6iOGXx1eeQ?si=WyFaEtqR06-vxfjG

      My next testing steps will be:

      • to source some TMC2660s for use in an alternative motherboard such as the Mellow super5pro. doing so hopefully will make the only difference the processor or ram capacity (ATSAM4E8E vs STM32H723)
      • TMC2240's and TMC2209 to see if there is driver dependent behaviour.
      • TMC2209s on Duet3Mini5+ vs Super5Pro
      • Further jerk testing
      • Further acceleration testing
      • Check for Slicer level options that could trigger the chirping

      Hopefully any of this is helpful. If there is any particular tests you require I will happily send over anything I can.
      Also a massive thankyou to @gloomyandy and @jay_s_uk for assisting in the diagnostic process and basically holding my hand whilst making sure I cover all bases.

      posted in Beta Firmware
      Notepadundefined
      Notepad
    • RE: RepRapFirmware 3.6.0-alpha.2 for Duet main boards available

      New tranche of tests completed,

      The first and most important is the new baseline for 3.6.A2+3
      Duet 2 3.6.a2+3 no arc weld x16microsteps.txt
      This completed without any issues, the output benchy is identical to A2+2 and the motor chirping is none existent (no chirping detected in A2+2 either). Thankfully the PanelDue is now functional so I can confirm the changes to the serial output has worked with no complications.

      Further testing to no ones surprise shows x256 and x128 microstepping failed to complete, and failed in the same code 3 error as in A2+0
      Duet 2 3.6.a2+3 no arc weld x128microsteps.txt
      Duet 2 3.6.a2+3 no arc weld x256microsteps.txt
      The motors sounded awful during this, and the prints failed within 10 layers of starting.

      Interestingly, in A2+2 I was able to get a successful print out of x128 microstepping, which was not possible in A2+3. I wonder if the fixed serial connection put extra load onto the MCU and caused it to fail.


      As I have confirmed that between A2+2 and A2+3 at x16 microsteps with interpolation are pretty much identical, I have resliced the test print file to increase accelerations from 5k->10k, and jerk values 10->14. The goal is to put as much strain on the MCU as possible to try and find any failure cases.

      If the test print was made back in 3.5.2, this print would look absolutely awful and highly risk layer shifts. With A2+3 the print was basically flawless with an average print speed of 220mm/s. The motors also sounded slightly quieter when compared to 3.5.2, though I expect this is because of the smoother transitions in corners not exciting the frame instead of directly being motor noise.
      21f5bf35-6f52-45df-900a-c4d213698f24-image.png
      Duet 2 3.6.a2+3 no arc weld x16microsteps 10kaccel14Jerk.txt

      The last test I have completed is the same increased speeds as before, however with pressure advance disabled. I wanted to remove any possibility that PA could be slowing the machines XY movements down, and at the same time I can test if PA is doing anything (spoiler, it is working)
      12e1f85e-ea75-4dfb-95cd-4412b65e7b9b-image.png
      Duet 2 3.6.a2+3 no arc weld x16microsteps 10kaccel14Jerk noPA.txt

      Both these higher speed / more aggressive prints performed flawlessly. there was no weird noises, and as you can see with the photos, Pressure advance seems to be working effectively.


      My next test will be focused on finding a new PA value, as my gut feeling is PA has become more effective, thus my original PA value of 0.022 can be reduced.
      After this I intend to focus on 16x microstepping and using alternative input shaping methods and cancelation frequencies to see if specific values (i.e ultra low frequencies with complex shapers) might cause issues.

      Interestingly I have not noticed any z-probe hanging akin to @Exerqtor has mentioned, the behaviour of my bed and gantry levelling using an inductive probe feels identical to normal.

      posted in Beta Firmware
      Notepadundefined
      Notepad
    • RE: Issues with pressure advance since RRF 3.4

      @tommyb
      Definitely some luck. I have identified a specific line of code that can be modified to allow for a user settable exponent based PA value. I still fully intend to get this tested yet I have unfortunately had external distractions eating up all my spare time to actually implement the change and to validate if it works.

      In theory, the change will allow for all current PA values to be respected (by having the exponent default to 1) so behaviour will be unchanged. But when the exponent is raised past 1, it can start becoming more aggressive to match the magnitude of the pressure differential.
      It is by no means a perfect process, as I have yet to fully work though all the maths that can be contributing factors, But hopefully it will at least minimise the problem.

      The biggest improvement I have made actually came by accident as I was analysing a new nozzle design I have been working on. The long and short of it is just to reduce the maximum flow rate to minimise the amount of cold core printing. This didn't fix the issue, but it did let the issue subside slightly back into the lowest acceptable standard.

      posted in General Discussion
      Notepadundefined
      Notepad
    • RE: RepRapFirmware 3.6.0-alpha.2 for Duet main boards available

      @Exerqtor Ive noticed my pressure advance seems to be more effective in 3.6.A2x. I have yet to do a PA calibration step yet to see how its been affected. It might be your value has changed.

      Also when it comes to retraction/deretraction/PA, it might be worth just noting what extruder & nozzle setup you have + speeds, as well as what flowrate the behaviour is noticed at.
      For me my prints are normally at 26mm^3/s out of a max flow of 32mm^3/s on a print with 5000mm/c^2Accel and 10jerk

      posted in Beta Firmware
      Notepadundefined
      Notepad
    • RE: Issues with pressure advance since RRF 3.4

      Quick update from my side.

      I have concluded that this issue is definitely a filament behaviour / Pressure Advance component.

      The largest improvement I have witnessed by tweaking every setting is to simply increasing the jerk value. I previously used a pretty conservative jerk of 4mm/s but with high accelerations 6000->12000mm/s^2. I have now changed the profiles to be of a much higher jerk 10->14mm/s with middling accelerations of 3000-5000mm/s^2.

      This change overall has maximised the speed the nozzle can take the corners at, and thus has reduced the bulge amount considerably. The other change I have done is to manually change the STL files I use to round most corners by a minimum of 0.8mm in a bid to again, increase the overall speed the nozzle can take a corner at.

      What I have found interesting during my testing is there seems to be a minimum jerk to acceleration ratio where if the nozzle cannot take a corner with sufficient speed. the outer layer quality on curved surfaces drops considerably (even with extremely high quality STL files and arc welder enabled). There is another thread that seems to be having the same issue: https://forum.duet3d.com/topic/33903/jerk-settings-at-different-speeds

      Though, in order to keep this thread focused on the PA aspect (which I am now 100% certain there is) I will probably be creating a new thread for the Jerk/Accel behaviour oddities separately in the next few weeks while I gather more data.

      posted in General Discussion
      Notepadundefined
      Notepad
    • RE: Issues with pressure advance since RRF 3.4

      @br7408

      Im not entirely sure what point you are trying to make here. But its definitely not on topic, nor is it helpful to identifying the cause and effect which causes these surface irregularities.

      My slightly modified Creality 5 pro prints FLAWLESS prints in ASA within +/- .03mm, and perfect corners every time, and has printed several hundred of these prints for two years now in numerous sizes and detail; with no PA or IS applied.

      Im happy that your machine works flawlessly for your use case and speed requirements, however this is the equivalent of saying "it works on my machine so it should work for yours"
      A CR-5-pro is an entirely different class of machine compared to most people who are having issues. And comparing a Bowden system to a Direct Drive is already a stretch.

      If youโ€™re relying on current software to fully tune out harmonic and flow issues of your printer, you simply need to slow down your outer perimeter print speed and accept the limitations of your printer.

      The issue most of us are having is not flow issues, its flow control issues. I can happily print my outer walls at 100mm/s using only 30% of my nozzles max flow, but the issue still persists. Thats because its not directly a speed or flow rate problem. The issue still exists at 60mm/s or 40mm/s.
      Just making a post about how "slow your machine down and you'll be fine" just derails the entire conversation and the research and identification that the other users in this thread are documenting.

      You will be more successful and efficient resolving resonance/pressure issues by improving the physical design of the printer than you will be expecting software to resolve it.

      If you have any advice to give I would gladly welcome it. I am currently using a Hemera XS with a copper heat block using a CHT Volcano nozzle. I would like to think that my choice in nozzle, extruder and tertiary materials are all aiding in making a better printed output. I would expect most people in this chat are probably using different extruders, with different nozzles from various brands and qualities.

      If you really want super speed, buy a Bamboo and deal with their proprietary bullshit.

      I hope its not just me, but I find this defeatist attitude extremely offensive towards all the hard work Duet have been putting in to making their ecosystem, to any advanced user (Voron, VZbot, Etc) who spent lots of time and money to make a fantastic machine, or even to the other companies like Bondtech or E3D with their high flow hot ends or parts designed for higher grade machines than your creality 5 pro.

      Your response is just "buy a Bamboo and deal with their proprietary bullshit".

      Im sorry if this comes across a bit ranty, and you are correct in your statement that without full feedback, no software will be 100% able to compensate for every situation, but that doesn't mean we shouldn't try. Trying to improve stuff with the community is pretty much the definition of Open Source and everyone here is documenting their experiences in a bid to help reduce or mitigate the issue.

      posted in General Discussion
      Notepadundefined
      Notepad
    • RE: How To Update Splashscreen On PD3.4.0?

      Issue Found!
      Screenshot_001.jpg
      Turns out the copy instruction is native to windows and not the program itself. The documentation doesn't make it very clear that this instruction line shouldn't be prepend with 'bmp2c.exe'. Or it could just be me a bit slow on the uptake.

      anyway, all sorted!

      posted in PanelDue
      Notepadundefined
      Notepad
    • RE: klipper & fluidd on Duet 3 mini 5+

      @roshiposhi

      @droftarts is right, this forum is primarily RRF related and not Klipper. the Discord is 100% better as there is more information on it.

      Just incase its relevant, I have actually set up klipper on a Duet 2 Wifi and have come to the conclusion that there is not much benefit when compared against the newest version of RRF (especially the 3.6 beta)
      The ecosystems are basically feature identical, except RRF is much easier to maintain IMO

      posted in Firmware installation
      Notepadundefined
      Notepad
    • Resume.g activating twice With FW3.5

      Quick question in regards to a possible behaviour change with Resume.g with FW 3.5.0 and 3.5.1

      When pausing and resuming a print, the retracted filament is reinserted as double the value causing a decent blob to form as the print restarts.
      By feel, the Pause.g is activating correctly and retracting the correct amount in one action. However the Resume.g is noticeably doing two separate actions of extruding the filament causing double the amount to be extruded.

      Its more than likely I just missed something in the firmware changelog notes for 3.5.x that affects the Resume.g.
      What is interesting is when I delete the extrusion command in the Resume.g, no extrusion at all is completed, meaning a manual extrusion command is indeed required, however for now I have had to half the value for accurate re-extrusion when resuming.

      pause.g
      resume.g

      posted in Beta Firmware
      Notepadundefined
      Notepad
    • RE: Issues with pressure advance since RRF 3.4

      Just chiming in for visibility as I can also confirm to be noticing what appears to be PA oddities in regards to corner bulging, but also material deposition before and after a corner.
      The hardware I use is a HemeraXS with a CHT 0.6mm Volcano nozzle with a InputShaper of EI2@20hz or EI2@48hz.2a13fda1-e80c-41a5-9de6-0772707900cc-image.png Pictured is PA0.035

      The issue is more noticeable with a 0.6 nozzle compared to the 0.4.
      I need to use a PA value of 0.045 to get non bulged corners, however by doing so I get inconsistent extrusion before and after the corner.

      There appears to be a correlation with flow rate and the severity of the behaviour. When pushing flow rates (>35mm^3/s) close to the limits of the nozzle, the behaviour is at its worst. which makes sense as the pressure differential would be the greatest. What is puzzling is that the issue also appears in smaller parts where the flow rates are below 60% of the nozzle capacity.

      I am currently using PA of 0.025 which is a middle ground of bulged corners and under/over extrusion.

      I have not currently found any changes in this behaviour by changing the Input Shaper frequency nor shaper type
      For extruder settings I was running a jerk value of 4mm/s (250mm/min) and an acceleration of 66mm/s2 (4000mm/min) - I am currently testing higher jerk and acceleration settings however data has been inconclusive so far

      posted in General Discussion
      Notepadundefined
      Notepad
    • RE: Sensorless homing with 1HCL / Quad motor XY setup

      @dc42
      Thank you for this. Now you're getting me excited for 3.6 before 3.5 has even launched ๐Ÿ˜„

      posted in Tuning and tweaking
      Notepadundefined
      Notepad
    • RE: Resume.g activating twice With FW3.5

      Apologies about the long delay in replying, Time has been slipping away quite easily over here ๐Ÿ˜–

      @dc42 Standalone mode, Behaviours seems consistent across a Duet 3 and a Duet 2.

      @JayT I haven't tested the power resume behaviours as the current printers I use generally don't recover well from depowering the motors. Ill report back once I get some time in the workshop to setup a Power resume test.

      posted in Beta Firmware
      Notepadundefined
      Notepad
    • RE: Duet 3 Scanning Z probe

      @fcwilt
      Nope, thats on me, My wording skills are pretty poor at times.

      I probe before every print because I want to reduce any risk of an imperfect first level. A failed print because I tried to save 4 minutes in skipping a probe sequence just isn't worth it IMO.

      And when you take a step back and look at the average time to complete a print (say 4 hours) the probing time is literally only 1% of the total time. So I'm happy to do the probing before every print.

      But on the flip side of the coin, from a user experience aspect, the initial wait for 4 minutes just feels sluggishly slow, especially when doing really small prints (say less than 1 hour) the probing time just eats at the mind as I wait for it to complete.

      my feelings are juxtaposed between happy with what I currently have, but also disappointed by the completely acceptable 4 minutes it takes.

      What I am definitely looking forward to is the ability to do increase resolution height maps without any time impact. And after using a beacon probe, it does become a tipping point where once you have experienced those speeds, you never really can look at the slower methods the same.

      Hope that makes more sense.

      posted in General Discussion
      Notepadundefined
      Notepad
    • RE: PETG as a support interface layer for PLA

      I have got PLA / PETG printing working, the trick is to make sure the interface layer is 100% dense, and to slow down the print speed of that interface layer so it gets a better chance of adhering, and lastly to increase the support density overall, as more surface for the PETG to stick to massively improves reliability.

      If you are using a Bambu machine (or similar one hot end multimaterial) then you MUST purge more filament than you expect, and once you have a value you are happy with, DOUBLE IT. Any PETG contamination will compromise the structural strength of the print, as PLA on PLA layers will refuse to stick to each other.

      posted in Tuning and tweaking
      Notepadundefined
      Notepad
    • RE: RepRapFirmware 3.6.0-alpha.2 for Duet main boards available

      @o_lampe AH, I probably should have mentioned, in the Y section at the top, I use pliers to grip the printed model to pull it off my bed. Im too lazy to take the PEI off or let it cool down so when I grip it causes those indentations.

      posted in Beta Firmware
      Notepadundefined
      Notepad
    • RE: Duet 3 Scanning Z probe

      Brain dump regarding using the probe as the only probe.

      In theory it would be possible to use the probe as the only sensing equipment as it includes the only variable you need. which is an amplitude reading from the probe (which is then converted to distance)

      The issue is there is no datum point, as depending on the scanned surface material, the activation distance could vary.
      HOWEVER, assuming there is no minimum distance to the sensing coils, you could put the probe directly against the print surface and take a measurement to create a "zero" reference measurement and store that for later use.
      In reality you may want to take various zero point measurements at different coil temperatures and create a look up table of sensitivity vs temperature.

      Then once the coils are mounted you would need to set a single Z-offset and that should be good enough.

      There is another way off the top of my head, but I cannot remember the algorithms name where you can repeatedly move a reference plate (in this case the bed) up and down a known amount (say 1mm and 2mm) and then you can work out the differences in measurements to gain a pretty accurate depth to probe value. The math was complex the last time I checked, but once I find the name of it, ill post it here as it may be helpful.

      posted in General Discussion
      Notepadundefined
      Notepad