Duet3D Logo Duet3D
    • Tags
    • Documentation
    • Order
    • Register
    • Login
    1. Home
    2. EasyTarget
    3. Best
    • Profile
    • Following 0
    • Followers 1
    • Topics 16
    • Posts 211
    • Best 42
    • Controversial 0
    • Groups 0

    Best posts made by EasyTarget

    • PrintEye; simple information panel for Duet boards.

      So; this is what I did to prove to myself that I could. Maybe for my CV, I had fun and learned a lot doing this. Enjoy, or ignore, as you wish.

      printeye-printing.jpg

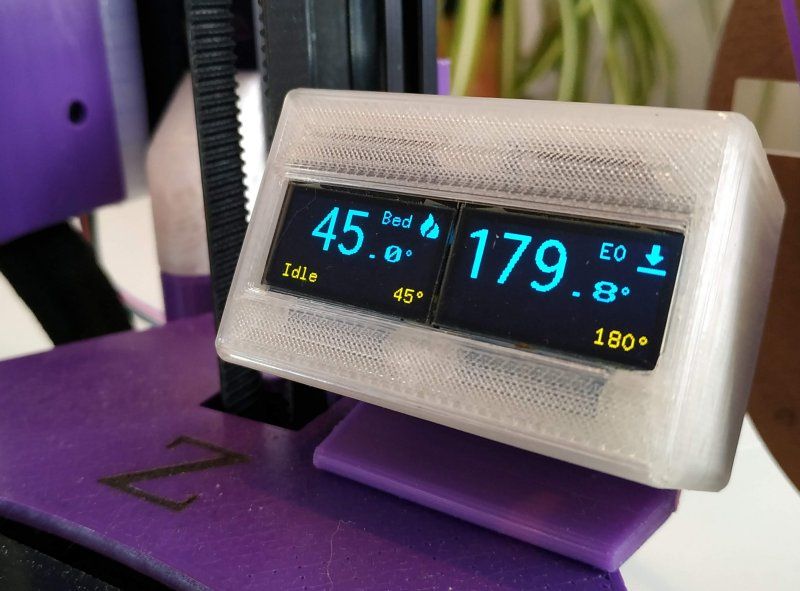
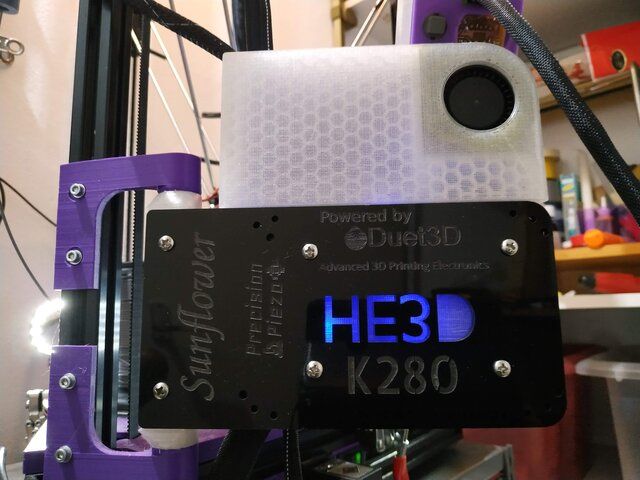
      PrintEye is a minimalist information panel for Duet boards; it plugs into the DanelDue UART port, taking power from there and sending M408 S0 once a second, and otherwise waiting for a reply and updating the display based on their contents.

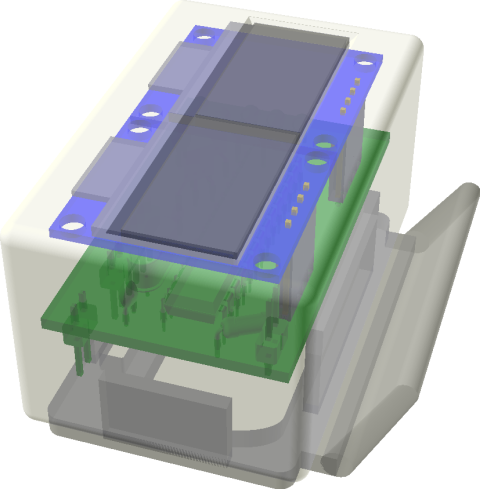
      It consists of a ATMega328P on a simple standalone board, linked to 2x 0.96' I2C OLED displays, a LED, a Button, and two mosfet level converters for the serial connection to the 3.3v UART on the Duet board.

      hardware.jpg

      The Primary connector for the Board doubles as a FTDI programming port, allowing me to update and debug without yanking the CPU out of it's socket. There is no reason why the current cable could not be adapted to the spiffy new 5-pin IO connector of the Duet3 and then that port configured as a UART. Afik the D3 does not have a dedicated panelDue port,

      The displays I used have hard-set identical I2C addresses, to avoid using a multiplexer I create two separate software I2C interfaces, one per display, this works surprisingly well. The U8x8 Arduino library handles all the heavy lifting on the display side.

      Most of my effort went into the software, which:

      • Follows printer status; can turn displays off when printer is in psu-off mode. (configurable)
      • Heartbeat/Status LED; brightness configurable.
      • Pause/Resume button; configurable on/off and hold-down time.
      • Bed plus selected tool heater set and actual temps are reported; as are 'off' and 'fail' states.
      • Screen brightness, timeouts, etc are all configurable.

      Processing the M408 response Json proved a challenge with minimal memory; I ended up using the Jsmn library. Once I had this running I realised I could leverage this to provide config control too. 🙂

      The Project exists as two repos on GitHub: Software and Hardware. Both have TL;DR readme's. The Hardware repo has the full KiCad project, and Gerber files.

      I have also written this up as a formal project on Hackaday, with archives, gallery and a better summary but lacking very detailed instructions, I assume you know which end of a soldering iron to pick up etc..

      assembled-running.jpg

      PrintEyeCase-layout.png

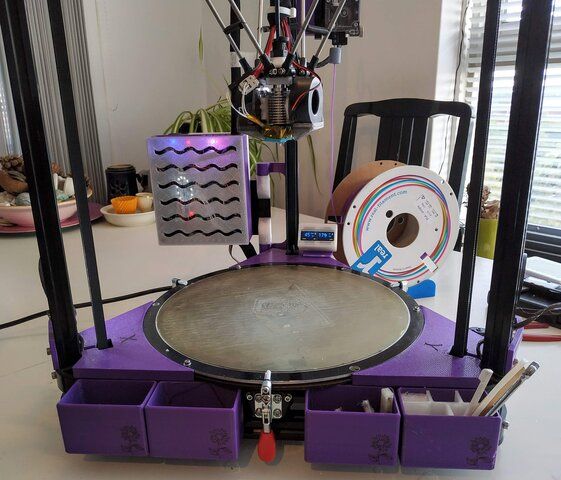
      My plan for the V2 of this drops the displays in flavor of a LED dot-matrix (16x2) and four servos plus these; for a mad plan to put a delta printer into a 70's era Tardis console. Possibly.

      posted in General Discussion
      EasyTargetundefined
      EasyTarget
    • serialOM.py : easy ObjectModel access for Python and microPython

      Hi all; this is something I have been working on to power my PrintEYE replacement but it took on a life of it's own and I'd like to get it out of my system.. so here goes.

      serialOM.py is a self-contained python class that connects to the OM on a RRF device via USB or UART, and provides a local copy of the OM that can be periodically updated.

      https://github.com/easytarget/serialOM

      The readme there does a proper TL;DR but the highlights are:

      • Python3/microPython cross-compatible with both PySerial and the mpy UART support
      • Keys to be fetched can be specified on a per-mode basis and the 'seqs' key is used to only do verbose fetches when needed.
      • Controller reboots and mode changes are handled appropriately. soft failures (timeouts) are tolerated and detectable. Hard (comms port) errors trigger a custom exception.
      • more.. see readme.

      Basic use can be as simple as:

      from serialOM import serialOM
      from serial import Serial
      
      rrf = Serial('/dev/ttyACM0',57600)
      OM  = serialOM(rrf, {'FFF':[],'CNC':[],'Laser':[]}, quiet=True)
      print('state: ' + OM.model['state']['status']
           + ', up: ' + str(OM.model['state']['upTime']) + 's')
      

      There is an associated printPy program that implements a robust logging / console info loop. It reconnects as USB ports change etc. and logs human-readable print/CNC/Laser status, value and progress data to the console and an optional file.

      I consider the CPython side of this 'done' (unless bugs.. quite likely because I'm no Pythonista), it runs well from a Pi3 with a USB connection to my Duet2 WiFi.

      There is a work in progress microPython version of this loop; printMPy which can do the same console output, but also has RGB 'mood/activity' light control and button/status controls being implemented.

      Both of the print*Py loops use a separate output class. currently the same 'TXT' demo works on both. This is a template for my in-progress I2C output class can be run in a thread to allow screen animations independent of the serial comms.

      posted in Third-party software
      EasyTargetundefined
      EasyTarget
    • Sunflower - K280 large 2020 delta

      This is Sunflower; I guess she's just a hobby printer but I've had a lot of fun getting her to this state. She prints art and big brackets with a big nozzle really well.

      bed.jpg

      Highlights:

      • 280mm x 630mm (at centre; more like 520mm at full radius), magnetically attached PEI bed but can quick swap to glass.
      • Built from a HE3D K280 Chinese kit; The hardware is just fine, functional aliexpress stuff. Good bed heater and PSU but the rest of the electronics less impressive. I ordered a DuetWiFi the same day I ordered the kit.
      • My own E3dv6 mount and modular easy access (click together) fan system.
      • My own simple adjustable slider brackets and clamps.
      • Spot the endstop switch? - it's done by encapsulated reedswitches and bar magnets in the slider brackets. No visible wiring and is very repeatable! Once calibrated I can reliably home, even when paused.
      • PrintEye status panel; temperature, status, info. Also mine.
      • DC42 IR sensor (she's also had a PPiezo unit at times)
      • Quite a bit of 'fluff' to finish her; 9mm belts, 0.9 steppers, lights. The (supplied) 16A 24v PSU is under the bed with additional fan ducting, the Duet has a mcu fan + duct underneath the board.
      • Purple. Lots of Purple. I like purple.

      Everything useful I that designed, and the other designs I use, are collected here: https://www.thingiverse.com/Nanocube/collections/sunflower-a-k280

      clamp-endstop.jpg

      hotend-fore.jpg

      overview.jpg

      in-action.jpg

      fluff.jpg

      posted in My Duet controlled machine
      EasyTargetundefined
      EasyTarget
    • RE: Add laser for duet2 wifi

      @yaman said in Add laser for duet2 wifi:

      SO I have to make this PCB board ?

      You can do, yes. Though possibly with less whitespace around it.
      It's an idealised circuit, but it provides a clean 5v PWM signal to the laser, which is good and has an interlock to stop the laser blipping full power during powerup.

      is it possible to use heater 6 PWM

      I dont know much about the expansion board. If it is a 5V signal then yes!
      But if it is a 24v heater output, no.

      Edit; looks good, thanks @T3P3Tony

      The issue here is that common laser modules set their PWM line to 5V and expect the controller to then pull that to 0v for the off part of the PWM cycle. This 5V is enough to damage the Duet if you put it directly on a controller pin. You need some sort of buffer between the two.

      In the circuit above this is done by the 74HCT020, which is a 5V logic chip, but will trigger with the 3v3 signal from the duet too. It's also fast and transmits a clean signal.

      There are quite a few options, you can possibly get a circuit like the one above from aliexpress etc already. Though it's not a complex one to build if you know how. Another great option is an optoisolator. But you lose the 'blip' protection.

      I'd suggest more research, try searching on more general topics like 'how do I control a 5V pwm laser module with a 3v3 controller', etc.

      A 'hidden' advantage of the circuit above is that, unlike many transistor/mosfet pwm drives which have internal capacitance, the 74HC chip produces a very clean signal. for the laser. And this is an advantage for lasers like ours.
      edit: Another great reason to use the expansion card solution..

      • once you have it working, try a fairly low PWM frequency (like 100 Hz. low) and 50% PWM cycle (power), this is when the 15/8W modules are 'pulse' cutting, you can do this continuously and get good results so long as your feedrate is slow (or you get a row of dots). There are a bunch of videos about this on youtube and elsewhere too, part of the secret is a clean PWM signal. I get good results, it's much more powerful at this sort of engraving than my 5W unit is at 100%.
      posted in Laser Cutters
      EasyTargetundefined
      EasyTarget
    • RE: Duet web control dutch issues

      I have created PR489 for this with my changes.

      Disclaimer; I'm not a native Dutch speaker and have never worked in a workshop here, so I may have missed things, used wrong terms or made other mistakes.. Still, it should be better than before 😉

      @brampie if you have a GitHub account you can comment on the PR (if @chrishamm wants to hold the PR for a few days to gather comments).

      posted in Duet Web Control
      EasyTargetundefined
      EasyTarget
    • RE: PrintEye; simple information panel for Duet boards.

      @T3P3Tony said in PrintEye; simple information panel for Duet boards.:

      @EasyTarget I saw from your signature that you had a plan for PrintEye for when M408 is deprecated and removed?

      I do indeed; but was avoiding necro-posting here until I had something to show.. 😇

      cb09b4ae-645f-4ce2-b9d0-ee79abe5c14a-image.png

      TL;DR

      The original PrintEYE code probably could be modified for M409 use; but it would be fiddly; directly targeting the keys needed and avoiding fetching full keysets. It's quite do-able but I want to move on.

      • The ATmega328 is the limiting factor; it's really low on RAM and once you have displays etc also running the JSON decoding became a 'mare, eventually I had to cobble together a 'inline' json decoder from various libs I found neglected elsewhere. Plus I was crippled in choices of fonts due to ROM space, and had to forget using a framebuffer (ram) and directly draw the screen.
      • It was good fun and satisfying to do, but not again...

      After I finished the original I started on 'PrintESP' with a similar plan, but a WemosD1 mini in the same case. And the code ported to take advantage of all the extra resources.

      • Did you know that 99% of D1 mini clones cripple the UART with a pulldown resistor? I didnt.. That, cranky SoftSerial implementations and covid stopped progress.

      What did happen during Lockdown was that I learned Python.. eventually coming up with 'SBCeye' (unoriginal naming is my superpower):
      https://github.com/easytarget/SBCEye

      To cut to the chase; I've been working on 'PrintPy', smaller and snazzier, micropython powered with 2 cores and a framebuffer! But still 2x OLED's and one button.
      https://github.com/easytarget/PrintPy2040

      If curious take a look at the Python/Tools folder, the script there currently runs well, is data-driven and flexible, and prints a once-per-interval status line from the OM. It's very in-development so ymmv.

      posted in General Discussion
      EasyTargetundefined
      EasyTarget
    • Support Proportional laser power on M4 commands

      The popular and well-supported GRBL firmware(s) implement an alternative form of 'laser mode' using the otherwise redundant M4 'reverse spindle' gcode.
      With this enabled they scale the laser power during (and only during) cut movements as a factor of the actual movement speed vs desired cut rate.

      This is not really aimed at laser cutting; it's intended for those of us doing engraving activities; it prevents overburning artifacts during acceleration and corners; and protects the workpiece during travel moves.

      So; I'd like to suggest that Duet implements a 2nd 'laser mode' that follows the behaviour of grbl1.1f+ in using M4 and pwm scaling.

      • It's a valuable mode that produces real improvements to work quality, and is totally the sort of thing an advanced motion control system should provide.
      • It brings instant compatibility with gcode produced by all the common free and hobby oriented engraving tools.

      Note:
      I had a search and saw this but cant find anything 'formal' here discussing this, so I thought I'd lob it at the Wishlist. I'm kinda hoping the answer is 'yawn; on the way; just wait for RRF3 to flesh out', but here goes anyway.

      posted in Firmware wishlist
      EasyTargetundefined
      EasyTarget
    • RE: Sunflower - K280 large 2020 delta

      It's on a spring steel plate, with a 'Whole Bunch' (tm) of high-temp supermagnets under the aluminium heatbed. Works very well and I can pop things off it almost trivially.

      However, very large footprint objects can warp the spring steel off the bed and end up with the model rocking or dancing about. So I have a system to use the original glass bed instead when needed.

      • the clamps you see are part of that (edge grip) and also hold the heatbed down against some springs (which in turn allow the bed to give a bit ifwhen the head crashes
      • I like this arrangement, it gives good results. But lacks enough surface hardness to let me use a PPiezo Orion with the PEI bed (though it worked OK on glass.)
      • Magnetic flux over the printbed is awesome! I can feel it dragging my watch down sometimes. Most people have a 'warning HOT!' sticker, but I also need to follow Prusa's example and put a 'Warning, high flux' one there.

      magnetic-sunflower.jpg

      posted in My Duet controlled machine
      EasyTargetundefined
      EasyTarget
    • RE: How can a calibrated extrusion produce overextruion-ish prints?

      @Eumldeuml said in How can a calibrated extrusion produce overextruion-ish prints?:

      Can someone tell me why that is the case?

      Tricky, you'll probably get six different answers, all of them possibly correct. 😉

      I saw similar things om my machine as I explored 0.6 and 0.8 Nozzles, I solved some of them after reading this and spending a few hrs printing cats with different line widths and layer heights, I was surprised at how big a difference small changes made.

      The problem is that this combines with other stuff too; So; here is my 'hit list';

      • beds that move (even if not visible to you) with Z height or temperature cycles also wreck walls and layers like that.
      • overstuffed first layers; I dont think you have this; but it forces every subsequent layer to be a little bit overstuffed too, a bad first layer can ripple up through the rest of the print., especially if you are overextruding a bit anyway.
      • Slicing; You dont mention which slicer you use, but with so many parameters to tweak and forget it can be a good idea to start with a very plain 'vanilla' profile for your printer and re-do the slicer settings from scratch based on experience.
      • Filament; has bitten me hard. Very small filament diameter changes are over-represented in extrusion changes (it's that pesky Ï€R squared business), without proper filament sensors (which do exist for the Duet) you have to trust suppliers to be consistent.
      posted in Tuning and tweaking
      EasyTargetundefined
      EasyTarget
    • RE: Caution! - STL Resolution

      The flip side of this on Thingieverse: https://www.thingiverse.com/search?q=low+poly

      And my extreme take on it:
      https://www.thingiverse.com/thing:2964528

      Sometimes I like the effect of low poly counts, but mostly it's a pita, as @deckingman says; it can be hard to get rid of them at big sizes. I do the occasional 250+mm diameter vases on my delta and need to look out for this, another area where Octoprint's gcode viewer comes in handy for seeing 'what you will axctually get' vs the preview in the slicer.

      posted in General Discussion
      EasyTargetundefined
      EasyTarget
    • RE: Heater showing 2000
      1. When you tested with the bed sensor; what happens when you switch it back; does the bed now show the correct temp again?
      2. As JoergS5 says; to help you we need to see the type of both sensors; and to know if they are both thermistors, etc.
      3. Are the M305 P0 & M305 P1 settings from your config the same? Please share these here.

      With thermistors a reading of 2000 normally means a disconnected sensor; open circuit.

      I once saw something identical (but with the bed sensor).

      • In my case it was a RTFM confusion; I was plugging the thermistor into a fan circuit, not into the bed sensor.. This destroyed the sensor; I got through a couple of them before finding my face with my palm.
      posted in Duet Hardware and wiring
      EasyTargetundefined
      EasyTarget
    • RE: serialOM.py : easy ObjectModel access for Python and microPython

      @berniej Thankyou! I'm glad if this is useful for others.

      Please note that I have just done some tweaks to the response reading and sequence processing that address a couple of concerns I had, it should be less liable to briefly de-syncing when console (or json) status messages arrive.

      There is a new release, v1.1.0 in the repo, the changes are all internal, usage has not changed.

      Finally; I got to do some gc.mem_free() data gathering at various points in the loop under micropython; I max out at about 24K total additional RAM consumed by the serialOM loop; even when I have cycled the controller through three modes and run a simulation in each to fully populate the local OM with typical data.
      I'm pretty happy with this, better than I expected.

      posted in Third-party software
      EasyTargetundefined
      EasyTarget
    • RE: Sunflower - K280 large 2020 delta

      @Phaedrux
      In that picture the bed is upside down.. Aluminum is non-ferrous, it does affect the field strength but not very much, those magnets project through 3mm of aluminum with enough force that I have to be careful not to pinch my fingertips when I'm taking the plate on/off.

      posted in My Duet controlled machine
      EasyTargetundefined
      EasyTarget
    • RE: Caution! - STL Resolution

      @droftarts said in Caution! - STL Resolution:

      Surprised G2/G3 doesn't have a Z input.

      This is a whole topic in itself... Not a common CNC feature at all. On GRBL you get some planar support (pick any two axes, eg XZ, but not three).

      Some controllers even implement a helix mode.. but no standards exist. My go-to reference bookmark for M2/3 is here: https://www.cnccookbook.com/cnc-g-code-arc-circle-g02-g03/

      posted in General Discussion
      EasyTargetundefined
      EasyTarget
    • RE: Duet 2 Wifi - Bed no longer heating

      @Tarasque_1024 said in Duet 2 Wifi - Bed no longer heating:

      How do I check that?

      As @dc42 and @3ddevil correctly say, the fact the LED comes on (you say that in the OP) actually means the mosfet should be good.

      Next step is to switch your multi-meter into resistance (continuity) mode and check each individual wire between the bed terminals. Eg from the +bed screw terminal to the + solder connection at the other end of the wire, same for the - wire.
      If they conduct (zero resistance) this is good.
      Next check the whole bed resistance; disconnect the bed wires from the terminals on the board and measure the resistance between them. It should be near zero; the heatbed has a resistance of one or two ohms, depending on capacity.

      • Try to do this with the bed and board in their normal place, wires can twist and internal breaks sometimes only happen when the wire is in one position, when you move it the wire strands touch inside the sheath again and it suddenly looks good again, until later.
      • You must disconnect from the screw terminals first because the bed led and diode(d4) will always show a false 'good' reading if the wires are connected to the board!

      ==================

      I'm going to post the image I'd hacked up earlier, if you or anybody else needs to check the mosfet it can serve as a handy reference:
      duet-issue-mosfet.jpg

      And here is the schematic of this bit of the system to add some context and because I really should have checked it earlier:
      duet-bed-mosfet-schematic.png

      Finally; the spec sheet for the mosfet is here:
      http://www.icbase.com/File/PDF/IFT/IFT03781303.pdf

      posted in Duet Hardware and wiring
      EasyTargetundefined
      EasyTarget
    • RE: serialOM.py : easy ObjectModel access for Python and microPython

      A quick note that I just published a small update as release: v1.2.0

      This removes the need to have a the separate compatLib.py library present; all the cross-python handling is now done in serialOM.py itself. Nothing else is changed.

      posted in Third-party software
      EasyTargetundefined
      EasyTarget
    • RE: Sunflower - K280 large 2020 delta

      @Danal said in Sunflower - K280 large 2020 delta:

      if you think that middle word is actually "Fast"...

      Fanatics ?
      Big Fanatic's Printer... yep, that's it.

      My goal was fast printing too; rather than go for a beefy solid frame I have soft rubber feet, as little moving mass as I can manage, and all the weight under the bed. She sways quite a lot, but this doesn't seem to translate into print artefacts.
      The best speed modification turned out to be a 60W heater cartridge, lots of niggling layer inconsistencies at high-speed simply disappeared when I fitted and tuned that.

      posted in My Duet controlled machine
      EasyTargetundefined
      EasyTarget
    • RE: Community Projects Wiki

      Thanks for thinking of the PrintEye guys, sorry for not being very active here, busy elsewhere (eg linkedIn, sigh).
      I have, however, done a 2.0 release of the code, adding more smart functions to the button including reset/emergency stop and OctoPrint(*) pause/resume, I've even got progress indication (sort of) going via a hacked OctoPrint plugin but need to finish and publish that.

      (*) Yeah, OctoPrint, sorry. I have my little foibles.

      posted in General Discussion
      EasyTargetundefined
      EasyTarget
    • RE: Looms

      I use several different sizes of this:
      https://www.canford.co.uk/TECHFLEX-BRAIDED-SLEEVING-Split-Spring-Wrap
      (from a differnt supplier but these guys look much cheaper 🙂 )
      All my external wiring on the Printer and CNC uses this and the effect is great.
      For the Delta's main loom I use a softer and more flexible version (sorry, no link) and it is really nice being able to carefully re-run a single cable without disturbing the rest.
      35-741_01.jpg

      posted in Duet Hardware and wiring
      EasyTargetundefined
      EasyTarget
    • RE: Add laser for duet2 wifi

      @yaman said in Add laser for duet2 wifi:

      I like to buy circuit then make one

      I can appreciate that 🙂

      I found everywhere I look this things
      1- PWM Laser Power Output Regulator/Frequency&Duty Adjustable

      This is not what you want. It is a standalone controller for when you are using the laser on a bench etc. It creates the PWM/ttl signal itself. The specs say it has a serial control (but I don't see that in the pictures) which could make it useful for some cnc stuff. But not for the Duet; serial control is nowhere near fast enough for our use.

      2-EleksMaker® 
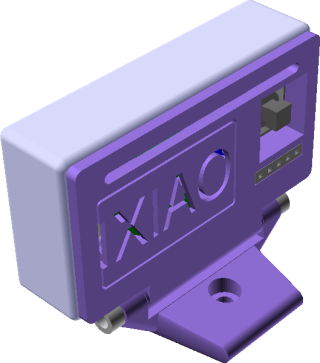
PWM To TTL Transition Module

      This looks more like it! so long as it can be driven from a 3.3v input. The eleksmaker controller is 5v, but this adaptor might be fine with 3.3v too. If so, it looks like exactly what you want.

      • its late here, I'll try and find time to look at this properly (find the circuit or something) before Monday.
      • in the meantime here is a thread that may prove educational about this module:
        https://github.com/openfab-lab/toolsDocs/issues/13

      My laser is PWM and TTL

      That is also good to know, it means the 'PWM pin should be properly driven both high and low (TTL PWM) for best results. Non TTL PWM only pulls the pin low, it has to be pulled back high by a resistor and for this reason can be a little bit less precise in timing; I've seen this discussed to death in CNC forums.
      This explains things nicely too.

      so any suggestions ?

      If you have money to burn, order one of those modules so that it is on the way.. I'm pretty sure it is a good plan but wont be held responsible if not.

      PS: Nederlands?

      nicolasdb created this issue in openfab-lab/toolsDocs

      open laser module TTL vs PWM #13

      posted in Laser Cutters
      EasyTargetundefined
      EasyTarget