Duet3D Logo Duet3D
    • Tags
    • Documentation
    • Order
    • Register
    • Login
    1. Home
    2. Norder
    3. Posts
    • Profile
    • Following 0
    • Followers 1
    • Topics 11
    • Posts 389
    • Best 76
    • Controversial 1
    • Groups 0

    Posts made by Norder

    • RE: Filament Drying

      @samlogan87

      Storing Filaments:
      About 5-6 spools of filament are stored in a vacuum bag which also contains some silica gel drying bags and a hydrometer that is clearly visible.
      About 12 filament rolls with nylon and ABS are stored in a large plastic box in which about 2kg of silica gel are scattered at the bottom and are covered with a plastic fly screen so that no silica gel beads get into the filament rolls.

      Filament during printing:
      When I print, the filament roll is placed in a drying oven lying flat. In this drying oven I installed a ball-bearing mounted thread roll in which the filament roll is clamped.
      The filament is guided from the drying oven to the print head in a transparent PTFE tube so that it is never exposed to humidity and dust in the room air.

      The drying oven is insulated inside with 19mm insulating foam (Armaflex) and there are about 15 of these silica gel bags in the bottom of the oven, which keep the humidity low for a long time, so that a filament roll can be stored there for 2-3 days between the prints
      In the lid of the drying oven I made the exhaust air openings variably adjustable and used a hydrometer.
      The dehydrator can heat up to 70°C but I run it on the lowest setting so that it reaches around 45°C.

      Humidity is at best 18% to 25%. If it rises above 35% in the vacuum bags or in the large box, I remove the silica gel and dry it in a dry air fryer, into which a large sieve fits exactly, in which about 1kg of silica gel fits.

      I mostly print ABS and Nylon. Next comes PETG and PLA is last for me.

      Photos of the dehydrator:
      1 / 2 / 3 / 4 / 5 / 6 / 7 / 8

      Google Translate
      --- Original Text ---

      Filamente Aufbewahren:
      Etwa 5-6 Filamentrollen lagern in einem Vakuumbeutel in dem auch einige Silika-Gel Trocknungsbeutel und ein gut sichtbarer Hydrometer liegen.
      Etwa 12 Filamentrollen mit Nylon und ABS lagern in einer großen Kunststoffbox in der unten etwa 2kg Silika-Gel ausgestreut sind und mit einem Fliegengitter aus Kunststoff abgedeckt sind so dass keine Kügelchen des Silika-Gel in die Filamentrollen gelangen.

      Filament während des Druckens:
      Wenn ich drucke, dann kommt die Filamentrolle liegend in einen Dörrofen. In diesem Dörrofen habe ich eine kugelgelagerte Gewinderolle eingebaut in der die Filamentrolle eingespannt wird.
      Das Filament wird aus dem Dörrofen bis zum Druckkopf in einem durchsichtigen PTFE Schlauch geführt so dass es zu keiner Zeit der Luftfeuchtigkeit und dem Staub der Zimmerluft ausgesetzt ist.

      Der Dörrofen ist innen mit 19mm Dämm-Schaumstoff (Armaflex) isoliert und es liegen etwa 15 dieser Silik-Gel Beutel unten im Ofen die die Luftfeuchtigkeit über eine längere Zeit niedrig halten, so dass dort eine Filamentrolle auch mal 2-3 Tage lagert zwischen den Prints.
      Im Deckel des Dörrofen habe ich die Abluftöffnungen variabel einstellbar gemacht und ein Hydrometer eingesetzt.
      Der Dörrofen kann bis 70°C heizen aber ich betreibe ihn auf der niedrigsten Stufe so dass in etwa 45°C erreicht wird.

      Die Luftfeuchtigkeit liegt im besten Fall bei 18% bis 25%. Steigt sie in den Vakuumbeuteln oder in der großen Box über 35% dann entnehme ich das Silika-Gel und trockne es in einer Trockenluftfriteuse wo exakt ein großes Sieb hinein passt in dem etwa 1kg Silika-Gel passt.

      Ich drucke zum größten Teil ABS und Nylon. Danach kommt PETG und PLA liegt bei mir auf dem letzten Platz.

      posted in 3D Printing General Chat
      Norderundefined
      Norder
    • RE: David's IR Sensor: Questions

      @br7408
      Regarding the falsified measurement results of the BLTouch due to the disturbing magnetic fields... I once posted something about this with a solution that works quite well, depending on which metal you use.
      Maybe it will help you ?

      Link to Thread:
      https://forum.duet3d.com/topic/29491/hint-bltouch-incorrect-measurement-due-to-magnetic-print-bed?_=1682329087880

      Google Translate
      --- Original Text ---

      Zu den verfälschten Messergebnissen des BLTouch wegen der störenden Magnetfeldern... dazu habe ich mal etwas gepostet mit einer Lösung die je nachdem welches Metall man nimmt, ganz gut funktioniert.
      Vielleicht hilft es Dir weiter ?

      Link zum Thread:
      https://forum.duet3d.com/topic/29491/hint-bltouch-incorrect-measurement-due-to-magnetic-print-bed?_=1682329087880

      posted in General Discussion
      Norderundefined
      Norder
    • RE: David's IR Sensor: Questions

      @br7408
      I use two sensors (BLTouch & dc42's IR Probe).
      I only use the BLTouch on print surfaces where the IR probe has its problems.
      99% of the time the IR probe is in use.

      I have a matte black GRP (glass fiber reinforced plastic) FR4 from Printbay.
      It is the Blackprint, as already mentioned, it is matt black and has no imprints such as a company logo or any stripes or patterns.

      I've been using this Blackprint for a few years and it's still just as great as it was on day one.
      I mainly print nylon and ABS.
      The Blackprint has no trouble with ASA.

      The plate consists of a magnet system (magnetic plate for the aluminum bed and the flexible black print itself is also magnetic.
      It should work with your existing magnetic board.

      Printbay also manufactures to measure and has sizes over 500x500mm.

      Printbay website

      Printbay video of me.
      Here I show how the "matched pair technique" of the blackprint works.
      The magnetization of the plate is "strip-like" and thus the plate is always exactly aligned horizontally.
      But normal spring steel PEI plates also work for me, but then this strip-shaped magnetization is not available and the PEI plate can be moved "continuously" even though it is held magnetically.

      I can only recommend this Blackprint. In addition, of all the records I know, she looks the hottest. 😄

      I hope I could show you something new.
      Please write here which record you last chose.
      Purely out of curiosity and interest 😉

      Google Translate
      ----- Original Text -----

      Ich nutze zwei Sensoren (BLTouch & dc42's IR Probe).
      Den BLTouch nutze ich nur bei Druckoberflächen wo der IR-Probe seine Probleme mit hat.
      Zu 99% ist der IR-Probe im Einsatz.

      Ich habe eine mattschwarze GFK (Glasfaserkunststoff) FR4 von Printbay.
      Es ist die Blackprint, sie ist wie bereits erwähnt, mattschwarz und hat keinerlei Aufdrucke wie zB ein Firmenlogo oder irgendwelche Streifen und Muster.

      Ich nutze diese Blackprint schon einige jahre und sie ist noch genau so toll wie am ersten Tag.
      Ich drucke hauptsächlich Nylon und ABS.
      Mit ASA hat die Blackprint keine Schwierigkeiten.

      Die Platte besteht aus ein Magnetsystem (Magnetplatte für das Alubett und die biegsame Blackprint ist selber auch magnetisch.
      Sie sollte mit Deiner bestehenden Magnetplatte funktionieren.

      Printbay fertigt auch auf Maß und hat Größen über 500x500mm.

      Printbay Website

      Printbay Video von mir.
      Hier zeige ich zeige wie die "Matched Pair Technik" der Blackprint funktioniert.
      Die magnetisierung der Platte ist "streifenförmig" und somit ist die Platte horizontal immer exakt ausgerichtet.
      Bei mir funktionieren aber auch normale Federstahlblech PEI Platten, dann ist diese streifenförmige magnetisierung aber nicht vorhanden und die PEI Platte kann "stufenlos" verschoben werden obwohl sie magnetisch gehalten wird.

      Ich kann diese Blackprint nur empfehlen. Zudem sieht sie von allen Platten die ich kenne... am geilsten aus. 😄

      Ich hoffe ich konnte Dir etwas neues zeigen.
      Bitte schreibe hier, für welche Platte Du Dich zuletzt entschieden hast.
      Rein aus Neugier und Interesse 😉

      posted in General Discussion
      Norderundefined
      Norder
    • RE: DC42 IR probe

      @downshift64
      Did you "manually" level your print bed before retrieving the mesh?

      If I get this error message, the print bed has shifted, so I have to level it manually on the level wheels.

      This can happen when the print surface has been reground or a different bed temperature has been set and the print bed has a different expansion.
      Some cross holders (holder between the print bed and the printer frame) bend when a printing plate is cleaned with excessive pressure.

      So take a piece of paper or a feeler gauge with 0.05mm or 0.1mm thickness and level the print bed with the bed level screws.
      Paper or feeler gauge between nozzle and print bed.

      Then you call up the mesh again with G29.

      Google Translate
      -- Original Text --

      Hast Du Dein Druckbett "manuell" gelevelt bevor Du das Mesh abgerufen hast ?

      Wenn ich diese Fehlermeldung bekomme, hat sich das Druckbett verstellt, so dass ich es manuell an den Levelrädern leveln muss.

      Das kann passieren wenn die Druckoberfläche neu geschliffen wurde oder eine andere Betttemperatur eingestellt ist und das Druckbett eine andere Ausdehnung hat.
      Manche Kreuzhalter (Halterung zwischen Druckbett und Druckerrahmen) verbiegen sich wenn eine Druckplatte mit zu hohem Druck gereinigt wird.

      Nimm also ein Blatt Papier oder eine Fühllehre mit 0,05mm oder 0,1mm Stärke und level das Druckbett mit den Bettlevelschrauben.
      Papier bzw Fühllehre zwischen Düse und Druckbett.

      Danach rufst Du erneut das Mesh mit G29 ab.

      posted in IR Height Sensor
      Norderundefined
      Norder
    • RE: Stutter on long curves - bitrate?

      @IndeX4D
      In the Cura settings... is RepRap set for the "GCode Flavor" ?
      It can be found in the printer settings, where the start and end GCode is also entered.
      (Settings -> Printer -> Manage Printers... -> Machine Settings).

      @T3P3Tony
      I added a M413 S0 to stop power loss like somebody said. was not working. may that´s the reason it looked like it was not printing.
      I´ll start a print, now.

      M413 does not know the duet.
      You probably mean M911: Configure auto save on loss of power (Duet GCode Dictionary Link) !?

      posted in Firmware installation
      Norderundefined
      Norder
    • RE: Heating speed control method

      @Dennis_kim Have you already done a PID tuning?

      The title should be in English so you can get help. At first I thought it was spam.

      posted in Tuning and tweaking
      Norderundefined
      Norder
    • RE: Z-probe offset

      @Reine
      That would be negative values.

      posted in Firmware installation
      Norderundefined
      Norder
    • RE: PT100 DAUGHTER BOARD, Reading 2000 c for Heat Bed

      @ScaraMan Hi,
      Please post some information about the heating mat used on the print bed... which thermistor is installed there?
      Then I would strongly recommend you to update to the latest firmware.

      posted in Duet Hardware and wiring
      Norderundefined
      Norder
    • RE: Turn off the z-axis limit switch

      @Proschi78
      With this command you switch the axis limit on or off.
      https://docs.duet3d.com/en/User_manual/Reference/Gcodes#m564-limit-axes
      However, the project should be treated with caution!

      posted in Tuning and tweaking
      Norderundefined
      Norder
    • RE: Print ABS in vase mode w/o chamber?

      @o_lampe
      I mainly print ABS and Nylon.
      As @deckingman correctly mentioned, ABS does not like drafts, you should also do without the fan and if so, then only work with some cooling on overhangs.
      Large objects are also no problem.
      But I think it depends on the ABS itself whether the pressure is successful.
      I use ABS-X from Minadax and rTitan from FormFutura.
      rTitan is recycled TitanX, which is cheaper through recycling.
      ABS-X and rTitan have Warp-Free technology and do not smell.
      I still have a cheap ABS from China, but you can't print it without extraction, the gases constrict your throat.
      I print ABS and Nylon with no enclosure, but with the window closed and no fan.

      posted in General Discussion
      Norderundefined
      Norder
    • RE: Strange Blobbing on Layer Change

      @Phaedrux
      Yes, exactly.
      But it is clear that the upper limit is determined by the config.g.

      posted in Tuning and tweaking
      Norderundefined
      Norder
    • RE: Strange Blobbing on Layer Change

      @Phaedrux

      Does prusa slicer now allow per move jerk settings as well as acceleration? I didn't think so.

      The PrusaSlicer has its own jerk setting (mm/s), maximum acceleration (mm/s²) and maximum feed (mm/s)
      for each axis.

      posted in Tuning and tweaking
      Norderundefined
      Norder
    • RE: Strange Blobbing on Layer Change

      @davidewen
      So far the settings look good.
      If you don't have stringing or other problems with blobs or similar, then the 0.8mm retraction path is probably OK. But it can change depending on the temperature and filament and then higher values would be more suitable, which could then go up to 1.5mm.

      That with the speed could reduce this gap at the Z-seam, as weed2all already wrote, 25-30 mm/s may be better values for you.

      If these changes don't bring any improvements, you could enter something under "Extra length on restart". Step up there by 0.1mm.
      This option of "Extra length on restart" is rarely used.

      Google Translate
      -- Original Text --

      Soweit sehen die Einstellungen gut aus.
      Wenn Du kein Stringing hast oder sonstige Probleme mit Kleckse o.ä., dann sind die 0.8mm Rückzugsweg wohl OK. Es kann sich aber je nach Temperatur und Filament ändern und dann wären höhere Werte besser geeignet die dann gerne mal bis 1.5mm gehen könnten.

      Das mit der Geschwindigkeit könnte diesen Spalt an der Z-Naht verringern, wie weed2all bereits schrieb sind 25-30 mm/s gegebenenfalls bessere Werte für Dich.

      Sollten diese Änderungen keine Verbesserungen bringen, dann könntest Du bei "Extralänge bei Neustart" etwas eintragen. Dort Schrittweise mit 0.1mm herangehen.
      Diese Option der "Extralänge bei Neustart" wird eher selten genutzt.

      posted in Tuning and tweaking
      Norderundefined
      Norder
    • RE: Strange Blobbing on Layer Change

      @davidewen
      How many mm is your retract in the slicer and at what speed does it run ?

      posted in Tuning and tweaking
      Norderundefined
      Norder
    • RE: Under extruding after firmware update

      @Wunderboy
      The Duet Wifi can only generate an interpolation at 16x microsteps.
      256x microstepping does not allow high speeds of the stepper motors, at least that was the case for me when I was experimenting with the settings at the time.

      Converting your old settings gives 16x microsteps for the extruder Z98 steps per mm in the M92 command line.

      This is how it should look like with 16x microsteps:
      M350 X256 Y256 Z64 E16 I0 ; configure microstepping without interpolation
      M92 X1280.00 Y1280.00 Z1600.00 E98.00 ; set steps per mm

      P.S.:
      Maybe the 855mA is not enough for the extruder?
      Most stepper motors for the extruder are listed with 1000mA to 1200mA.
      Check the specifications of your stepper motor if you can increase the value.

      If your HotEnd has a PTFE tube that runs into the heatbreak, check that it hasn't deformed due to the heat.

      Google Translate
      -- Original Text --

      Das Duet Wifi kann nur bei 16x Microschritten eine Interpolation erzeugen.
      256x Microschritte erlaubt keine hohen Geschwindigkeiten der Stepper Motoren, zumindest war es bei mir der Fall als ich damals mit den Einstellungen herum experimentiert habe.

      Rechnet man Deine alten Einstellungen um, dann ergibt 16x Microstepps für den Extruder Z98 Stepps pro mm in der M92 Befehlszeile.

      So sollte es aussehen bei 16x Microstepps:
      M350 X256 Y256 Z64 E16 I0 ; configure microstepping without interpolation
      M92 X1280.00 Y1280.00 Z1600.00 E98.00 ; set steps per mm

      P.S.:
      Vielleicht sind die 855mA für den Extruder zu wenig ?
      Die allermeisten Stepper-Motoren für den Extruder sind mit 1000mA bis 1200mA eingetragen.
      Überprüfe die Spezifikationen Deines Stepper-Motors ob Du den Wert erhöhen kannst.

      Wenn in Deinem HotEnd ein PTFE Schlauch bis in den Heat-Break verlegt ist, prüfe ob dieser sich nicht durch die Hitze verformt hat.

      posted in General Discussion
      Norderundefined
      Norder
    • RE: Question About the UI: Scrollbar Gone from G-code List

      And with the keyboard arrow keys 🔼🔽 you can generally move up and down the entire website line by line.
      If you click with the normal mouse pointer (arrow) in the area of the website where the scroll bar is missing, then you only move this area with the arrow keys on the keyboard.

      posted in Documentation
      Norderundefined
      Norder
    • RE: Anyone use PrusaSlicer or IdeaMaker?

      @o_lampe said in [Anyone use PrusaSlicer or IdeaMaker?](/post/298278
      ...If you have some experience with Cura, why start from zero with PrusaSlicer?

      I think it's always worth having a second fully set up slicer.
      In an emergency, you have the security of being able to continue working if a slicer causes problems for any reason.
      You can use a second slicer to rule out problems where you suspect a slicer and you can try out new features that the other slicer doesn't have yet, such as the Pressure Equalizer in PrusaSlicer, which is a kind of pressure advance, but not controls the flow but the speed.
      Example:
      If the printer goes from an inner wall line, which is printed at 50mm/s, to the outer perimeter, which is printed at 30mm/s, then the speed is not changed abruptly but on the last piece (which can be adjusted) of the inner wall line is already reduced to the speed of the outline so as not to change the pressure in the nozzle abruptly which could cause artifacts.
      The entire print job is also smoother.

      Google Translate
      -- Original Text --

      Ich finde, es lohnt sich immer einen zweiten voll eingerichteten Slicer zu haben.
      So hat man im Notfall eine Sicherheit weiter arbeiten zu können, falls ein Slicer aus irgendwelchen Gründen Probleme macht.
      Man kann mit einem zweiten Slicer Probleme ausschließen, wo man einen Slicer in Verdacht hat und man kann neue Funktionen ausprobieren die der andere Slicer noch nicht besitzt, wie zB den Pressure Equalizer im PrusaSlicer, welches so eine Art Pressure Advance ist, aber nicht den Fluss steuert sondern die Geschwindigkeit.
      Beispiel:
      Geht der Drucker von einer inneren Wandlinie die mit 50mm/s gedruckt wird, über auf den Außenperimeter der mit 30mm/s gedruckt wird, dann wird die Geschwindigkeit nicht abrupt geändert sondern auf dem letzten Stück (den man anpassen kann) der Inneren Wandlinie wird bereits auf die Geschwindigkeit der Außenlinie reduziert um den Druck in der Düse nicht aprupt zu ändern was Artefakte verursachen könnte.
      Der gesamte Druckauftrag läuft so auch weicher ab.

      posted in General Discussion
      Norderundefined
      Norder
    • RE: Anyone use PrusaSlicer or IdeaMaker?

      @westech
      I use the PrusaSlicer and Cura as a backup in case the PrusaSlicer causes problems.
      So far it has only happened once after a PS update where nothing worked as before, although the settings were still the same.

      In the printer settings menu you can change the G-code type to RepRap Firmware.
      The start GCode and the end GCode for the printer can also be found there in the settings.
      I entered the identical GCodes there that I also entered in Cura.

      As @deckingman rightly mentioned, you should enter the tool with the GCode T command at the end of config.g and you can also specify it in the start GCode of the printer in the slicer.
      It doesn't matter if the T command is present twice.
      If you only have one print head, then T0 should be ther

      If you set up a printer in PrusaSlicer, you can also enter the IP of your printer there.
      Tip: Assign a fixed IP for the printer in your router menu so that it no longer changes.
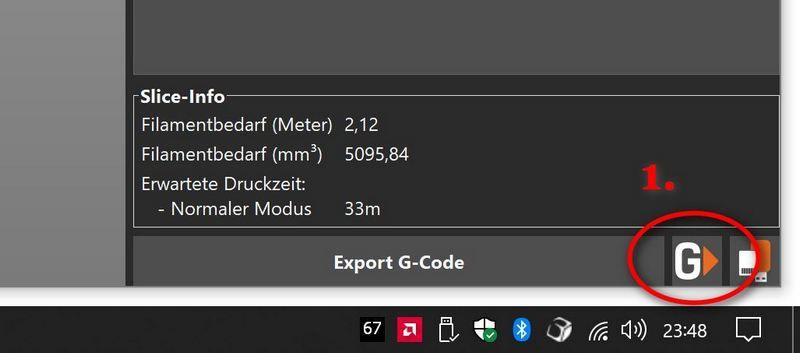
      If you have entered the IP of your printer in the PrusaSlicer, you will get an additional icon with a G (see screenshot 1#) in the lower right corner of the slicer, with which you can send the sliced ​​GCode directly to the Duet or send it to the Duet and the print immediately should start or the print should be simulated (see screenshot #2).
      You no longer need to cache the GCode on the computer and then copy it to the Duet.

      1.JPG
      2.JPG

      There is a Duet PlugIn (DuetRRF) for Cura so that the sliced GCode is sent directly from Cura to the Duet.

      Google Translate
      -- Original Text --

      Ich nutze den PrusaSlicer und Cura als Backup, falls der PrusaSlicer mal Probleme macht.
      Es ist bis jetzt aber nur einmal passiert nachdem ein PS-Update wo nichts mehr so funktionieren wollte wie vorher, obwohl die Einstellungen noch die gleichen waren.

      Im Drucker Einstellungsmenü kannst Du den G-Code Typ auf RepRap Firmware umstellen.
      Dort in den Einstellungen sind auch der Start GCode und der End-GCode für den Drucker zu finden.
      Ich habe dort die identischen GCodes eingetragen die ich auch in Cura eingetragen habe.

      Wie @deckingman schon richtig erwähnte solltest Du das Werkzeug mit dem GCode T Befehl am Ende der config.g eintragen und Du kannst ihn aber auch zusätzlich noch im Start-GCode des Druckers im Slicer mit angeben.
      Es stört nicht wenn der T Befehl doppelt vorhanden ist.
      Hast Du nur einen Druckkopf, dann sollte dort T0 stehen.

      Wenn Du im PrusaSlicer einen Drucker einrichtest, kannst Du dort auch die IP Deines Druckers mit eintragen.
      Tipp: Vergebe für den Drucker in Deinem Router-Menü eine feste IP, damit diese sich nicht mehr ändert.
      Hast Du im PrusaSlicer die IP Deines Druckers eingetragen, bekommst Du unten rechts im Slicer einen zusätzliches Icon mit einem G (siehe Screenshot 1#) mit dem Du den geslicten GCode direkt an das Duet schicken kannst oder ihn an das Duet schickst und der Druck sofort beginnen soll oder der Druck simuliert werden soll (siehe Screenshot #2).
      Du brauchst den GCode also nicht mehr auf dem Computer zwischen zu speichern und ihn dann auf das Duet zu kopieren.

      Für Cura gibt es ein Duet PlugIn (DuetRRF) damit der geslicte GCode direkt von Cura auf das Duet geschickt wird.

      posted in General Discussion
      Norderundefined
      Norder